


Start with a high-quality on-mountain lesson to build control and reduce falls. For first-timers, that hands-on coaching gives you the feel for turning, stopping, and pace, so you know what to expect rather than guessing like nothing else. This approach helps you learn safely and can help others on the slope.
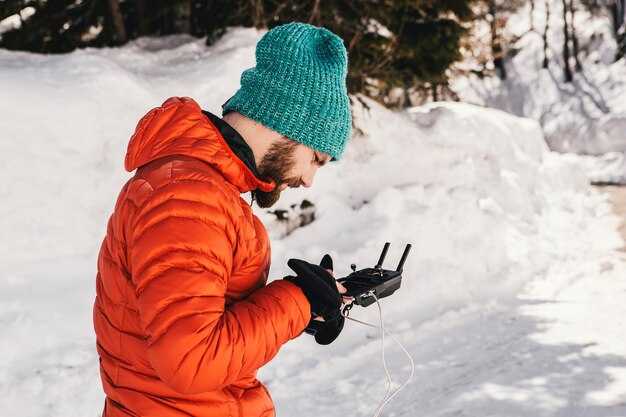
Choose high-quality gear and a properly fitting helmet to protect your head and mask your face from wind. For on-mountain comfort, pick boots that fit well, and gloves with good grip. In colorado, cold days demand smart layering: avoid cotton, and choose moisture-wicking fabrics for a bright, dry feeling all day. green runs welcome to beginners when conditions are stable.
Plan food and water wisely to maintain energy and focus. Carry quick snacks and a small bottle so you can stay alert between runs, reducing risks. Short breaks allow you to reset balance and prevent fatigue between runs. Advice from on-mountain staff helps you choose safer lines and keep your day pleasant.
Respect others on the slope and set personal limits early. Do not follow faster skiers too closely; keep a safe distance and watch for changing conditions. Use a mask when needed to stay comfortable in windy sections and keep your vision clear. Listen to advice from instructors and local staff–they spot icy patches and weather shifts that influence your line.
Expert-Recommended Pitfalls for First-Time Skiers
Start with a certified beginner lesson and buy a lift ticket for the beginner area. This builds a solid foundation before tackling longer runs. An instructor shows you how to glide, stop, and turn with control, reducing the risk of a hard fall. Wear lightweight, well-fitting gear and avoid bulky packs that slow you down. A calm, focused start keeps you safe and makes the day feel great.
Prioritize layering: base layer, middle layer, and an outer shell made of breathable fabrics. The base layer wicks moisture, the middle layer adds warmth, and the shell blocks wind and snow. Test the fit by moving and bending; there should be no pinching at the neck. Keep a few essentials in a pocket–lip balm, sunscreen, and a small snack–for quick access. A cozy mid-layer adds warmth without bulk.
Be mindful of exposure to sun and wind on the mountains. Use goggles with 100% UV protection and sunscreen on exposed skin. The glare from the snow can surprise you, so protect your eyes on sunny chair rides and throughout your time on the slopes.
Schedule short rests every hour and drink water to avoid fatigue. Pack a quick snack to sustain energy; for the season-long effort, consistency matters. Take a longer lunch break if you feel tired, but keep moving enough to stay warm and avoid stiffness. Rest helps your form improve faster.
Practice safe lift etiquette: ride with the chair out front and avoid sudden movements while boarding. On the slope, stay in control, focusing on doing slow, deliberate turns and stopping gently to avoid collisions with others. Keep your neck relaxed and your weight centered to reduce neck strain during transitions.
Don’t rush to the middle of the mountain; stay in the beginner area until you can link turns smoothly. Rushing makes it easy to lose balance and go off the trail. Keep shoes, poles, and gear properly fitted and tested before you start moving fast. A cautious pace protects your knees and your confidence.
Respect the culture of ski resorts and the family-friendly vibe on the slopes. Follow posted signs, yield to riders in front, and wait your turn in lines. theres value in clear communication and steady progress, especially when you’re learning with kids or a group. Others will notice your safety habits and respond with patience.
Be prepared for a practical reminder: a beaver-like snug strap around the helmet keeps chin and neck secure. Tie cords and straps neatly so nothing dangles. This simple habit saves you from distractions while you focus on the snow.
theres always room to grow with each session. Build a plan for the rest of the season: pick a few easy runs, gradually build speed, and enjoy family trips to practice common moves. Bring a breathable pocket for snacks, keep exposure minimal on windy days, and celebrate small wins with your crew.
Smart Packing: Avoid Overpacking and Forgetting Key Gear
Pack a single compact daypack that holds a base layer, a mid-layer fleece, a water-resistant outer shell, two pairs of socks, gloves, a hat, goggles, sunscreen, lip balm, a small first-aid kit, a compact multitool, a spare lens, a water bottle, and energy bars.
Choose layering that adapts to conditions: a breathable base layer, a warm mid-layer, and a dry outer shell; each item should compress well and dry fast.
Plan two zones of packing: the daypack holds items needed on the slope; the remaining gear stays in a larger bag stored in the car or a locker at the lodge.
Test the pack at home and trim items until the total weight feels manageable; aim for roughly 6–8 pounds (3–4 kg) in the daypack for a half-day outing.
Choose compact alternatives: foldable water bottle, micro towel, small charging cable, and a spare battery.
If gear is rented, assemble a minimal personal kit and verify it before leaving the house.
Do a final check before leaving the house: confirm you have water, snacks, spare lens, charging cable, and a basic first-aid item; verify that you can access everything during the day.
Smart packing supports a smooth day on snow and reduces stress for all ages and abilities.
Gear Decisions: Rent vs Buy, and When to Bring Your Own Boots
Rent boots for your first ski trip. If you already own a well-fitting pair, bring them, but start with rentals to test fit early and feel how your body responds on easy runs. Book a fitting with a boot specialist to compare options, and decide which path feels best for you. This approach saves time and keeps the adventure enjoyable from day one.
Typical boot rentals run about 15–35 per day, with weekly bundles that save a bit. For a 3–4 day trip, expect roughly 60–140; a 7 day plan can reach 100–250. Always wear thin ski socks and test two sizes if needed to ensure heel hold and toe clearance; the right pair should stay down when you flex, and you should feel no numbness after a few minutes. If anything feels off, switch to a different width or a larger shell, and they can help you adjust quickly at the shop. Find a setup somewhere in your plan, and stay hydrated with water or a warm drink during breaks.
The biggest benefit of owning boots is consistent control, which translates to better safety on icy patches and longer fatigue-free sessions. If you ski 8–12 days per season, or you have feet that need a custom insole or wider/narrower volume, buying makes sense. Schedule a final fit with a certified boot fitter to dial in shell size, liner, and footbeds, and test the setup on easy runs before moving to more challenging terrain. The time you invest now pays off on longer days and faster transitions on steeper sections.
Bring your own boots when you travel often, especially for longer stays or multi-stop trips such as Thanksgiving weeks or trips to places like Japan, where you’ll want the same feel across days. Personal boots reduce sizing quirks at the shop and help you stay cozy on cold days; they support orthotics and high-arch feet when needed. If you do bring them, check airline rules for skis and boots, pack them in a sturdy boot bag, and run them through a boot dryer when you return to keep them in shape. On the hill, they help you stay onto the slope and set you up for the next adventure.
Final tips: If you rent, reserve ahead and verify width options; if you buy, plan a 2–3 hour fitting with a pro and bring your own socks, insole inserts, and a boot bag. A quick check on a gentle slope after a short break will reveal if you’ve found the right setup; while you wait, sip a hot drink and keep mittens handy. If anything doesnt feel right, adjust immediately; they wont fix themselves.
Layering Strategy: Base Layers, Insulation, and Outerwear for Cold Days
Start with a snug, moisture-wicking base layer made from merino wool or a high-performance synthetic blend. This first layer sits close to the skin and moves moisture away through the whole day, keeping you dry and warm while skiing. Some runners prefer cotton shirts, but cotton traps moisture and fails when exposure matters, so avoid it at the base. After you secure the base, add a mid-layer that is thick enough to trap heat but breathable, so you stay comfortable on long climbs through changing conditions.
Mid-layer options include thick fleece or light down. Strongly consider pieces that compress well for easy packing and fit under your shell. For what you will experience across a resort town, choose a mid-layer that can adapt to bright sun and chilly wind; on bright days you want warmth without overheating, and on windy, cold days you still need protection. In many cases, the right mid-layer keeps you enjoying the day and reduces fatigue. Also, this layer supports the culture of practical, all-weather clothing that works here and across town centers.
Finish with a weatherproof outer shell that blocks wind and sheds moisture. Look for a waterproof membrane with good breathability, taped seams, and adjustable cuffs. Outerwear offers protection on exposed sections of the trail and on chairlifts, and it should be able to vent when you heat up during a long run. Mittens or insulated gloves, a hat, and a neck gaiter complete the setup so your exposure to cold stays limited here in town or at the resort, and you stay comfortable from first chair to last run. This clothing system is safe and flexible for big days.
Testing at home helps. When you pack for a first ski trip, this whole layering strategy pays off across many destinations. It works in small town hills and in large, bright resort complexes. The biggest payoff comes from a simple rule: adjust layers as conditions change through the day. What matters most is warmth with breathability, protection with mobility, and readiness for weather shifts on snow. This approach keeps you comfortable during experiences you enjoy with friends and family.
| Layer | Material Options | Ключевое преимущество | Practical Tips |
|---|---|---|---|
| Base Layer | Merino wool, synthetic blends (polyester, polypropylene) | Moisture wicking; fast drying | Choose snug fit; avoid cotton |
| Insulation (Mid-layer) | Thick fleece, light down, synthetic fill | Удержание тепла; воздухопроницаемость | Выбирайте компактный вариант, если вы часто переезжаете. |
| Верхняя одежда | Водонепроницаемая/дышащая мембрана; утепленные варианты | Ветронепроницаемость; защита от влаги | Ищите проклеенные швы, регулируемые манжеты, вентиляционные молнии |
Подготовка: Запишитесь на урок, прежде чем отправиться на склоны
Закажите урок перед тем, как отправиться на склоны. Профессиональный инструктор поставит вас в правильную стойку и покажет безопасную, повторяемую технику, чтобы ваши первые спуски были контролируемыми, а не рискованными. Говорят, советы адаптированы к вашему уровню, дают немедленную обратную связь и помогают вам получать удовольствие от стабильного прогресса в течение утра, например, от освоения простого поворота. Когда вы начинаете с обучения, вы обретаете уверенность и избавляетесь от вредных привычек. Особенно для новичков, такое руководство помогает освоиться с основами. Они обучают повторяемой последовательности, которую вы можете использовать на любом склоне.
Во время занятия вы узнаете о безопасности при падениях, переносе веса и о том, как задать четкий ритм в поворотах. Тренер использует упражнения, которые вы сможете применять на реальных трассах, и они адаптируются к вашему темпу, чтобы поездка оставалась воодушевляющей, а не подавляющей. Некоторые новички считают первое скольжение сложным, и вы преодолеете несколько трудных моментов с помощью инструктора, превратив их в устойчивый, приятный прогресс. На пологом склоне есть траверс в тирольском стиле, чтобы создать ощущение высоты без давления.
Прежде чем отправиться, подтвердите выбранный вами пакет услуг: индивидуальный урок, частное занятие или групповое занятие. Многие магазины предлагают комплекты снаряжения, поэтому вы можете взять напрокат ботинки, шлем и палки, если у вас их нет. Наденьте удобную многослойную одежду и шлем; возьмите с собой перчатки, солнцезащитный крем и бутылку воды. Если у вас уже есть билет, вы можете привязать его к уроку и сэкономить время на курорте. Некоторые места также позволяют зарезервировать манишки, чтобы избежать скопления людей у стойки проката. Если вам нужно что-то еще, просто спросите персонал за стойкой.
Логистика и безопасность: спланируйте ски-пассы, время катания и проверку снаряжения
Забронируйте ски-пассы онлайн минимум за 7 дней и выберите утреннее окно, чтобы минимизировать очереди и обеспечить плавный старт на горе, особенно для начинающих.
- Планирование ски-пассов и групповой логистики
- Покупайте онлайн за 7–14 дней до посещения; цифровые пропуска ускоряют вход и уменьшают количество контактов.
- Для группы рассчитайте количество взрослых и детей и назначьте одного из участников ответственным за билеты и за то, чтобы все держались вместе.
- Сохраните пропуска где-нибудь в легкодоступном месте на телефоне или в распечатанном виде и узнайте, где их можно забрать – стойка регистрации в отеле или информационная стойка на курорте могут помочь.
- Всегда имейте запасной план: если пропустили окно, переходите к следующему; не пропускайте первую попытку, прибыв слишком поздно, особенно это касается новичков.
- Совет для новичков: сначала планируйте свой день вокруг простых склонов; это поможет вам укрепить уверенность и снизит риск ошибок, связанных с усталостью.
- Время дня и ритм на горе
- Планируйте быть в горах к 08:30–09:00; большинство подъемников открываются в этом промежутке времени, а ранний приезд поможет вам разогреться постепенно, как легкая разминка.
- Запланируйте полуденный перерыв в солнечном месте, чтобы избежать переутомления; носите с собой энергетическую пищу и бутылку воды для стабильной подпитки, особенно в течение долгих, очень долгих дней.
- Используйте простой маршрут по горе: разминочный спуск, затем пара легких спусков, а затем переходите к более крутым участкам по мере повышения вашего уровня.
- Погода может быстро меняться; защита от солнца важна – наносите солнцезащитный крем повторно, носите шляпу и закрывайте открытую кожу, чтобы избежать солнечных ожогов; многослойность помогает комфортно себя чувствовать при меняющихся температурах.
- Ознакомьтесь с путеводителем по курорту и картами здесь, чтобы узнать, где находится местность, подходящая для начинающих, и где можно встретиться с вашим гидом.
- Проверка снаряжения и подготовка к забегу
- Быстрая проверка снаряжения перед днем катания: осмотрите крепления, винты, тормоза и посадку ботинок; убедитесь, что шлем надежно закреплен, а очки чистые.
- Проверьте канты и нанесите воск на лыжи или сноуборд; базовая настройка улучшает контроль и снижает усталость на длинных склонах.
- Одевайтесь слоями: базовый слой, средний слой и верхний слой; регулируйте утепление под курткой, чтобы оставаться в тепле и не перегреваться.
- Необходимый набор: бутылка воды, энергетическое питание, бальзам для губ, солнцезащитный крем, небольшой набор инструментов, запасные части и компактная ремонтная заплатка; держите сумку в легкодоступном месте.
- Быстрая проверка сейчас сэкономит время на горе и поможет избежать необходимости внесения корректировок позже.
- Планируйте стирку снаряжения после дня использования и тщательно просушивайте; храните оборудование надлежащим образом в отеле, чтобы предотвратить ржавчину или жесткость.
- Безопасность и дисциплина на горе
- Соблюдайте правила поведения на склоне: на учебных участках держитесь правой стороны, уступайте лыжникам, едущим быстрее, и не съезжайте на закрытые трассы.
- Знай свой уровень и оставайся на подходящей местности; если ты начинаешь уставать, переключись на более короткие и легкие забеги и отдохни, чтобы предотвратить ошибки.
- Следите за погодой и статусом подъемников; если видимость ухудшается, сократите длину спуска и возвращайтесь в безопасные зоны.
- Всегда имейте при себе контактную информацию отеля и персонала курорта; в случае разделения соберитесь в условленном месте встречи и прочитайте размещенные объявления, чтобы быстро воссоединиться со своей группой.
- Одна из составляющих безопасности - это наличие плана, который вы отработали со своим гидом и персоналом отеля.
- Пост-игровой распорядок дня и ошибки, которых следует избегать
- Вернувшись в отель, смойте солнцезащитный крем, высушите снаряжение и храните оборудование в сухом, проветриваемом месте.
- Проанализируйте, что прошло хорошо, а что нужно изменить на следующий день; это поможет вам избежать повторения тех же ошибок и повысит вашу общую безопасность.
- Восстановите водный баланс и сбалансированно поешьте; более длительная послеобеденная передышка поможет избежать усталости и воздействия солнца, которые могут затянуться до вечера.
- Ведите простой журнал того, что работает на вашем уровне, и составьте план маршрута на завтра на горе и проверок снаряжения.