

 Top 10 Instagram Spots in New York City, USA – Best Photo Locations in NYC">
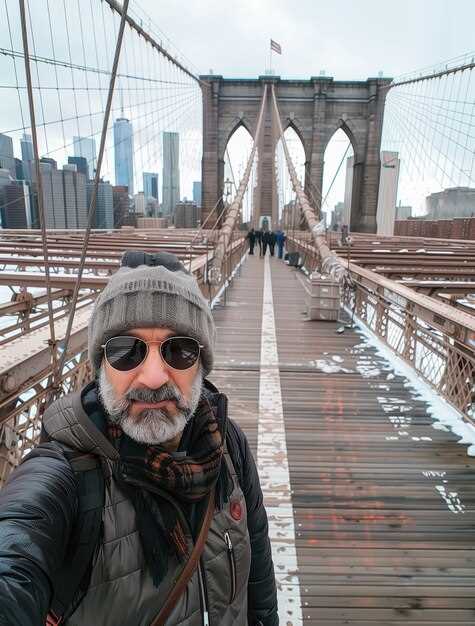
Kick off with a sunrise over Brooklyn Bridge. Stand on the Manhattan-side pedestrian path just before dawn, then frame the arches with the skyline as light spills across the East River. This shot anchors your feeds and gives your readers a confident narrative from the start.
From there, swing to DUMBO for the iconic view where the Manhattan Bridge frames brick walls and cobblestones. For a vertical skyline, climb to Top of the Rock or One World Observatory after 5 p.m. on clear days, when the glass towers glow. Stroll the High Line around 14th Street for elevated perspectives, and catch Central Park’s Bow Bridge or the Bethesda Terrace with a wide-angle lens in the morning mist.
Backpackersglobe tells you to bring imagination and destination focus. You can improve by putting your best foot forward, crafting a concise narrative and choosing moments that fit your style. louis doesnt chase filters; his posts highlight textures that feel real, with a touch of local flavor. getyourguide tips help you lock in timed entries, while united communities of travelers share tricks with other creators, influencers, and a storyteller to shape your own narrative on the feeds.
Prepare a compact kit and a single-strap bag to keep your approach efficient. A light bag, spare battery, and a lens or two will serve across all ten spots. The article that follows dives into each location with concrete, practical advice so you can move from one shot to the next without friction, putting your imagination to work for every frame. Treat yourself as a storyteller.
Top 10 Instagram Spots in New York City, USA
Visit Central Park at sunrise for your most vibrant landscape shot. Start at Bethesda Terrace for symmetry, then move toward Bow Bridge to catch reflections on the lake. Visiting early minimizes crowds, making posting cleaner and more engaging. Your planning should include a versatile lens and a few ready captions for posting, turning photo adventures into memorable content.
The Top of the Rock offers a high vantage with the city unfolding in layers. For the best angles, arrive about 30 minutes before golden hour and switch between wide and telephoto shots. Which spot aligns with your vibe will guide your planning–the terrace view for a broad skyline, or closer street-level street photography for a human-scale feel. This approach helps both solo creators and teams rate spots by impact and ease of shooting.
The High Line delivers elevated textures of architecture and nature. Walk from Gansevoort to Chelsea Market to capture planting details against skyscrapers, then switch to street-level angles near the staircases. This setting invites microgender-aware planning, welcoming creators and humans alike to try quiet, editorial framing without crowds.
<pDUMBO and Brooklyn Bridge Park form a two-for-one look: the Manhattan skyline framed by brick arches and a dramatic bridgeline. Shoot from the waterfront at Washington Street for the classic photo, or move to the riverside paths for low-angle shots that emphasize the high towers. Plan a sunset session here to balance warm light and the cool blue of the East River, a perfect getaways option for your weekend lineup. <pTimes Square bursts with bustling energy and neon. Shoot from the north side of 7th Avenue after dusk when the signs glow, then capture street performers, taxi streaks, and crowds of humans moving in rhythm. Broadway shows nearby add context to your caption, and you can frame close-up faces or wide-angle panoramas to convey the scale of this urban stage. For posting, a mixture of wide and tight frames works wonders, especially when you want to show the rate of constant motion in the city. <pEmpire State Building stands tall, offering a halo of city lights and a classic silhouette. If you can time it for dusk or after sunset, you’ll catch the city’s high-rise chorus blinking alive. Use a 24–70mm range to capture both the tower and surrounding streets, and consider a vertical composition to emphasize its height in your feed. For visiting planners, the observation deck opens earlier on weekdays, helping avoid the long weekend lines. <pGrand Central Terminal dazzles with a celestial ceiling and grand concourses. Arrive during late morning or early afternoon when daylight streams through the windows, then frame the main concourse with travelers as natural motion. Christina from local guides notes that interior shots thrive on symmetry and reflections in the marble floors, giving you a polished, editorial look for your posted feeds. <pFlatiron Building’s wedge silhouette stands out against the city grid. Stand across Madison Square Park for a bold, clean street shot, or move a few steps closer to frame the building with Fifth Avenue traffic trails. Use a mid-range lens to emphasize geometry, and try a perspective that puts the triangle against a clear sky or a busy street for contrast. This spot pairs well with a quick walking adventure through nearby SoHo. <pOne World Observatory provides sweeping, 360-degree views of the skyline. Shoot during twilight when the city glows, then switch to nighttime shots capturing the gridwork of lights. This spot suits long exposure cityscapes and intimate portraits with the river and skyline in the background, perfect for a creator’s portfolio and for planning multi-location adventures when visiting NYC. <pFinish at The Oculus for interior geometry and glass reflections. The symmetry here makes for striking close-ups or wide interior panoramas, with the transit hub vibe offering authentic urban energy. It’s a great closing chapter for your posting, especially when you want architectural precision and a sense of movement that mirrors your day’s adventures and getaways around the World Trade Center complex.Times Square at Night: Capture Neon Lights and Crowds
Shoot at 9:15 PM from the corner of Broadway and 46th Street to capture neon reflections on glass and the steady flow of people along the road.
Use a fast lens (24-70mm) and a lightweight tripod to stabilize longer exposures. Start with ISO 800, f/4, and 1/15–1/30 s to blend motion with sharp signage, then adjust based on crowd density and brightness.
Carry a lightweight camera bag, sip teas between takes, and keep your gear secure as you explore. This moment invites exploring journeys, and the view changes with every passersby along the neon highway of NYC.
For your blog, craft a tight narrative around the experience, because real stories resonate with followers. Include a brief profile of your route, a note on demographics you observe, and a microgender-aware caption that respects privacy while highlighting urban diversity.
Foto and video ideas to capture the highlight:
- Wide shot from the TKTS steps facing Times Square to show the scale of signs and crowds, then switch to a close-up of a street performer or a vendor to tell a grounded story.
- Long exposure clips (2–4 s) of moving buses and pedestrians to create light trails that weave with the signs.
- Slow-motion sequences of people crossing the street while the skyline flashes in the background for a freestyle vibe.
- Interview-style microsegments with locals or tourists, focusing on their journeys and impressions of the night view.
- Overlay data such as typical ticket costs for nearby shows and a quick note on safety tips for first-time visitors from different states, including readers from Florida or other parts of the based state.
Tips for framing and composition: frame a clean foreground against a sea of signs, let silhouettes create depth, and avoid clutter by isolating a single neon character within the chaos. Use a layered approach: foreground sign, mid-ground crowd, background skyline for a strong sense of place.
Captions and storytelling: pair visuals with concise bites about demographics and culture, then invite engagement with a question to your audience to grow following and encourage sharing.
Practical reminders: check street-level angles early, respect private spaces, and be mindful of ticketed attractions nearby. If you’re documenting from a city like York or a New York state itinerary, note the contrast between daytime touring and nighttime energy to help readers plan their own routes.
With consistent posts, your blog can become a go-to guide for nocturnal city photography, helping viewers see how Laura and other followers layer style, energy, and data into memorable visual journeys.
Brooklyn Bridge Park: Classic Skyline Shots from Brooklyn
Begin at Pier 1’s western edge during golden hour to secure a clean frame of the bridge with Manhattan in the distance. This strategic starting point sets you up to shoot multiple angles as light shifts, making it easy for audiences to follow your narrative as you go.
From there, progress along the riverfront to Pier 2 and the grassy esplanade for eye-level views, then step onto the elevated boardwalk near the War Memorial for a high vantage that emphasizes the bridge’s span. If you want a dramatic silhouette, time the blue hour so the city lights glow behind the arches. Check weather forecasts and light forecasts from Forbes before you go to plan wind, humidity, and haze. Airwaves above the river add subtle motion to longer exposures, and this space invites you to go wide or zoom in for details. The approach involves scouting and testing light across the day to determine the best window for your crew and your own going pace.
Gear and technique: carry a 16-35mm or 24-70mm lens, a sturdy tripod, and a remote shutter if possible. Shoot RAW, bracket exposures to protect highlights on water glare, and keep ISO 100–200 for clean tones. Use a polarizer when glare is strong, and shoot at f/8 to keep foreground details crisp while the skyline stays sharp. A fast memory card helps you capture multiple angles without losing momentum. This advice helps you become a consistent shooter who can satisfy audiences with a curated set of frames. If you plan a caption, try a line from tanyas to set a mood; you can also invite followers to vote on their preferred angle by including a call-to-action in the caption. Some tours offer a ticket option; if you join a guided walk, you gain access to vantage spots still crowded on weekends. The process involves balancing crowd flow with timing to keep the shots clean and the composition tight.
Storytelling approach: go beyond a single frame by establishing a small sequence: wide shot, mid-ground with the bridge, tight detail on stonework, and a long exposure of traffic trails. This keeps scrolling on social feeds moving and helps both new visitors and longtime followers connect with your work. The space between water and sky is where color blocks merge; tell viewers how you curated the set, from location scouting to exposure choices and captions, to attract more comments and shares. For audiences with diverse demographics, show the same shot in two aspect ratios to maximize how it appears in feeds and stories. Use a caption that highlights the city’s fortune of architecture and water textures; a caption like ‘Brooklyn light, city rhythm’ resonates with many followers. The following audience will appreciate a clear narrative arc across the sequence, so keep captions concise and linked to each frame.
| Vantage Point | Best Time | What to Shoot | Notes |
|---|---|---|---|
| Pier 1 Overlook | Golden hour to blue hour | Bridge towers, reflections on water, clean skyline line | Place tripod on railing; watch crowds |
| War Memorial Steps | 蓝色时刻 | Wide arc of skyline with memorial stones in foreground | Use wide lens; compact crowds can frame scale |
| DUMBO Waterfront (north of park) | Sunset | Bridge framed with Empire State Building; leading lines | Long lens 70–200mm helps compression |
| Grassy Esplanade by Pier 6 | Late afternoon | Long horizon shot across river; light on water | Great for patient, mapped compositions |
中央公园弓桥:倒影与浪漫景色
在黄金时段去那里,捕捉弓桥在湖中的倒影和远处的城市天际线。弓桥在日落时分绝不会令人失望。那个时刻适合拍摄引人注目的照片。.
站立的位置很重要:选择靠近桥南端的东侧人行道,将桥的弧度与水面一同框入,并包含栏杆上的标志,以在照片中锚定宏观位置。使用24-70毫米镜头以获得灵活性,如果光线允许,较慢的快门可以平滑表面,营造出玻璃般的效果。关于平衡和反射的快速注意事项可以指导您的设置。如果您想要拍摄一张经典照片,此设置可以支持摄影。.
托马斯,一位当地路人,沿着小路分享了一个短传:广角拍摄以捕捉桥梁全貌,然后切换到更紧的构图,拍摄青铜栏杆,以展现纹理和想象力。摄影得益于混合视角,捕捉当下时刻能为你的收藏增添个人深度。.
这个宏观地点是美国摄影指南中的一个常规特色,来自数十次拍摄的数据表明,傍晚到蓝色时刻会产生最佳的倒影。寻找附近的餐饮和娱乐选择来延长参观时间;这种结合展现了城市中的浪漫,并使您的拍摄具有个性化和成功性,美国。.
黄金时段的高线公园:高架视角和城市纹理
在日落前约 45 分钟前往 Gansevoort 街的南入口,捕捉金色时刻洒满高线公园的景象。光线拥抱着铁轨、铺路石和花坛,营造出丰富的纹理,无论彩色还是单色都表现出色。这里不收取入场费,因此您可以停留足够长的时间来尝试不同的角度和时机。在那里,您会注意到随着人们的 passing 和天际线在消逝的灯光中呼吸,城市的节奏也在发生变化。.
规划一条重点路线,并在一个简单的电子表格中记录你最喜欢的角度。这可以帮助你比较时间和光线窗口,并追踪钢铁、木材和绿植在不同日期的互动方式。在网上分享你的照片,你会发现同一个地点在不同的时间会呈现出完全不同的感觉——创作者们通常认为这些时刻是发布帖子的绝佳素材。.
沿途三个可靠的有利位置,始终能产生强劲的效果:
- 南端(甘斯沃尔特街至第14街):向北朝着肉品加工区和河流拍摄。利用低角度的阳光在铁轨上雕刻出长长的阴影,并留意重复的线条引导视线。非常适合广角构图以及周围高楼大厦的窗户反射。.
- 街区中段(16街至23街):切换到中距离镜头,捕捉行人、纹理和远处摩天大楼的混合景象,包括洛克菲勒中心的惊鸿一瞥。这一区域深受创作者喜爱,因为它平衡了纹理、色彩和动感。这里的人流量会随时间变化,因此请耐心等待一个清晰的静止时刻。.
- 哈德逊广场末端(30街至34街):以开阔的河景和中城天际线结尾。 光线经常将水面染成金色,玻璃上的倒影在人行道上营造出动态图案。 如果您从栏杆附近的边缘拍摄,您会捕捉到强烈的海拔感。.
灵感来自 nytimestravel 和其他指南。如果您热衷于探索城市空间,您会喜欢将此路线与 explorecharleston 或其他高架步道进行比较。无论您是为了拍摄您最喜欢的记忆还是为了与社区分享的项目,High Line 都欢迎幽默和实验。体验此空间需要时机、构图和耐心。街头活力与高架平静的世界在此汇聚,窗口光线随时间变化而变化。对于纽约游客来说,这条路线通常会成为城市探索的首选序列。如果您想协调计划,一些创作者会在个人资料中包含 gmailcom 账号;这是可选的,但它确实在线上发生。.
苏豪区街头艺术与建筑角落:打造时尚造型照的绚丽背景
在苏荷区一条隐蔽的壁画面前开始你的造型会话,然后滑向砖与玻璃交汇的锐利建筑拐角。让墙壁的色块邀请拍摄对象融入画面,而纹理则丰富照片。附近表面上kallmeyer精选的调色板可以引导你的服装选择,而不会喧宾夺主,并且你可以策划一个迷你背景轮换,以保持造型的新鲜感。.
策略性地选择光源:二楼朝向墙壁的日光可以设定情绪,而小型便携式灯可以从附近的表面反射,以填充阴影而又不使纹理扁平化。在最佳日光时段的第二个窗口进行拍摄,然后引入一些灯光来增加图像的深度并避免平面效果。.
以自由风格调整造型比例:倚靠建筑圆柱,捕捉不经意的瞬间,然后转向安静的角落,那里有隐藏的金属栏杆或船坞风格的门口,带来航海风。这种组合带来引人入胜的图像,在您的页面和度假专题中产生共鸣,图像旨在感觉是精心设计的,而不是摆拍的。.
与你的团队协调,在场景之间高效移动,在控制人群的同时保持精力。专注的力量动态——明确的角色、快速的转换和对风格的共同关注——让你判断当下并锁定最佳画面。让团队策划一套轮换的背景,以保持单次拍摄的势头。.
以苏荷区目的地为背景,创作能在旅游页面上引起共鸣的内容:在标题中标记目的地、度假胜地和风格,并将图像与真实的度假地点联系起来。对于合作,通过gmailcom与合作伙伴分享拍摄想法,并参考航空公司体验或邮轮氛围——航线、拉丁风格的装饰或挪威邮轮航行的惊鸿一瞥——以丰富您的图像目录。.