

 امریکہ کے شہر نیویارک میں انسٹاگرام کے لیے بہترین 10 مقامات - NYC میں بہترین تصویر کے مقامات">
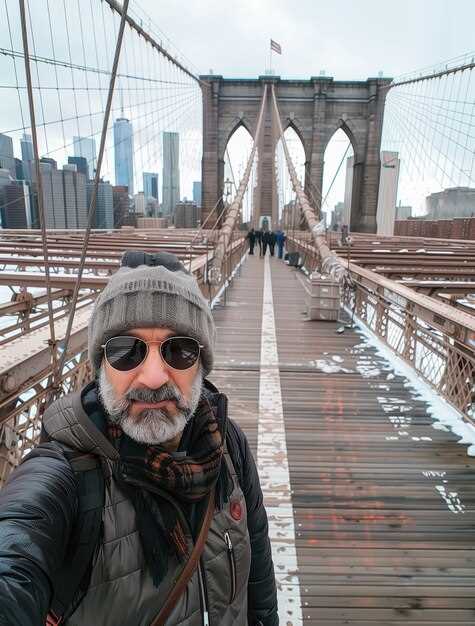
Kick off with a sunrise over Brooklyn Bridge. Stand on the Manhattan-side pedestrian path just before dawn, then frame the arches with the skyline as light spills across the East River. This shot anchors your feeds and gives your readers a confident narrative from the start.
From there, swing to DUMBO for the iconic view where the Manhattan Bridge frames brick walls and cobblestones. For a vertical skyline, climb to Top of the Rock or One World Observatory after 5 p.m. on clear days, when the glass towers glow. Stroll the High Line around 14th Street for elevated perspectives, and catch Central Park’s Bow Bridge or the Bethesda Terrace with a wide-angle lens in the morning mist.
Backpackersglobe tells you to bring imagination and destination focus. You can improve by putting your best foot forward, crafting a concise narrative and choosing moments that fit your style. louis doesnt chase filters; his posts highlight textures that feel real, with a touch of local flavor. getyourguide tips help you lock in timed entries, while united communities of travelers share tricks with other creators, influencers, and a storyteller to shape your own narrative on the feeds.
Prepare a compact kit and a single-strap bag to keep your approach efficient. A light bag, spare battery, and a lens or two will serve across all ten spots. The article that follows dives into each location with concrete, practical advice so you can move from one shot to the next without friction, putting your imagination to work for every frame. Treat yourself as a storyteller.
Top 10 Instagram Spots in New York City, USA
Visit Central Park at sunrise for your most vibrant landscape shot. Start at Bethesda Terrace for symmetry, then move toward Bow Bridge to catch reflections on the lake. Visiting early minimizes crowds, making posting cleaner and more engaging. Your planning should include a versatile lens and a few ready captions for posting, turning photo adventures into memorable content.
The Top of the Rock offers a high vantage with the city unfolding in layers. For the best angles, arrive about 30 minutes before golden hour and switch between wide and telephoto shots. Which spot aligns with your vibe will guide your planning–the terrace view for a broad skyline, or closer street-level street photography for a human-scale feel. This approach helps both solo creators and teams rate spots by impact and ease of shooting.
The High Line delivers elevated textures of architecture and nature. Walk from Gansevoort to Chelsea Market to capture planting details against skyscrapers, then switch to street-level angles near the staircases. This setting invites microgender-aware planning, welcoming creators and humans alike to try quiet, editorial framing without crowds.
Times Square at Night: Capture Neon Lights and Crowds
Shoot at 9:15 PM from the corner of Broadway and 46th Street to capture neon reflections on glass and the steady flow of people along the road.
Use a fast lens (24-70mm) and a lightweight tripod to stabilize longer exposures. Start with ISO 800, f/4, and 1/15–1/30 s to blend motion with sharp signage, then adjust based on crowd density and brightness.
Carry a lightweight camera bag, sip teas between takes, and keep your gear secure as you explore. This moment invites exploring journeys, and the view changes with every passersby along the neon highway of NYC.
For your blog, craft a tight narrative around the experience, because real stories resonate with followers. Include a brief profile of your route, a note on demographics you observe, and a microgender-aware caption that respects privacy while highlighting urban diversity.
Foto and video ideas to capture the highlight:
- Wide shot from the TKTS steps facing Times Square to show the scale of signs and crowds, then switch to a close-up of a street performer or a vendor to tell a grounded story.
- Long exposure clips (2–4 s) of moving buses and pedestrians to create light trails that weave with the signs.
- Slow-motion sequences of people crossing the street while the skyline flashes in the background for a freestyle vibe.
- Interview-style microsegments with locals or tourists, focusing on their journeys and impressions of the night view.
- Overlay data such as typical ticket costs for nearby shows and a quick note on safety tips for first-time visitors from different states, including readers from Florida or other parts of the based state.
Tips for framing and composition: frame a clean foreground against a sea of signs, let silhouettes create depth, and avoid clutter by isolating a single neon character within the chaos. Use a layered approach: foreground sign, mid-ground crowd, background skyline for a strong sense of place.
Captions and storytelling: pair visuals with concise bites about demographics and culture, then invite engagement with a question to your audience to grow following and encourage sharing.
Practical reminders: check street-level angles early, respect private spaces, and be mindful of ticketed attractions nearby. If you’re documenting from a city like York or a New York state itinerary, note the contrast between daytime touring and nighttime energy to help readers plan their own routes.
With consistent posts, your blog can become a go-to guide for nocturnal city photography, helping viewers see how Laura and other followers layer style, energy, and data into memorable visual journeys.
Brooklyn Bridge Park: Classic Skyline Shots from Brooklyn
Begin at Pier 1’s western edge during golden hour to secure a clean frame of the bridge with Manhattan in the distance. This strategic starting point sets you up to shoot multiple angles as light shifts, making it easy for audiences to follow your narrative as you go.
From there, progress along the riverfront to Pier 2 and the grassy esplanade for eye-level views, then step onto the elevated boardwalk near the War Memorial for a high vantage that emphasizes the bridge’s span. If you want a dramatic silhouette, time the blue hour so the city lights glow behind the arches. Check weather forecasts and light forecasts from Forbes before you go to plan wind, humidity, and haze. Airwaves above the river add subtle motion to longer exposures, and this space invites you to go wide or zoom in for details. The approach involves scouting and testing light across the day to determine the best window for your crew and your own going pace.
Gear and technique: carry a 16-35mm or 24-70mm lens, a sturdy tripod, and a remote shutter if possible. Shoot RAW, bracket exposures to protect highlights on water glare, and keep ISO 100–200 for clean tones. Use a polarizer when glare is strong, and shoot at f/8 to keep foreground details crisp while the skyline stays sharp. A fast memory card helps you capture multiple angles without losing momentum. This advice helps you become a consistent shooter who can satisfy audiences with a curated set of frames. If you plan a caption, try a line from tanyas to set a mood; you can also invite followers to vote on their preferred angle by including a call-to-action in the caption. Some tours offer a ticket option; if you join a guided walk, you gain access to vantage spots still crowded on weekends. The process involves balancing crowd flow with timing to keep the shots clean and the composition tight.
Storytelling approach: go beyond a single frame by establishing a small sequence: wide shot, mid-ground with the bridge, tight detail on stonework, and a long exposure of traffic trails. This keeps scrolling on social feeds moving and helps both new visitors and longtime followers connect with your work. The space between water and sky is where color blocks merge; tell viewers how you curated the set, from location scouting to exposure choices and captions, to attract more comments and shares. For audiences with diverse demographics, show the same shot in two aspect ratios to maximize how it appears in feeds and stories. Use a caption that highlights the city’s fortune of architecture and water textures; a caption like ‘Brooklyn light, city rhythm’ resonates with many followers. The following audience will appreciate a clear narrative arc across the sequence, so keep captions concise and linked to each frame.
| Vantage Point | بہترین وقت | What to Shoot | نوٹس |
|---|---|---|---|
| Pier 1 Overlook | Golden hour to blue hour | Bridge towers, reflections on water, clean skyline line | Place tripod on railing; watch crowds |
| War Memorial Steps | نیلی گھنٹہ | Wide arc of skyline with memorial stones in foreground | Use wide lens; compact crowds can frame scale |
| DUMBO Waterfront (north of park) | غروب آفتاب | Bridge framed with Empire State Building; leading lines | Long lens 70–200mm helps compression |
| Grassy Esplanade by Pier 6 | دیر دوپہر | Long horizon shot across river; light on water | Great for patient, mapped compositions |
سینٹرل پارک بو برج: عکس اور رومانوی نظارے
وہاں سنہری گھنٹے میں جاکر جھیل میں منعکس بَو برج کے محرابوں اور افق کو اپنے کیمرے میں قید کریں۔ سنہری گھنٹے میں بَو برج آپ کو مایوس نہیں کرے گا۔ وہ گھنٹہ ایک شاندار تصویر لینے کی دعوت دیتا ہے۔.
کہاں کھڑے ہونا اہم ہے: پانی کے مقابل گھماؤ کو فریم کرنے کے لیے پُل کے جنوبی سرے کے قریب مشرقی سمت کے پیدل چلنے والے راستے کو منتخب کریں، اور میکرو مقام کو اپنی شاٹ میں شامل کرنے کے لیے ریلنگ پر موجود نشان کو شامل کریں۔ لچک کے لیے 24-70mm لینس استعمال کریں، اور اگر روشنی اجازت دے تو، ایک سست شٹر سطح کو ہموار کرکے شیشے کی طرح دکھائے گا۔ توازن اور عکاسی کے بارے میں ایک فوری نوٹ آپ کی سیٹ اپ کی رہنمائی کر سکتا ہے۔ اگر آپ ایک کلاسک شاٹ کے لیے جا رہے ہیں، تو یہ سیٹ اپ فوٹوگرافی کی حمایت کرتا ہے۔.
تھامس، ایک مقامی راہگیر، راستے پر ایک مختصر پاس شیئر کرتا ہے: پورے پل کو قید کرنے کے لیے وائیڈ شوٹ کریں، پھر ساخت اور تخیل کو ظاہر کرنے کے لیے کانسی کی ریلنگ کے تنگ فریموں پر سوئچ کریں۔ فوٹوگرافی مختلف نقطہ نظروں کو ملانے سے فائدہ اٹھاتی ہے، اور لمحے کو قید کرنا آپ کے مجموعہ میں ذاتی گہرائی کا اضافہ کرتا ہے۔.
یہ میکرُولیکیشن امریکہ فوٹوگرافی گائیڈ میں ایک باقاعدہ فیچر ہے، اور درجنوں شوٹس سے حاصل کردہ ڈیٹا سے پتہ چلتا ہے کہ دیر سے دوپہر سے بلیو آور تک بہترین عکاسی حاصل ہوتی ہے۔ قریبی کھانے کے اختیارات اور تفریح تلاش کریں تاکہ سیر کو بڑھایا جا سکے۔ یہ مجموعہ شہر میں رومانس کو ظاہر کرتا ہے اور آپ کی گرفت کو ذاتی اور کامیاب بناتا ہے، امریکہ۔.
گولڈن آور میں ہائی لائن: بلند مناظر اور شہری ساخت
گانسیوورت اسٹریٹ پر موجود جنوبی داخلی راستے پر غروبِ آفتاب سے تقریباً 45 منٹ پہلے جائیں تاکہ ہائی لائن پر سنہری گھنٹے کے اثر کو دیکھ سکیں۔ روشنی ریلوں، پیورز اور پودوں کی کیاریوں کو گلے لگاتی ہے، اور ایسے بھرپور نقوش بناتی ہے جو رنگین اور یک رنگی دونوں صورتوں میں بخوبی نظر آتے ہیں۔ یہاں داخلے کی کوئی فیس نہیں ہے، اس لیے آپ زاویوں اور وقت کے ساتھ تجربہ کرنے کے لیے کافی دیر تک ٹھہر سکتے ہیں۔ وہاں، آپ شہر کی روانی کو بدلتے ہوئے محسوس کریں گے جب لوگ گزریں گے اور معدوم ہوتی روشنی کے ساتھ آسمان سانس لے گا۔.
ایک مخصوص روٹ کی منصوبہ بندی کریں اور ایک سادہ سپریڈ شیٹ میں اپنے پسندیدہ زاویوں کو لاگ کریں۔ یہ آپ کو روشنی کے گھنٹے اور دریچے کا موازنہ کرنے میں مدد کرتا ہے، اور یہ ٹریک کرتا ہے کہ کس طرح اسٹیل، ٹمبر اور ہریالی مختلف دنوں میں تعامل کرتے ہیں۔ اپنی شاٹس کو آن لائن شیئر کرنے سے، آپ دیکھیں گے کہ کس طرح ایک ہی جگہ گھنٹے بہ گھنٹے بالکل مختلف محسوس ہو سکتی ہے – اور تخلیق کار اکثر ان لمحات کو پوسٹس کے لیے بہترین مواد قرار دیتے ہیں۔.
راستے میں تین قابل اعتماد مقامات جہاں سے مسلسل اچھے نتائج حاصل ہوتے ہیں:
- جنوبی سرا (گینسوورٹ سے 14th سٹریٹ تک): شمال کی جانب میٹ پیکنگ ڈسٹرکٹ اور دریا کی طرف شوٹ کریں۔ نیچی دھوپ کو ریلوں کے ساتھ لمبے سائے بنانے کے لیے استعمال کریں، اور بار بار آنے والی لکیروں کو آنکھوں کو رہنمائی کرتے ہوئے دیکھیں۔ وسیع کمپوزیشن اور آس پاس کے ٹاورز سے کھڑکیوں کے عکس کے لیے بہترین۔.
- مڈ-بلاک (16ویں سے 23 ویں سٹریٹ): درمیانے درجے کے لینس پر سوئچ کریں تاکہ پیدل چلنے والوں، بناوٹوں اور دور آسمان کو چھوتی عمارتوں کا ایک امتزاج حاصل کیا جا سکے، بشمول راکفیلر سینٹر کی جھلکیاں۔ یہ علاقہ تخلیق کاروں میں مقبول ہے کیونکہ یہ ساخت، رنگ اور حرکت میں توازن رکھتا ہے۔ یہاں وقت ہجوم کے لحاظ سے مختلف ہو سکتا ہے، اس لیے سکون کے واضح لمحے کے لیے صبر کریں۔.
- ہڈسن یارڈز کا اختتام (30 ویں سے 34 ویں اسٹریٹ): ایک وسیع دریا کے منظر اور مڈٹاؤن اسکائی لائن کے ساتھ اختتام۔ روشنی اکثر پانی پر سنہری ہو جاتی ہے، اور شیشے پر پڑنے والے عکس واک وے پر متحرک نمونے بناتے ہیں۔ اگر آپ ریلنگ کے قریب کنارے سے شوٹ کرتے ہیں، تو آپ بلندی کا ایک مضبوط احساس حاصل کر لیں گے۔.
نیویارکٹائمزٹریول اور دیگر گائیڈز سے تحریک ملتی ہے۔ اگر آپ کو شہر کی جگہوں کو تلاش کرنے سے تحریک ملتی ہے، تو آپ اس راستے کو ایکسپلورچارلسٹن یا دیگر بلند واکس کے ساتھ موازنہ کرنے سے لطف اندوز ہوں گے۔ چاہے آپ اپنی پسندیدہ یادداشت کے لیے شوٹ کریں یا کسی کمیونٹی کے ساتھ اشتراک کرنے کے لیے کوئی پروجیکٹ، ہائی لائن مزاح اور تجربات کی دعوت دیتی ہے۔ اس جگہ کا تجربہ وقت، کمپوزیشن اور صبر پر مشتمل ہوتا ہے۔ یہاں گلی کی توانائی اور بلند سکون کی دنیایں ملتی ہیں، اور وقت بدلنے کے ساتھ کھڑکی کی روشنی بدلتی ہے۔ نیویارک کے مسافروں کے لیے، یہ راستہ اکثر شہر کی تلاش میں جانے والی ترتیب بن جاتا ہے۔ اگر آپ منصوبوں کو مربوط کرنا چاہتے ہیں، تو کچھ تخلیق کار پروفائلز میں gmailcom ہینڈل شامل کرتے ہیں؛ یہ اختیاری ہے، لیکن یہ آن لائن ہوتا ہے۔.
سوھو اسٹریٹ آرٹ اور آرکیٹیکچرل کارنرز: اسٹائلنگ شاٹس کے لیے رنگین بیک ڈراپس
سوھو راہداری کے ساتھ ایک پوشیدہ مُورل پر اپنے اسٹائلنگ سیشن کا آغاز کریں، پھر ایک تیز تعمیراتی کونے کی طرف بڑھیں جہاں اینٹ شیشے سے ملتی ہے۔ دیوار کے رنگین بلاکس مضمون کو فریم میں رہنے کی دعوت دیں، جبکہ بناوٹ تصویر کو مزید بلند کرے۔ قریبی سطحوں پر کالمیر کی تیار کردہ رنگ سکیم آپ کے لباس کے انتخاب میں رہنمائی کر سکتی ہے بغیر شاٹ پر حاوی ہوئے، اور آپ شکل کو تازہ رکھنے کے لیے بیک ڈراپس کی ایک منی روٹیشن تیار کر سکتے ہیں۔.
روشنی کے ذرائع کو حکمت عملی سے منتخب کریں: دوسری منزل کی جانب والی دیوار پر دن کی روشنی ماحول پیدا کرتی ہے، جبکہ ایک چھوٹی پورٹیبل لائٹ آس پاس کی سطح سے ٹکرا کر ساخت کو چپٹا کیے بغیر سائے بھر سکتی ہے۔ دن کی مناسب روشنی کے دوسرے دریچے میں شوٹ کریں، پھر تصویروں میں گہرائی پیدا کرنے اور سپاٹ نتائج سے بچنے کے لیے کچھ روشنیاں لائیں۔.
آزادانہ انداز کے ساتھ اسٹائلنگ میں وسعت لائیں: کسی تعمیراتی ستون کے ساتھ ٹیک لگائیں، ایک بے تکلف لمحہ قید کریں، پھر سمندری تھیم کے لیے پوشیدہ دھاتی ریلنگ یا بوٹ ہاؤس طرز کے دروازے کے ساتھ ایک پرسکون کونے کی طرف متوجہ ہوں۔ یہ امتزاج دعوت دینے والی تصویری پیشکش فراہم کرتا ہے جو کہ آپ کے صفحات اور گیٹ ویز کی خصوصیات میں گونجتی ہے، جس میں تصویری کشش کو اسٹیج کے بجائے جان بوجھ کر تیار کیا گیا محسوس ہوتا ہے۔.
اپنی ٹیم کے ساتھ مؤثر طریقے سے مناظر کے درمیان حرکت کریں، توانائی کو برقرار رکھتے ہوئے ہجوم کو قابو میں رکھیں۔ ایک مرکوز پاور ڈائنامک - واضح کردار، فوری تبدیلیاں، اور انداز کے لیے ایک مشترکہ نظر - آپ کو لمحے کا فیصلہ کرنے اور بہترین فریم کو لاک کرنے کی اجازت دیتی ہے۔ ٹیم کو ایک ہی شوٹ میں رفتار برقرار رکھنے کے لیے گھومنے والے سیٹ کے پس منظروں کی نگرانی کرنے دیں۔.
سوہو کے مقامات کو ایسے مواد کے لیے اپنے پس منظر کے طور پر استعمال کریں جو سفر کے صفحات پر گونجتا ہے: کیپشن میں مقامات، گیٹ ویز اور اسٹائلز کو ٹیگ کریں، اور تصویری کو حقیقی دنیا کے گیٹ ویز سے لنک کریں۔ اشتراک کے لیے، gmailcom کے ذریعے شراکت داروں کے ساتھ شاٹ آئیڈیاز شیئر کریں، اور اپنے تصویری کیٹلاگ کو بہتر بنانے کے لیے ایئرلائن کے تجربات یا بحری سفر کے وائبز - ایئرویز، لاطینی متاثرہ لہجے، یا نارویجن کروز لائن کے سفر کی جھلکیاں - کا حوالہ دیں۔.