

 미국 뉴욕시 최고의 인스타그램 명소 Top 10 – 뉴욕 최고의 사진 촬영 장소">
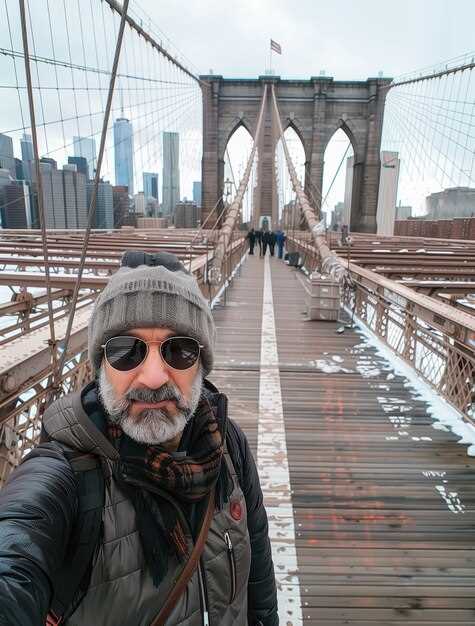
Kick off with a sunrise over Brooklyn Bridge. Stand on the Manhattan-side pedestrian path just before dawn, then frame the arches with the skyline as light spills across the East River. This shot anchors your feeds and gives your readers a confident narrative from the start.
From there, swing to DUMBO for the iconic view where the Manhattan Bridge frames brick walls and cobblestones. For a vertical skyline, climb to Top of the Rock or One World Observatory after 5 p.m. on clear days, when the glass towers glow. Stroll the High Line around 14th Street for elevated perspectives, and catch Central Park’s Bow Bridge or the Bethesda Terrace with a wide-angle lens in the morning mist.
Backpackersglobe tells you to bring imagination and destination focus. You can improve by putting your best foot forward, crafting a concise narrative and choosing moments that fit your style. louis doesnt chase filters; his posts highlight textures that feel real, with a touch of local flavor. getyourguide tips help you lock in timed entries, while united communities of travelers share tricks with other creators, influencers, and a storyteller to shape your own narrative on the feeds.
Prepare a compact kit and a single-strap bag to keep your approach efficient. A light bag, spare battery, and a lens or two will serve across all ten spots. The article that follows dives into each location with concrete, practical advice so you can move from one shot to the next without friction, putting your imagination to work for every frame. Treat yourself as a storyteller.
Top 10 Instagram Spots in New York City, USA
Visit Central Park at sunrise for your most vibrant landscape shot. Start at Bethesda Terrace for symmetry, then move toward Bow Bridge to catch reflections on the lake. Visiting early minimizes crowds, making posting cleaner and more engaging. Your planning should include a versatile lens and a few ready captions for posting, turning photo adventures into memorable content.
The Top of the Rock offers a high vantage with the city unfolding in layers. For the best angles, arrive about 30 minutes before golden hour and switch between wide and telephoto shots. Which spot aligns with your vibe will guide your planning–the terrace view for a broad skyline, or closer street-level street photography for a human-scale feel. This approach helps both solo creators and teams rate spots by impact and ease of shooting.
The High Line delivers elevated textures of architecture and nature. Walk from Gansevoort to Chelsea Market to capture planting details against skyscrapers, then switch to street-level angles near the staircases. This setting invites microgender-aware planning, welcoming creators and humans alike to try quiet, editorial framing without crowds.
<pDUMBO and Brooklyn Bridge Park form a two-for-one look: the Manhattan skyline framed by brick arches and a dramatic bridgeline. Shoot from the waterfront at Washington Street for the classic photo, or move to the riverside paths for low-angle shots that emphasize the high towers. Plan a sunset session here to balance warm light and the cool blue of the East River, a perfect getaways option for your weekend lineup. <pTimes Square bursts with bustling energy and neon. Shoot from the north side of 7th Avenue after dusk when the signs glow, then capture street performers, taxi streaks, and crowds of humans moving in rhythm. Broadway shows nearby add context to your caption, and you can frame close-up faces or wide-angle panoramas to convey the scale of this urban stage. For posting, a mixture of wide and tight frames works wonders, especially when you want to show the rate of constant motion in the city. <pEmpire State Building stands tall, offering a halo of city lights and a classic silhouette. If you can time it for dusk or after sunset, you’ll catch the city’s high-rise chorus blinking alive. Use a 24–70mm range to capture both the tower and surrounding streets, and consider a vertical composition to emphasize its height in your feed. For visiting planners, the observation deck opens earlier on weekdays, helping avoid the long weekend lines. <pGrand Central Terminal dazzles with a celestial ceiling and grand concourses. Arrive during late morning or early afternoon when daylight streams through the windows, then frame the main concourse with travelers as natural motion. Christina from local guides notes that interior shots thrive on symmetry and reflections in the marble floors, giving you a polished, editorial look for your posted feeds. <pFlatiron Building’s wedge silhouette stands out against the city grid. Stand across Madison Square Park for a bold, clean street shot, or move a few steps closer to frame the building with Fifth Avenue traffic trails. Use a mid-range lens to emphasize geometry, and try a perspective that puts the triangle against a clear sky or a busy street for contrast. This spot pairs well with a quick walking adventure through nearby SoHo. <pOne World Observatory provides sweeping, 360-degree views of the skyline. Shoot during twilight when the city glows, then switch to nighttime shots capturing the gridwork of lights. This spot suits long exposure cityscapes and intimate portraits with the river and skyline in the background, perfect for a creator’s portfolio and for planning multi-location adventures when visiting NYC. <pFinish at The Oculus for interior geometry and glass reflections. The symmetry here makes for striking close-ups or wide interior panoramas, with the transit hub vibe offering authentic urban energy. It’s a great closing chapter for your posting, especially when you want architectural precision and a sense of movement that mirrors your day’s adventures and getaways around the World Trade Center complex.Times Square at Night: Capture Neon Lights and Crowds
Shoot at 9:15 PM from the corner of Broadway and 46th Street to capture neon reflections on glass and the steady flow of people along the road.
Use a fast lens (24-70mm) and a lightweight tripod to stabilize longer exposures. Start with ISO 800, f/4, and 1/15–1/30 s to blend motion with sharp signage, then adjust based on crowd density and brightness.
Carry a lightweight camera bag, sip teas between takes, and keep your gear secure as you explore. This moment invites exploring journeys, and the view changes with every passersby along the neon highway of NYC.
For your blog, craft a tight narrative around the experience, because real stories resonate with followers. Include a brief profile of your route, a note on demographics you observe, and a microgender-aware caption that respects privacy while highlighting urban diversity.
Foto and video ideas to capture the highlight:
- Wide shot from the TKTS steps facing Times Square to show the scale of signs and crowds, then switch to a close-up of a street performer or a vendor to tell a grounded story.
- Long exposure clips (2–4 s) of moving buses and pedestrians to create light trails that weave with the signs.
- Slow-motion sequences of people crossing the street while the skyline flashes in the background for a freestyle vibe.
- Interview-style microsegments with locals or tourists, focusing on their journeys and impressions of the night view.
- Overlay data such as typical ticket costs for nearby shows and a quick note on safety tips for first-time visitors from different states, including readers from Florida or other parts of the based state.
Tips for framing and composition: frame a clean foreground against a sea of signs, let silhouettes create depth, and avoid clutter by isolating a single neon character within the chaos. Use a layered approach: foreground sign, mid-ground crowd, background skyline for a strong sense of place.
Captions and storytelling: pair visuals with concise bites about demographics and culture, then invite engagement with a question to your audience to grow following and encourage sharing.
Practical reminders: check street-level angles early, respect private spaces, and be mindful of ticketed attractions nearby. If you’re documenting from a city like York or a New York state itinerary, note the contrast between daytime touring and nighttime energy to help readers plan their own routes.
With consistent posts, your blog can become a go-to guide for nocturnal city photography, helping viewers see how Laura and other followers layer style, energy, and data into memorable visual journeys.
Brooklyn Bridge Park: Classic Skyline Shots from Brooklyn
Begin at Pier 1’s western edge during golden hour to secure a clean frame of the bridge with Manhattan in the distance. This strategic starting point sets you up to shoot multiple angles as light shifts, making it easy for audiences to follow your narrative as you go.
From there, progress along the riverfront to Pier 2 and the grassy esplanade for eye-level views, then step onto the elevated boardwalk near the War Memorial for a high vantage that emphasizes the bridge’s span. If you want a dramatic silhouette, time the blue hour so the city lights glow behind the arches. Check weather forecasts and light forecasts from Forbes before you go to plan wind, humidity, and haze. Airwaves above the river add subtle motion to longer exposures, and this space invites you to go wide or zoom in for details. The approach involves scouting and testing light across the day to determine the best window for your crew and your own going pace.
Gear and technique: carry a 16-35mm or 24-70mm lens, a sturdy tripod, and a remote shutter if possible. Shoot RAW, bracket exposures to protect highlights on water glare, and keep ISO 100–200 for clean tones. Use a polarizer when glare is strong, and shoot at f/8 to keep foreground details crisp while the skyline stays sharp. A fast memory card helps you capture multiple angles without losing momentum. This advice helps you become a consistent shooter who can satisfy audiences with a curated set of frames. If you plan a caption, try a line from tanyas to set a mood; you can also invite followers to vote on their preferred angle by including a call-to-action in the caption. Some tours offer a ticket option; if you join a guided walk, you gain access to vantage spots still crowded on weekends. The process involves balancing crowd flow with timing to keep the shots clean and the composition tight.
Storytelling approach: go beyond a single frame by establishing a small sequence: wide shot, mid-ground with the bridge, tight detail on stonework, and a long exposure of traffic trails. This keeps scrolling on social feeds moving and helps both new visitors and longtime followers connect with your work. The space between water and sky is where color blocks merge; tell viewers how you curated the set, from location scouting to exposure choices and captions, to attract more comments and shares. For audiences with diverse demographics, show the same shot in two aspect ratios to maximize how it appears in feeds and stories. Use a caption that highlights the city’s fortune of architecture and water textures; a caption like ‘Brooklyn light, city rhythm’ resonates with many followers. The following audience will appreciate a clear narrative arc across the sequence, so keep captions concise and linked to each frame.
| Vantage Point | 최고의 시간 | What to Shoot | 메모 |
|---|---|---|---|
| Pier 1 Overlook | Golden hour to blue hour | Bridge towers, reflections on water, clean skyline line | Place tripod on railing; watch crowds |
| War Memorial Steps | 푸른 시간 | Wide arc of skyline with memorial stones in foreground | Use wide lens; compact crowds can frame scale |
| DUMBO Waterfront (north of park) | 일몰 | Bridge framed with Empire State Building; leading lines | Long lens 70–200mm helps compression |
| Grassy Esplanade by Pier 6 | Late afternoon | Long horizon shot across river; light on water | Great for patient, mapped compositions |
센트럴 파크 보우 브리지: 반영과 낭만적인 풍경
황금 시간대에 가서 호수에 비친 보 브리지의 아치와 건너편 스카이라인을 담아보세요. 보 브리지는 석양에 실망시키지 않습니다. 그 시간은 멋진 사진을 찍도록 유혹합니다.
위치가 중요합니다. 다리의 남쪽 끝 근처 동쪽 보행자 도로를 선택하여 물을 배경으로 곡선을 구도에 담고 난간 위의 표지판을 포함하여 촬영 위치를 고정하세요. 24-70mm 렌즈를 사용하여 유연성을 확보하고, 조명이 충분하다면 느린 셔터 속도로 물 표면을 유리처럼 매끄럽게 표현하세요. 균형과 반사에 대한 간단한 메모는 설정에 도움이 될 수 있습니다. 클래식한 사진을 찍고 싶다면 이 설정이 사진 촬영을 지원합니다.
토마스 씨는 길을 지나가던 중 짧은 순간을 공유합니다. 다리 전체를 담기 위해 넓게 촬영한 다음, 청동 난간의 질감과 상상력을 보여주기 위해 더 타이트한 프레임으로 전환하세요. 사진은 다양한 관점을 혼합할 때 더욱 빛을 발하며, 순간을 포착하는 것은 여러분의 컬렉션에 개인적인 깊이를 더해줍니다.
이 거시적 위치는 미국 사진 가이드에 정기적으로 등장하며, 수십 번의 촬영 데이터에 따르면 늦은 오후부터 매직 아워까지가 최고의 반영을 보여줍니다. 인근 식사 옵션과 엔터테인먼트를 찾아 방문을 연장하세요. 이러한 조합은 도시의 낭만을 보여주고, 여러분의 촬영을 개인적이고 성공적으로 만들어 줄 것입니다, 미국.
골든 아워의 하이라인: 높아진 시각과 도시의 질감
간세부르트 스트리트 남쪽 입구로 해 질 녘 45분 전에 가서 하이라인에 황금빛 햇살이 쏟아지는 모습을 감상해 보세요. 빛이 난간, 보도블록, 화단을 감싸 안아 풍부한 질감을 만들어내는데, 컬러와 흑백 모두에서 잘 표현됩니다. 입장료가 없으니, 원하는 만큼 충분히 머물면서 각도와 타이밍을 실험해 볼 수 있습니다. 그곳에서 사람들이 지나가고 스카이라인이 희미해지는 빛과 함께 숨 쉬는 도시의 리듬 변화를 느껴보세요.
집중적인 경로를 계획하고 좋아하는 구도를 간단한 스프레드시트에 기록하세요. 이렇게 하면 시간과 빛의 창을 비교하고, 강철, 목재, 녹지가 서로 다른 날에 어떻게 상호 작용하는지 추적하는 데 도움이 됩니다. 온라인에 촬영물을 공유하면 같은 장소가 시간마다 완전히 다르게 느껴질 수 있다는 것을 알 수 있습니다. 크리에이터들은 종종 그러한 순간들을 게시물에 좋은 자료라고 평가합니다.
경로를 따라 강력한 결과를 꾸준히 얻을 수 있는 세 가지 믿을 만한 관측 지점:
- 남쪽 끝 (갠즈부르트에서 14번가): 미트패킹 지구와 강을 향해 북쪽으로 촬영하세요. 낮은 태양을 이용하여 철로를 따라 긴 그림자를 만들고, 반복되는 선들이 시선을 유도하는지 살펴보세요. 넓은 구도와 주변 타워의 창문 반사를 담기에 좋습니다.
- 미드 블록(16번가~23번가): 중거리 렌즈로 전환하여 보행자, 질감, 그리고 멀리 보이는 록펠러 센터의 모습 등 고층 빌딩을 담아보세요. 이 구역은 질감, 색상, 움직임의 균형이 잘 잡혀 있어 창작자들이 가장 선호합니다. 이곳의 풍경은 인파에 따라 달라질 수 있으므로, 잠시 고요한 순간을 포착하기 위해 인내심을 가지세요.
- 허드슨 야드 끝자락 (30번가에서 34번가): 넓은 강 전망과 미드타운 스카이라인으로 마무리됩니다. 물 위로 빛이 황금빛으로 변하는 경우가 많고, 유리에 반사된 빛이 보행로에 역동적인 패턴을 만들어냅니다. 난간 근처 가장자리에서 촬영하면 높이감을 강하게 포착할 수 있습니다.
영감은 뉴욕타임스트래블 및 기타 가이드에서 얻었습니다. 도시 공간 탐험에 영감을 받았다면 이 경로를 explorecharleston 또는 다른 고가 산책로와 비교하는 것을 즐길 것입니다. 가장 좋아하는 추억을 찍든 커뮤니티와 공유할 프로젝트를 찍든, 하이 라인은 유머와 실험 정신을 불러일으킵니다. 이 공간을 경험하려면 타이밍, 구도, 인내심이 필요합니다. 거리의 에너지와 고요함이 이곳에서 만나고, 시간이 지날수록 창가 조명이 바뀝니다. 뉴욕 여행자에게 이 경로는 도시 탐험에서 자주 찾는 코스가 됩니다. 계획을 조정하고 싶다면 일부 크리에이터는 프로필에 gmailcom 핸들을 포함합니다. 필수는 아니지만 온라인에서 이루어집니다.
소호 거리 미술과 건축 모퉁이: 스타일링 사진을 위한 다채로운 배경
소호 거리의 숨겨진 벽화에서 스타일링 세션을 시작한 다음, 벽돌과 유리가 만나는 날카로운 건축적 코너로 이동하세요. 벽의 컬러 블록이 피사체를 프레임 안에서 생동감 있게 만들고, 질감이 사진을 풍부하게 만들도록 하세요. 주변 표면에 있는 kallmeyer의 세심하게 선택된 색상 팔레트는 사진을 압도하지 않으면서 의상 선택에 영감을 줄 수 있으며, 미니 배경 로테이션을 통해 룩을 신선하게 유지할 수 있습니다.
광원을 전략적으로 선택하세요. 2층 벽을 향한 자연광은 분위기를 연출하고, 작은 휴대용 조명은 주변 표면에 반사되어 질감을 뭉개지 않으면서 그림자를 채울 수 있습니다. 가장 좋은 자연광이 들어오는 두 번째 창가에서 촬영한 다음, 몇 개의 조명을 추가하여 이미지에 깊이를 더하고 평면적인 결과물을 피하세요.
자유로운 스타일로 스타일링 연출하기: 건축 기둥에 기대어 자연스러운 순간을 포착한 다음, 숨겨진 금속 난간이나 보트하우스 스타일의 출입구가 있는 조용한 구석으로 자리를 옮겨 항해에 관련된 느낌을 더합니다. 이러한 조합은 연출된 느낌이 아닌 의도적인 느낌을 주도록 디자인된 이미지로, 독자들의 페이지와 휴가 특집 기사에서 공감을 얻을 수 있는 매력적인 이미지를 제공합니다.
팀과 협력하여 효율적으로 장면을 이동하고, 에너지를 유지하면서 군중을 통제하세요. 집중된 힘의 역학—명확한 역할, 빠른 전환, 스타일에 대한 공유된 안목—을 통해 순간을 판단하고 최고의 프레임을 고정할 수 있습니다. 팀이 로테이션 배경 세트를 큐레이팅하여 단일 촬영에서 모멘텀을 유지하도록 하세요.
소호의 명소를 배경으로 여행 페이지에 공감을 불러일으키는 콘텐츠를 만드세요. 캡션에 목적지, 여행, 스타일을 태그하고 이미지를 실제 여행과 연결하세요. 협업을 위해 gmail.com을 통해 파트너와 촬영 아이디어를 공유하고 항공 경험 또는 크루즈 분위기 (항공사, 라틴풍 악센트, 노르웨이 크루즈 라인 항해 엿보기 등)를 참조하여 이미지 카탈로그를 풍성하게 만드세요.