


Start with a private, hands-on session to master a trio of Italian classics in one evening. You’ll craft a silky, long flat pasta from freshly milled flour, shape delicate stuffed pockets, and finish with a coffee-kissed mascarpone dessert. however, this format is добродошли for cooks of all levels, with soft coaching that helps you replicate each step at home, inside a централни studio designed for comfort and focus, encouraging beginners and experienced cooks alike. The approach underscores the value of practical technique as the fastest path to confident results, starting from your first roll.
Duration: 2 hours 45 minutes; four parts: dough preparation and resting; rolling and shaping; filling and sealing pockets; dessert layering. Each part is timed to keep momentum. Each participant uses a stand at a private workstation inside the studio, with two instructors guiding the group. For traveling guests, convenient transportation опције и а централни location reduce travel time and make it easy to arrive on time for the warm-up.
Tips for success: arrive 10 minutes early to settle in; the studio provides fresh aprons and sanitized tools; wear non-slip shoes. The group stays small–up to eight кувари–so feedback is highly personalized. For traveling attendees, централни transport links and nearby parking simplify the day. The session У реду. with a tasting and a quick Q&A, so you can start planning how to bring these techniques into your private meals or traveling dinners.
Step-by-step class outline for hands-on pasta and dessert creation
Begin with a focused kneading and roll drill to establish the best dough texture, keeping hands comfortable and ready for precise forming.
Step 1 – central setup and safety. Create three stations: dough work, filling prep, and dessert assembly. This designed layout helps knowledgeable chefs orchestrate activity while students stay within view, while noting where towels, water, and tools live. Hide clutter behind the stow shelves to keep the central work area clean.
Step 2 – dough creation details. Combine flour (a mix of fine and standard varieties) with eggs, salt, and a splash of water as needed. Rest the dough 15 minutes, then knead 7–9 minutes until smooth and elastic. Roll sheets to 2–2.5 mm thickness; dust lightly to prevent sticking. This creates a reliable base for creating delicate ribbons and pockets.
Step 3 – shaping pasta ribbons and stuffed parcels. Cut sheets into wide and narrow strips, then roll gently to shape. For filled pieces, pipe or place a teaspoon of filling and seal edges with a light press. Use a touch of water on the seam to help adhesion. The hand control and expert tips keep tearing to a minimum and ensure even thickness, which is essential for consistent cooking.
Step 4 – filling ideas and sealing technique. Options include herb-ricotta, spinach–feta, or mushroom fillings. Keep fillings cool, not too wet, and portion evenly to avoid leaks. Pinch edges firmly and test seal by a gentle twist. This creates a positive eating experience and builds your ability to choose the best balance of flavors.
Step 5 – cooking and finishing. Bring salted water to a rolling boil where the pasta sheets or shapes are dropped in batches; cook until al dente, typically 2–4 minutes depending on thickness. Remove with a slotted spoon, drizzle with olive oil or sauce, and toss lightly. This step often serves as the central test for texture and flavor, with ticks of timing guiding the final result.
Step 6 – dessert construction. Build a coffee-cream layered dessert using a mascarpone-like filling, espresso-soaked layers or sponge, and a dusting of cocoa. Alternate layers to create contrast in density and taste, then chill for at least 2–4 hours. Creating this dish teaches you to balance sweetness and bitterness, and to understand how textures interact with each bite.
Step 7 – tasting, noting, and review. Conduct guided tasting of dough, fresh pasta, and dessert in sequence. Note where flavors align with texture, where salt and acidity improve balance, and where the finish lands. Gather positive traveler feedback if participants are visitors, then document overall impressions and concrete details for improvement. This teaching approach emphasizes learning, sharing knowledge, and gaining confidence.
Step 8 – follow-up materials and gaining confidence. Provide a concise reference sheet, a shopping list, and a simple practice timeline for home use. The plan is designed to be repeatable, with a central emphasis on touch, guidance from expert chefs, and opportunities to gain hands-on mastery in comfortable settings.
Fettuccine Dough Mastery: flour-to-egg ratios, resting, and rolling thin sheets
Recommendation: Start with 100 g flour per 1 large egg, preferably tipo 00 for a silky dough. If the dough is stiff, add 1–2 tsp water; if it’s too wet, dust with a pinch more flour. Knead 5–8 minutes until smooth and just tacky. Rest 20–30 minutes, wrapped, to relax gluten. This ratio is super true for pasta lovers who chase Italian traditions and homemade, prepared sheets. Availability of flour and egg quality matters, so choose seasonally fresh ingredients when you can find them; the move toward a consistent dough improves eating and results you can replicate. This approach is a great highlight in cookbook guides and is well suited to relaxed sessions that accompany a workshop or restaurant-style workflow.
- Step 1 – Mix and knead: Weigh 100 g flour and 1 large egg; form a well, drop the egg in, and bring flour in with a fork. Knead 5–8 minutes until a smooth, non-sticky ball forms. If the dough feels stiff, whisk in a teaspoon at a time; if too soft, dust with a little flour. This base supports a real, reliable pasta as part of a homemade choice for cooks and lovers alike.
- Step 2 – Rest and relax: Wrap dough and rest 20–30 minutes at room temperature; for longer storage, refrigerate up to 24 hours. Resting lets gluten align so the sheets roll thinner with less effort, a relaxed process that many chefs treat as an important tradition and a core part of Italian eating experiences. The rested dough is accompanied by aroma and texture that elevate contents and flavor.
- Step 3 – Roll to sheets: Divide into 4 portions; flatten each with the palm. If using a machine, start at the thickest setting and pass through several times, then reduce to a thin setting around 0.25–0.3 mm. If rolling by hand, use steady, long strokes with a pin. Keep surfaces lightly floured or dusted with semolina to prevent sticking; a steady hand and cool workspace help you move toward consistent thickness.
- Step 4 – Thin sheets with control: Aim for sheets that are translucent enough to read print behind them but strong enough not to tear. Run extra passes as needed, allowing a short rest between passes if the dough stiffens. The result should be a uniform, pliable sheet that can be handled without cracking, ideal for long ribbons or sheet-based shapes. This step is a reliable highlight for beginners and seasoned cooks alike, and it helps you replicate restaurant quality at home.
- Step 5 – Cut into long ribbons: lay sheets flat and cut into strips about 6–8 mm wide for classic, generous ribbons. Dust lightly with flour and lay on a rack or clean towel to dry briefly before cooking. This width pairs beautifully with simple sauces and lets flavors come through, a great choice for lovers seeking authentic Italian dining at home.
- Step 6 – Cook and finish: Boil salted water; drop sheets and cook 2–3 minutes until al dente. Reserve ¼ cup starchy water to adjust sauce consistency, then toss gently so ribbons shine. Serve immediately or keep warm briefly; prepared pasta like this elevates weeknight meals and can be a centerpiece in a home menu or a restaurant-style tasting.
Notes: seasonal fluctuation in flour protein or egg size can affect hydration; check availability and adapt. The contents of your cookbook or guides offer additional tips, but the core method remains a reliable source (источник) supported by cesarine insights. For those new to pasta making, a relaxed mindset and encouraging practice help you find your rhythm, increase confidence, and gradually replicate restaurant-quality sheets that accompany simple olive oil, garlic, or mushroom sauces as a satisfying, real experience.
Ravioli Essentials: dough, 3 filling options, and proper sealing to prevent leaks
Start with a dough formula that offers flexibility: 250 g00 flour, 2 large eggs, and 1–2 tbsp water. Knead 8–10 minutes until smooth, then rest, covered, for 30 minutes inside a cool place. This process yields elastic sheets that won’t tear and keeps the filling inside; moisture balance is mentioned as a critical factor for clean edges and a relaxed handling experience.
Roll the dough to about 2 mm thickness; dust lightly with flour to prevent sticking. If the sheet sticks, fold and reroll. A well-organized class benefits from a dedicated pasta machine or a long rolling pin. Start on the widest setting and gradually move to thinner settings; keep sheets flat and covered between steps to stay relaxed. Instructors guide the sequence so each participant feels confident, whether cooking at home or in a public class, and the place remains well-structured.
Three filling options balance flavor and moisture: Option one is ricotta with spinach and Parmesan; mix 250 g ricotta, 120 g chopped spinach, 60 g grated Parm, a pinch of nutmeg, salt, and pepper; squeeze any excess moisture from the spinach and chill the mixture 15 minutes before filling. Option two is mushroom and herb with a dairy-friendly or dairy-free binding; sauté 200 g mushrooms with a shallot and garlic, cool, then blend with 60 g cream cheese or a dairy-free equivalent and 1 tbsp chopped parsley; season to taste. Option three is roasted squash with amaretti crumbs and sage; mash 250 g squash, fold in 40 g grated cheese or nutritional yeast for dairy-free, add 15 g crushed amaretti and a pinch of sage; let cool and bind with 1 egg yolk or a splash of water. These fillings accommodate allergies by swapping binders and dairy as needed and are worth trying for home meals or city tours in the city, whether you cook solo or with a group.
To seal, brush the edges with a light wash of egg or water. Place a second dough sheet over the filling, align edges, and press firmly to remove air pockets; seal by pinching along the edges with fingers or using a crimp wheel; after sealing, press around each pocket to ensure the seam ends are tight. Cut between pockets and transfer onto a lightly floured tray; to prevent leaks, leave a small gap between pockets and avoid overfilling. In city classes or public sessions, this step is repeatedly mentioned as the key point that keeps leaks from forming.
Cook in salted boiling water for 2–4 minutes; they are ready when they float to the surface. Remove with a slotted spoon and serve with your preferred sauce. If not cooking immediately, freeze on a tray, then transfer to a bag; this home technique suits extra practice at home. Following these best practices, the process ends with confident participants leaving a well-organized kitchen feeling capable, whether you’re on tours or teaching in a city center, and the knowledgeable instructors are often mentioned as a reason the session feels enjoyable and worth the time.
Ravioli Technique Drills: shaping, cutting, and drying without sticking
Dust the work surface with a light veil of semolina and flour to prevent sticking. Roll sheets to about 1/16 inch thickness; this ensures uniform thickness and easy sealing, a core pasta-making rule. Before starting, cover the dough and let it rest 15 minutes to relax; this step improves elasticity and handling.
Нанесите мали брежуљке пуњења, по отприлике 1/2 кашичице сваки; ивице премажите водом; преклопите да формирате џеп и чврсто притисните да бисте га запечатили; избегавајте ваздушне џепове стискањем од центра ка споља; ножем одрежите грубе ивице.
Sušenje: stavite džepiće na papir za pečenje na rešetku ili ravan poslužavnik; razmaknite ih 1,5 cm; pospite brašnom ili grizom; sušite na vazduhu 15–30 minuta dok se ivice ne stegnu; nemojte ih slagati dok su vlažni; kada se osuše, labavo ih pokrijte ili ostavite sa strane dok sosovi ne budu spremni.
Rešavanje problema: ako dođe do lepljenja, podignite širokom špatulom i pospite površinu sa još brašna; pažljivo odvojite da ne bi došlo do kidanja; nikada ne grebite testo oštrim predmetima; pazite da prostorija nije previše vlažna; planirajte blok od 3 sata nastave da biste završili vežbe.
Контекст и закључци: овај час ће пробудити сећања за пријатељи и љубавници, почевши од основа обликовања и заптивања. За each учесник, та пракса се преноси у кухиње домова где се свежи џепови слажу са сосови. Рутина се одвија throughout сесије и белешке се могу сачувати у kuvar као референца. У знак поштовања према colosseum подешавања одржавају висок ниво енергије и чине јести više kao zajednički događaj nego kao solo zadatak. Možete fotografisati uspomene na насловна ваших белешки и планирајте десерт упаривање и Bezalkoholno опције за завршетак. Parking близина места одржавања помаже да се избегне отказивање, и овај метод ће већина људи почињу са самопоуздањем и поставиће чврсте темеље за будућност јести adventures.
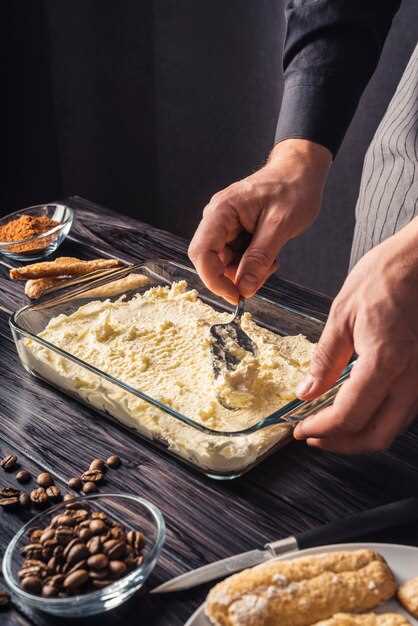
Sastavljanje tiramisua: natapanje espresom, stabilnost krema od maskarponea i precizno slojevitje
Препорука: Скувајте 180 мл јаког еспреса, растворите 2 кашике кристалног шећера и охладите на 15–18°C. Опционо додајте 1 кашику ликера од кафе. Умачите сваки пишкоту 1–2 секунде са сваке стране; поређајте у једном густом слоју у посуду величине 20×20 cm. Ови кораци пружају чврсту основу која спречава распадање, а истовремено омогућава једнаку прекривеност за сваки залогај. Ове смернице, поменуте изнад, биће видљиве током склапања.
Stabilnost kreme od maskarponea: Umutite 250 g maskarponea sa 50 g šećera u prahu i 1 kašičicom vanile dok ne postane glatko. Umutite 200 ml slatke pavlake u čvrst šlag i umešajte u maskarpone iz dva puta. Ako vam se čini da je smesa previše tečna, ne brinite – testirajte stabilnost tako što ćete umutiti 1-2 kašičice vode ili malu smesu gustina; ako se tekstura ne čini stabilnom, dodajte još po potrebi. Rezultat bi trebalo da bude sjajan i da zadrži oblik nakon hlađenja.
-
Natapanje i keks: Koristite plitku posudu; održavajte tečnost za natapanje čistom. Prvo testirajte jedan keks da biste procenili upijanje. Oni koji se pridržavaju pravila ostaju dosledni tokom celog procesa.
-
Preciznost slojeva: Ravnomerno rasporedite debeo sloj smese maskarponea preko prvog natopljenog sloja. Dodajte drugi natopljeni sloj, blago pritisnite da biste uklonili vazduh, a zatim prekrijte još jednim slojem krema. Ponavljajte dok posuda ne bude pokrivena, završavajući sa konačnom površinom od krema. Svaki sloj treba da bude ujednačene debljine; strugač ili poleđina kašike pomažu u postizanju centralne ravnoteže.
-
Ohladiti i završiti: Staviti u frižider najmanje 4 sata; preko noći daje kohezivnije kriške. Neposredno pre serviranja, posuti kakao prahom i, po želji, dodati čokoladne strugotine za teksturu. Za elegantniji izgled, tankom linijom kakaa preći po obodu.
Белешке са радионице: Ове добро организоване сесије привлаче парове и појединце који желе да унапреде своје кулинарске вештине. Купци често постављају питања о трајању намакања и стабилизацији; додатна лекција детаљно покрива те теме. Неки коментари истичу велико задовољство дељењем технике са другима, као и могућност да се овај десерт реплицира код куће уз бесплатан водич за штампање. Уз меније инспирисане римском кухињом, ова централна, поуздана техника зарађује одушевљење и похвале од стране гостију који уживају у слатком, уравнотеженом залогају. Корисни савети подељени током сесије помажу сваком учеснику да побољша своје вештине и осећа се сигурно, а они који вежбају могу поделити приступ са пријатељима, претварајући једноставан десерт у незабораван завршетак. Корисне смернице за оне који желе да деле знање широм кухиње чине искуство занимљивим за оне који траже одличан, заокружен резултат.
Uparivanje pića i serviranje: kafa, desertno vino i bezalkoholne opcije koje odgovaraju svakom jelu
Započnite sa svetlim, domaćim espresom nakon predjela da biste probudili nepce; ovaj plan započinje degustaciju na svetloj noti za prisutne, gurmane i putnike.
Za glavno jelo od testenine, ponudite kafu srednje jačine koja se slaže sa sosom, desertno vino koje odražava fil ili akcente sira, i bezalkoholnu opciju koja čisti nepce između zalogaja. Zatim, sekvenca gradi energiju i olakšava vašim vodičima i prijateljima da podele povratne informacije.
| Course | Слаткиш уз кафу | Десертно вино | Bezalkoholna opcija |
|---|---|---|---|
| Предјело (лагана паста са сосом од зачинског биља) | Espreso srednje jačine ili makijato sa notom citrusne korice | Vin Santo ili Moscato d’Asti | Пенушави напитак од лимуна и ђумбира |
| Други тањир (богатија пуњена тестенина) | Еспресо са тамнијим печењем, сервиран као лунго да уравнотежи богати укус | Brachetto d’Acqui или Recioto | Биљни ледени чај са корицом поморанџе |
| Десерт (слатка посластица на спрат) | Мали еспресо кортадо да очисти непце. | Moscato u stilu Dolčea ili Vin Santo | Čaj od kamilice s vanilom ili soda od vanile i ruže |
Planiranje uz uštedu podržava istinsko 3-satno iskustvo koje ostaje predivno za gurmane i vodiče; italijanska tradicija je u prvom planu, a komentari učesnika pomažu u krojenju budućih sesija. Ovo podešavanje vam pomaže da podelite tehniku, energiju i podučavanje sa svojim prijateljima i saputnicima.