


Start with a private, hands-on session to master a trio of Italian classics in one evening. You’ll craft a silky, long flat pasta from freshly milled flour, shape delicate stuffed pockets, and finish with a coffee-kissed mascarpone dessert. however, this format is 歓迎 for cooks of all levels, with ソフト coaching that helps you replicate each step at home, inside a 中央 studio designed for comfort and focus, encouraging beginners and experienced cooks alike. The approach underscores the value of practical technique as the fastest path to confident results, starting from your first roll.
Duration: 2 hours 45 minutes; four parts: dough preparation and resting; rolling and shaping; filling and sealing pockets; dessert layering. Each part is timed to keep momentum. Each participant uses a 立つ at a private workstation inside the studio, with two instructors guiding the group. For traveling guests, convenient 輸送 options and a 中央 location reduce travel time and make it easy to arrive on time for the warm-up.
Tips for success: arrive 10 minutes early to settle in; the studio provides fresh aprons and sanitized tools; wear non-slip shoes. The group stays small–up to eight コック–so feedback is highly personalized. For traveling attendees, 中央 transport links and nearby parking simplify the day. The session はい、承知いたしました。原文を翻訳します。 with a tasting and a quick Q&A, so you can start planning how to bring these techniques into your private meals or traveling dinners.
Step-by-step class outline for hands-on pasta and dessert creation
Begin with a focused kneading and roll drill to establish the best dough texture, keeping hands comfortable and ready for precise forming.
Step 1 – central setup and safety. Create three stations: dough work, filling prep, and dessert assembly. This designed layout helps knowledgeable chefs orchestrate activity while students stay within view, while noting where towels, water, and tools live. Hide clutter behind the stow shelves to keep the central work area clean.
Step 2 – dough creation details. Combine flour (a mix of fine and standard varieties) with eggs, salt, and a splash of water as needed. Rest the dough 15 minutes, then knead 7–9 minutes until smooth and elastic. Roll sheets to 2–2.5 mm thickness; dust lightly to prevent sticking. This creates a reliable base for creating delicate ribbons and pockets.
Step 3 – shaping pasta ribbons and stuffed parcels. Cut sheets into wide and narrow strips, then roll gently to shape. For filled pieces, pipe or place a teaspoon of filling and seal edges with a light press. Use a touch of water on the seam to help adhesion. The hand control and expert tips keep tearing to a minimum and ensure even thickness, which is essential for consistent cooking.
Step 4 – filling ideas and sealing technique. Options include herb-ricotta, spinach–feta, or mushroom fillings. Keep fillings cool, not too wet, and portion evenly to avoid leaks. Pinch edges firmly and test seal by a gentle twist. This creates a positive eating experience and builds your ability to choose the best balance of flavors.
Step 5 – cooking and finishing. Bring salted water to a rolling boil where the pasta sheets or shapes are dropped in batches; cook until al dente, typically 2–4 minutes depending on thickness. Remove with a slotted spoon, drizzle with olive oil or sauce, and toss lightly. This step often serves as the central test for texture and flavor, with ticks of timing guiding the final result.
Step 6 – dessert construction. Build a coffee-cream layered dessert using a mascarpone-like filling, espresso-soaked layers or sponge, and a dusting of cocoa. Alternate layers to create contrast in density and taste, then chill for at least 2–4 hours. Creating this dish teaches you to balance sweetness and bitterness, and to understand how textures interact with each bite.
Step 7 – tasting, noting, and review. Conduct guided tasting of dough, fresh pasta, and dessert in sequence. Note where flavors align with texture, where salt and acidity improve balance, and where the finish lands. Gather positive traveler feedback if participants are visitors, then document overall impressions and concrete details for improvement. This teaching approach emphasizes learning, sharing knowledge, and gaining confidence.
Step 8 – follow-up materials and gaining confidence. Provide a concise reference sheet, a shopping list, and a simple practice timeline for home use. The plan is designed to be repeatable, with a central emphasis on touch, guidance from expert chefs, and opportunities to gain hands-on mastery in comfortable settings.
Fettuccine Dough Mastery: flour-to-egg ratios, resting, and rolling thin sheets
Recommendation: Start with 100 g flour per 1 large egg, preferably tipo 00 for a silky dough. If the dough is stiff, add 1–2 tsp water; if it’s too wet, dust with a pinch more flour. Knead 5–8 minutes until smooth and just tacky. Rest 20–30 minutes, wrapped, to relax gluten. This ratio is super true for pasta lovers who chase Italian traditions and homemade, prepared sheets. Availability of flour and egg quality matters, so choose seasonally fresh ingredients when you can find them; the move toward a consistent dough improves eating and results you can replicate. This approach is a great highlight in cookbook guides and is well suited to relaxed sessions that accompany a workshop or restaurant-style workflow.
- Step 1 – Mix and knead: Weigh 100 g flour and 1 large egg; form a well, drop the egg in, and bring flour in with a fork. Knead 5–8 minutes until a smooth, non-sticky ball forms. If the dough feels stiff, whisk in a teaspoon at a time; if too soft, dust with a little flour. This base supports a real, reliable pasta as part of a homemade choice for cooks and lovers alike.
- Step 2 – Rest and relax: Wrap dough and rest 20–30 minutes at room temperature; for longer storage, refrigerate up to 24 hours. Resting lets gluten align so the sheets roll thinner with less effort, a relaxed process that many chefs treat as an important tradition and a core part of Italian eating experiences. The rested dough is accompanied by aroma and texture that elevate contents and flavor.
- Step 3 – Roll to sheets: Divide into 4 portions; flatten each with the palm. If using a machine, start at the thickest setting and pass through several times, then reduce to a thin setting around 0.25–0.3 mm. If rolling by hand, use steady, long strokes with a pin. Keep surfaces lightly floured or dusted with semolina to prevent sticking; a steady hand and cool workspace help you move toward consistent thickness.
- Step 4 – Thin sheets with control: Aim for sheets that are translucent enough to read print behind them but strong enough not to tear. Run extra passes as needed, allowing a short rest between passes if the dough stiffens. The result should be a uniform, pliable sheet that can be handled without cracking, ideal for long ribbons or sheet-based shapes. This step is a reliable highlight for beginners and seasoned cooks alike, and it helps you replicate restaurant quality at home.
- Step 5 – Cut into long ribbons: lay sheets flat and cut into strips about 6–8 mm wide for classic, generous ribbons. Dust lightly with flour and lay on a rack or clean towel to dry briefly before cooking. This width pairs beautifully with simple sauces and lets flavors come through, a great choice for lovers seeking authentic Italian dining at home.
- Step 6 – Cook and finish: Boil salted water; drop sheets and cook 2–3 minutes until al dente. Reserve ¼ cup starchy water to adjust sauce consistency, then toss gently so ribbons shine. Serve immediately or keep warm briefly; prepared pasta like this elevates weeknight meals and can be a centerpiece in a home menu or a restaurant-style tasting.
Notes: seasonal fluctuation in flour protein or egg size can affect hydration; check availability and adapt. The contents of your cookbook or guides offer additional tips, but the core method remains a reliable source (источник) supported by cesarine insights. For those new to pasta making, a relaxed mindset and encouraging practice help you find your rhythm, increase confidence, and gradually replicate restaurant-quality sheets that accompany simple olive oil, garlic, or mushroom sauces as a satisfying, real experience.
Ravioli Essentials: dough, 3 filling options, and proper sealing to prevent leaks
Start with a dough formula that offers flexibility: 250 g00 flour, 2 large eggs, and 1–2 tbsp water. Knead 8–10 minutes until smooth, then rest, covered, for 30 minutes inside a cool place. This process yields elastic sheets that won’t tear and keeps the filling inside; moisture balance is mentioned as a critical factor for clean edges and a relaxed handling experience.
Roll the dough to about 2 mm thickness; dust lightly with flour to prevent sticking. If the sheet sticks, fold and reroll. A well-organized class benefits from a dedicated pasta machine or a long rolling pin. Start on the widest setting and gradually move to thinner settings; keep sheets flat and covered between steps to stay relaxed. Instructors guide the sequence so each participant feels confident, whether cooking at home or in a public class, and the place remains well-structured.
Three filling options balance flavor and moisture: Option one is ricotta with spinach and Parmesan; mix 250 g ricotta, 120 g chopped spinach, 60 g grated Parm, a pinch of nutmeg, salt, and pepper; squeeze any excess moisture from the spinach and chill the mixture 15 minutes before filling. Option two is mushroom and herb with a dairy-friendly or dairy-free binding; sauté 200 g mushrooms with a shallot and garlic, cool, then blend with 60 g cream cheese or a dairy-free equivalent and 1 tbsp chopped parsley; season to taste. Option three is roasted squash with amaretti crumbs and sage; mash 250 g squash, fold in 40 g grated cheese or nutritional yeast for dairy-free, add 15 g crushed amaretti and a pinch of sage; let cool and bind with 1 egg yolk or a splash of water. These fillings accommodate allergies by swapping binders and dairy as needed and are worth trying for home meals or city tours in the city, whether you cook solo or with a group.
To seal, brush the edges with a light wash of egg or water. Place a second dough sheet over the filling, align edges, and press firmly to remove air pockets; seal by pinching along the edges with fingers or using a crimp wheel; after sealing, press around each pocket to ensure the seam ends are tight. Cut between pockets and transfer onto a lightly floured tray; to prevent leaks, leave a small gap between pockets and avoid overfilling. In city classes or public sessions, this step is repeatedly mentioned as the key point that keeps leaks from forming.
Cook in salted boiling water for 2–4 minutes; they are ready when they float to the surface. Remove with a slotted spoon and serve with your preferred sauce. If not cooking immediately, freeze on a tray, then transfer to a bag; this home technique suits extra practice at home. Following these best practices, the process ends with confident participants leaving a well-organized kitchen feeling capable, whether you’re on tours or teaching in a city center, and the knowledgeable instructors are often mentioned as a reason the session feels enjoyable and worth the time.
Ravioli Technique Drills: shaping, cutting, and drying without sticking
Dust the work surface with a light veil of semolina and flour to prevent sticking. Roll sheets to about 1/16 inch thickness; this ensures uniform thickness and easy sealing, a core pasta-making rule. Before starting, cover the dough and let it rest 15 minutes to relax; this step improves elasticity and handling.
Where you place the filling, use small mounds about 1/2 teaspoon each; brush edges with water; fold to form a pocket, and press firmly to seal; avoid air pockets by squeezing from the center outward; trim rough edges with a knife.
乾燥:ポケットをクッキングシートを敷いたラックまたは平らなトレイに並べ、1.5cm間隔を空ける。小麦粉またはセモリナ粉を軽く振りかけ、縁が固まるまで15~30分間風乾させる。湿っている間は重ねない。乾燥したら、ゆるく覆うか、ソースの準備ができるまで脇に置く。.
トラブルシューティング:くっつきが発生した場合は、幅広のヘラで持ち上げ、表面にさらに小麦粉を振る。破れないようにそっと剥がす。鋭利なもので生地を傷つけない。部屋が湿気すぎないように注意する。演習を終えるには3時間の授業時間を確保する。.
コンテクストと重要ポイント:このクラスは思い出を呼び起こすでしょう。 友達 そして lovers, 、成形と密閉の基本から始めます。 each participant, 、その習慣は家庭の台所に翻訳され、新鮮なポケットが組み合わされます。 sauces. ルーチンが展開される。 Throughout セッション、およびメモはに保存できます。 料理本 参照として。 colosseum 設定はエネルギーを高め、 食べる ソロのタスクというより、共有のイベントのように感じられます。思い出を写真に収めることができます。 cover ノートをまとめ、以下を計画する。 デザート ペアリングと non-alcoholic 完了するためのオプション。. Parking 会場の近くは避けるのに役立ちます キャンセル, 、この方法で most 人は自信を持って物事を始め、将来のための確固たる基礎を築くでしょう。 食べる adventures.
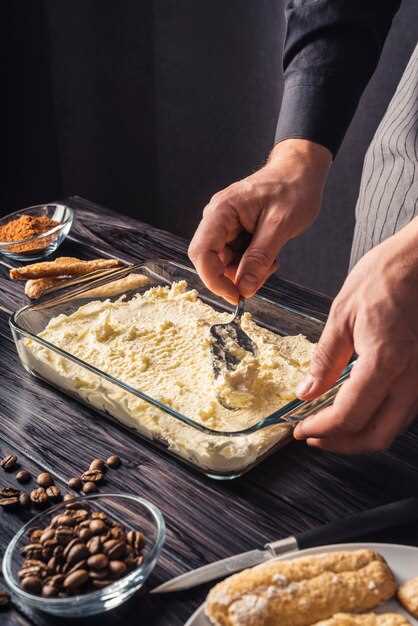
ティラミス組み立て:エスプレッソ浸透、マスカルポーネクリームの安定性、そして正確なレイヤー。
推奨:濃いエスプレッソ180mlを淹れ、グラニュー糖大さじ2杯を溶かし、15~18℃に冷まします。オプションでコーヒーリキュール大さじ1杯を加えます。フィンガービスケットを片面1~2秒ずつ浸し、20×20cmの容器に隙間なく一段に並べます。これらの手順により、水っぽさを防ぎながら、一口ごとに均等な広がりのあるしっかりとした土台ができます。上記のガイドラインは、組み立て全体を通して確認できます。.
マスカルポーネクリームの安定性:マスカルポーネ250gに粉糖50gとバニラ小さじ1を加えて滑らかになるまで混ぜます。生クリーム200mlをツノが立つまで泡立て、2回に分けてマスカルポーネに混ぜ込みます。もし緩すぎるように感じても、心配しないでください。水小さじ1~2、または少量のコーンスターチ水溶きを加えて安定性をテストしてください。安定した質感にならない場合は、必要に応じてさらに加えてください。冷蔵後、艶があり、形を保てる状態になるはずです。.
-
浸け液とビスケット:浅い皿を使い、浸け液は常に清潔に。最初にクッキーを1枚試して、浸透具合を確認。このルールを守る人は、最後まで一貫性を保ちます。.
-
正確な重ね方:最初の浸した層に、マスカルポーネミックスを厚く均一に塗ります。2番目の浸した層を加え、軽く押して空気を取り除き、さらにクリームの層を重ねます。容器がいっぱいになるまで繰り返し、最後のクリームの表面で仕上げます。各層は厚さが均一になるようにしてください。スクレーパーやスプーンの背を使うと、中央のバランスを取りやすくなります。.
-
冷やして仕上げる:冷蔵庫で少なくとも4時間、一晩冷やすとよりまとまりのあるスライスになります。サーブする直前にココアパウダーをふりかけ、お好みでチョコレートの削りくずを加えて食感を加えます。より洗練された仕上がりにするには、ココアを縁に沿って細く一周させます。.
ワークショップノート:しっかりと構成されたセッションは、料理のスキルを向上させたいカップルや個人を魅了します。お客様からは、浸水時間や安定化に関する質問がよく寄せられます。追加のレッスン部分では、これらのトピックを詳細に扱っています。いくつかのコメントでは、他の人とテクニックを共有することへの大きな満足感や、無料で印刷可能なガイドを使って自宅でこのデザートを再現できるオプションが強調されています。ローマ風のメニューを中心に、この中心的で信頼できるテクニックは、甘くてバランスの取れた一口を堪能する人々から喜びと称賛を得ています。セッションで共有される賢明なヒントは、参加者全員がスキルを向上させ、自信を持てるようにします。そして、練習を重ねることで、友人たちとこのアプローチを共有し、シンプルなデザートを思い出に残るフィナーレに変えることができます。キッチン全体で知識を共有したい人への賢明なガイダンスは、素晴らしい、バランスの取れた結果を求める人にとって、体験を魅力的なものに保ちます。.
飲料のペアリングと提供:コーヒー、デザートワイン、そして各コースに合うノンアルコール飲料
前菜の後に自家製エスプレッソで口をすっきりさせ、味覚を呼び覚ましましょう。このプランは、参加者、食通、旅行者など、テイスティングを明るい雰囲気で始めることができます。.
メインのパスタ料理には、ソースに合うミディアムローストのコーヒー、詰め物やチーズの風味を引き立てるデザートワイン、そして一口ごとに口の中をさっぱりさせるノンアルコール飲料をご用意ください。この構成によって、エネルギーが生まれ、ガイドや友人がフィードバックを共有しやすくなります。.
| Course | コーヒーペアリング | デザートワイン | ノンアルコールオプション |
|---|---|---|---|
| 前菜 (軽めのパスタ ハーブソース) | ミディアムローストのエスプレッソ、または柑橘系の皮をほんのり加えたマキアート | ヴィン・サントか、モスカート・ダスティか | スパークリングレモンジンジャーシュラブ |
| プリモ(詰め物をしたリッチなパスタ) | 深煎りのエスプレッソを、リッチさを和らげるためルンゴで提供。 | ブラケット・ダックイまたはレチョート | オレンジピール入りハーブアイスティー |
| デザートコース(甘いレイヤードトリート) | エスプレッソのコルタド、口直しに。 | ドルチェスタイルのモスカート、またはヴィンサント | バニラ風味のカモミールティー、またはバニラローズソーダ |
費用対効果の高い計画は、真に3時間の体験をサポートし、食通やガイドにとって素晴らしい時間となるでしょう。イタリアの伝統が強調され、参加者からのコメントは今後のセッションを調整するのに役立ちます。この設定により、技術、エネルギー、そして教えを友人や旅仲間と共有することができます。.