


Start with a private, hands-on session to master a trio of Italian classics in one evening. You’ll craft a silky, long flat pasta from freshly milled flour, shape delicate stuffed pockets, and finish with a coffee-kissed mascarpone dessert. however, this format is Καλωσόρισμα for cooks of all levels, with μαλακός coaching that helps you replicate each step at home, inside a κεντρικός studio designed for comfort and focus, encouraging beginners and experienced cooks alike. The approach underscores the value of practical technique as the fastest path to confident results, ξεκινώντας from your first roll.
Duration: 2 hours 45 minutes; four parts: dough preparation and resting; rolling and shaping; filling and sealing pockets; dessert layering. Each part is timed to keep momentum. Each participant uses a σταθείτε at a private workstation inside the studio, with two instructors guiding the group. For traveling guests, convenient μεταφορές επιλογές και α κεντρικός location reduce travel time and make it easy to arrive on time for the warm-up.
Tips for success: arrive 10 minutes early to settle in; the studio provides fresh aprons and sanitized tools; wear non-slip shoes. The group stays small–up to eight cooks–so feedback is highly personalized. For traveling attendees, κεντρικός transport links and nearby parking simplify the day. The session ends with a tasting and a quick Q&A, so you can start planning how to bring these techniques into your private meals or traveling dinners.
Step-by-step class outline for hands-on pasta and dessert creation
Begin with a focused kneading and roll drill to establish the best dough texture, keeping hands comfortable and ready for precise forming.
Step 1 – central setup and safety. Create three stations: dough work, filling prep, and dessert assembly. This designed layout helps knowledgeable chefs orchestrate activity while students stay within view, while noting where towels, water, and tools live. Hide clutter behind the stow shelves to keep the central work area clean.
Step 2 – dough creation details. Combine flour (a mix of fine and standard varieties) with eggs, salt, and a splash of water as needed. Rest the dough 15 minutes, then knead 7–9 minutes until smooth and elastic. Roll sheets to 2–2.5 mm thickness; dust lightly to prevent sticking. This creates a reliable base for creating delicate ribbons and pockets.
Step 3 – shaping pasta ribbons and stuffed parcels. Cut sheets into wide and narrow strips, then roll gently to shape. For filled pieces, pipe or place a teaspoon of filling and seal edges with a light press. Use a touch of water on the seam to help adhesion. The hand control and expert tips keep tearing to a minimum and ensure even thickness, which is essential for consistent cooking.
Step 4 – filling ideas and sealing technique. Options include herb-ricotta, spinach–feta, or mushroom fillings. Keep fillings cool, not too wet, and portion evenly to avoid leaks. Pinch edges firmly and test seal by a gentle twist. This creates a positive eating experience and builds your ability to choose the best balance of flavors.
Step 5 – cooking and finishing. Bring salted water to a rolling boil where the pasta sheets or shapes are dropped in batches; cook until al dente, typically 2–4 minutes depending on thickness. Remove with a slotted spoon, drizzle with olive oil or sauce, and toss lightly. This step often serves as the central test for texture and flavor, with ticks of timing guiding the final result.
Step 6 – dessert construction. Build a coffee-cream layered dessert using a mascarpone-like filling, espresso-soaked layers or sponge, and a dusting of cocoa. Alternate layers to create contrast in density and taste, then chill for at least 2–4 hours. Creating this dish teaches you to balance sweetness and bitterness, and to understand how textures interact with each bite.
Step 7 – tasting, noting, and review. Conduct guided tasting of dough, fresh pasta, and dessert in sequence. Note where flavors align with texture, where salt and acidity improve balance, and where the finish lands. Gather positive traveler feedback if participants are visitors, then document overall impressions and concrete details for improvement. This teaching approach emphasizes learning, sharing knowledge, and gaining confidence.
Step 8 – follow-up materials and gaining confidence. Provide a concise reference sheet, a shopping list, and a simple practice timeline for home use. The plan is designed to be repeatable, with a central emphasis on touch, guidance from expert chefs, and opportunities to gain hands-on mastery in comfortable settings.
Fettuccine Dough Mastery: flour-to-egg ratios, resting, and rolling thin sheets
Recommendation: Start with 100 g flour per 1 large egg, preferably tipo 00 for a silky dough. If the dough is stiff, add 1–2 tsp water; if it’s too wet, dust with a pinch more flour. Knead 5–8 minutes until smooth and just tacky. Rest 20–30 minutes, wrapped, to relax gluten. This ratio is super true for pasta lovers who chase Italian traditions and homemade, prepared sheets. Availability of flour and egg quality matters, so choose seasonally fresh ingredients when you can find them; the move toward a consistent dough improves eating and results you can replicate. This approach is a great highlight in cookbook guides and is well suited to relaxed sessions that accompany a workshop or restaurant-style workflow.
- Step 1 – Mix and knead: Weigh 100 g flour and 1 large egg; form a well, drop the egg in, and bring flour in with a fork. Knead 5–8 minutes until a smooth, non-sticky ball forms. If the dough feels stiff, whisk in a teaspoon at a time; if too soft, dust with a little flour. This base supports a real, reliable pasta as part of a homemade choice for cooks and lovers alike.
- Step 2 – Rest and relax: Wrap dough and rest 20–30 minutes at room temperature; for longer storage, refrigerate up to 24 hours. Resting lets gluten align so the sheets roll thinner with less effort, a relaxed process that many chefs treat as an important tradition and a core part of Italian eating experiences. The rested dough is accompanied by aroma and texture that elevate contents and flavor.
- Step 3 – Roll to sheets: Divide into 4 portions; flatten each with the palm. If using a machine, start at the thickest setting and pass through several times, then reduce to a thin setting around 0.25–0.3 mm. If rolling by hand, use steady, long strokes with a pin. Keep surfaces lightly floured or dusted with semolina to prevent sticking; a steady hand and cool workspace help you move toward consistent thickness.
- Step 4 – Thin sheets with control: Aim for sheets that are translucent enough to read print behind them but strong enough not to tear. Run extra passes as needed, allowing a short rest between passes if the dough stiffens. The result should be a uniform, pliable sheet that can be handled without cracking, ideal for long ribbons or sheet-based shapes. This step is a reliable highlight for beginners and seasoned cooks alike, and it helps you replicate restaurant quality at home.
- Step 5 – Cut into long ribbons: lay sheets flat and cut into strips about 6–8 mm wide for classic, generous ribbons. Dust lightly with flour and lay on a rack or clean towel to dry briefly before cooking. This width pairs beautifully with simple sauces and lets flavors come through, a great choice for lovers seeking authentic Italian dining at home.
- Step 6 – Cook and finish: Boil salted water; drop sheets and cook 2–3 minutes until al dente. Reserve ¼ cup starchy water to adjust sauce consistency, then toss gently so ribbons shine. Serve immediately or keep warm briefly; prepared pasta like this elevates weeknight meals and can be a centerpiece in a home menu or a restaurant-style tasting.
Notes: seasonal fluctuation in flour protein or egg size can affect hydration; check availability and adapt. The contents of your cookbook or guides offer additional tips, but the core method remains a reliable source (источник) supported by cesarine insights. For those new to pasta making, a relaxed mindset and encouraging practice help you find your rhythm, increase confidence, and gradually replicate restaurant-quality sheets that accompany simple olive oil, garlic, or mushroom sauces as a satisfying, real experience.
Ravioli Essentials: dough, 3 filling options, and proper sealing to prevent leaks
Start with a dough formula that offers flexibility: 250 g00 flour, 2 large eggs, and 1–2 tbsp water. Knead 8–10 minutes until smooth, then rest, covered, for 30 minutes inside a cool place. This process yields elastic sheets that won’t tear and keeps the filling inside; moisture balance is mentioned as a critical factor for clean edges and a relaxed handling experience.
Roll the dough to about 2 mm thickness; dust lightly with flour to prevent sticking. If the sheet sticks, fold and reroll. A well-organized class benefits from a dedicated pasta machine or a long rolling pin. Start on the widest setting and gradually move to thinner settings; keep sheets flat and covered between steps to stay relaxed. Instructors guide the sequence so each participant feels confident, whether cooking at home or in a public class, and the place remains well-structured.
Three filling options balance flavor and moisture: Option one is ricotta with spinach and Parmesan; mix 250 g ricotta, 120 g chopped spinach, 60 g grated Parm, a pinch of nutmeg, salt, and pepper; squeeze any excess moisture from the spinach and chill the mixture 15 minutes before filling. Option two is mushroom and herb with a dairy-friendly or dairy-free binding; sauté 200 g mushrooms with a shallot and garlic, cool, then blend with 60 g cream cheese or a dairy-free equivalent and 1 tbsp chopped parsley; season to taste. Option three is roasted squash with amaretti crumbs and sage; mash 250 g squash, fold in 40 g grated cheese or nutritional yeast for dairy-free, add 15 g crushed amaretti and a pinch of sage; let cool and bind with 1 egg yolk or a splash of water. These fillings accommodate allergies by swapping binders and dairy as needed and are worth trying for home meals or city tours in the city, whether you cook solo or with a group.
To seal, brush the edges with a light wash of egg or water. Place a second dough sheet over the filling, align edges, and press firmly to remove air pockets; seal by pinching along the edges with fingers or using a crimp wheel; after sealing, press around each pocket to ensure the seam ends are tight. Cut between pockets and transfer onto a lightly floured tray; to prevent leaks, leave a small gap between pockets and avoid overfilling. In city classes or public sessions, this step is repeatedly mentioned as the key point that keeps leaks from forming.
Cook in salted boiling water for 2–4 minutes; they are ready when they float to the surface. Remove with a slotted spoon and serve with your preferred sauce. If not cooking immediately, freeze on a tray, then transfer to a bag; this home technique suits extra practice at home. Following these best practices, the process ends with confident participants leaving a well-organized kitchen feeling capable, whether you’re on tours or teaching in a city center, and the knowledgeable instructors are often mentioned as a reason the session feels enjoyable and worth the time.
Ravioli Technique Drills: shaping, cutting, and drying without sticking
Dust the work surface with a light veil of semolina and flour to prevent sticking. Roll sheets to about 1/16 inch thickness; this ensures uniform thickness and easy sealing, a core pasta-making rule. Before starting, cover the dough and let it rest 15 minutes to relax; this step improves elasticity and handling.
Where you place the filling, use small mounds about 1/2 teaspoon each; brush edges with water; fold to form a pocket, and press firmly to seal; avoid air pockets by squeezing from the center outward; trim rough edges with a knife.
Drying: lay pockets on parchment on a rack or flat tray; space them 1.5 cm apart; dust with flour or semolina; let air-dry 15–30 minutes until edges are set; do not stack while damp; once dry, cover loosely or set aside until sauces are ready.
Troubleshooting: if sticking occurs, lift with a wide blade and dust the surface with more flour; separate gently to avoid tearing; never scratch dough with sharp objects; ensure the room isn’t too humid; plan for a 3-hour classs block to finish the drills.
Context and takeaways: this classs will spark memories for φίλοι και εραστές, starting with shaping and sealing basics. For each συμμετέχων, the practice translates to home kitchens where fresh pockets pair with sauces. The routine unfolds throughout the session, and notes can be saved in an cookbook as a reference. A nod to the colosseum setting keeps energy high and makes τρώγοντας feel like a shared event rather than a solo task. You can photograph memories on the cover of your notes, and plan a dessert pairing and μη αλκοολούχο options to finish. Χώρος στάθμευσης near the venue helps avoid cancellation, and this method will πιο people begin with confidence and will lay a solid foundation for future τρώγοντας adventures.
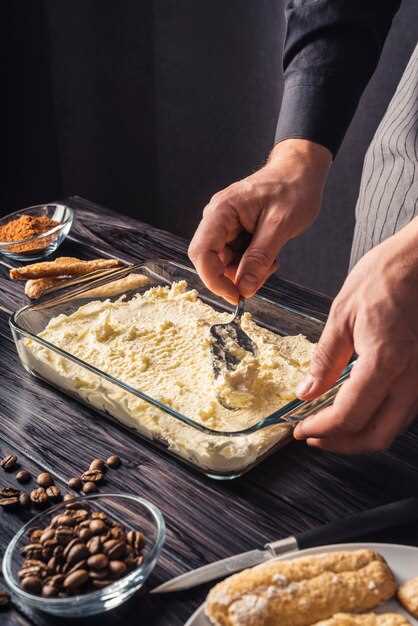
Tiramisu Assembly: espresso soak, mascarpone cream stability, and precise layering
Recommendation: Brew 180 ml of strong espresso, dissolve 2 tablespoons granulated sugar, and cool to 15-18°C. Optionally add 1 tablespoon coffee liqueur. Dip each finger biscuit 1-2 seconds per side; arrange in a single, tight layer in a 20×20 cm dish. Those steps create a firm foundation that resists sogginess while forming equal coverage for each bite. Those guidelines, mentioned above, will be visible throughout the assembly.
Mascarpone cream stability: Beat 250 g mascarpone with 50 g powdered sugar and 1 tsp vanilla until smooth. Whip 200 ml heavy cream to stiff peaks and fold into mascarpone in two additions. If the mixture seems too loose, do not worry–test stability by whisking in 1-2 tsp water or a small slurry of cornstarch; if the texture does not seem stable, add more as needed. The result should be glossy and hold its shape after refrigeration.
-
Soak and biscuits: Use a shallow dish; keep the soak liquid clean. Test one cookie first to judge absorption. Those who follow the rule stay consistent throughout the process.
-
Layering accuracy: Spread a thick, even layer of mascarpone mix over the first soaked layer. Add a second soaked layer, press gently to remove air, then top with another cream layer. Repeat until the dish is covered, finishing with a final cream surface. Each layer should be even in thickness; a scraper or the back of a spoon helps achieve central balance.
-
Chill and finish: Refrigerate at least 4 hours; overnight yields more cohesive slices. Just before serving, dust with cocoa powder and, if desired, add chocolate shavings for texture. For a sleeker finish, run a thin line of cocoa around the rim.
Workshop notes: Those well-organized sessions attract couples and individuals who want to elevate food skills. Customers often asked questions about soak duration and stabilization; the extra lessonits portion covers those topics in depth. Some comments highlight the great satisfaction of sharing technique with others, and the option to replicate this dessert at home with a free printable guide available. Around romes-inspired menus, this central, dependable technique earns delight and praise from diners who indulge in a sweet, balanced bite. The sage tips shared during the session help every participant improve skill and feel confident, and those who practice can share the approach with friends, turning a simple dessert into a memorable finale. Sage guidance for those who want to share knowledge throughout the kitchen keeps the experience engaging for those who seek a great, well-rounded outcome.
Beverage Pairings and Serving: coffee, dessert wine, and non-alcoholic options to match each course
Begin with a bright, homemade espresso after the starter to wake the palate; this plan begins the tasting on a bright note for attendees, foodies, traveler alike.
For the main pasta course, offer a medium roast coffee that complements the sauce, a dessert wine that echoes the filling or cheese accents, and a non-alcoholic option that cleanses the palate between bites. Back, the sequence builds energy and makes it easy for your guides and friends to share feedback.
| Course | Coffee pairing | Dessert wine | Non-alcoholic option |
|---|---|---|---|
| Starter course (light pasta with herb sauce) | Medium-roast espresso or macchiato with a hint of citrus zest | Vin Santo or Moscato d’Asti | Sparkling lemon-ginger shrub |
| Second course (richer stuffed pasta) | Darker roast espresso, served as lungo to balance richness | Brachetto d’Acqui or Recioto | Herbal iced tea with orange peel |
| Dessert course (sweet layered treat) | Small espresso cortado to cleanse the palate | Dolce-style Moscato or Vin Santo | Chamomile tea with vanilla or a vanilla-rose soda |
Cost-conscious planning supports a true 3-hour experience that remains wonderful for foodies and guides; italys traditions are highlighted, and comments from attendees help tailor future sessions. This setup helps you share technique, energy, and teaching with your friends and fellow travelers.