

 – Map & Photos") 53 Most Instagrammable Places in Dallas (2024) – Map & Photos">
53 Most Instagrammable Places in Dallas (2024) – Map & Photos">

Start your Dallas photo tour at sunrise in Klyde Warren Park, set your lens to 50mm for clean skyline shots, and wear neutral colors to let the city glow. Your first shots will anchor the feed with bold greens on the lawn and subtle reflections off the wall sculptures. This guide then maps 53 spots featuring dining, street art, and parks, with featuring murals, chic cafes, and classic façades across the city.
To keep the day smooth, we group spots by neighborhoods and practical cues: parking options near Arts District, walking routes through Deep Ellum, and quick coffee breaks at their favorite cafe corners. Expect vibrant walls, tulips in bloom in spring, and a mix of dining terraces that are camera-friendly at golden hour.
In Deep Ellum, the rodgers mural walls pair with neon signs for dramatic look shots, while the madison storefronts offer vintage textures that traveling photographers love. As you move, theyre storefronts reflect the light in fresh ways. Stop at a local cafe for candid shots of baristas and their dining patios that glow at dusk; this is where things like light, texture, and reflections come together to create mood.
Carry a lightweight tripod and a lens range of 24-70mm for flexible framing, and definitely prepare a plan to link spots that share light. Dallas traffic can surprise you, so set aside buffer time for parking and short walks; the drive between clusters takes 15–25 minutes in normal conditions.
Seasonal highlights help you pace the day: spring blooms around the Arboretum and tulips in full display during peak season; pair a shot of the tulips with a lemmon drizzle pastry at a cafe nearby to capture color contrasts. On the riverfront, the wall textures reflect the sunset, so keep your look steady as you go traveling between neighborhoods by car or ride-share.
With this map and photos approach, you’ll build a cohesive narrative of Dallas that balances architecture, dining, and street art. Each stop offers a clear angle: dining terraces for intimate portraits, walls for bold color blocks, and cafes as human moments. Traveling between spots, you’ll notice how lighting shifts–definitely a moment to adjust your look and angles as you go.
Strategic Photo Route and Practical Tips for Dallas Spots
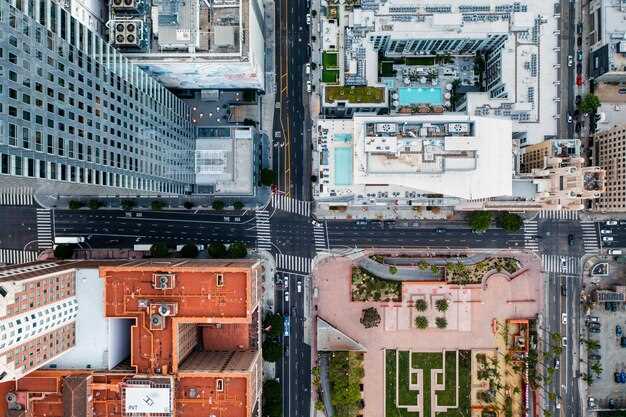
Begin at Klyde Warren Park for your first shot; good light, wide lawns, and a guest-friendly crowd make it ideal for instagrammers. These scenes offer candid moments near the skyline before you push farther along the route to the next destinations.
Then move to the Dallas Arts District to capture iconic buildings and reflective glass. Focus around the Winspear Opera House, the DMA, and the sculpture plaza; the juxtaposition of stone, steel, and water creates versatile backdrops. Want variety? shoot from eye level, then tilt up for dramatic angles that emphasize height and geometry. Anyone can follow this route to get a broad range of scenes.
For floral moments, head to the Dallas Arboretum or explore pockets near White Rock Lake. The floral beds deliver rich color and a picturesque mood, especially during the golden hour (about one hour before sunset). Bring a macro or a 70–200mm to isolate petals, then switch to a wider lens to capture the scene with context. Before you move on, grab a few wide establishing shots and a tight detail frame.
Next, dive into Deep Ellum for urban texture, murals, and neon. Look for a mural with a mockingbird motif to satisfy a unique detail. A popular crossing area offers dynamic light and street commerce–restaurants and boutiques line the blocks, adding opportunities to frame people in motion. The Bishop Arts District provides a village vibe, with cozy restaurants, shops, and brick facades that pair well with sunset light.
Practical tips: carry a lightweight setup (a 24–70mm and an 85mm option cover most scenes), keep ISO low to avoid grain, and shoot in RAW for post tweaks. If you gain access to interiors, look for rooms with warm light to create mood. Wear comfortable shoes for walking these blocks, and plan parking or rides to minimize extra steps–feet stay fresh when you map a shortcut between venues. Bring water, sunscreen, and a small reflector to brighten shadows on midday shoots.
Which 5 top locations to include for a 4–6 hour shoot based on the map
Start with Klyde Warren Park as the anchor for a 4–6 hour shoot. The park offers pretty greens, shaded paths, and water features that read instagram-worthy in both wide and close shots. Set up rooms-style corners near the cafe to swap looks quickly; this should keep the crew moving smoothly, and would let you capture visiting moments on the lawn while you test different lighting across nearby parks and fields.
Then head to Dealey Plaza for iconic angles. The plaza sits at the edge of the hill and hangs over a busy street, offering a strong city-face backdrop; it’s ideal for establishing shots and a few textures from crowds. Visiting Dallas on the map, you should allocate about 60–75 minutes here, maybe a touch more if you want extra B-roll, and the route remains united with the rest of the day plus strong verticals for the feed.
Deep Ellum offers vibrant street art and an edgefield vibe. Capture mural walls, gritty alleys with a shack door, and traffic that adds life to every frame. Use nearby offices and halls for indoor looks; whatever lighting you find, this block will deliver truly dynamic shots. Cars passing by give motion that your likes count will benefit from.
Pioneer Plaza brings wide-open fields and the famous cattle statues for dramatic scale. Shoot long lines across the plaza and close-ups that highlight the metallic textures. This spot would be a natural transition between downtown energy and the next vibe; it’s just a short drive to Reunion Park, and it strengthens the five-spot arc on the map–ones you can reuse in future shoots. If you’re looking for a clean break, this location means you can reset quickly and stay on schedule.
Finish at Reunion Park for a skyline finale in the dallas-fort corridor. Hilltop views let you pull car reflections on glass towers, and the nearby offices provide clean interiors for a quick interior look. This last block should capture a united arc from greens to glass, plus opportunities for sunset lighting and plenty of instagram-worthy moments. If you’re visiting, maybe this route delivers the five locations plus a cohesive story that your audience will like.
When to shoot: lighting, hours, and seasonal considerations for maximum glow
Plan shoots for an array of scenes by dialing in two core windows: 60-90 minutes after sunrise and 60-90 minutes before sunset. In Dallas, winter mornings run roughly 7:15–8:15 am and evenings 5:15–6:15 pm; summer shifts earlier and later by about an hour. When the sun sits low, light becomes directional, boosting texture on marble facades and making reflections from white railings and glass controllable around downtown and west Village, ready for bright images.
Exterior spots, from downtown arches to madison Street storefronts, and West Village facades, shine when you shoot with the sun behind you or at a 30–45 degree angle to carve depth. If glare hits glass or white marble, use a polarizer to tame reflections. In shade between buildings, you get even lighting on textures like brick, stone, and flower beds; pace your walk so you catch full moments without squinting, their shapes revealing detail along the road and in walking paths. Look for a quiet patch of shade to steady the shot.
Blue hour offers a cool, city-glow backdrop; plan 30-45 minutes after sunset for silhouettes against tall towers. For interiors, seek spaces with large windows in private suites or hotel lobbies near downtown; these spaces often feature white walls and marble counters that catch a soft, flattering light. A wide-angle helps capture both subject and window light, while a reflector fills shadows on faces. If you want a downtown feel that nods to angeles-style skylines, shoot near the river or tall glass towers until the lights come up.
Seasonal notes guide your color and mood. Spring brings an array of color; capture blossoms along walkable patches and near village greens, and in farm markets that echo rural textures. Look for a quiet patch of sun or shade to keep color true as you move across locations. Fall lights kiss brick textures and golden trees; winter offers crisp lines on clear days; summer favors shade or early mornings when the air is soft. Many tourists visit downtown at sunset, so plan to shoot before crowds emerge or after they disperse to keep images clean. In interiors, private suites with big windows stay ready for brighter shots even on cloudier days.
Ready-to-go checklist: arrive 15 minutes early to scout the light, bring an array of lenses and a compact reflector, and set white balance to a warm neutral for consistent color. This means you can switch from full exterior scenes to intimate details–flower petals, marble textures, and road textures–without losing cohesion across images and pictures of the moment. heres a concise plan to capture the glow in Dallas, from downtown to west village and beyond.
Parking, transit, and access hacks to reach each site without delays
Should plan to drive to a DART Park & Ride hub, then hop the rail to each site to avoid downtown congestion and parking fees. The dallas-fort corridor offers quick access to central districts, so you can reach the first stop in minutes rather than circling blocks. Just map a single rail transfer between neighborhoods and start your day with a beautifully efficient route. This approach has potential to save hours across a full itinerary.
When parking, use garages that offer clear rights and flat-rate windows. For downtown clusters, aim for weekend rates and use cross-town options to move between sites, saving minutes, more efficient than circling blocks. For greenery, park near the park entrance of an urban greenery space and take the short crossing to the first photo op; a saving of minutes compounds for later spots. Reunion with friends after a shoot is simple when you pick a nearby bistro or eateries with quick service; the city offers many social spots within a short stroll of each site.
For sites perched on skylines or near rivers, plan transfers that minimize stairs and street crossings; some spots have stair access to terraces or overlook points–use the most direct route to save time. Many locations sit near offices and lived history, so you can pair a quick overlook with a cafe stop. After you shoot, drive to the next site or ride transit, enjoying greenery along the way and the cityscape that photographers love. The route feels incredible for locals and tourists, with cherry moments, cityscape views, and ample opportunities to share your day on social.
Composition tricks for diverse backdrops: framing, perspectives, and color palettes
Place your subject on the left or right third of the frame and lean into a background that has greenery or bright walls to create depth you can rely on in any Dallas locations. Move to the right, then shift left; respect the rights of your frame by avoiding accidental crops.
Switch perspectives to keep photos dynamic: shoot at hip height for casual street scenes, drop to a low angle for architecture, or step back for wide interior shots that include interiors and a hint of the market outside.
Choose color palettes with intent: pair floral tones with muted brick in interiors, or go vibrant outside with greenery and cactus as bold accents. Rich warm tones plus a bright accent color help you stand out in spots like markets and hill overlooks. The delicious mix of hues invites tourists and locals alike to stop scrolling and enjoy.
Use foreground frames: a doorway, a shop counter, or a line of market stalls can guide the eye toward the subject. If moving through crowded locales, crop to keep the subject crisp and the background rich with texture, then relocate to a quieter spot and continue shooting.
Shoot with a phone or camera in manual mode when possible; aim for bright light and avoid harsh midday glare by seeking shade or shooting golden hour near outside spots or interiors. Adjust white balance to keep greens true, especially with greenery and cactus in frame.
Whether you’re scouting downtown walls, market corners, or hill overlooks, these tricks apply across locations to create staycation-worthy photos. Definitely try these ideas and forget stiff poses–theyre easy to apply and will boost how you frame scenes. If you want to continue, invite a friend to shop for props or simply enjoy the moment with fresh perspectives.
40 Lynn Creek Park: best viewpoints, trails, and practical shoot setup
Start at the station overlook, set your tripod, and lock in angles before the light shifts; the bright glass towers rise cleanly, giving your first frame immediate impact.
- Overlook Terrace by the station – wide skyline glimpse at golden hour. The railing height keeps gear stable while you shoot from feet level or a low stance, and the floral beds nearby add soft foreground interest. Edgefield neighborhoods across the lake frame the scene, enhancing atmosphere without clutter. Bring a wide and a mid-tele to cover both horizon and detail, and don’t forget a polarizer for water reflections.
- Lakeside Promenade – gentle curve along the water invites candid action from pedestrians and cyclists. Shoot from mid-distance to catch people in motion against mirrored towers, then switch to a tight crop for architectural texture. The scene stays accessible for handheld work, while a small tripod helps for longer exposures at blue hour.
- Cedar Ridge Vista – elevated bend that combines trees with distant skyscrapers. This spot yields a bright, clean backdrop and a true sense of place; youre able to blend foreground branches with the city line for layered composition. Whatever lens you choose, use the sky as negative space to emphasize the park’s quiet pulse.
- meadow-edge lookouts – where floral edges meet water glare, giving a soft contrast to concrete. It’s ideal for fashion-in-Nature style tests, providing a calm counterpoint to the urban rush.
Trails to explore
- Riverside Loop – flat, accessible path encircling the lake with several vantage points. Perfect for steadying a shot with people in motion, or for a quiet reflection shot with the skyline as a backdrop.
- Cedar Bluff Connector – moderate incline to a higher platform; you gain a broader sweep of downtown while keeping the lake in frame. Good for multi-angle sequences and quick wardrobe changes.
- Meadow Ridge Trail – short forested stretch that leads to open meadows. Here you capture sunbeams through the branches and a softer city silhouette in the distance.
Practical shoot setup
- Gear and plan – bring a 24-70 and a 70-200, tripod, remote, spare batteries, and a microfiber cloth. Start with a wide shot at 24mm, then move to 70mm for city detail; keep a 135mm handy for compressed skyline frames.
- Lighting and timing – target golden hour for warm reflections on glass, and blue hour for saturated sky and streetlights. If you shoot during peak brightness, use a polarizer to tame glare on the water and windows.
- Composition and subjects – mix architectural lines with floral foregrounds. Include people for scale, but select moments of quiet action so the frame doesn’t feel crowded; always look for a glimpse of the edgefield neighborhoods beyond the lake to add depth.
- Fashion and vibe – for editorial looks, coordinate outfits that pop against the bright backdrop; Madison-area boutiques and nearby bistros can supply styling options, while a nearby winery offers a chic post-shoot scene. You can also test a quick indoor/outdoor contrast in a nearby hall or cafe to show versatility.
- Workflow and safety – keep gear on a light backpack for easy shifts between viewpoints; if you need to cross rough ground, adjust sticks to avoid tripping on roots, and be mindful of feet and footing on uneven soil.
- Post-shoot plan – drive to a nearby bistro for quick edits and mood checks, then map out a longer session if light holds. If mood shifts, you can flip to a different location while keeping your kit ready for a quick switch.
Tips for maximizing potential
- Always scout multiple angles from the station and along the promenade to capture both distant towers and intimate foregrounds.
- Forget over-processed looks; aim for natural color and clean lines that convey the park’s calm energy.
- Edgefield and other neighborhoods appear as subtle textures in longer lenses; use them to frame the skyline without overpowering the main subject.
- Bring spare batteries and memory cards; you’ll want a rapid sequence during the blue hour to capture gradual color shifts.
- Whatever your style, keep the scene uncluttered by removing extraneous gear and letting the light lead the composition.