

 - نقشہ اور تصاویر") ڈلاس میں انسٹاگرام کے لیے بہترین 53 جگہیں (2024) - نقشہ اور تصاویر">
ڈلاس میں انسٹاگرام کے لیے بہترین 53 جگہیں (2024) - نقشہ اور تصاویر">

Start your Dallas photo tour at sunrise in Klyde Warren Park, set your lens to 50mm for clean skyline shots, and wear neutral colors to let the city glow. Your first shots will anchor the feed with bold greens on the lawn and subtle reflections off the wall sculptures. This guide then maps 53 spots featuring dining, street art, and parks, with باعث فخر murals, chic cafes, and classic façades across the city.
To keep the day smooth, we group spots by neighborhoods and practical cues: parking options near Arts District, walking routes through Deep Ellum, and quick coffee breaks at ان کا favorite cafe corners. Expect vibrant walls, tulips in bloom in spring, and a mix of کھانے کا کمرہ terraces that are camera-friendly at golden hour.
In Deep Ellum, the rodgers mural walls pair with neon signs for dramatic look shots, while the madison storefronts offer vintage textures that traveling photographers love. As you move, theyre storefronts reflect the light in fresh ways. Stop at a local cafe for candid shots of baristas and their کھانے کا کمرہ patios that glow at dusk; this is where چیزیں۔ like light, texture, and reflections come together to create mood.
Carry a lightweight tripod and a lens range of 24-70mm for flexible framing, and بالیقین prepare a plan to link spots that share light. Dallas traffic can surprise you, so set aside buffer time for parking and short walks; the drive between clusters takes 15–25 minutes in normal conditions.
Seasonal highlights help you pace the day: spring blooms around the Arboretum and tulips in full display during peak season; pair a shot of the tulips with a lemmon drizzle pastry at a cafe nearby to capture color contrasts. On the riverfront, the wall textures reflect the sunset, so keep your دیکھو steady as you go traveling between neighborhoods by car or ride-share.
With this map and photos approach, you’ll build a cohesive narrative of Dallas that balances architecture, dining, and street art. Each stop offers a clear angle: dining terraces for intimate portraits, walls for bold color blocks, and cafes as human moments. Traveling between spots, you’ll notice how lighting shifts–definitely a moment to adjust your دیکھو and angles as you go.
Strategic Photo Route and Practical Tips for Dallas Spots
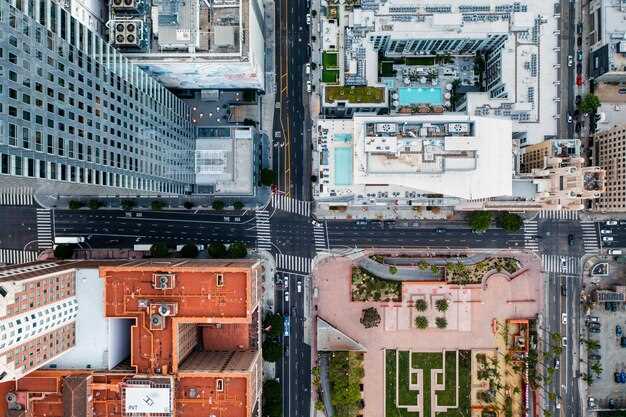
Begin at Klyde Warren Park for your first shot; good light, wide lawns, and a guest-friendly crowd make it ideal for instagrammers. These scenes offer candid moments near the skyline before you push farther along the route to the next destinations.
Then move to the Dallas Arts District to capture iconic buildings and reflective glass. Focus around the Winspear Opera House, the DMA, and the sculpture plaza; the juxtaposition of stone, steel, and water creates versatile backdrops. Want variety? shoot from eye level, then tilt up for dramatic angles that emphasize height and geometry. Anyone can follow this route to get a broad range of scenes.
For floral moments, head to the Dallas Arboretum or explore pockets near White Rock Lake. The floral beds deliver rich color and a picturesque mood, especially during the golden hour (about one hour before sunset). Bring a macro or a 70–200mm to isolate petals, then switch to a wider lens to capture the scene with context. Before you move on, grab a few wide establishing shots and a tight detail frame.
Next, dive into Deep Ellum for urban texture, murals, and neon. Look for a mural with a mockingbird motif to satisfy a unique detail. A popular crossing area offers dynamic light and street commerce–restaurants and boutiques line the blocks, adding opportunities to frame people in motion. The Bishop Arts District provides a village vibe, with cozy restaurants, shops, and brick facades that pair well with sunset light.
Practical tips: carry a lightweight setup (a 24–70mm and an 85mm option cover most scenes), keep ISO low to avoid grain, and shoot in RAW for post tweaks. If you gain access to interiors, look for rooms with warm light to create mood. Wear comfortable shoes for walking these blocks, and plan parking or rides to minimize extra steps–feet stay fresh when you map a shortcut between venues. Bring water, sunscreen, and a small reflector to brighten shadows on midday shoots.
Which 5 top locations to include for a 4–6 hour shoot based on the map
Start with Klyde Warren Park as the anchor for a 4–6 hour shoot. The park offers pretty greens, shaded paths, and water features that read instagram-worthy in both wide and close shots. Set up rooms-style corners near the cafe to swap looks quickly; this should keep the crew moving smoothly, and would let you capture visiting moments on the lawn while you test different lighting across nearby parks and fields.
Then head to Dealey Plaza for iconic angles. The plaza sits at the edge of the hill and hangs over a busy street, offering a strong city-face backdrop; it’s ideal for establishing shots and a few textures from crowds. Visiting Dallas on the map, you should allocate about 60–75 minutes here, maybe a touch more if you want extra B-roll, and the route remains united with the rest of the day plus strong verticals for the feed.
Deep Ellum offers vibrant street art and an edgefield vibe. Capture mural walls, gritty alleys with a shack door, and traffic that adds life to every frame. Use nearby offices and halls for indoor looks; whatever lighting you find, this block will deliver truly dynamic shots. Cars passing by give motion that your likes count will benefit from.
Pioneer Plaza brings wide-open fields and the famous cattle statues for dramatic scale. Shoot long lines across the plaza and close-ups that highlight the metallic textures. This spot would be a natural transition between downtown energy and the next vibe; it’s just a short drive to Reunion Park, and it strengthens the five-spot arc on the map–ones you can reuse in future shoots. If you’re looking for a clean break, this location means you can reset quickly and stay on schedule.
Finish at Reunion Park for a skyline finale in the dallas-fort corridor. Hilltop views let you pull car reflections on glass towers, and the nearby offices provide clean interiors for a quick interior look. This last block should capture a united arc from greens to glass, plus opportunities for sunset lighting and plenty of instagram-worthy moments. If you’re visiting, maybe this route delivers the five locations plus a cohesive story that your audience will like.
When to shoot: lighting, hours, and seasonal considerations for maximum glow
Plan shoots for an array of scenes by dialing in two core windows: 60-90 minutes after sunrise and 60-90 minutes before sunset. In Dallas, winter mornings run roughly 7:15–8:15 am and evenings 5:15–6:15 pm; summer shifts earlier and later by about an hour. When the sun sits low, light becomes directional, boosting texture on marble facades and making reflections from white railings and glass controllable around downtown and west Village, ready for bright تصاویر.
Exterior spots, from downtown arches to madison Street storefronts, and West Village facades, shine when you shoot with the sun behind you or at a 30–45 degree angle to carve depth. If glare hits glass or white marble, use a polarizer to tame reflections. In shade between buildings, you get even lighting on textures like brick, stone, and پھول beds; pace your walk so you catch مکمل moments without squinting, ان کا shapes revealing detail along the road and in walking paths. Look for a quiet patch of shade to steady the shot.
Blue hour offers a cool, city-glow backdrop; plan 30-45 minutes after sunset for silhouettes against tall towers. For interiors, seek spaces with large windows in private suites or hotel lobbies near downtown; these spaces often feature white walls and marble counters that catch a soft, flattering light. A wide-angle helps capture both subject and window light, while a reflector fills shadows on faces. If you want a downtown feel that nods to angeles-style skylines, shoot near the river or tall glass towers until the lights come up.
Seasonal notes guide your color and mood. Spring brings an array of color; capture blossoms along walkable patches and near village greens, and in farm markets that echo rural textures. Look for a quiet patch of sun or shade to keep color true as you move across locations. Fall lights kiss brick textures and golden trees; winter offers crisp lines on clear days; summer favors shade or early mornings when the air is soft. Many tourists visit downtown at sunset, so plan to shoot before crowds emerge or after they disperse to keep images clean. In interiors, private suites with big windows stay ready for brighter shots even on cloudier days.
Ready-to-go checklist: arrive 15 minutes early to scout the light, bring an array of lenses and a compact reflector, and set white balance to a warm neutral for consistent color. This means you can switch from full exterior scenes to intimate details–flower petals, marble textures, and road textures–without losing cohesion across تصاویر اور تصاویر of the moment. heres a concise plan to capture the glow in Dallas, from downtown to west village and beyond.
Parking, transit, and access hacks to reach each site without delays
Should plan to drive to a DART Park & Ride hub, then hop the rail to each site to avoid downtown congestion and parking fees. The dallas-fort corridor offers quick access to central districts, so you can reach the first stop in minutes rather than circling blocks. Just map a single rail transfer between neighborhoods and start your day with a beautifully efficient route. This approach has potential to save hours across a full itinerary.
پارکنگ کرتے وقت، ایسے گیراج استعمال کریں جو واضح حقوق اور فلیٹ ریٹ ونڈوز پیش کرتے ہیں۔ ڈاون ٹاؤن کلسٹرز کے لیے، ویک اینڈ ریٹس کا ہدف رکھیں اور سائٹس کے درمیان منتقل ہونے کے لیے کراس ٹاؤن آپشنز استعمال کریں، جس سے منٹ کی بچت ہوتی ہے، بلاکس کے گرد گھومنے سے زیادہ موثر۔ ہریالی کے لیے، شہری ہریالی کی جگہ کے پارک کے داخلی راستے کے قریب پارک کریں اور پہلی تصویر کھینچنے کے لیے مختصر راستہ اختیار کریں۔ منٹوں کی بچت بعد کے مقامات کے لیے مرکب ہے۔ شوٹ کے بعد دوستوں کے ساتھ دوبارہ ملنا آسان ہے جب آپ فوری سروس کے ساتھ قریبی بسٹرو یا کھانے پینے کی جگہیں چنتے ہیں۔ شہر ہر سائٹ سے تھوڑی ہی دوری پر بہت سی سماجی جگہیں پیش کرتا ہے۔.
آسمانوں پر معلق یا دریاؤں کے قریب سائٹس کے لیے، ایسے منتقلیوں کی منصوبہ بندی کریں جو سیڑھیوں اور سڑک کے پار جانے کو کم سے کم کریں؛ کچھ مقامات پر چھتوں اور اونچی جگہوں تک سیڑھیوں کے ذریعے رسائی حاصل ہے – وقت بچانے کے لیے سیدھا راستہ استعمال کریں۔ بہت سی جگہیں دفاتر اور گزری ہوئی تاریخ کے قریب واقع ہیں، اس لیے آپ ایک فوری نظارے کو کیفے میں رکنے کے ساتھ جوڑ سکتے ہیں۔ شوٹ کرنے کے بعد، اگلی سائٹ پر گاڑی چلائیں یا ٹرانزٹ پر سوار ہوں، راستے میں ہریالی اور شہر کے نظارے سے لطف اندوز ہوں جسے فوٹوگرافر پسند کرتے ہیں۔ یہ راستہ مقامی لوگوں اور سیاحوں کے لیے ناقابل یقین حد تک اچھا محسوس ہوتا ہے، جس میں خوشگوار لمحات، شہر کے نظارے اور سوشل میڈیا پر اپنے دن کو شیئر کرنے کے کافی مواقع موجود ہیں۔.
متنوع پس منظر کے لیے کمپوزیشن کی ترکیبیں: فریم بندی، تناظر، اور رنگوں کا پیلیٹ
اپنے موضوع کو فریم کے بائیں یا دائیں تیسرے حصے پر رکھیں اور ایسے پس منظر کی طرف جھکیں جس میں ہریالی ہو یا روشن دیواریں تاکہ آپ کسی بھی ڈلاس کے مقام پر انحصار کر سکنے والی گہرائی پیدا ہو۔ دائیں طرف حرکت کریں، پھر بائیں طرف منتقل ہوں؛ حادثاتی طور پر فصلوں سے بچ کر اپنے فریم کے حقوق کا احترام کریں۔.
تصاویر کو متحرک رکھنے کے لیے نقطہ نظر تبدیل کریں: عام سڑک کے مناظر کے لیے کولہے کی اونچائی پر شوٹ کریں، فن تعمیر کے لیے ایک نچلے زاویے پر آئیں، یا اندرونی حصوں اور باہر کی مارکیٹ کی ایک جھلک کو شامل کرنے والے وسیع اندرونی شاٹس کے لیے پیچھے ہٹیں۔.
ارادے کے ساتھ رنگوں کے پیلیٹ کا انتخاب کریں: اندرونی حصوں میں پھولوں کے رنگوں کو دھیمے اینٹوں کے ساتھ جوڑیں، یا بیرونی حصوں میں ہریالی اور کیکٹس کو نمایاں انداز میں استعمال کرتے ہوئے جاندار رنگوں کا انتخاب کریں۔ گہرے گرم رنگوں کے ساتھ ایک روشن رنگ جیسے بازاروں اور پہاڑیوں کے نظاروں میں آپ کو نمایاں کرنے میں مدد کرتا ہے۔ رنگوں کا مزیدار امتزاج سیاحوں اور مقامی لوگوں دونوں کو اسکرولنگ روک کر لطف اندوز ہونے کی دعوت دیتا ہے۔.
پیش منظر کے فریم استعمال کریں: ایک دروازہ، ایک دکان کاؤنٹر، یا مارکیٹ اسٹالوں کی ایک قطار آپ کی نظروں کو موضوع کی طرف لے جا سکتی ہے۔ اگر آپ کسی گنجان جگہ سے گزر رہے ہیں تو موضوع کو واضح رکھنے کے لیے کراپ کریں اور پس منظر کو ساخت سے بھرپور رکھیں، پھر کسی پرسکون جگہ پر منتقل ہو جائیں اور شوٹنگ جاری رکھیں۔.
جہاں تک ممکن ہو، فون یا کیمرے سے دستی موڈ میں شوٹ کریں؛ تیز روشنی کا مقصد رکھیں اور سخت دوپہر کی چکاچوند سے بچیں، سائے کی تلاش کریں یا بیرونی مقامات یا اندرونی حصوں کے قریب سنہری گھنٹے میں شوٹ کریں۔ سبزیوں کو اصلی رکھنے کے لیے سفید توازن کو ایڈجسٹ کریں، خاص کر فریم میں سبزی اور کیکٹس کے ساتھ۔.
چاہے آپ شہر کی دیواروں، مارکیٹ کے کونوں، یا پہاڑی کی چوٹیوں کو تلاش کر رہے ہوں، یہ تراکیب مقامات پر تصاویر بنانے کے لیے یکساں طور پر لاگو ہوتی ہیں۔ ان آئیڈیاز کو ضرور آزمائیں اور اکڑے ہوئے انداز کو بھول جائیں - یہ لاگو کرنے میں آسان ہیں اور یہ اس بات کو بڑھاوا دیں گے کہ آپ مناظر کو کس طرح فریم کرتے ہیں۔ اگر آپ جاری رکھنا چاہتے ہیں، تو کسی دوست کو دعوت دیں کہ وہ سازوسامان کی خریداری کرے یا محض تازہ نقطہ نظر کے ساتھ لمحے سے لطف اندوز ہو۔.
40 لین کریک پارک: بہترین ویو پوائنٹس، ٹریلز، اور عملی شوٹ سیٹ اپ
اسٹیشن کے نظارے پر شروع کریں، اپنا تپائی لگائیں اور روشنی بدلنے سے پہلے زاویوں کو مقفل کریں؛ روشن شیشے کے ٹاور صاف طور پر بلند ہوتے ہیں، آپ کے پہلے فریم کو فوری اثر دیتے ہیں۔.
- اسٹیشن کے قریب اوورلک ٹیرس - سنہری گھنٹے میں اسکائی لائن کا وسیع نظارہ۔ ریلنگ کی اونچائی آپ کے سامان کو مستحکم رکھتی ہے جب آپ پیروں کی سطح یا نیچے والی سطح سے شوٹ کرتے ہیں، اور قریبی پھولوں کی کیاریاں سامنے کی جانب ہلکی دلچسپی کا اضافہ کرتی ہیں۔ جھیل کے اس پار ایج فیلڈ کے محلے منظر کو فریم کرتے ہیں، جو ماحول کو بغیر کسی رکاوٹ کے بڑھاتے ہیں۔ افق اور تفصیل دونوں کو کور کرنے کے لیے ایک وائیڈ اور ایک مڈ-ٹیلی لائیں، اور پانی کے عکس کے لیے پولرائزر لانا نہ بھولیں۔.
- لیک سائڈ پرومینیڈ – پانی کے ساتھ نرم خم پیدل چلنے والوں اور سائیکلسٹوں کو بے تکلفانہ عمل کی دعوت دیتا ہے۔ درمیانی فاصلے سے شوٹ کریں تاکہ عکس بند ٹاورز کے پس منظر میں لوگوں کو حرکت میں پکڑ سکیں، پھر تعمیراتی ساخت کے لیے ایک تنگ فصل پر سوئچ کریں۔ منظر ہاتھ سے کام کرنے کے لیے قابل رسائی رہتا ہے، جبکہ چھوٹا تپائی نیلے گھنٹے میں طویل نمائشوں کے لیے مدد کرتا ہے۔.
- سیڈر رج وسٹا – بلند خم جو درختوں کو دور کی فلک بوس عمارتوں کے ساتھ ملاتا ہے۔ یہ جگہ ایک روشن، صاف پس منظر اور مقامیت کا سچا احساس پیدا کرتی ہے۔ آپ پس منظر کی شاخوں کو شہر کی لکیر کے ساتھ ملا کر ایک پرت دار ساخت بنا سکتے ہیں۔ آپ جو بھی لینز منتخب کریں، پارک کی خاموش نبض پر زور دینے کے لیے آسمان کو منفی جگہ کے طور پر استعمال کریں۔.
- میڈو-ایج لُک آؤٹس – جہاں پھولوں والے کنارے پانی کی چمک سے ملتے ہیں، اور کنکریٹ کو ایک نرم تضاد دیتے ہیں۔ یہ فیشن اِن نیچر سٹائل ٹیسٹوں کے لیے مثالی ہے، جو شہری رش کے لیے ایک پرسکون جوابی نقطہ فراہم کرتا ہے۔.
ٹريلز ٹو ايکپلور
- ریور سائیڈ لوپ - سیدھا، قابلِ رسائی راستہ جو جھیل کے گرد گھومتا ہے اور کئی نمایاں مقامات رکھتا ہے۔ حرکت میں موجود لوگوں کے ساتھ شاٹ کو متوازن کرنے، یا پس منظر میں اسکائی لائن کے ساتھ ایک پُرسکون عکاسی شاٹ کے لیے بہترین ہے۔.
- سیڈر بلف کنیکٹر - ایک اونچے پلیٹ فارم کی طرف معتدل ڈھلوان؛ جھیل کو فریم میں رکھتے ہوئے آپ کو شہر کے مرکز کا وسیع منظر ملتا ہے۔ ملٹی اینگل سیکونس اور فوری لباس کی تبدیلیوں کے لیے بہترین۔.
- میڈو رج ٹریل - جنگل کا ایک مختصر حصہ جو کھلے میدانوں کی طرف جاتا ہے۔ یہاں آپ شاخوں کے ذریعے سورج کی شعاعوں اور دور سے شہر کا دھندلا سا خاکہ قید کرتے ہیں۔.
عملی شوٹ سیٹ اپ
- ساز و سامان اور منصوبہ - ایک 24-70 اور ایک 70-200، تپائی، ریموٹ، اضافی بیٹریاں، اور ایک مائیکرو فائبر کپڑا ساتھ لائیں۔ 24mm پر ایک وسیع شاٹ سے آغاز کریں، پھر شہر کی تفصیل کے لیے 70mm پر منتقل ہوجائیں؛ کمپریسڈ اسکائی لائن فریموں کے لیے ایک 135mm دستی رکھیں۔.
- روشنی اور وقت کا تعین - شیشے پر گرم انعکاس کے لیے سنہری گھنٹے کو ہدف بنائیں، اور سیر شدہ آسمان اور اسٹریٹ لائٹس کے لیے نیلے گھنٹے کو۔ اگر آپ زیادہ سے زیادہ چمک کے دوران شوٹ کرتے ہیں، تو پانی اور کھڑکیوں پر چکاچوند کو کم کرنے کے لیے پولرائزر استعمال کریں۔.
- ترکیب اور مضامین - تعمیراتی خطوط کو پھولوں والے پیش منظر کے ساتھ ملائیں۔ پیمانے کے لیے لوگوں کو شامل کریں، لیکن خاموش ایکشن کے لمحات کا انتخاب کریں تاکہ فریم میں بھیڑ محسوس نہ ہو؛ گہرائی شامل کرنے کے لیے ہمیشہ جھیل کے پیچھے ایج فیلڈ کے محلوں کی ایک جھلک تلاش کریں۔.
- فیشن اور وائب - ایڈیٹوریل لُکس کے لیے ایسے ملبوسات کوآرڈینیٹ کریں جو روشن پس منظر میں نمایاں ہوں؛ میڈیسن کے علاقے کے بوتیک اور قریبی بٖسٹرو اسٹائلنگ کے آپشنز فراہم کر سکتے ہیں، جبکہ ایک قریبی وائنری شوٹ کے بعد ایک شاندار منظر پیش کرتی ہے۔ آپ ورسٹائلٹی دکھانے کے لیے قریبی ہال یا کیفے میں فوری انڈور/آؤٹ ڈور کنٹراسٹ بھی آزما سکتے ہیں۔.
- ورک فلو اور حفاظت - گیئر کو ہلکے بیگ پر رکھیں تاکہ ویو پوائنٹس کے درمیان آسانی سے تبدیلی کی جا سکے؛ اگر آپ کو کچے میدان کو عبور کرنے کی ضرورت ہے، تو جڑوں پر ٹرپ کرنے سے بچنے کے لیے چھڑیوں کو ایڈجسٹ کریں، اور ناہموار مٹی پر اپنے قدموں اور قدم رکھنے کا خیال رکھیں۔.
- تصویر کشی کے بعد کا منصوبہ - فوری تدوین اور مزاج کی جانچ کے لیے قریبی ریستوراں تک ڈرائیو کریں، پھر اگر روشنی برقرار رہے تو ایک طویل سیشن کا نقشہ بنائیں۔ اگر مزاج بدلتا ہے تو، آپ جلدی سے سوئچ کرنے کے لیے اپنا کِٹ تیار رکھتے ہوئے کسی دوسری جگہ پر جا سکتے ہیں۔.
صلاحیتوں کو بڑھانے کے لیے تجاویز
- اسٹیشن سے اور سیرگاہ کے ساتھ ساتھ متعدد زاویوں سے ہمیشہ منظر کشی کریں تاکہ دور دراز میناروں اور قریبی پیش منظر دونوں کو قید کیا جا سکے۔.
- زیادہ تراش خراش والے انداز کو بھول جائیں؛ قدرتی رنگ اور صاف لکیروں کا مقصد رکھیں جو پارک کی پرسکون توانائی کو ظاہر کریں۔.
- ایِج فیلڈ اور دیگر محلے لمبے لینز میں لطیف ساختوں کے طور پر ظاہر ہوتے ہیں۔ انہیں فلک بوس عمارتوں کو اس طرح فریم کرنے کے لیے استعمال کریں کہ وہ اصل موضوع پر غالب نہ آئیں۔.
- اضافی بیٹریاں اور میموری کارڈ ساتھ لائیں؛ نیلے گھنٹے کے دوران بتدریج رنگوں کی تبدیلی کو قید کرنے کے لیے آپ کو تیز رفتار تسلسل کی ضرورت ہوگی۔.
- آپ کا انداز جو بھی ہو، غیر ضروری سازوسامان کو ہٹا کر منظر کو صاف رکھیں اور روشنی کو کمپوزیشن کی رہنمائی کرنے دیں۔.