

 – Мапа и фотографије") 53 Најфотогеничнија места у Даласу за Инстаграм (2024) – Мапа и фотографије">
53 Најфотогеничнија места у Даласу за Инстаграм (2024) – Мапа и фотографије">

Start your Dallas photo tour at sunrise in Klyde Warren Park, set your објектив to 50mm for clean skyline shots, and wear neutral colors to let the city glow. Your first shots will anchor the feed with bold greens on the lawn and subtle reflections off the wall sculptures. This guide then maps 53 spots featuring dining, street art, and parks, with featuring murals, chic cafes, and classic façades across the city.
To keep the day smooth, we group spots by neighborhoods and practical cues: parking options near Arts District, walking routes through Deep Ellum, and quick coffee breaks at њихов favorite cafe corners. Expect vibrant walls, tulips in bloom in spring, and a mix of трпезарија terraces that are camera-friendly at golden hour.
In Deep Ellum, the rodgers mural walls pair with neon signs for dramatic look shots, while the madison storefronts offer vintage textures that traveling photographers love. As you move, theyre storefronts reflect the light in fresh ways. Stop at a local cafe for candid shots of baristas and their трпезарија patios that glow at dusk; this is where things like light, texture, and reflections come together to create mood.
Carry a lightweight tripod and a објектив range of 24-70mm for flexible framing, and дефинитивно prepare a plan to link spots that share light. Dallas traffic can surprise you, so set aside buffer time for parking and short walks; the drive between clusters takes 15–25 minutes in normal conditions.
Seasonal highlights help you pace the day: spring blooms around the Arboretum and tulips in full display during peak season; pair a shot of the tulips with a lemmon drizzle pastry at a cafe nearby to capture color contrasts. On the riverfront, the wall textures reflect the sunset, so keep your гледај steady as you go traveling between neighborhoods by car or ride-share.
With this map and photos approach, you’ll build a cohesive narrative of Dallas that balances architecture, dining, and street art. Each stop offers a clear angle: dining terraces for intimate portraits, walls for bold color blocks, and cafes as human moments. Traveling between spots, you’ll notice how lighting shifts–definitely a moment to adjust your гледај and angles as you go.
Strategic Photo Route and Practical Tips for Dallas Spots
Begin at Klyde Warren Park for your first shot; good light, wide lawns, and a guest-friendly crowd make it ideal for instagrammers. These scenes offer candid moments near the skyline before you push farther along the route to the next destinations.
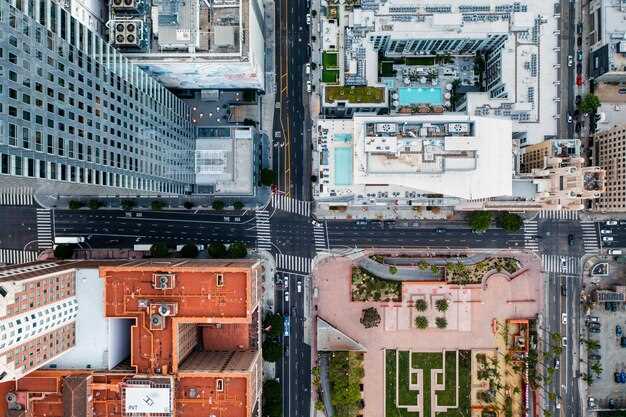
Then move to the Dallas Arts District to capture iconic buildings and reflective glass. Focus around the Winspear Opera House, the DMA, and the sculpture plaza; the juxtaposition of stone, steel, and water creates versatile backdrops. Want variety? shoot from eye level, then tilt up for dramatic angles that emphasize height and geometry. Anyone can follow this route to get a broad range of scenes.
For floral moments, head to the Dallas Arboretum or explore pockets near White Rock Lake. The floral beds deliver rich color and a picturesque mood, especially during the golden hour (about one hour before sunset). Bring a macro or a 70–200mm to isolate petals, then switch to a wider lens to capture the scene with context. Before you move on, grab a few wide establishing shots and a tight detail frame.
Next, dive into Deep Ellum for urban texture, murals, and neon. Look for a mural with a mockingbird motif to satisfy a unique detail. A popular crossing area offers dynamic light and street commerce–restaurants and boutiques line the blocks, adding opportunities to frame people in motion. The Bishop Arts District provides a village vibe, with cozy restaurants, shops, and brick facades that pair well with sunset light.
Practical tips: carry a lightweight setup (a 24–70mm and an 85mm option cover most scenes), keep ISO low to avoid grain, and shoot in RAW for post tweaks. If you gain access to interiors, look for rooms with warm light to create mood. Wear comfortable shoes for walking these blocks, and plan parking or rides to minimize extra steps–feet stay fresh when you map a shortcut between venues. Bring water, sunscreen, and a small reflector to brighten shadows on midday shoots.
Which 5 top locations to include for a 4–6 hour shoot based on the map
Start with Klyde Warren Park as the anchor for a 4–6 hour shoot. The park offers pretty greens, shaded paths, and water features that read instagram-worthy in both wide and close shots. Set up rooms-style corners near the cafe to swap looks quickly; this should keep the crew moving smoothly, and would let you capture visiting moments on the lawn while you test different lighting across nearby parks and fields.
Then head to Dealey Plaza for iconic angles. The plaza sits at the edge of the hill and hangs over a busy street, offering a strong city-face backdrop; it’s ideal for establishing shots and a few textures from crowds. Visiting Dallas on the map, you should allocate about 60–75 minutes here, maybe a touch more if you want extra B-roll, and the route remains united with the rest of the day plus strong verticals for the feed.
Deep Ellum offers vibrant street art and an edgefield vibe. Capture mural walls, gritty alleys with a shack door, and traffic that adds life to every frame. Use nearby offices and halls for indoor looks; whatever lighting you find, this block will deliver truly dynamic shots. Cars passing by give motion that your likes count will benefit from.
Pioneer Plaza brings wide-open fields and the famous cattle statues for dramatic scale. Shoot long lines across the plaza and close-ups that highlight the metallic textures. This spot would be a natural transition between downtown energy and the next vibe; it’s just a short drive to Reunion Park, and it strengthens the five-spot arc on the map–ones you can reuse in future shoots. If you’re looking for a clean break, this location means you can reset quickly and stay on schedule.
Finish at Reunion Park for a skyline finale in the dallas-fort corridor. Hilltop views let you pull car reflections on glass towers, and the nearby offices provide clean interiors for a quick interior look. This last block should capture a united arc from greens to glass, plus opportunities for sunset lighting and plenty of instagram-worthy moments. If you’re visiting, maybe this route delivers the five locations plus a cohesive story that your audience will like.
When to shoot: lighting, hours, and seasonal considerations for maximum glow
Plan shoots for an array of scenes by dialing in two core windows: 60-90 minutes after sunrise and 60-90 minutes before sunset. In Dallas, winter mornings run roughly 7:15–8:15 am and evenings 5:15–6:15 pm; summer shifts earlier and later by about an hour. When the sun sits low, light becomes directional, boosting texture on marble facades and making reflections from white railings and glass controllable around downtown and west Village, ready for bright слике.
Exterior spots, from downtown arches to madison Street storefronts, and West Village facades, shine when you shoot with the sun behind you or at a 30–45 degree angle to carve depth. If glare hits glass or white marble, use a polarizer to tame reflections. In shade between buildings, you get even lighting on textures like brick, stone, and цвет beds; pace your walk so you catch пун. moments without squinting, њихов shapes revealing detail along the road and in walking paths. Look for a quiet patch of shade to steady the shot.
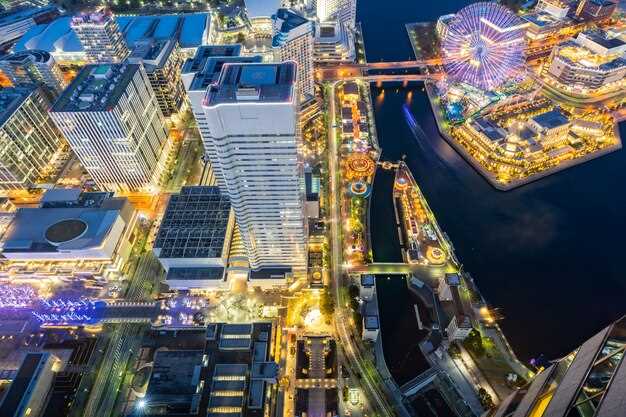
Blue hour offers a cool, city-glow backdrop; plan 30-45 minutes after sunset for silhouettes against tall towers. For interiors, seek spaces with large windows in private suites or hotel lobbies near downtown; these spaces often feature white walls and marble counters that catch a soft, flattering light. A wide-angle helps capture both subject and window light, while a reflector fills shadows on faces. If you want a downtown feel that nods to angeles-style skylines, shoot near the river or tall glass towers until the lights come up.
Seasonal notes guide your color and mood. Spring brings an array of color; capture blossoms along walkable patches and near village greens, and in farm markets that echo rural textures. Look for a quiet patch of sun or shade to keep color true as you move across locations. Fall lights kiss brick textures and golden trees; winter offers crisp lines on clear days; summer favors shade or early mornings when the air is soft. Many tourists visit downtown at sunset, so plan to shoot before crowds emerge or after they disperse to keep images clean. In interiors, private suites with big windows stay ready for brighter shots even on cloudier days.
Ready-to-go checklist: arrive 15 minutes early to scout the light, bring an array of lenses and a compact reflector, and set white balance to a warm neutral for consistent color. This means you can switch from full exterior scenes to intimate details–flower petals, marble textures, and road textures–without losing cohesion across слике и слике of the moment. heres a concise plan to capture the glow in Dallas, from downtown to west village and beyond.
Parking, transit, and access hacks to reach each site without delays
Should plan to drive to a DART Park & Ride hub, then hop the rail to each site to avoid downtown congestion and parking fees. The dallas-fort corridor offers quick access to central districts, so you can reach the first stop in minutes rather than circling blocks. Just map a single rail transfer between neighborhoods and start your day with a beautifully efficient route. This approach has potential to save hours across a full itinerary.
Приликом паркирања, користите гараже које нуде јасна права и паушалне прозоре. За центре градова, циљајте на викенд цене и користите опције преко града да бисте се кретали између локација, штедећи минуте, ефикасније од кружења око блокова. За зеленило, паркирајте се близу улаза у парк урбаног зеленила и пређите кратак прелаз до првог места за фотографисање; уштеда минута се надовезује за касније локације. Поновни сусрет са пријатељима након снимања је једноставан када изаберете оближњи бистро или ресторане брзе услуге; град нуди многа друштвена места на краткој шетњи од сваке локације.
За локације смештене на хоризонтима или близу река, планирајте трансфере који минимизирају степенице и прелазе улице; нека места имају приступ терасама преко степеница или видиковцима–користите најдиректнију руту да уштедите време. Многе локације се налазе у близини канцеларија и живе историје, тако да можете упарити брз поглед са заустављањем у кафићу. Након што снимите, возите се до следеће локације или користите јавни превоз, уживајући у зеленилу успут и градском пејзажу који фотографи воле. Рута је невероватна за локално становништво и туристе, са тренуцима за памћење, погледима на град и бројним приликама да поделите свој дан на друштвеним мрежама.
Композиционе трикове за разноврсне позадине: кадрирање, перспективе и палете боја
Postavite subjekta na levu ili desnu trećinu kadra i naslonite se na pozadinu sa zelenilom ili svetlim zidovima da biste stvorili dubinu na koju možete da se oslonite na bilo kojoj lokaciji u Dalasu. Pomerite se udesno, a zatim se pomerite ulevo; poštujte prava vašeg kadra izbegavanjem slučajnih useva.
Menjajte perspektive da biste fotografije učinili dinamičnim: snimajte u visini kuka za opuštene scene sa ulice, spustite se u niski ugao za arhitekturu ili se odmaknite za široke snimke enterijera koji uključuju enterijere i naznake pijace napolju.
Одаберите палете боја са намером: упарите цветне тонове са пригушеном циглом у ентеријерима, или будите живахни напољу са зеленилом и кактусима као смелим акцентима. Богати топли тонови плус светла акцентна боја помажу вам да се истакнете на местима као што су пијаце и видиковци на брдима. Укусна мешавина нијанси позива туристе и локално становништво да престану да скролују и уживају.
Koristite prednje kadrove: vrata, pult prodavnice ili red tezgi na pijaci mogu da usmere pogled ka subjektu. Ako se krećete kroz prometna mesta, kropujte da bi subjekt bio oštar, a pozadina bogata teksturom, a zatim se premestite na mirnije mesto i nastavite da fotografišete.
Када год је могуће, фотографишите телефоном или камером у ручном режиму; тежите јаком светлу и избегавајте јак подневни одсјај тако што ћете тражити хлад или фотографисати у златно доба близу спољашњих места или ентеријера. Подесите баланс белог да бисте сачували праву зелену боју, посебно са зеленилом и кактусима у кадру.
Bilo da istražujete zidove u centru grada, pijace ili brda sa pogledom, ovi trikovi se mogu primeniti na svim lokacijama da biste kreirali fotografije vredne odmora u mestu. Definitivno isprobajte ove ideje i zaboravite na ukočene poze – lako se primenjuju i poboljšaće način na koji kadrirate scene. Ako želite da nastavite, pozovite prijatelja da kupi rekvizite ili jednostavno uživajte u trenutku sa svežim perspektivama.
40 Lynn Creek Park: најбоље тачке гледишта, стазе и практична поставка снимања
Заузмите положај на видиковцу станице, поставите статив и учврстите углове пре него што се светлост промени; светли стаклени торњеви се уздижу грациозно, дајући вашем првом кадру тренутни утисак.
- Тераса Overlook код станице – широк поглед на панораму у златно доба. Висина ограде обезбеђује стабилност опреме док снимате из нивоа стопала или ниског става, а цветне леје у близини додају меки предњи план. Насеља Еџфилд преко језера уоквирују сцену, појачавајући атмосферу без претрпавања. Понесите широкоугаони и средњи телефото објектив да покријете и хоризонт и детаље, и не заборавите поларизатор за рефлексије у води.
- Шеталиште поред језера – благи завој дуж воде позива пешаке и бициклисте на спонтану акцију. Снимајте са средње удаљености да бисте ухватили људе у покрету насупрот кулама које се огледају, а затим пређите на уски кадар за текстуру архитектуре. Сцена остаје приступачна за рад из руке, док мали статив помаже за дуже експозиције у сумрак.
- Видик Седар Риџа – узвишена кривина која комбинује дрвеће са далеким облакодерима. Ово место даје светлу, чисту позадину и прави осећај места; у могућности сте да спојите гране у првом плану са линијом града за слојевиту композицију. Које год сочиво да одаберете, користите небо као негативни простор да бисте нагласили тихи пулс парка.
- осматрачнице на рубовима ливада – где се цветне ивице сусрећу са одсјајем воде, пружајући меки контраст бетону. Идеално је за модне пробе у природи, пружајући смирен контрапункт урбаној гужви.
Стазе за истраживање
- Риверсајд круг – равна, приступачна стаза која окружује језеро са неколико видиковаца. Савршена за стабилизовање снимка са људима у покрету, или за тихи рефлексивни снимак са панорамом као позадином.
- Cedar Bluff Connector – умерени успон до више платформе; добијате шири поглед на центар града док вам је језеро у кадру. Добро за секвенце из више углова и брзе промене гардеробе.
- Стаза Meadow Ridge – кратка деоница кроз шуму која води до отворених ливада. Овде хватате сунчеве зраке кроз грање и нежнију силуету града у даљини.
Praktičan raspored snimanja
- Oprema i plan – ponesite 24-70 i 70-200, stativ, daljinski upravljač, rezervne baterije i krpu od mikrovlakana. Počnite sa širokim kadrom na 24 mm, zatim pređite na 70 mm za detalje grada; držite 135 mm pri ruci za kompresovane kadrove horizonta.
- Osvetljenje i tajming – ciljajte zlatni sat za tople odsjaje na staklu i plavi sat za zasićeno nebo i ulično osvetljenje. Ako snimate tokom najveće jačine svetlosti, koristite polarizator da biste smanjili odsjaj na vodi i prozorima.
- Kompozicija i subjekti – kombinujte arhitektonske linije sa cvetnim planovima u prvom planu. Uključite ljude radi poređenja veličina, ali birajte prizore tihe akcije kako kadar ne bi delovao pretrpano; uvek tražite pogled na naselja Edgefild iza jezera da biste dodali dubinu.
- Moda i atmosfera – za potrebe izgleda u uvodnicima, uskladite odevne kombinacije koje se ističu u odnosu na svetlu pozadinu; butici u oblasti Medisona i obližnji bistroi mogu da obezbede opcije stilizovanja, dok obližnja vinarija nudi šik scenu nakon snimanja. Takođe, možete testirati brzi unutrašnji/spoljašnji kontrast u obližnjoj sali ili kafiću da biste pokazali svestranost.
- Tok rada i bezbednost – držite opremu u laganom rancu radi lakšeg prebacivanja između različitih tačaka gledišta; ako treba da pređete neravan teren, podesite štapove da biste izbegli saplitanje o korenje i pazite na stopala i položaj na neravnom tlu.
- Plan za posle snimanja – odlazak do obližnjeg bistroa radi brze montaže i provere atmosfere, a zatim planiranje duže sesije ako svetlo izdrži. Ako se raspoloženje promeni, možete preći na drugu lokaciju, držeći opremu spremnom za brzu promenu.
Савети за максимално искоришћавање потенцијала
- Увек извиђајте више углова са станице и дуж шеталишта да бисте снимили и удаљене куле и интимне планове у предњем плану.
- Zaboravite na prenaglašeni izgled; težite prirodnoj boji i čistim linijama koje prenose smirenu energiju parka.
- Edgefield i druga naselja se pojavljuju kao suptilne teksture u dužim objektivima; koristite ih da uokvirite horizont, a da ne nadjačaju glavni objekat.
- Ponesite rezervne baterije i memorijske kartice; želećete brzu sekvencu tokom plavog sata da biste uhvatili postepene promene boja.
- Bez obzira na vaš stil, neka scena bude pregledna uklanjanjem suvišne opreme i puštanjem da svetlost vodi kompoziciju.