

 - מפה ותמונות") 53 המקומות הכי פוטוגניים באינסטגרם בדאלאס (2024) - מפה ותמונות">
53 המקומות הכי פוטוגניים באינסטגרם בדאלאס (2024) - מפה ותמונות">

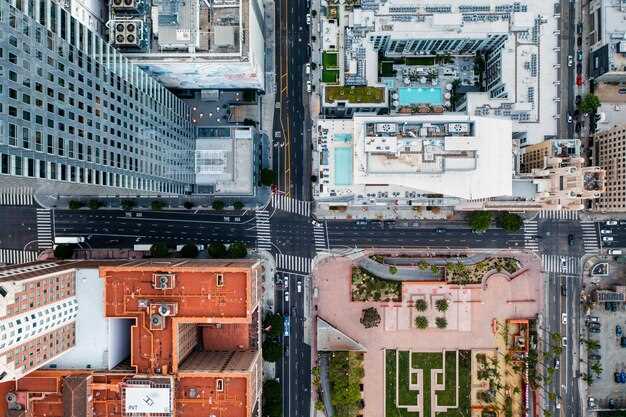
Start your Dallas photo tour at sunrise in Klyde Warren Park, set your עֲדָשָׁה to 50mm for clean skyline shots, and wear neutral colors to let the city glow. Your first shots will anchor the feed with bold greens on the lawn and subtle reflections off the wall sculptures. This guide then maps 53 spots featuring dining, street art, and parks, with בהשתתפות murals, chic cafes, and classic façades across the city.
To keep the day smooth, we group spots by neighborhoods and practical cues: parking options near Arts District, walking routes through Deep Ellum, and quick coffee breaks at שֶׁלָּהֶם\שֶׁלָּן favorite cafe corners. Expect vibrant walls, tulips in bloom in spring, and a mix of אוכל terraces that are camera-friendly at golden hour.
In Deep Ellum, the rodgers mural walls pair with neon signs for dramatic look shots, while the madison storefronts offer vintage textures that traveling photographers love. As you move, theyre storefronts reflect the light in fresh ways. Stop at a local cafe for candid shots of baristas and their אוכל patios that glow at dusk; this is where דברים like light, texture, and reflections come together to create mood.
Carry a lightweight tripod and a עֲדָשָׁה range of 24-70mm for flexible framing, and בהחלט prepare a plan to link spots that share light. Dallas traffic can surprise you, so set aside buffer time for parking and short walks; the drive between clusters takes 15–25 minutes in normal conditions.
Seasonal highlights help you pace the day: spring blooms around the Arboretum and tulips in full display during peak season; pair a shot of the tulips with a lemmon drizzle pastry at a cafe nearby to capture color contrasts. On the riverfront, the wall textures reflect the sunset, so keep your תראה steady as you go traveling between neighborhoods by car or ride-share.
With this map and photos approach, you’ll build a cohesive narrative of Dallas that balances architecture, dining, and street art. Each stop offers a clear angle: dining terraces for intimate portraits, walls for bold color blocks, and cafes as human moments. Traveling between spots, you’ll notice how lighting shifts–definitely a moment to adjust your תראה and angles as you go.
Strategic Photo Route and Practical Tips for Dallas Spots
Begin at Klyde Warren Park for your first shot; good light, wide lawns, and a guest-friendly crowd make it ideal for instagrammers. These scenes offer candid moments near the skyline before you push farther along the route to the next destinations.
Then move to the Dallas Arts District to capture iconic buildings and reflective glass. Focus around the Winspear Opera House, the DMA, and the sculpture plaza; the juxtaposition of stone, steel, and water creates versatile backdrops. Want variety? shoot from eye level, then tilt up for dramatic angles that emphasize height and geometry. Anyone can follow this route to get a broad range of scenes.
For floral moments, head to the Dallas Arboretum or explore pockets near White Rock Lake. The floral beds deliver rich color and a picturesque mood, especially during the golden hour (about one hour before sunset). Bring a macro or a 70–200mm to isolate petals, then switch to a wider lens to capture the scene with context. Before you move on, grab a few wide establishing shots and a tight detail frame.
Next, dive into Deep Ellum for urban texture, murals, and neon. Look for a mural with a mockingbird motif to satisfy a unique detail. A popular crossing area offers dynamic light and street commerce–restaurants and boutiques line the blocks, adding opportunities to frame people in motion. The Bishop Arts District provides a village vibe, with cozy restaurants, shops, and brick facades that pair well with sunset light.
Practical tips: carry a lightweight setup (a 24–70mm and an 85mm option cover most scenes), keep ISO low to avoid grain, and shoot in RAW for post tweaks. If you gain access to interiors, look for rooms with warm light to create mood. Wear comfortable shoes for walking these blocks, and plan parking or rides to minimize extra steps–feet stay fresh when you map a shortcut between venues. Bring water, sunscreen, and a small reflector to brighten shadows on midday shoots.
Which 5 top locations to include for a 4–6 hour shoot based on the map
Start with Klyde Warren Park as the anchor for a 4–6 hour shoot. The park offers pretty greens, shaded paths, and water features that read instagram-worthy in both wide and close shots. Set up rooms-style corners near the cafe to swap looks quickly; this should keep the crew moving smoothly, and would let you capture visiting moments on the lawn while you test different lighting across nearby parks and fields.
Then head to Dealey Plaza for iconic angles. The plaza sits at the edge of the hill and hangs over a busy street, offering a strong city-face backdrop; it’s ideal for establishing shots and a few textures from crowds. Visiting Dallas on the map, you should allocate about 60–75 minutes here, maybe a touch more if you want extra B-roll, and the route remains united with the rest of the day plus strong verticals for the feed.
Deep Ellum offers vibrant street art and an edgefield vibe. Capture mural walls, gritty alleys with a shack door, and traffic that adds life to every frame. Use nearby offices and halls for indoor looks; whatever lighting you find, this block will deliver truly dynamic shots. Cars passing by give motion that your likes count will benefit from.
Pioneer Plaza brings wide-open fields and the famous cattle statues for dramatic scale. Shoot long lines across the plaza and close-ups that highlight the metallic textures. This spot would be a natural transition between downtown energy and the next vibe; it’s just a short drive to Reunion Park, and it strengthens the five-spot arc on the map–ones you can reuse in future shoots. If you’re looking for a clean break, this location means you can reset quickly and stay on schedule.
Finish at Reunion Park for a skyline finale in the dallas-fort corridor. Hilltop views let you pull car reflections on glass towers, and the nearby offices provide clean interiors for a quick interior look. This last block should capture a united arc from greens to glass, plus opportunities for sunset lighting and plenty of instagram-worthy moments. If you’re visiting, maybe this route delivers the five locations plus a cohesive story that your audience will like.
When to shoot: lighting, hours, and seasonal considerations for maximum glow
Plan shoots for an array of scenes by dialing in two core windows: 60-90 minutes after sunrise and 60-90 minutes before sunset. In Dallas, winter mornings run roughly 7:15–8:15 am and evenings 5:15–6:15 pm; summer shifts earlier and later by about an hour. When the sun sits low, light becomes directional, boosting texture on marble facades and making reflections from white railings and glass controllable around downtown and west Village, ready for bright תמונות.
Exterior spots, from downtown arches to madison Street storefronts, and West Village facades, shine when you shoot with the sun behind you or at a 30–45 degree angle to carve depth. If glare hits glass or white marble, use a polarizer to tame reflections. In shade between buildings, you get even lighting on textures like brick, stone, and פרח beds; pace your walk so you catch מלא moments without squinting, שֶׁלָּהֶם\שֶׁלָּן shapes revealing detail along the road and in walking paths. Look for a quiet patch of shade to steady the shot.
Blue hour offers a cool, city-glow backdrop; plan 30-45 minutes after sunset for silhouettes against tall towers. For interiors, seek spaces with large windows in פרטי suites or hotel lobbies near downtown; these spaces often feature white walls and marble counters that catch a soft, flattering light. A wide-angle helps capture both subject and window light, while a reflector fills shadows on faces. If you want a downtown feel that nods to angeles-style skylines, shoot near the river or tall glass towers until the lights come up.
Seasonal notes guide your color and mood. Spring brings an array of color; capture blossoms along walkable patches and near village greens, and in farm markets that echo rural textures. Look for a quiet patch of sun or shade to keep color true as you move across locations. Fall lights kiss brick textures and golden trees; winter offers crisp lines on clear days; summer favors shade or early mornings when the air is soft. Many tourists visit downtown at sunset, so plan to shoot before crowds emerge or after they disperse to keep images clean. In interiors, private suites with big windows stay ready for brighter shots even on cloudier days.
Ready-to-go checklist: arrive 15 minutes early to scout the light, bring an array of lenses and a compact reflector, and set white balance to a warm neutral for consistent color. This means you can switch from full exterior scenes to intimate details–flower petals, marble textures, and road textures–without losing cohesion across תמונות ו תמונות of the moment. heres a concise plan to capture the glow in Dallas, from downtown to west village and beyond.
Parking, transit, and access hacks to reach each site without delays
Should plan to drive to a DART Park & Ride hub, then hop the rail to each site to avoid downtown congestion and parking fees. The dallas-fort corridor offers quick access to central districts, so you can reach the first stop in minutes rather than circling blocks. Just map a single rail transfer between neighborhoods and start your day with a beautifully efficient route. This approach has potential to save hours across a full itinerary.
בעת חניה, השתמשו בחניונים המציעים זכויות ברורות וחלונות תעריף אחיד. עבור אשכולות במרכז העיר, כוונו לתעריפי סוף שבוע והשתמשו באפשרויות חוצות עיר כדי לנוע בין אתרים, וחוסכים דקות, יעיל יותר מאשר הקפת בלוקים. עבור שטחים ירוקים, חנו ליד כניסת הפארק של שטח ירוק עירוני ובצעו את המעבר הקצר לתמונה הראשונה; חיסכון של דקות מצטבר עבור נקודות מאוחרות יותר. מפגש עם חברים לאחר צילום פשוט כאשר בוחרים ביסטרו או מסעדות סמוכות עם שירות מהיר; העיר מציעה מקומות מפגש רבים במרחק הליכה קצר מכל אתר.
עבור אתרים השוכנים על קו הרקיע או ליד נהרות, תכננו העברות המצמצמות מדרגות וחציית רחובות; בחלק מהמקומות יש גישה במדרגות למרפסות או לנקודות תצפית - השתמשו בדרך הישירה ביותר כדי לחסוך זמן. מיקומים רבים נמצאים ליד משרדים והיסטוריה חיה, כך שתוכלו לשלב תצפית מהירה עם עצירה בבית קפה. לאחר שצילמתם, סעו לאתר הבא או סעו בתחבורה ציבורית, תוך שאתם נהנים מהירוק לאורך הדרך ומהנוף העירוני שצלמים אוהבים. המסלול מרגיש מדהים עבור מקומיים ותיירים, עם רגעי שיא, נופי עיר ושפע הזדמנויות לשתף את היום שלכם ברשתות החברתיות.
טריקים לקומפוזיציה עבור רקע מגוון: מסגור, פרספקטיבות ופלטות צבעים
מקמו את הנושא שלכם בשליש השמאלי או הימני של הפריים והישענו על רקע עם צמחייה או קירות בהירים כדי ליצור עומק שאפשר לסמוך עליו בכל מיקום בדאלאס. זזו ימינה, ואז שמאלה; כבדו את הזכויות של הפריים שלכם על ידי הימנעות מחיתוכים מקריים.
החליפו פרספקטיבות כדי לשמור על דינמיות בתמונות: צלמו מגובה הירך לסצנות רחוב סתמיות, רדו לזווית נמוכה לצילום אדריכלות, או צלמו מרחוק לצילומי פנים רחבים הכוללים גם את הפנים וגם רמז לשוק שבחוץ.
בחרו פלטות צבעים מתוך כוונה: שלבו גוונים פרחוניים עם לבנים מושתקים בחללי פנים, או לכו על צבעים עזים בחוץ עם ירק וקקטוסים כדגשים נועזים. גוונים חמים ועשירים בתוספת צבע הדגשה בהיר עוזרים לכם להתבלט במקומות כמו שווקים ותצפיות על גבעות. השילוב הטעים של גוונים מזמין תיירים ומקומיים כאחד להפסיק לגלול וליהנות.
השתמשו במסגרות חזיתיות: פתח דלת, דלפק חנות או שורת דוכני שוק יכולים להוביל את העין אל הנושא. אם אתם נעים בלוקיישנים צפופים, בצעו חיתוך כדי לשמור על הנושא חד ועל הרקע עשיר בטקסטורה, ואז עברו לנקודה שקטה יותר והמשיכו לצלם.
במידת האפשר, צלמו במצב ידני בטלפון או במצלמה; שאפו לאור בהיר והימנעו מסנוור צהריים חזק על ידי חיפוש צל או צילום בשעת הזהב ליד נקודות חיצוניות או פנים. כווננו את איזון הלבן כדי לשמור על גוונים ירוקים אמיתיים, במיוחד עם ירק וקקטוסים במסגרת.
בין אם אתם סוקרים קירות במרכז העיר, פינות שוק או תצפיות על גבעות, הטריקים האלה מתאימים לכל המקומות ליצירת תמונות ששווה להישאר בשבילן בחופשת בית. בהחלט כדאי לנסות את הרעיונות האלה ולשכוח מתנוחות נוקשות – הם קלים ליישום וישפרו את האופן שבו אתם ממסגרים סצנות. אם אתם רוצים להמשיך, הזמינו חבר לקנות אביזרים או פשוט תיהנו מהרגע עם נקודות מבט רעננות.
40 פארק לין קריק: נקודות התצפית, השבילים וסידורי הצילום המעשיים הטובים ביותר
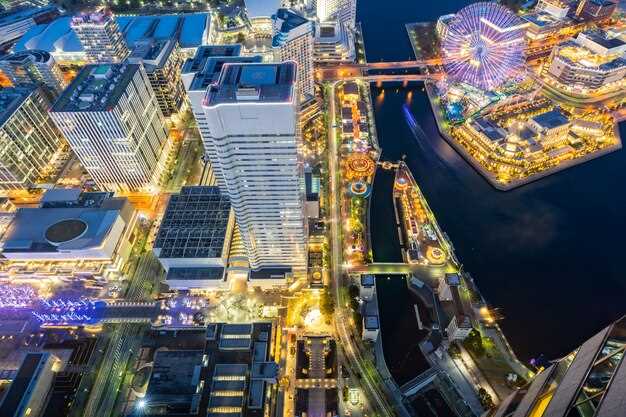
התחילו בתצפית על התחנה, הציבו את החצובה ונעלו זוויות לפני שהאור משתנה; מגדלי הזכוכית הבהירים מתרוממים בחדות, ומעניקים לפריים הראשון שלכם אפקט מיידי.
- מרפסת המשקיפה ליד התחנה – הצצה רחבה לקו הרקיע בשעת הזהב. גובה המעקה שומר על יציבות הציוד כשמצלמים מגובה הרגליים או מעמדה נמוכה, וערוגות הפרחים הסמוכות מוסיפות עניין רך לחזית. שכונות אדג'פילד מעבר לאגם ממסגרות את הסצנה, ומשפרות את האווירה מבלי ליצור עומס. הביאו עדשה רחבה ועדשת טלה-בינונית כדי לכסות גם את האופק וגם את הפרטים, ואל תשכחו פילטר מקטב להשתקפויות במים.
- טיילת האגם – קימור עדין לאורך המים מזמין פעולה ספונטנית מהולכי רגל ורוכבי אופניים. צלמו ממרחק בינוני כדי לתפוס אנשים בתנועה על רקע מגדלים מראים, ואז עברו לקרופ צמוד למרקם אדריכלי. הסצנה נגישה לצילום ביד, בעוד חצובה קטנה עוזרת לחשיפות ארוכות יותר בשעה הכחולה.
- נוף רכס הארז – עיקול מוגבה המשלב עצים עם גורדי שחקים מרוחקים. נקודה זו מספקת רקע בהיר ונקי ותחושת מקום אמיתית; ניתן למזג ענפי חזית עם קו העיר לקבלת קומפוזיציה מרובדת. בכל עדשה שתבחרו, השתמשו בשמיים כמרחב שלילי כדי להדגיש את הדופק השקט של הפארק.
- מִצְפֵּי שְׂפַת הַמִּרְעֶה – מְקוֹמוֹת שֶׁבָּהֶם קְצוֹת פְּרִיחָה פּוֹגְשִׁים בְּהִיק מַיִם, וְנוֹתְנִים נִגּוּד רַךְ לַבֶּטוֹן. זֶה מְתֻאִּם לְנִסְיוֹנוֹת סִגְנוֹן אָפְנָה-בַּטֶּבַע, וּמְסַפֵּק מִשְׁקָל נֶגְדִּי רָגוּעַ לַמֵּרוֹץ הָעִירוֹנִי.
מסלולי טיול לחקור
- לולאת ריברסייד – שביל שטוח ונגיש המקיף את האגם עם כמה נקודות תצפית. מושלם לייצוב צילום עם אנשים בתנועה, או לצילום השתקפות שקטה עם קו הרקיע כרקע.
- מחבר סדר בליף – עלייה מתונה לפלטפורמה גבוהה יותר; זוכים לתצפית רחבה יותר של מרכז העיר תוך שמירה על האגם במסגרת. טוב לרצפים מרובי זוויות ולהחלפות בגדים מהירות.
- שביל רכס המדשאות – קטע מיוער קצר שמוביל למדשאות פתוחות. כאן תוכלו ללכוד קרני שמש דרך הענפים וצללית רכה יותר של העיר במרחק.
הגדרת צילום מעשית
- ציוד ותכנית – להביא 24-70 ו-70-200, חצובה, שלט רחוק, סוללות רזרביות ומטלית מיקרופייבר. להתחיל עם צילום רחב ב-24 מ"מ, לאחר מכן לעבור ל-70 מ"מ לפרטי העיר; להחזיק 135 מ"מ בהישג יד עבור פריימים דחוסים של קו הרקיע.
- תאורה ותזמון – כוונו לשעת הזהב להשתקפויות חמימות על זכוכית, ולשעה הכחולה לשמיים רוויים בפנסים וברחוב. אם אתם מצלמים בשעות השיא של הבהירות, השתמשו בפילטר מקטב כדי לרסן את הסנוור על המים והחלונות.
- קומפוזיציה ונושאים – ערבבו קווים ארכיטקטוניים עם חזיתות פרחוניות. שלבו אנשים כדי לתת קנה מידה, אך בחרו רגעים של פעולה שקטה כדי שהמסגרת לא תיראה צפופה; תמיד חפשו הצצה לשכונות אדג'פילד שמעבר לאגם כדי להוסיף עומק.
- אופנה וויב - למראה עריכתי, תאמו תלבושות שבולטות על רקע התפאורה הבהירה; בוטיקים באזור מדיסון וביסטרואים סמוכים יכולים לספק אפשרויות סטיילינג, ויקב סמוך מציע סצנה שיקית אחרי הצילומים. אפשר גם לבחון ניגוד פנימי/חיצוני מהיר באולם או בית קפה סמוכים כדי להציג רב-גוניות.
- זריזות תנועה ובטיחות – שמרו על הציוד בתרמיל קל לנשיאה כדי לעבור בקלות בין נקודות תצפית; אם עליכם לחצות שטח קשה, התאימו את המקלות כדי להימנע ממעידה על שורשים, ושימו לב לרגליים ולמשטח הדריכה על אדמה לא אחידה.
- תוכנית אחרי הצילומים – נסיעה לביסטרו סמוך לעריכות מהירות ובדיקת מצב רוח, ואז תכנון סשן ארוך יותר אם האור יחזיק מעמד. אם מצב הרוח ישתנה, אפשר לעבור ללוקיישן אחר תוך שמירה על הציוד מוכן למעבר מהיר.
טיפים למיצוי הפוטנציאל
- יש לתשאל תמיד מזוויות שונות מהתחנה ולאורך הטיילת כדי לתפוס גם מגדלים רחוקים וגם תמונות תקריב אינטימיות.
- שכחו ממראה מעובד יתר על המידה; שאפו לצבע טבעי וקווים נקיים המשדרים את האנרגיה השקטה של הפארק.
- אדג'פילד ושכונות אחרות מופיעות כמרקמים עדינים בעדשות ארוכות יותר; השתמשו בהן כדי למסגר את קו הרקיע מבלי להאפיל על הנושא העיקרי.
- הביאו סוללות וכרטיסי זיכרון נוספים; תרצו צילום רצף מהיר בשעה הכחולה כדי לתפוס את שינויי הצבע ההדרגתיים.
- יהיה הסגנון שלך אשר יהיה, שמור על סדר בסצנה על ידי הסרת ציוד מיותר ותן לאור להוביל את הקומפוזיציה.