


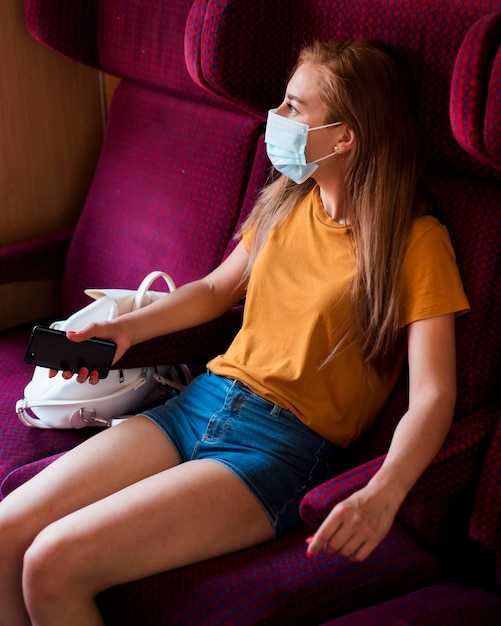
Start by securing lumbar support as soon as you sit: place a slim cushion or rolled towel at the lower back, adjust the seat back to about 100 to 110 degrees, and keep your toes relaxed with feet flat in-seat above the floor. This setup stabilizes your spine and reduces early cramps.
Use a quick علامت from your body and a simple score to guide changes. Every hour, rate your back discomfort on a 0–10 scale, log that معلومات, and then adjust height, angle, and support. Keeping a small notebook or notes in your phone helps you spot patterns and avoid repeating mistakes.
Plan for micro-movements to prevent stiffness during اِن فلائٹ sessions. Rotate your torso and hips every 15–20 minutes, shift weight between sitting bones, and trying small in-seat stretches. Keep extra cushions handy for subtle adjustments, and use a footrest if available to ease leg pressure. Move only when the belt sign allows. You can allow a moment for the shift.
انتخاب کریں۔ ایزل seat when possible to ease access for stretches without disturbing neighbors, and place essentials like boarding کارڈز in the pocket above so you can reach them without major shifts. Consider using a second cushion if you still feel pressure, and position items within arm’s reach to avoid extra movement.
If cramps threaten, pause to flex your feet, stretch calves, and rotate ankles. Hydration matters: sip water regularly, avoid alcohol, and aim for 2–3 liters for a full flight. For ongoing relief, try trying gentle abdominal breaths and a brief standing stretch when the belt sign allows. Use gentle leg pumps and alternating pressure when you’re allowed to stand, which helps circulation and reduces stiffness. Consider a quick toe tap sequence to keep circulation active.
With secure support, data-driven adjustments, and unlimited small moves, you can travel pain-free on long flights. Start with the first adjustment, heed the sign from your body, and tailor your approach to your needs for future trips.
Practical seating and movement strategies to reduce back strain during air travel
Set your lower back against a lumbar support and sit tall with a neutral spinal alignment, head over shoulders. Place a rolled towel or compact lumbar cushion at the curve, keep both feet flat on the ground, and adjust seat depth so your hips touch the backrest while your knees form about a 90-degree angle.
Maintain a calm, tall posture with shoulders relaxed and the head stacked over the spine. If your lower back feels pressed, move the cushion until the edge of the seat supports you. Keep toes loose to allow blood flow and prevent stiffness in the calves and feet.
Schedule movement every 60–90 minutes. Stand in the aisle if allowed, or perform seated moves: rotate shoulders, gentle spinal twists, and hip hinges to lean forward and then straighten up. Do 10 ankle pumps and 10 calf raises to pump venous blood and limit swollen ankles. Use a footrest to keep ankles near 90 degrees and reduce pressure on the lower legs. Spending long hours in the air increases risk, so plan micro-breaks accordingly.
When the seat back is slightly reclined, use your hands on the armrests to assist gentle pulling upward on the torso to lengthen the spine, helping you stay upright and maintain good posture.
In the category of seating choices, opt for seats with extra legroom or aisle access to enable unrestricted movement. If you spend a long flight in a compact cabin, book a seat with additional leg support and a footrest; this helps you keep upright posture and reduce pressure on the lower back. From global routes to local locations, plan movement opportunities during layovers and after landing to reestablish comfort.
Active stretches before takeoff and during the flight can reduce tightness: perform 8–12 forward folds from the hips (knees soft), 4 gentle spinal twists to either side, and 6–8 cat-cow motions while seated. Flex and straighten your spine with each set to improve flexibility. For the feet and legs, do toe curls and foot circles to keep veins flowing and avoid swelling.
If you notice swollen ankles after long flights, use compression socks and adjust your posture to maintain good blood flow. Take short breaks and move regularly to stay flexible and ready for the next leg of your trip. From these practices, you get immediate relief during the flight and become more comfortable, becoming a habit that helps with back health across trips, whether you travel weekly or occasionally.
Spending long hours in the air can be painful, but trying small moves done correctly yields more comfort. From a simple posture tune-up to a full stretching set, these steps are becoming a reliable routine with rewards like less stiffness, more energy, and unlimited ability to stay mobile on global trips.
Optimal Seat Setup for Lower Back Support
Choose an aisle seat in the middle of the cabin and apply a lumbar support under your bottom to keep the spine aligned from taxi to landing. This setup eases back tension, keeps you comfortable, and makes sleeping more doable in-flight.
These quick adjustments work while sitting and traveling; add a compact lumbar roll or rolled towel and secure it behind your lower back; if you can, slip a thin pillow behind your neck for sleeping comfort, while you stay still and relaxed.
- Seat selection: pick an aisle seat in the middle of the cabin to ease access to the aisle; use a small cushion to fill the gap at the spine and keep your bottom supported so you can get in and out without twisting. If the bottom cushion shifts, secure it with a light strap or the seat edge, then pull your shoulders back and sit straight.
- Padding and posture: place a lumbar roll or rolled towel at the curve of the spine; add a folded jacket behind the pelvis to distribute pressure; sit fully with hips and knees about 90 degrees and keep your chest open to avoid slouching. These adjustments help keep your spine aligned while sleeping or resting.
- Seat back and leg alignment: set the seat back to a gentle recline around 5-15 degrees; use a footrest if available; this keeps the hips stable and reduces pulling on the lower back when you sit or sleep. Then follow the sign for allowed adjustments and stay within those limits.
- Movement cadence: plan micro breaks every 30-45 minutes; walk the aisle, shrug your shoulders, rotate your torso, and perform ankle pumps to ease stiffness and keep circulation active through a full loop of movements.
- Disembark readiness: when it’s time to deplane, stand slowly, stretch the back and legs, and switch to a tall posture as you reach the aisle; partners can assist by hoisting their items safely and guiding you to the exit.
Extra tips for regular travelers: if your airport or airline offers rentals of ergonomic cushions, consider them; these can be a hero addition to your kit and make the whole flight feel more secure. For sleeping, align your spine with a rolled towel along the back and a small pillow behind the knees to relieve pressure; this helps you stay comfortable when the plane hits bumps or chimes. If you travel frequently, adopting this travel10x routine keeps you agile and reduces discomfort across long trips.
Headrest, Lumbar Curve, and Seat Recline Guidelines
Set the headrest so the back of your head rests on the cushion and your ears align with your shoulders, keeping the neck in a neutral position while you sit.
Use a simple lumbar support or cushion for maintaining the healthy natural curve at the base of your spine; position it to fill the gap behind your lower back and support the curve without pushing you forward.
Keep the seat recline within a comfortable range: start near 0-5 degrees when awake, tilt to 10-15 degrees for light rest, and move slowly toward 15-20 degrees only if you must sleep, ensuring you can still see where you are headed and avoid neck strain; use a gentle tilt in a direction that keeps your chest open.
Shift your posture every 15-20 minutes and, if possible, do this simultaneously with gentle torso adjustments: lean toward the front, then settle to the side on both sides to relieve pressure on the lower back while keeping your back muscles engaged, and let your shoulders settle down. Think of the load transfer as a simple transaction between your spine and the seat.
Keep in-seat adjustments within safe limits and coordinate with partners to share the load; ensure the headrest supports your neck while your lumbar area remains aligned with the base of the spine, keeping the overall posture healthy.
What to bring and place: a compact lumbar cushion, a small pillow, or folded blanket; bring your own support if the seat lacks it, place it against your back at the curve, and use the blanket to cover your thighs for extra warmth and flexibility.
For swollen feet or legs, keep blood flow moving by extending your legs gently, using a footrest or a bag; slow movements help veins and reduce discomfort, making frequent repositioning easier to maintain for multiple hours. If you’re trying to stay comfortable, more often small adjustments make a big difference.
Breathing Techniques and Micro-Movements to Prevent Stiffness
Start with a four-second inhale through the nose, a four-second hold, and a four-second exhale through the mouth, repeated for five cycles every hour to maintain full-body flow and reduce tightness.
When done, you should feel the hips and back looser and the shoulders more relaxed. Additional benefits come from pairing this breathing with micro-movements to ease common stiffness and prevent cramps in long flights.
In terms of practicality, apply these steps whether you sit still or shift positions. The most straightforward approach is to keep a steady rhythm and secure your base by sitting tall, with hips slightly above the knees and feet flat on the floor.
- Breathing basics: sit tall, place one hand on your abdomen and the other on your chest, and breathe through your nose for four seconds so both sides of the rib cage rise. This raises the chest gently and creates a smooth flow in the diaphragm while protecting the muscle groups along the spine.
- Exhale and release: exhale for four seconds, feeling the air flow out and the shoulders ease away from the ears. Keep hands relaxed and form supported by the chair, reducing the risk of cramping or tightening.
- Transaction of tension and ease: view each breath as a quick transaction between base tension and release. The four-second cycle becomes a reliable rhythm you can repeat without thinking about it.
- Return to base posture: after each cycle, return to a neutral position with your back aligned and hands resting on the thighs or armrests to maintain secure support.
- Notes on setting: for most settings, this routine takes five to seven minutes. It’s a common, easy practice that can be added to boarding or taxiing without delaying the transaction of traveling.
Micro-movements to complement breathing help maintain circulation and ease stiffness the sides of the body and the legs. These moves are simple, require no equipment, and can be done in seating or with a quick stand at a galley if permitted.
- Foot taps and ankle circles: keep knees soft, tap the toes and circle the ankles for 30–60 seconds to promote flow in the lower legs and reduce swelling. This supports lifting of the leg muscles and protects the joints from cramps.
- Seated hip tilts: gently tilt the pelvis forward and back for 5–8 repetitions to loosen the base of the spine and reduce lower-back tightness; hands can rest on the thighs for stability.
- گھٹنوں کو موڑنا: گھٹنوں کو کھولیں اور 8-12 تکرار کے لیے ہلکی موڑنے اور سیدھا کرنے کی ورزش کریں۔ یہ حرکت چوگوشہ عضلات اور رانوں کے پچھلے پٹھوں کو متحرک رکھتی ہے اور جب آپ طویل عرصے تک بیٹھے رہیں تو اینٹھن کا خطرہ کم ہوتا ہے۔.
- ٹورسو کراس اوورز: سیدھی ریڑھ کی ہڈی کے ساتھ، بازوؤں کو کراس کریں یا ایک ہاتھ مخالف گھٹنے پر رکھیں، دھیرے دھیرے دائیں جانب 4 چکروں کے لیے اور بائیں جانب 4 چکروں کے لیے مڑیں۔ یہ کراسنگ پورے جسم کے محور میں تناؤ کی تقسیم میں مدد کرتی ہے اور ریڑھ کی ہڈی کی نقل و حرکت کو سہارا دیتی ہے۔.
- کندھوں کو گول گھمانا اور گردن کو ڈھیلا کرنا: کندھوں کو کانوں کی طرف اٹھائیں، انہیں پیچھے اور نیچے کی طرف گھمائیں، پھر 6-8 چکروں کے لیے آگے گرائیں؛ کمر کے اوپری حصے کی تنگی کو دور کرنے کے لیے گردن کو آہستہ سے جھکائیں۔.
- طرفوں کو کھینچنا اور اٹھانا: ایک بازو کو سر کے اوپر اٹھائیں اور کنٹرول شدہ کھینچنے کے لیے مخالف سمت میں جھکیں، پھر اطراف بدلیں۔ یہ پسلی کے پنجرے کے پھیلاؤ اور سینے اور اطراف میں آرام کو بہتر بناتا ہے، جس سے ہوا اور خون کا بہاؤ جاری رہتا ہے۔.
زیادہ تر مسافر ٹیکسی، ٹیک آف اور کروز کے دوران ان چھوٹی حرکتوں کو سانس لینے کے ساتھ جوڑنے سے فائدہ اٹھاتے ہیں، جس سے ایک مستقل معمول بنتا ہے جو کرنسی کی حفاظت کرتا ہے۔ سادہ شکل آپ کے ہاتھوں کو آزاد رکھتی ہے، تناؤ کو کم کرتی ہے اور اضافی جگہ کی ضرورت کے بغیر آپ کی کمر اور کور کو محفوظ کرتی ہے۔.
کندھوں کو گھمانے کا سلسلہ: گردن اور کمر کے اوپری حصے کے تناؤ کو دور کرنے کے لیے 4 حرکات
چار حرکات کو ترتیب سے کریں، ہر ایک 8-12 تکرار کے ساتھ، اور اگر ضرورت ہو تو ایک بار دہرائیں۔ اپنی کمر کو سیٹ کے ساتھ چپٹا رکھیں، پیروں کو فرش پر چپٹا رکھیں، اور کمر کے نچلے حصے کی حفاظت کے لیے جبڑے کو آرام دیں۔ حرکت کرتے وقت براہ کرم مستقل طور پر سانس لیں۔.
درج ذیل تفصیلات آپ کو ہوائی جہاز میں یا طویل بکنگ کے دوران معمولات کو اپنانے میں مدد کرتی ہیں۔ ایک اور فوری ٹپ: اپنے کندھوں کو مرکز میں رکھنے کے لیے نشست کے اطراف کو بطور حوالہ نقطہ استعمال کریں، راؤنڈز کے درمیان غیر جانبدار پر واپس جائیں اور تناؤ سے بچنے کے لیے ایک آزاد، پرسکون ٹیمپو رکھیں۔.
| منتقل کریں۔ | کیسے کریں | توجہ اور فوائد | نکات |
|---|---|---|---|
| Move 1 – Classic Shoulder Roll (4-part) | ایک سپاٹ سیٹ سے، سیدھے بیٹھیں۔ سانس لیں، کندھوں کو کانوں کی طرف اٹھائیں، انہیں ہموار دائرے میں پیچھے، نیچے اور آگے کی طرف گھمائیں۔ آغاز پر واپس آئیں اور 8-12 بار دہرائیں۔. | اوپری ट्रैپس को ڈھیلا کرتا ہے، کھوپڑی کی بنیاد پر تناؤ کو کم کرتا ہے، کمر اور گردن میں بہتر کرنسی کو سپورٹ کرتا ہے۔. | گردن کو پرسکون رکھیں؛ دانتوں کو بھینچنے سے گریز کریں۔ اگر آپ کو سختی محسوس ہوتی ہے تو، مختصر وقفہ لیں اور رفتار کم کریں۔. |
| حرکت 2 – دایره پهلو به پشت | کندھوں کو تھوڑا سا اٹھائیں، پھر کنٹرول کے ساتھ ایک قوس میں اطراف، اوپر، پیچھے اور نیچے کی طرف گھمائیں۔ 8-12 تکرار کے بعد سمت تبدیل کریں۔. | گردن کے اطراف اور اوپری کمر میں تناؤ کو دور کرتا ہے۔ جب آپ گھنٹوں ایک تنگ نشست میں گزار رہے ہوں تو مفید ہے۔. | پسلیوں کا پنجرا ساکن رہے؛ صرف کندھوں کو حرکت دینی ہے۔ سانس کو پرسکون اور مستحکم رکھیں۔. |
| حرکت 3 – چانه را به داخل فشار دهید و شانهها را به هم نزدیک کنید | تھوڑی دیر کے لیے ٹھوڑی کو اندر کی طرف دبائیں اور کندھوں کے بلیڈ کو ایک ساتھ ملا دیں، جیسے آپ نے ان کے درمیان ایک پنسل پکڑی ہوئی ہے۔ 2 سیکنڈ کے لیے پکڑیں، چھوڑ دیں۔ 8-12 بار دہرائیں۔. | گردن کے گہرے عضلات کو متحرک کرتا ہے، آگے کی طرف جھکے ہوئے سر کی حالت کو کم کرتا ہے، اوپری سروائیکل تناؤ کو آزاد کرتا ہے۔. | گردن میں اگر کوئی چُبھن محسوس ہو تو مزید نہ کریں؛ بس کردیں۔. |
| حرکت 4 – آگے پیچھے سانس کا رول | سانس لیتے ہوئے کندھوں کو آگے کی طرف گھمائیں، پھر سانس لیتے ہوئے پیچھے کی طرف۔ ہموار، مربوط سانسوں کے ساتھ 8-12 تکرار مکمل کریں۔. | گردن کے اگلے حصے کی جکڑن اور ٹریپس کو دور کرتا ہے، جسم کے اوپری حصے میں گردش کو بہتر بناتا ہے۔. | راؤنڈز کے درمیان نیوٹرل پوزیشن پر واپس آجائیں؛ اگر ضرورت ہو تو، بعد میں بریک کے دوران ایک یا دو بار مزید دہرائیں۔. |
اگر آپ ان حرکتوں میں نئے ہیں، تو ایک راؤنڈ سے شروعات کریں اور دیکھیں کہ آپ کی کمر اور گردن کیسے رد عمل ظاہر کرتی ہیں۔ معلوم کریں کہ کون سا تسلسل آپ کے جسم کے لیے بہترین ہے، پھر ضرورت کے مطابق اسے دہرائیں۔ یہ طویل سفروں پر صحت کو فروغ دیتا ہے جہاں حرکت میں چند منٹ گزارنا ایک اہم فرق پیدا کر سکتا ہے۔ ہوائی جہاز میں، اپنے پاؤں فرش پر رکھیں اور اپنی کمر کو نشست سے سہارا دیں۔ کسی بھی وقفے کے بعد براہ کرم ترتیب پر واپس آجائیں، اور اپنی پیش رفت کو ٹریک کرنے کے لیے اپنے اندراج کارڈز یا صحت کے نوٹس میں موجود تفصیلات کا استعمال کریں۔ آپ کی آرام کی کمائی مسلسل مشق سے بڑھتی ہے، اور ہموار پروازوں کے میل10 دور نہیں ہیں۔.
ہائیڈریشن، سرکولیشن، اور درد کم کرنے کے لیے بریک ٹائمنگ
ایک سادہ قاعدے سے آغاز کریں: ٹیک آف کے بعد ہوائی جہاز میں ہر 30 منٹ بعد 200 ملی لیٹر پانی پی لیں، جس کا مقصد عام 6-8 گھنٹے کی پرواز کے دوران 1.5-2 لیٹر پانی پینا ہے اور ہائیڈریشن کو برقرار رکھنے کے لیے الکحل یا زیادہ کیفین سے پرہیز کریں۔.
پیشاب کی رنگت ہلکی رکھ کر اپنے جسم میں پانی کی مقدار کا اندازہ رکھیں؛ اگر رنگت گہری ہو تو زیادہ مائع اشیاء استعمال کریں اور الیکٹرولائٹ جزو والی اشیاء کا انتخاب کریں تاکہ کیبن میں آپ کا جسم متوازن رہے۔.
خون کی گردش کو بڑھانے کے لیے ہر 60–90 منٹ میں حرکت کریں۔ بیٹھے ہوئے، ٹخنوں سے دائرے بنائیں، انگلیوں کو تھپتھپائیں، گھٹنوں کو اٹھائیں اور رانوں کو دبائیں؛ جب آپ کھڑے ہوں تو سینے کو کھولنے اور ریڑھ کی ہڈی کو سیدھا رکھنے کے لیے اپنی انگلیوں کو اپنی پیٹھ کے پیچھے آپس میں جوڑیں؛ لمبے وقت تک کے لیے ٹانگوں کو سہارا دینے کے لیے گریجویٹڈ کمپریشن جرابیں پہنیں۔ خون کی گردش کا یہ معمول غیر فعال انداز میں بیٹھے رہنے سے زیادہ مؤثر ہے۔.
وقفے کے اوقات اہم ہیں: تقریباً ہر 60-90 منٹ میں وقفے کا شیڈول بنائیں؛ ایک یاد دہانی سیٹ کریں اور ان منٹوں کو 2-3 منٹ کے فوری معمول کے لیے استعمال کریں: کھڑے ہوں، گلیارے میں ایک چھوٹا سا قوس چلیں، اور ایک لمبے، متوازن انداز کے ساتھ اپنی سیٹ پر واپس آجائیں، اور خود کو یاد دلائیں کہ وقفے منصوبے کا حصہ ہیں۔.
جسمانی رکھ رکھاؤ اور سانس لینا: ریڑھ کی ہڈی سیدھی، کندھے ڈھیلے اور کولہے قدرے آگے رکھ کر بیٹھیں۔ کبڑا ہونے سے گریز کریں نیز ریڑھ کی ہڈی میں تناؤ کم کرنے کے لیے اپنے اگلے حصے کو کھلا رکھیں۔ سادہ آگے کی طرف جھکنے یا ہلکی سی ترچھی حرکتیں بغیر زیادہ کوشش کے سیدھ کو درست کر سکتی ہیں۔.
آپ کا سفری ساتھی مدد کر سکتا ہے: وہ آپ کو کھڑے ہونے، کھینچنے یا کشن کو ایڈجسٹ کرنے کے لیے کہہ سکتے ہیں؛ آپ مل کر ایک ایسی رفتار بنا سکتے ہیں جو خون کو گردش میں رکھتی ہے، جس سے پرواز کے دوران زیادہ آرام ملتا ہے۔.
مسافروں سے حاصل کردہ اعداد و شمار سے پتہ چلتا ہے کہ ہائیڈریشن، حرکت اور جسم کی مناسب حالت کا ایک مستقل معمول سختی میں کمی، بہتر نیند، اور ایک ہموار سواری جیسے فوائد دیتا ہے۔ یہ طریقہ آپ پرواز کے دوران کیسا محسوس کرتے ہیں اس پر زیادہ کنٹرول پیش کرتا ہے۔.