


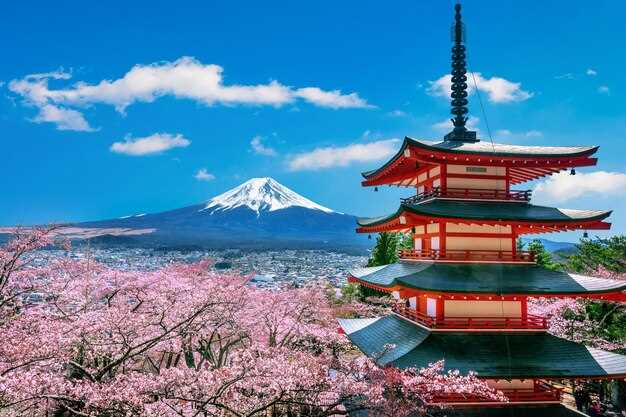
آغاز کرو ایک علی الصبح کا آپشن جو ٹرانسپورٹ کو جوڑتا ہے ہلکی پیدل سفر کے ساتھ تاکہ ہجوم سے پہلے پہاڑی تک پہنچا جائے، بہترین مناظر پیش کرتے ہوئے۔ پینورامک منظر.
دارالحکومت کے علاقے سے، آپ کئی ایک کا انتخاب کر سکتے ہیں۔ انتخاب پتھس: ریل پلس کوچ کے سفری منصوبے، یا نجی دن کے فرار جو مراکز کے درمیان کم سے کم انتظار کے ساتھ ورکیہرٹ کرتے ہیں۔ ایک اسٹاپ پر چورییتو-پگوڈا پیشکش کرتا ہے ایک کلاسیکی تصویر، اور آپ کے پاس وقت ہوگا گرد و نواح کی وادیوں کو دیکھنے کے لیے کیونکہ ٹرینیں اور بسیں دن بھر یکساں طور پر چلتی رہتی ہے۔ اگر موسم بدلتا ہے، تو آپ کو رفتار اور نظاروں سے لطف اندوز ہونے کے درمیان توازن مل جائے گا۔ یہاں بھی ایک مختصر نظر ڈالنا مفید ہے۔.
ایک اور نمایاں بات یہ ہے کہ سے ملاقات کرنا kultur مقامات سے سیکھتے ہوئے، نشانات آتش فشانی آغاز، اور مشاہدہ کریں۔ فستے قریبی دیہات میں؛ اونچی جگہوں پر آسمان کھلتا ہے اور وہ پینورامک منظر کھلے ہوئے گڑھوں کے خدوخال پر محیط ہے۔.
ہلکا اور عملی سامان باندھیں: ایک کمپیکٹ جیکٹ، بارش سے بچاؤ کی تہہ، پانی، ٹوپی اور ایک چھوٹا کیمرہ۔. پیک کرنا اپنی ضروریات ایک رات پہلے، اور چیک کریں۔ آسائشیں اسٹاپ پر؛ اس سفر میں اسٹیشنوں کے درمیان باقاعدہ verkehra کا مظاہرہ کیا جاتا ہے، جس سے آپ ہر منظر سے لطف اندوز ہونے کے لیے اپنی رفتار برقرار رکھ سکتے ہیں۔.
اس کے بعد، آپ کر سکتے ہیں۔ ٹھہریں کسی مهمان خانہ میں یا کھینچنا زیادہ گنجان آباد علاقوں کی طرف؛ آپ جو بھی انتخاب کریں، ریل نیٹ ورک واپسی کے لچکدار اوقات فراہم کرتا ہے تاکہ آپ شام سے پہلے یادوں سے لطف اندوز ہوسکیں۔.
ٹوکیو سے ماؤنٹ فجی کے شاندار ٹور - ایڈونچر آپ کا منتظر ہے!
ایسی بس ٹور کا انتخاب کریں جو ایک مختصر سیر کو نچلی ڈھلوان پر چڑھنے کے ساتھ ملائے؛ اس میں آپ کے پاس ایک گائیڈ ہوگا جو خطہ، حفاظت اور تصویر کے مقامات کی وضاحت کرے گا۔ نارِتا پہنچنے والے مسافروں کے لیے، ایک ایسا پیکیج منتخب کریں جو نارِتا ایئر پورٹ پک اپ اور میٹنگ پوائنٹ تک ٹرانسفر فراہم کرے۔ آسانی سے شرکت کے لیے، تصدیق کریں کہ آپریٹر انگریزی بولتا ہے اور واضح ٹائم ٹیبل فراہم کرتا ہے۔.
وقت اہمیت رکھتا ہے: بہار اکثر صاف آسمان اور ڈرامائی نظارے لاتی ہے؛ کبھی کبھار حالات بدل جاتے ہیں، لیکن ایک عام روایتی سفر کا دورانیہ 10-12 گھنٹے ہو گا۔ یہ منصوبہ نظاروں پر چند مختصر وقفے فراہم کرتا ہے جہاں آپ اپنے آپ کو پھیلا سکتے ہیں، پانی پی سکتے ہیں، اور آرام دہ کھڑکیوں سے یا اپنی سیٹ سے ایک مستقل زاویے کے ساتھ شوٹ کر سکتے ہیں۔ چڑھائی پر پہنچنے سے پہلے، اس بات کو یقینی بنائیں کہ آپ کے آرام دہ بوٹ اور اونی ٹوپیاں تیار ہیں۔.
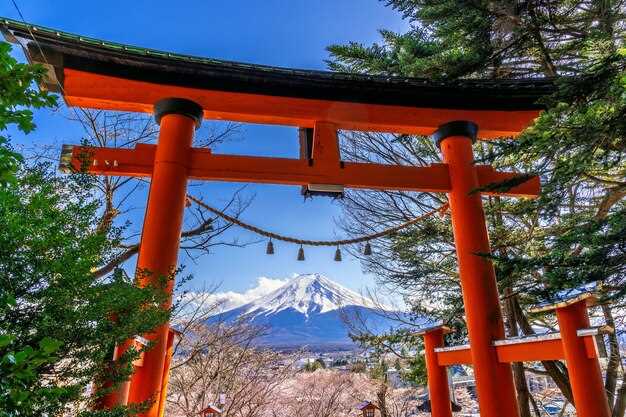
ٹرانسپورٹ کے آپشنز مختلف ہوتے ہیں: آٹو ٹرانسفرز ٹریل ہیڈ تک عام ہیں، جبکہ دیگر ایک قریبی مرکز تک زگفارٹ کے ساتھ ایک زاہلت ٹرین لیگ پر انحصار کرتے ہیں۔ یہ رنڈ روٹس عموماً گروسن فینسٹر پر مشتمل ہوتے ہیں جو افق کو فریم کرتے ہیں، اس لیے اپنا کیمرہ تیار رکھیں۔ اگر آپ کو اضافی جگہ چاہیے تو ایک چھوٹے گروپ کا آپشن منتخب کریں؛ کونن آپ بعض اوقات بھیڑ سے بچ سکتے ہیں اور سینری مہر ہینوز سے لطف اندوز ہو سکتے ہیں۔.
سامان باندھنے کے لیے: آرام دہ جوتے، اونی ٹوپیاں، ایک اضافی تہہ، ہلکا پھلکا بارش سے بچاؤ، اور ایک چھوٹا ناشتہ۔ بہار کے موسم میں، دھوپ کی ٹوپی طویل دورانیے میں مدد کرتی ہے۔ بلیٹر یا پتّے راستے پر بہہ سکتے ہیں، اس لیے ہر قدم پر دھیان دیں اور اپنے آپ کو سنبھالنے کے لیے اسٹیلن ہینڈ ہولڈز کا استعمال کریں۔ ایک نقشہ باندھیں یا گائیڈ کی ایپ پر انحصار کریں۔ اپنے قدموں کو زائلٹ کریں اور راستے کی احتیاط سے منصوبہ بندی کریں؛ ہیناؤ راستہ گھومنے والا ہے، اس لیے نشان زدہ لکیروں پر رہیں۔.
تجربے کو زیادہ سے زیادہ کرنے کے لیے، آپریٹرز کے جائزے پڑھیں اور نظام الاوقات کا موازنہ کریں۔ ایک ایسا منصوبہ بنائیں جس میں ڈرائیو مختصر ہو اور واپسی دیر سے ہو تاکہ آپ دن پر غور کر سکیں؛ daher آپ ایسی یادیں ساتھ رکھیں گے جو اترنے اور ریل یا آٹو کے ذریعے دارالحکومت واپسی کے بعد بھی دیر تک رہیں گی، zählt وہ لمحات جو نمایاں تھے اور اس کے بعد کی سکون، daran آپ بعد میں دوسری سیر کی منصوبہ بندی کر سکتے ہیں۔.
ٹوکیو سے ماؤنٹ فوجی اور لیک آشی دیکھنے کے لیے سرمائی پیکنگ اور سفر کا منصوبہ
سفارش: ایک کمپیکٹ، تہہ دار وارڈروب پیک کریں اور ٹرینوں، جھیل کروز، اور ہوٹلوں کے لیے آن لائن بوچنگ کو لاک کریں تاکہ актуальные شیڈول اور پریز یقینی ہوں، تاکہ آپ کم سورگوں کے ساتھ gelangen können۔.
نوٹ: فوری نظرثانی کے لیے بلٹ ریفرنس استعمال کریں؛ یہ آپ کو مؤثر طریقے سے ضروری چیزوں کو استعمال کرنے میں مدد کرتا ہے۔.
سردیوں کے لیے ضروری اشیاء:
- بیس لیئرز: مرینو یا سنتھیٹک کپڑے کے 2-3 سیٹ۔.
- وسطی تہیں: موصلیت کے لیے اونی یا ہلکی ڈاون۔.
- بیرونی خول: واٹر پروف، ونڈ پروف، سانس لینے کے قابل، ہوڈ کے ساتھ۔.
- مضبوط گرفت والے موصل جوتے؛ اضافی جرابیں لے آئیں۔.
- گرم ملحقات: ٹوپی، سکارف، دستانے (گرم استر پر غور کریں)۔.
- سن سکرین، چکاچوند کے لیے دھوپ کے چشمے، ہونٹوں کا بام۔.
- چھوٹا بیگ جس میں بارش سے بچاؤ اور ایک چھوٹا چھاتا ہو؛ ساتھ میں کھانے کی چیزیں اور پانی رکھیں۔.
- پاور بینک، چارجر، اور سفری اڈاپٹر؛ لذیذ انرجی بارز کارآمد ہیں۔.
- ضروریاتِ صفائی، ادویات، اور اُنتَر ویگس کے لیے چھوٹا فرسٹ ایڈ کِٹ۔.
- کیمرا یا سمارٹ فون بمع حفاظتی کور؛ ان علاقوں کے لیے سادہ نقشہ یا آف لائن روٹ ایپ لائیں۔.
- اختیاری: گرم مشروب کے لیے چھوٹا تھرمس؛ سائیکلنگ گیئر صرف اس صورت میں جب حالات سازگار ہوں۔.
حالیہ نوٹ: سیاحوں کو نوٹ کرنا چاہیے کہ موسم سرما کے حالات میں سائیکل چلانا اکثر محدود ہوتا ہے۔ سیاح روٹ کو بحفاظت دریافت کرنے کے لیے اکثر بس یا کشتی کے رابطوں کا استعمال کرتے ہیں۔ یہ ممکن ہے کہ برف کی وجہ سے کچھ راستوں کو تبدیل کرنا پڑے؛ تاہم، اس سے آپ کے منصوبوں پر صرف کم سے کم اثر پڑے گا۔.
خلاصہ سفر:
- دارالحکومت سے شروع کرتے ہوئے، بذریعہ ریل اوٹسوکی کا سفر کریں، پھر فوجیکیو ریلوے میں کاواگوچیکو کے لیے منتقل ہو جائیں۔ عام دورانیہ تقریباً 2 گھنٹے؛ روانگی کے لیے aktuell regel چیک کریں؛ Preise موسِم کے لحاظ سے مختلف ہوتے ہیں؛ vorherige buchung کی سفارش کی جاتی ہے؛ diese روٹ gehört zu den beliebtesten؛ جھیل پر جلدی gelangen حاصل کریں۔.
- جھیل کے قریب کسی ایک ہوٹل میں چیک ان کریں؛ اگر ممکن ہو تو ایک ایسا ہوٹل منتخب کریں جس میں اونسن ہو؛ آن لائن بکنگ قیمتوں اور ویو والے کمرے کو محفوظ بنانے میں مدد کرتی ہے؛ یہ موسم سرما کے مناظر کو دیکھنے کے لیے ایک مضبوط بنیاد فراہم کرتا ہے۔.
- Afternoon: stroll the lakeside promenade or board a sightseeing boat to see the coast; if conditions permit, you können gehen to a lookout point; the view is besonders striking when clouds pull back.
- Day 2: From Kawaguchiko, travel to the Lake Ashi area and take a cruise to explore the coastline; note dass die Dienste je nach wetterlage reduziert sein können; check aktuelle schedules; many Touristen nutzen diese Gelegenheit, um einzigartige Perspektiven zu fotographieren; danach ride the Hakone Ropeway to an elevated viewpoint; jedoch weather may obstructions auftreten, so planen Sie entsprechend.
- Return to the capital via the same route; allow buffer time for delays; nutzen additional time, vielleicht mit einem Besuch im Gotemba Outlet oder einem lokalen onsen, bevor Sie diesen trip beenden. Wenn nötig, können Sie alternativ eine längere pause einlegen, um Ihre Route durch andere Seen landschaftlich zu genießen, köstliche Snacks inklusive.
Getting There from Tokyo in Winter: Fuji, Lake Ashi, and Hakone routes
Begin with a winter-ready plan: Shinjuku-bound Romancecar reaches Hakone-Yumoto in about 85 minutes; swap to Hakone Tozan Railway for Gora, then the cable car to Sounzan and the ropeway to Togendai. Togendai serves the lake cruiser to Motohakone; a short bus hop to Oshino. Tickets for the rail leg are best booked online, and the Hakone Free Pass covers rund transfers and the boat ride. airport connections in the capital-area speed the start of this circuit. allem in winter, this route suits besucher seeking kultur and nachhaltigkeit, with klar views on cold mornings.
On the ground, the Hakone-Yumoto to Gora leg takes roughly 40 minutes on the Hakone Tozan Line; a short Funicular climb to Sounzan is followed by the ropeway to Togendai, offering immediate lake views. The lake cruise to Motohakone runs on winter timetables, with frequent departures; check the timetable, then continue by bus to Oshino if a longer day suits you. Tickets can be purchased at counters or online; auch if you want mehr touren, start früh in dieser zeit.
Oshino acts as a scenic hinge: from Oshino, a quick bus links you to Kawaguchiko for a broader panorama of the snow-dusted Fujisan on clear mornings. For besucher who wish to maximize a day, the loop kann innerhalb eines Tages completed; the nearby heilige shrines and lokale kultur add depth to the experience. Frühling typically brings more daylight, but klare winter skies still offer stunning views hier.
Local kultur and sustainability tag along: innerhalb der umliegende region, hotels prioritize nachhaltigkeit and support lokalen produkten. Besuche heilige places with respect, dann join kulturevents and learn about traditions; ihre besucher experiences enrich die reise. nehmen tickets only at authorized counters, und kaufen you can pick up at the station or online.
Practical notes: daylight is short in winter; plan around zeit, layer up, and pack a compact umbrella for crisp skies. Prices for passes and transfers are quoted in euro; airport access simplifies arrivals, besonders für internationale guests. innerhalb eines Tages you can loop core sights, dann optional weiter zu Kawaguchiko oder Oshino, hier ein angenehmer Abschluss vor dem Rückweg. allem gesagt, buchen Sie zeitig Tickets, denn die besten slots füllen sich rasch während der kälteren monate.
What to Pack for Fuji and Lake Ashi in Winter: Clothing, gear, water, and documents
Layering is essential for winter around the lake region: base, mid, and outer layers. regel: heavier layers go in your main bag, lighter items stay in your daypack. Pack a down or synthetic insulated jacket rated to -5°C, a warm hat, gloves, and waterproof boots with insulated socks. If your itinerary includes the hakkai section, add gaiters to keep snow from entering boots.
Footwear and warmth matter most on icy ramps and windy boardwalks. Choose waterproof boots with good traction, and bring thick wool or synthetic socks, a spare pair of lightweight socks, a thermal balaclava or beanie, and a lightweight mid-layer you can pull on during breaks. Diese Ausrüstung ist geeignet gegen kälte und wind; extra pair of insoles can enhance comfort longer during stops.
Gear and protection help balance weight and safety. Trekking poles provide stability on snow and wet boards; a compact headlamp with extra batteries; a power bank; dry bags for electronics; and camera protection against spray. Organisation matters; empfehle a small, weatherproof pouch for essentials and a larger bag for heavier items, damit Sorgen reduziert werden. Längerier Tagestouren profitieren von einem gut organisierten Aufbau.
Hydration and weather awareness go hand in hand. Carry an insulated water bottle or hydration bladder to resist freezing, plus electrolyte powder or tablets for energy. Check wetterbedingungen before departure and have a compact rain cover for your pack. Zusätzlich, dazu, monitor wind and sun exposure to adjust layers on the fly.
Documents and tickets should be ready and protected. Carry passport/ID, travel insurance, tickets, and reservation confirmations; keep digital copies and a printed backup. Pack diese in a waterproof sleeve and note Ihren Abfahrtsort, Notfallkontakte und Abholzeiten. Dazu gehören auch Vorsichtsmaßnahmen wie eine Liste Ihrer wichtigen Nummern und Anweisungen, falls Pläne sich ändern.
Seasonal specifics matter: in September or transitioning to winter, mornings can stay chilly while afternoons warm up. Plan für längere treks, pack extra snacks, a compact stove or thermos, und eine zusätzliche Lage zum Aufwärmen. Wirst du unterwegs abgelegt, halte Ersatzwärme bereit und halte den Rucksack leicht zugänglich. Für längere Touren können längere Pausen sinnvoll sein, aber bleib flexibel und passe deine Ausrüstung an.
Tickets, transportation, und Unterkunft sollten vorab gesichert werden. Hotels nahe dem Abfahrtsort erleichtern Morgenstarts; bestätige Transportoptionen, Abfahrtszeiten, und eventuelle Alternativrouten. Eine Notfalloption ist immer sinnvoll, sodass du bei Wetterwechsel oder Verspätungen eine alternative Planung hast. Berücksichtige auch lokale Bestimmungen und reiseplanung basierend auf deinen Bedürfnissen, um Stress zu vermeiden.
Weather-Ready Clothing: Layering, boots, gloves, and headgear for snow and wind
Start with a breathable base layer to manage moisture, then add an insulating midlayer, and finish with a windproof shell. Base fabrics should be merino or high-performance synthetic in the 150–260 g/m2 range, followed by a midlayer around 200–400 g, and a 2- to 3‑layer outer shell rated at least 10,000 mm water and 20,000 g/m2/24h breathability. Wenn conditions worsen, add a compact down or synthetic Insulation layer up to 200–300 g; trotzdem, keep the overall bulk reasonable so beweging remains unrestricted. Lassen moisture escape through pit zips or underarm vents to prevent overheating, even on a fototour in the damp, windy air.
Boots should be waterproof and insulated, with an ankle‑supporting cut and a rugged outsole. Look for 4–5 mm lug depth, a gusseted tongue to block snow, and crampon compatibility if you anticipate icy strecken. Für extreme winds, choose a taller model than normal and add gaiters to verhindern Schnee‑Infiltration; a properly fitted pair of socks–liner plus thick wool–reduces hotspots and blister risk on long tracks through owakudani and other alpine park zones.
Gloves require a two‑piece approach: a snug, moisture‑wicking liner gLOVE and a waterproof outer shell glove. Outer mittens are ideal for persisting cold, while touchscreen‑compatible fingertips help during a fototour. Ensure Erforderlich warmth reach is maintained with 150–300 g of insulation in the outer layer, and consider a windproof palm reinforcement for dichter squalls. Pack a spare inner pair in your organized kit so reisende can rotate without exposing chilled hands.
Headgear should cover the ears and neck when wind speeds rise. A lightweight, moisture‑wicking beanie or balaclava under a helmet or hood is perfekte for rapid shifts in the region’s weather. Include a windproof neck gaiter and a lightweight, packable shell hood; these items halten wind out and keep your face from drying out in dry‑ice gusts along streets and park trails on strecken der region.
Gear organization matters: an organized packing list (organisierte) with mehrere layers and an extra base layer (beinhalten) helps you adapt quickly. Travelers (reisende) who plan for mehrere climate windows find sich besser vorbereitet, sogar bei plötzlichen Kälte‑ oder Windfronten. For a fototour on the tokaido route and nearby seen points, keep a compact, dry bag at the ready, und denn’s musst du darauf vorbereitet (erforderlich) für wechselnde Bedingungen. Wenn du in einem wechselhaften wind‑ und schneebedingten Abschnitt der strecke unterwegs bist, ist ein gut belüftetes System perfekt; somit kannst du dich auf die landschaft konzentrieren, statt auf die Kleidung zu achten. In der owakudani region, erkundungen entlang straßen und parkpfade erfordern mehrere Schichten und stabile Stiefel, damit du zuverlässig tempo halten kannst, egal ob du auf seen oder fels treppst. Ein Teil deiner Ausrüstung sollte ein warmer, leichter Schal oder neck‑gaiter enthalten, der sich flexibel zu einem Balaclava formen lässt, sodass du dich auf der strecke nicht stressen musst. Wenn du dich an die Hinweise hältst, findest du den richtigen balans zwischen Wärme, Bewegungsfreiheit und Schutz–perfekt für jeden reisenden, der die beliebtesten routen der region sicher erleben will.
On-the-Spot Gear and Safety: Maps, GPS, flashlight, trekking poles, and crampons if needed
Always carry a waterproof map and a GPS with offline maps; Akasaka serves as a common starting hub, and a short zugfahrt delivers you to the trailhead; along ikonischen Wegen, note the spitze rise and the punkt on your map; keep a bullet checklist so nichts vergessen unterwegs.
Maps and GPS: Use a primary map on your device with offline data, and keep a compact paper map as backup. Set waypoints at the trailhead, major junctions, and oben lookout. In areas with poor signal, navigation by line and landmarks along Wegen matters. Share deinen Kontakt and a rough Zeitrahmen for return with a trusted person; if conditions change, be prepared to shorten wanderungen and turn back at the nächst sichere stätte.
Flashlight and light-weight power: a headlamp with 200–350 lumens handles dawn, dusk, and clouded sections; pack 2 spare batteries and a small power bank; keep the lantern and batteries in a dry pocket. Trekking poles: adjustable aluminum or carbon, 115–135 cm extended, with carbide tips for rocky stretches; collapse them for unterwegs storage and use on icy or steep sections to stabilize balance. Crampons only wenn ice or fresh snow demands traction; choose a compatible binding for deinen boots and practice quick clipping and unclipping before the ascent. Combine this with weather checks and a quick bolso of extra socks and a light insulating layer to adjust for wechselnde Verhältnisse. Nachhaltigkeit matters: carry reusable water bottle, avoid disposable batteries, and recycle any waste along the route.
Size and safety reminders: keep line management simple, tell someone your route at Akasaka, oshino, or hakkai checkpoints, and recheck gear before leaving stätte. Prepare for caminatas where zahlreiche trail signs appear along straßen and entlang der Wege; siempre verify gear fit and boundaries, and remember: niemand goes weiter ohne Sicherung, wenigstens in kritischen Abschnitten.
| گیئر آئٹم | آپ کو اس کی ضرورت کیوں ہے؟ | Recommended spec | نوٹس |
|---|---|---|---|
| Maps (physical + offline digital) | Reduces risk if signal drops; marks start, junctions, and oben lookouts | Waterproof, scale to 1:25,000; include a back-up paper map | Check signs along ikonischen Wegen; refer to punkt markers |
| GPS device / offline app | Precise positioning and waypoint navigation | Single-battery life >6 hours; robust in cold weather | Have a backup power source; avoid over-reliance |
| Flashlight (headlamp) | Visibility in dawn/dusk; quick hands-free operation | 200–350 lumens; IPX4+; 2 spare batteries | Keep in dry pocket; test before ascent |
| Trekking poles | Stabilization on uneven terrain and steep sections | Adjustable, 115–135 cm; carbide tips | Fold for unterwegs; replace worn tips |
| Crampons (if needed) | Traction on ice or hard-packed snow | Compatibile with boots; strap-on or step-in type | Practice clipping; remove on dry rock |