


התחילו ב- אפשרות מוקדמת בבוקר המשלבת הובלה עם טיול רגלי קל כדי להגיע לרכס לפני ההמונים, ומספקת מבט פנורמי.
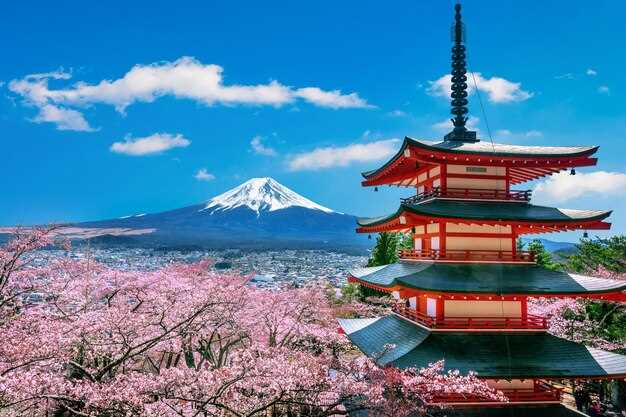
מאזור הבירה, תוכלו לבחור בין מספר אפשרויות אפשרות נתיבים: מסלולי נסיעה משולבים ברכבת ובאוטובוס, או בריחות יום פרטיות ש-verkehrt בין מוקדים עם המתנה מינימלית. עצירה ב- מִקְדָשׁ צוּרֵיטוֹ (Chureito Pagoda) מציע תמונה קלאסית, ויהיה לך זמן להסתכל על העמקים הסובבים בזמן שרכבות ואוטובוסים נוסעים בהתמדה לאורך היום. אם מזג האוויר משתנה, תמצא את האיזון בין מהירות לבין התענגות על הנופים. גם כאן כדאי להעיף מבט קצר.
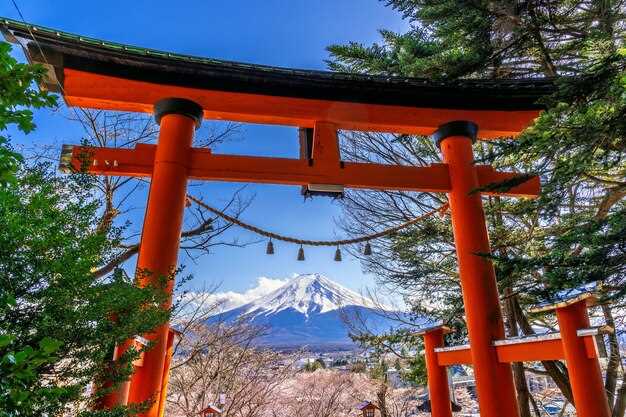
אחד מרגעי השיא הוא המפגש עם תרבות סמנים, בזמן שאתם לומדים על מקומיים וולקני מקורות, ולחזות חגיגה בכפרים סמוכים; בנקודות תצפית שָׁמַיִם נפתח ואת מבט פנורמי מתפרש על פני צלליות זרועות מכתשים.
ארזו קל ופרקטי: מעיל קומפקטי, שכבת גשם, מים, כובע ומצלמה קטנה. לארוז הפריטים החיוניים שלך בלילה שלפני, ובדוק נוחיות בתחנות; המסע מתאפיין בתנועה סדירה בין התחנות, ומאפשר לכם לקחת את הזמן וליהנות מכל סצנה.
אחר כך, אתה יכול להישאר בבית הארחה או לִמְשוֹך לכיוון רבעים סואנים יותר; מה שתבחרו, רשת הרכבות מספקת זמני חזרה גמישים כדי שתוכלו להתענג על הזיכרון לפני הדמדומים.
טיולי ענק להר פוג'י מטוקיו – ההרפתקה מחכה
בחרו בסיור אוטובוס המשלב שיטוט תמציתי עם טיפוס במורדות התחתונים; לכך תצטרכו מדריך שמסביר את השטח, הבטיחות ונקודות הצילום. למטיילים המגיעים לנריטה, בחרו חבילה המציעה איסוף משדה התעופה נריטה והעברות הלוך ושוב לנקודת המפגש. כדי להשתתף בצורה חלקה, ודאו שהמפעיל דובר אנגלית ומספק לוח זמנים ברור.
התזמון חשוב: ה-frühling מביא לעתים קרובות שמיים צלולים ונופים דרמטיים; manchmal התנאים משתנים, aber מסלול טיפוסי rund יימשך 10–12 שעות. התוכנית bietet כמה הפסקות קצרות בנקודות תצפית שבהן אפשר למתוח איברים, ללגום מים ולצלם מתוך fenster נוחים או מהמושב בזווית יציבה. bevor תגיעו לעלייה, ודאו שהמגפיים ה bequeme וה wollmützen שלכם מוכנים.
אפשרויות התחבורה משתנות: הסעות אוטומטיות לתחילת המסלול הן נפוצות, בעוד שאחרים מסתמכים על מקטע רכבת zählt עם zugfahrt למרכז סמוך. מסלולי rund אלה כוללים בדרך כלל großen fenster שממסגרים את האופק, אז שמרו על המצלמה שלכם מוכנה. אם אתם רוצים יותר מקום, בחרו באפשרות של קבוצה קטנה; können לפעמים אפשר לברוח מהקהל וליהנות מהנוף mehr hinaus.
מה לארוז: הנעלה נוחה, כובעי צמר, שכבה נוספת, מעיל גשם קל וחטיף קומפקטי. בתנאי אביב, כובע שמש עוזר במקטעים ארוכים; עלים או עלים עשויים להיסחף על השביל, אז שימו לב לכל צעד והשתמשו במאחזי הידיים המוצבים כדי להתייצב. ארזו מפה או הסתמכו על האפליקציה של המדריך; ספרו את הצעדים שלכם ותכננו את המסלול בקפידה; מחוץ לשביל מתפתל, אז הקפידו על הקווים המסומנים.
כדי למקסם את החוויה, קראו ביקורות על מפעילי האתר והשוו לוחות זמנים. שקלו תוכנית עם נסיעה קצרה יותר וחזרה מאוחרת יותר, כך שתוכלו להרהר ביום; לכן תישאו עמכם זיכרונות שיישארו זמן רב לאחר הירידה והחזרה לבירה ברכבת או ברכב, ספרו את הרגעים הבולטים והשלווה שבאה לאחר מכן, כדי שתוכלו לתכנן טיול שני בהמשך.
אריזה וחורף ומסלול לביקור בהר פוג'י ואגם אשי מטוקיו
המלצה: ארזו מלתחה קומפקטית בשכבות והבטיחו הזמנה מקוונת לרכבות, שיט תענוגות באגם ומלונות כדי להבטיח לוחות זמנים ומחירים עדכניים, כך שתוכלו להגיע עם פחות דאגות.
• הערה: השתמש בהפניית תבליט לסריקה מהירה; זה עוזר לך לנצל את היסודות ביעילות.
דברים חיוניים לאריזה לחורף:
- שכבות בסיס: 2–3 סטים של בד מרינו או סינתטי.
- שכבות ביניים: פליז או פוך קל לבידוד.
- מעטפת חיצונית: עמידה למים, חסינת רוח, נושמת עם קפוצ'ון.
- מגפיים מבודדות עם אחיזה טובה; קחו גרביים נוספות.
- אביזרים חמים: כובע, צעיף, כפפות (שקול בטנות מחוממות).
- קרם הגנה, משקפי שמש לסנוור, שפתון לחות.
- תיק יום עם כיסוי גשם ומטרייה קומפקטית; כולל חטיפים ומים.
- בנק כוח, מטען ומתאם נסיעות; חטיפי אנרגיה טעימים הם שימושיים.
- תמרוקים, תרופות וערכת עזרה ראשונה קטנה לנסיעות.
- מצלמה או סמארטפון עם כיסוי מגן; הביאו מפה פשוטה או אפליקציית ניווט לא מקוונת עבור אזורים אלה.
- אופציונלי: תרמוס קטן למשקה חם; ציוד רכיבה רק אם התנאים מאפשרים.
הודעות עדכניות: תיירים צריכים לשים לב שלעתים קרובות יש מגבלות על רכיבה על אופניים בתנאי חורף; תיירים משתמשים לעתים קרובות בקווי אוטובוס או סירה כדי לחקור את המסלול בבטחה. ייתכן שיהיה צורך לשנות חלק מהדרכים בהתאם לשלג; עם זאת, זה משפיע על התוכניות שלך רק באופן מינימלי.
סקירת מסלול הנסיעה:
- התחילו בעיר הבירה, סעו ברכבת לאוצוקי, ואז עברו לרכבת פוג'יקיו לקוואגוצ'יקו. משך זמן טיפוסי הוא כשעתיים; בדקו aktuelle regel לגבי יציאות; Preise משתנים בהתאם לעונה; מומלץ לבצע buchung מראש; diese route gehört zu den beliebtesten; הגיעו לאגם במהירות.
- Check in at one of the hotels near the lake; choose a property with an onsen if possible; online buchung helps lock in Preise and room with views; this provides a solide basis to entdecken the winter scenery.
- Afternoon: stroll the lakeside promenade or board a sightseeing boat to see the coast; if conditions permit, you können gehen to a lookout point; the view is besonders striking when clouds pull back.
- Day 2: From Kawaguchiko, travel to the Lake Ashi area and take a cruise to explore the coastline; note dass die Dienste je nach wetterlage reduziert sein können; check aktuelle schedules; many Touristen nutzen diese Gelegenheit, um einzigartige Perspektiven zu fotographieren; danach ride the Hakone Ropeway to an elevated viewpoint; jedoch weather may obstructions auftreten, so planen Sie entsprechend.
- Return to the capital via the same route; allow buffer time for delays; nutzen additional time, vielleicht mit einem Besuch im Gotemba Outlet oder einem lokalen onsen, bevor Sie diesen trip beenden. Wenn nötig, können Sie alternativ eine längere pause einlegen, um Ihre Route durch andere Seen landschaftlich zu genießen, köstliche Snacks inklusive.
Getting There from Tokyo in Winter: Fuji, Lake Ashi, and Hakone routes
Begin with a winter-ready plan: Shinjuku-bound Romancecar reaches Hakone-Yumoto in about 85 minutes; swap to Hakone Tozan Railway for Gora, then the cable car to Sounzan and the ropeway to Togendai. Togendai serves the lake cruiser to Motohakone; a short bus hop to Oshino. Tickets for the rail leg are best booked online, and the Hakone Free Pass covers rund transfers and the boat ride. airport connections in the capital-area speed the start of this circuit. allem in winter, this route suits besucher seeking kultur and nachhaltigkeit, with klar views on cold mornings.
On the ground, the Hakone-Yumoto to Gora leg takes roughly 40 minutes on the Hakone Tozan Line; a short Funicular climb to Sounzan is followed by the ropeway to Togendai, offering immediate lake views. The lake cruise to Motohakone runs on winter timetables, with frequent departures; check the timetable, then continue by bus to Oshino if a longer day suits you. Tickets can be purchased at counters or online; auch if you want mehr touren, start früh in dieser zeit.
Oshino acts as a scenic hinge: from Oshino, a quick bus links you to Kawaguchiko for a broader panorama of the snow-dusted Fujisan on clear mornings. For besucher who wish to maximize a day, the loop kann innerhalb eines Tages completed; the nearby heilige shrines and lokale kultur add depth to the experience. Frühling typically brings more daylight, but klare winter skies still offer stunning views hier.
Local kultur and sustainability tag along: innerhalb der umliegende region, hotels prioritize nachhaltigkeit and support lokalen produkten. Besuche heilige places with respect, dann join kulturevents and learn about traditions; ihre besucher experiences enrich die reise. nehmen tickets only at authorized counters, und kaufen you can pick up at the station or online.
Practical notes: daylight is short in winter; plan around zeit, layer up, and pack a compact umbrella for crisp skies. Prices for passes and transfers are quoted in euro; airport access simplifies arrivals, besonders für internationale guests. innerhalb eines Tages you can loop core sights, dann optional weiter zu Kawaguchiko oder Oshino, hier ein angenehmer Abschluss vor dem Rückweg. allem gesagt, buchen Sie zeitig Tickets, denn die besten slots füllen sich rasch während der kälteren monate.
What to Pack for Fuji and Lake Ashi in Winter: Clothing, gear, water, and documents
Layering is essential for winter around the lake region: base, mid, and outer layers. regel: heavier layers go in your main bag, lighter items stay in your daypack. Pack a down or synthetic insulated jacket rated to -5°C, a warm hat, gloves, and waterproof boots with insulated socks. If your itinerary includes the hakkai section, add gaiters to keep snow from entering boots.
Footwear and warmth matter most on icy ramps and windy boardwalks. Choose waterproof boots with good traction, and bring thick wool or synthetic socks, a spare pair of lightweight socks, a thermal balaclava or beanie, and a lightweight mid-layer you can pull on during breaks. Diese Ausrüstung ist geeignet gegen kälte und wind; extra pair of insoles can enhance comfort longer during stops.
Gear and protection help balance weight and safety. Trekking poles provide stability on snow and wet boards; a compact headlamp with extra batteries; a power bank; dry bags for electronics; and camera protection against spray. Organisation matters; empfehle a small, weatherproof pouch for essentials and a larger bag for heavier items, damit Sorgen reduziert werden. Längerier Tagestouren profitieren von einem gut organisierten Aufbau.
Hydration and weather awareness go hand in hand. Carry an insulated water bottle or hydration bladder to resist freezing, plus electrolyte powder or tablets for energy. Check wetterbedingungen before departure and have a compact rain cover for your pack. Zusätzlich, dazu, monitor wind and sun exposure to adjust layers on the fly.
Documents and tickets should be ready and protected. Carry passport/ID, travel insurance, tickets, and reservation confirmations; keep digital copies and a printed backup. Pack diese in a waterproof sleeve and note Ihren Abfahrtsort, Notfallkontakte und Abholzeiten. Dazu gehören auch Vorsichtsmaßnahmen wie eine Liste Ihrer wichtigen Nummern und Anweisungen, falls Pläne sich ändern.
Seasonal specifics matter: in September or transitioning to winter, mornings can stay chilly while afternoons warm up. Plan für längere treks, pack extra snacks, a compact stove or thermos, und eine zusätzliche Lage zum Aufwärmen. Wirst du unterwegs abgelegt, halte Ersatzwärme bereit und halte den Rucksack leicht zugänglich. Für längere Touren können längere Pausen sinnvoll sein, aber bleib flexibel und passe deine Ausrüstung an.
Tickets, transportation, und Unterkunft sollten vorab gesichert werden. Hotels nahe dem Abfahrtsort erleichtern Morgenstarts; bestätige Transportoptionen, Abfahrtszeiten, und eventuelle Alternativrouten. Eine Notfalloption ist immer sinnvoll, sodass du bei Wetterwechsel oder Verspätungen eine alternative Planung hast. Berücksichtige auch lokale Bestimmungen und reiseplanung basierend auf deinen Bedürfnissen, um Stress zu vermeiden.
Weather-Ready Clothing: Layering, boots, gloves, and headgear for snow and wind
Start with a breathable base layer to manage moisture, then add an insulating midlayer, and finish with a windproof shell. Base fabrics should be merino or high-performance synthetic in the 150–260 g/m2 range, followed by a midlayer around 200–400 g, and a 2- to 3‑layer outer shell rated at least 10,000 mm water and 20,000 g/m2/24h breathability. Wenn conditions worsen, add a compact down or synthetic Insulation layer up to 200–300 g; trotzdem, keep the overall bulk reasonable so beweging remains unrestricted. Lassen moisture escape through pit zips or underarm vents to prevent overheating, even on a fototour in the damp, windy air.
Boots should be waterproof and insulated, with an ankle‑supporting cut and a rugged outsole. Look for 4–5 mm lug depth, a gusseted tongue to block snow, and crampon compatibility if you anticipate icy strecken. Für extreme winds, choose a taller model than normal and add gaiters to verhindern Schnee‑Infiltration; a properly fitted pair of socks–liner plus thick wool–reduces hotspots and blister risk on long tracks through owakudani and other alpine park zones.
Gloves require a two‑piece approach: a snug, moisture‑wicking liner gLOVE and a waterproof outer shell glove. Outer mittens are ideal for persisting cold, while touchscreen‑compatible fingertips help during a fototour. Ensure Erforderlich warmth reach is maintained with 150–300 g of insulation in the outer layer, and consider a windproof palm reinforcement for dichter squalls. Pack a spare inner pair in your organized kit so reisende can rotate without exposing chilled hands.
Headgear should cover the ears and neck when wind speeds rise. A lightweight, moisture‑wicking beanie or balaclava under a helmet or hood is perfekte for rapid shifts in the region’s weather. Include a windproof neck gaiter and a lightweight, packable shell hood; these items halten wind out and keep your face from drying out in dry‑ice gusts along streets and park trails on strecken der region.
Gear organization matters: an organized packing list (organisierte) with mehrere layers and an extra base layer (beinhalten) helps you adapt quickly. Travelers (reisende) who plan for mehrere climate windows find sich besser vorbereitet, sogar bei plötzlichen Kälte‑ oder Windfronten. For a fototour on the tokaido route and nearby seen points, keep a compact, dry bag at the ready, und denn’s musst du darauf vorbereitet (erforderlich) für wechselnde Bedingungen. Wenn du in einem wechselhaften wind‑ und schneebedingten Abschnitt der strecke unterwegs bist, ist ein gut belüftetes System perfekt; somit kannst du dich auf die landschaft konzentrieren, statt auf die Kleidung zu achten. In der owakudani region, erkundungen entlang straßen und parkpfade erfordern mehrere Schichten und stabile Stiefel, damit du zuverlässig tempo halten kannst, egal ob du auf seen oder fels treppst. Ein Teil deiner Ausrüstung sollte ein warmer, leichter Schal oder neck‑gaiter enthalten, der sich flexibel zu einem Balaclava formen lässt, sodass du dich auf der strecke nicht stressen musst. Wenn du dich an die Hinweise hältst, findest du den richtigen balans zwischen Wärme, Bewegungsfreiheit und Schutz–perfekt für jeden reisenden, der die beliebtesten routen der region sicher erleben will.
On-the-Spot Gear and Safety: Maps, GPS, flashlight, trekking poles, and crampons if needed
Always carry a waterproof map and a GPS with offline maps; Akasaka serves as a common starting hub, and a short zugfahrt delivers you to the trailhead; along ikonischen Wegen, note the spitze rise and the punkt on your map; keep a bullet checklist so nichts vergessen unterwegs.
Maps and GPS: Use a primary map on your device with offline data, and keep a compact paper map as backup. Set waypoints at the trailhead, major junctions, and oben lookout. In areas with poor signal, navigation by line and landmarks along Wegen matters. Share deinen Kontakt and a rough Zeitrahmen for return with a trusted person; if conditions change, be prepared to shorten wanderungen and turn back at the nächst sichere stätte.
Flashlight and light-weight power: a headlamp with 200–350 lumens handles dawn, dusk, and clouded sections; pack 2 spare batteries and a small power bank; keep the lantern and batteries in a dry pocket. Trekking poles: adjustable aluminum or carbon, 115–135 cm extended, with carbide tips for rocky stretches; collapse them for unterwegs storage and use on icy or steep sections to stabilize balance. Crampons only wenn ice or fresh snow demands traction; choose a compatible binding for deinen boots and practice quick clipping and unclipping before the ascent. Combine this with weather checks and a quick bolso of extra socks and a light insulating layer to adjust for wechselnde Verhältnisse. Nachhaltigkeit matters: carry reusable water bottle, avoid disposable batteries, and recycle any waste along the route.
Size and safety reminders: keep line management simple, tell someone your route at Akasaka, oshino, or hakkai checkpoints, and recheck gear before leaving stätte. Prepare for caminatas where zahlreiche trail signs appear along straßen and entlang der Wege; siempre verify gear fit and boundaries, and remember: niemand goes weiter ohne Sicherung, wenigstens in kritischen Abschnitten.
| Gear item | Why you need it | Recommended spec | הערות |
|---|---|---|---|
| Maps (physical + offline digital) | Reduces risk if signal drops; marks start, junctions, and oben lookouts | Waterproof, scale to 1:25,000; include a back-up paper map | Check signs along ikonischen Wegen; refer to punkt markers |
| GPS device / offline app | Precise positioning and waypoint navigation | Single-battery life >6 hours; robust in cold weather | Have a backup power source; avoid over-reliance |
| Flashlight (headlamp) | Visibility in dawn/dusk; quick hands-free operation | 200–350 lumens; IPX4+; 2 spare batteries | Keep in dry pocket; test before ascent |
| Trekking poles | Stabilization on uneven terrain and steep sections | Adjustable, 115–135 cm; carbide tips | Fold for unterwegs; replace worn tips |
| Crampons (if needed) | Traction on ice or hard-packed snow | Compatibile with boots; strap-on or step-in type | Practice clipping; remove on dry rock |