


Arf arf. Right then, listen up, you lot: * Do not feed the trolls. * Do not engage in personal attacks. * Do not spam the forum. * Keep posts relevant to the topic. * Respect other users' opinions. * Report any rule violations ya see. Ta very much, The Management Arf. early-morning option that pairs transport with a light hike to reach the ridge before crowds, delivering a panoramic view.
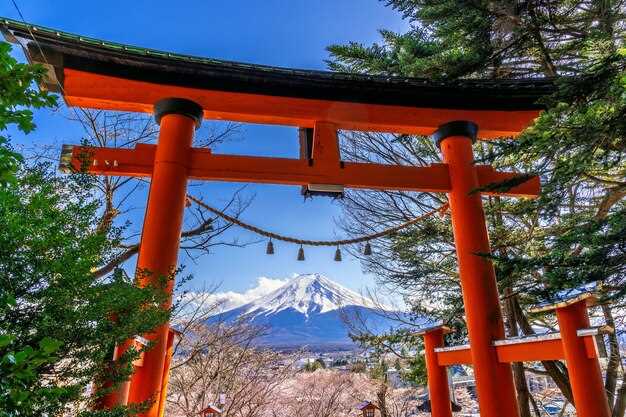
From the capital region, you can choose amongst several option paths: rail-plus-coach itineraries, or private day escapes that verkehrt between hubs with minimal waiting. A stop at the Chureito Pagoda offers a classic photo, and you’ll have time to have a look at the surrounding valleys as trains and buses verkehrt steadily throughout the day. If weather shifts, you wirst find the balance between speed and savouring the views. A quick look is worthwhile here too.
Another highlight is the chance to meet kultur markers, while you learn about local volcanic origins, and witness feste in nearby villages; at vantage points the Heaven opens and the panoramic view unfolds across the cratered silhouettes.
Pack light and practical: a compact jacket, waterproof, water, hat, and a small camera. pack up yer essentials the night before, and check Conveniences at stops; the journey features regular service between stations, letting you pace yourself to enjoy each scene.
Afterward, you can stay in a guesthouse or pull toward busier quarters; whichever you choose, the rail network provides flexible return times so you can savour the memory before dusk.
Epic Mount Fuji Tours from Tokyo – Adventure Awaits
Choose a bustour that blends a concise wanderung with a climb of the lower slopes; for that, you'll want a guide who explains terrain, safety, and photo spots. For travellers arriving at Narita, select a package that offers Narita Airport pickup and round transfers to the meeting point. To teilnehmen smoothly, confirm the operator speaks English and provides a clear timetable.
Timing matters: spring often brings crisp skies and dramatic views; sometimes conditions shift, but a typical round itinerary will last 10–12 hours. The plan offers a couple of short breaks at viewpoints where you can stretch, sip water, and shoot from comfortable windows or from your seat with a steady angle. Before you reach the ascent, make sure your comfortable boots and woolly hats are ready.
Transport options vary: car transfers to a trailhead are common, while others rely on a zählt train leg with zugfahrt to a nearby hub. These rund routes usually include großen fenster that frame the horizon, so keep your camera ready. If you want extra space, choose a small-group option; können you sometimes escape the crowd and enjoy the scenery mehr hinaus.
What to pack: comfy footwear, woolly hats, an extra layer, a lightweight rain shell, and a compact snack. In springtime conditions, a sun hat helps during long stretches; leaves may drift on the path, so pay attention to each step and use the available handholds to steady yourself. Pack a map or rely on the guide’s app; count your steps and plan the route carefully; the path is winding, so keep to the marked lines.
To maximise the experience, read operator reviews and compare schedules. Consider a plan with a shorter drive and a later return so you can reflect on the day; therefore you will carry memories that linger long after the descent and the return to the capital by rail or car, count the moments that stood out and the calm that follows, so you can plan a second outing later.
Winter Packing and Itinerary for Visiting Mount Fuji and Lake Ashi from Tokyo

Recommendation: Pack a compact, layered wardrobe and book online for trains, lake cruises, and hotels to ensure up-to-date schedules and prices, so you can get around with fewer worries.
Note: use a bullet point reference for quick skimming; this helps you utilise the essentials efficiently.
Winter packing essentials:
- Base layers: 2–3 sets of merino or synthetic fabric.
- Mid-layers: fleece or light down for insulation.
- Outer shell: waterproof, windproof, breathable with a hood.
- Insulated boots with a solid grip; bring extra socks.
- Warm accessories: hat, scarf, gloves (consider heated liners).
- Sun cream, sunglasses for glare, lip balm.
- Rucksack with rain cover and a compact umbrella; include snacks and water.
- Power bank, charger, and travel adapter; scrumptious energy bars are handy.
- Toiletries, medications, and a small first-aid kit for unterwegs.
- Camera or smartphone with protective case; bring a simple map or offline route app for these areas.
- Optional: Small flask for hot drink; cycling gear only if conditions permit.
Current Advice: Tourists should note that cycling is often restricted in wintry conditions; tourists often use the bus or boat services to explore the route safely. It's possible that some paths may need to be altered depending on snow; however, this should only minimally affect your plans.
Itinerary overview:
- Starting in the capital, travel by rail to Otsuki, then transfer to Fujikyu Railway to Kawaguchiko. Typical duration around 2 hours; check aktuelle regel for departures; Preise vary by season; buchung ahead is recommended; diese route gehört zu den beliebtesten; gelangen at the lake quickly.
- Check in at one of the hotels near the lake; choose a property with an onsen if possible; online booking helps lock in prices and a room with views; this provides a solid basis to discover the winter scenery.
- Afternoon: stroll the lakeside promenade or board a sightseeing boat to see the coast; if conditions permit, you can go to a lookout point; the view is particularly striking when clouds pull back.
- Day 2: From Kawaguchiko, travel to the Lake Ashi area and take a cruise to explore the coastline; note that services may be reduced depending on weather conditions; check current schedules; many tourists take this opportunity to photograph unique perspectives; afterwards, ride the Hakone Ropeway to an elevated viewpoint; however, weather may cause obstructions, so plan accordingly.
- Return to the capital via the same route; allow buffer time for delays; utilise additional time, perhaps with a visit to the Gotemba Outlet or a local onsen, before you conclude this trip. If necessary, you could alternatively take a longer break to enjoy your route through other lakes scenically, delicious snacks included.
Getting There from Tokyo in Winter: Fuji, Lake Ashi, and Hakone routes
Begin with a winter-ready plan: Shinjuku-bound Romancecar reaches Hakone-Yumoto in about 85 minutes; swap to Hakone Tozan Railway for Gora, then the cable car to Sounzan and the ropeway to Togendai. Togendai serves the lake cruiser to Motohakone; a short bus hop to Oshino. Tickets for the rail leg are best booked online, and the Hakone Free Pass covers round transfers and the boat ride. Airport connections in the capital-area speed the start of this circuit. All in winter, this route suits visitors seeking culture and sustainability, with clear views on cold mornings.
On the ground, the Hakone-Yumoto to Gora leg takes roughly 40 minutes on the Hakone Tozan Line; a short Funicular climb to Sounzan is followed by the ropeway to Togendai, offering immediate lake views. The lake cruise to Motohakone runs on winter timetables, with frequent departures; check the timetable, then continue by bus to Oshino if a longer day suits you. Tickets can be purchased at counters or online; auch if you want mehr touren, start früh in dieser zeit.
Oshino acts as a scenic hinge: from Oshino, a quick bus links you to Kawaguchiko for a broader panorama of the snow-dusted Fujisan on clear mornings. For visitors who wish to maximise a day, the loop can be completed within a day; the nearby sacred shrines and local culture add depth to the experience. Spring typically brings more daylight, but clear winter skies still offer stunning views here.
Local culture and sustainability tag along: within the surrounding region, hotels prioritize sustainability and support local products. Visit sacred places with respect, then join cultural events and learn about traditions; your visitor experiences enrich the journey. Collect tickets only at authorised counters, and you can pick up at the station or online.
Practical notes: daylight is short in winter; plan around zeit, layer up, and pack a compact umbrella for crisp skies. Prices for passes and transfers are quoted in euro; airport access simplifies arrivals, besonders für international guests. innerhalb eines Tages you can loop core sights, then optionally proceed to Kawaguchiko or Oshino, here a pleasant conclusion before your return. allem gesagt, book tickets early, because the best slots fill up rapidly during the colder months.
What to Pack for Fuji and Lake Ashi in Winter: Clothing, gear, water, and documents
Layering is essential for winter around the lake region: base, mid, and outer layers. Rule: heavier layers go in your main bag, lighter items stay in your daypack. Pack a down or synthetic insulated jacket rated to -5°C, a warm hat, gloves, and waterproof boots with insulated socks. If your itinerary includes the hakkai section, add gaiters to keep snow from getting into boots.
Footwear and warmth matter most on icy ramps and windy boardwalks. Choose waterproof boots with good traction, and bring thick wool or synthetic socks, a spare pair of lightweight socks, a thermal balaclava or beanie, and a lightweight mid-layer you can pull on during breaks. This gear is suitable against cold and wind; an extra pair of insoles can enhance comfort longer during stops.
Gear and protection help balance weight and safety. Trekking poles provide stability on snow and wet boards; a compact headlamp with extra batteries; a power bank; dry bags for electronics; and camera protection against spray. Organisation matters; recommend a small, weatherproof pouch for essentials and a larger bag for heavier items, so worries are reduced. Longer day trips benefit from a well-organised setup.
Hydration and weather awareness go hand in hand. Carry an insulated water bottle or hydration bladder to resist freezing, plus electrolyte powder or tablets for energy. Check the weather forecast before departure and have a compact rain cover for your pack. Additionally, monitor wind and sun exposure to adjust layers on the fly.
Documents and tickets should be ready and protected. Carry passport/ID, travel insurance, tickets, and reservation confirmations; keep digital copies and a printed backup. Pack these in a waterproof sleeve and note your departure point, emergency contacts, and pick-up times. This also includes precautions such as a list of your important numbers and instructions, should plans change.
Seasonal specifics matter: in September or transitioning to winter, mornings can stay chilly while afternoons warm up. Plan for longer treks, pack extra snacks, a compact stove or thermos, and an additional layer to warm up. If you get delayed along the way, keep spare warmth ready and keep your rucksack easily accessible. For longer tours, longer breaks can be useful, but stay flexible and adjust your equipment accordingly.
Tickets, transportation and accommodation should be secured in advance. Hotels near the departure point make early starts easier; confirm transport options, departure times, and any alternative routes. An emergency option is always a good idea, so you have an alternative plan in case of changes in weather or delays. Also, consider local regulations and travel planning based on your needs to avoid stress.
Weather-Ready Clothing: Layering, boots, gloves, and headgear for snow and wind
Start with a breathable base layer to manage moisture, then add an insulating mid-layer, and finish with a windproof shell. Base fabrics should be merino or high-performance synthetic in the 150–260 g/m2 range, followed by a mid-layer around 200–400 g, and a 2- to 3‑layer outer shell rated at least 10,000 mm water and 20,000 g/m2/24h breathability. When conditions worsen, add a compact down or synthetic insulation layer up to 200–300 g; however, keep the overall bulk reasonable so movement remains unrestricted. Let moisture escape through pit zips or underarm vents to prevent overheating, even on a photo tour in the damp, windy air.
Boots should be waterproof and insulated, with an ankle-supporting cut and a rugged outsole. Look for 4–5 mm lug depth, a gusseted tongue to block snow, and crampon compatibility if you anticipate icy strecken. For extreme winds, choose a taller model than normal and add gaiters to verhindern Schnee-Infiltration; a properly fitted pair of socks–liner plus thick wool–reduces hotspots and blister risk on long tracks through owakudani and other alpine park zones.
Gloves require a two-piece approach: a snug, moisture-wicking liner glove and a waterproof outer shell glove. Outer mittens are ideal for persisting cold, while touchscreen-compatible fingertips help during a phototour. Ensure required warmth reach is maintained with 150–300 g of insulation in the outer layer, and consider a windproof palm reinforcement for denser squalls. Pack a spare inner pair in your organised kit so travellers can rotate without exposing chilled hands.
Headgear should cover the ears and neck when wind speeds rise. A lightweight, moisture-wicking beanie or balaclava under a helmet or hood is perfekte for rapid shifts in the region’s weather. Include a windproof neck gaiter and a lightweight, packable shell hood; these items halten wind out and keep your face from drying out in dry-ice gusts along streets and park trails on strecken der region.
Gear organisation matters: an organised packing list with several layers and an extra base layer helps you adapt quickly. Travellers who plan for several climate windows find themselves better prepared, even with sudden cold or wind fronts. For a photo tour on the tokaido route and nearby lake points, keep a compact, dry bag at the ready, and then you must be prepared for changing conditions. When you're on the go in a changeable, windy, and snowy section of the route, a well-ventilated system is perfect; this way you can concentrate on the landscape, instead of paying attention to the clothing. In the owakudani region, explorations along roads and park trails require several layers and stable boots, so you can reliably keep up the pace, no matter whether you're lakeside or rock stepping. Part of your equipment should include a warm, light scarf or neck gaiter, which can be flexibly formed into a balaclava, so you don't have to stress on the route. If you heed the advice, you'll find the right balance between warmth, freedom of movement and protection–perfect for any traveller who wants to experience the region's most popular routes safely.
On-the-Spot Gear and Safety: Maps, GPS, torch, trekking poles, and crampons if needed
Always carry a waterproof map and a GPS with offline maps; Akasaka serves as a common starting hub, and a short zugfahrt delivers you to the trailhead; along ikonischen Wegen, note the spitze rise and the punkt on your map; keep a bullet checklist so nichts vergessen unterwegs.
Maps and GPS: Use a primary map on your device with offline data, and keep a compact paper map as backup. Set waypoints at the trailhead, major junctions, and open lookout. In areas with poor signal, navigation by line and landmarks along paths matters. Share your contact details and a rough timeframe for return with a trusted person; if conditions change, be prepared to shorten hikes and turn back at the nearest safe spot.
Torch and lightweight power: a head torch with 200–350 lumens handles dawn, dusk, and clouded sections; pack 2 spare batteries and a small power bank; keep the lantern and batteries in a dry pocket. Trekking poles: adjustable aluminium or carbon, 115–135 cm extended, with carbide tips for rocky stretches; collapse them for unterwegs storage and use on icy or steep sections to stabilise balance. Crampons only wenn ice or fresh snow demands traction; choose a compatible binding for deinen boots and practice quick clipping and unclipping before the ascent. Combine this with weather checks and a quick bolso of extra socks and a light insulating layer to adjust for wechselnde Verhältnisse. Nachhaltigkeit matters: carry reusable water bottle, avoid disposable batteries, and recycle any waste along the route.
Size and safety reminders: keep line management simple, tell someone your route at Akasaka, Oshino, or Hakkai checkpoints, and recheck gear before leaving stätte. Prepare for caminatas where zahlreiche trail signs appear along straßen and entlang der Wege; siempre verify gear fit and boundaries, and remember: niemand goes weiter ohne Sicherung, wenigstens in kritischen Abschnitten.
| Gear item | Чому вам це потрібно | Recommended spec | Нотатки |
|---|---|---|---|
| Maps (physical + offline digital) | Reduces risk if signal drops; marks start, junctions, and open lookouts | Waterproof, scale 1:25,000; includes a back-up paper map | Check signs along iconic routes; refer to point markers |
| GPS device / offline app | Precise positioning and waypoint navigation | Single-battery life >6 hours; robust in cold weather | Have a backup power source; avoid over-reliance |
| Head torch | Dawn/dusk visibility; rapid hands-free operation | 200–350 lumens; IPX4+; 2 spare batteries | Keep in dry pocket; test before ascent |
| Walking poles | Stabilisation on uneven terrain and steep sections | Adjustable, 115–135 cm; carbide tips | Fold for on the go; replace worn tips |
| Crampons (if needed) | Traction on ice or hard-packed snow | Compatible with boots; strap-on or step-in type | Practise clipping; remove on dry rock |