


Take the Denali Star on a september saturdays for crisp light, steady speed, and rewarding views across the north.
The northbound transit from anchorage to denali national park spans roughly 7 hours, with expansive windows in the railcar providing constant viewing. Reserve a window seat or the dedicated observation car to maximize the following landscape along rivers, tundra, and distant peaks. The crew keeps to a reliable schedule, and veteran member harding shares photography tips that help you frame wildlife and denali silhouettes as the train climbs toward the park. Look north as the range comes into view and the river valleys widen.
Pack for rapid weather shifts: breathable layers, a rain shell, and a compact camera kit. Store gear in containers or a small daypack that fits under the seat, and keep valuables in a secure tote. dont rely on long stops for meals; the dining car provides options at set times, and you can enjoy nice, gentle views from the railcar while you eat.
September light lasts longer, and for wildlife, early morning and late afternoon remain best. The Denali Star’s broad windows in the railcar give you a steady stream of scenery, including rivers, tundra, and distant peaks. Book a seat near the observation deck on saturdays for easy access to the best viewpoints and a chance to catch a moose along the riverbank, or a herd of caribou in the open flats.
Book early and plan a two-day stay around denali national park to maximize your time, with a final return leg in the evening and a window for photos. The Denali Star provides a gentle transit through alaska’s heart and keeps you connected to the rhythms of a north-country rail experience–without the crowds.
Denali Star Train Photo Guide: Shots, Gear, and Timing
Shoot from the north-facing seats during the golden hour to catch glacier light; sit near the front car to see the train pull and keep the scenery in frame for continuous shots.
Gear tips: bring a 200-600mm telephoto, a spare battery, and fast memory cards; use a lens hood and a monopod or a steady handheld setup, since a moving coach makes tripod use awkward. Pack a microfiber cloth for window smudges and a small rain cover if you expect mist; for glare control, try a polarizer and switch angles when light shifts.
Build a list of shot ideas before you ride: glacier textures, silhouettes of the front of the train, interior scenes in the bistro car, and signs along the routes; plan for both wide context frames and tight details to vary your content.
The sd70mac locomotive typically pulls the train, so time your frames as it passes ice cliffs or a snow field; use a faster shutter to freeze motion when you see a clear action moment, and switch to a slower setting for moody skies if light holds.
Interior shots become compelling when the outside light is dim; switch to lower ISO and a slower shutter to capture warm tones in the bistro interior while avoiding reflections from the glass. Keep the window at a slight angle and check the alignment of chairs and tables for a clean composition.
At unloading stops, step to the side to avoid blocking aisles, and keep gear secure in a padded bag; use the pause to reset exposure and frame new angles while passengers switch cars. If you want people in your frame, sit by the window and capture candid moments without intruding on fellow travelers.
During holidays, the bistro area may display playful touches like james on a chart and a santa banner; these small details offer a lighthearted contrast to grand landscape shots, so enjoy the moment and continue shooting. In general, focus on the areas around Denali that reveal textures of rock, snow, and sky, which provide considerably vivid color when clouds break.
Keep a steady pace with your plan and avoid overloading a single frame; mostly shoot a mix of front-and-side angles and interior scenes to build a varied list that highlights both seen views and intimate details. The popular vantage points are the front railing and the bistro window, but explore side windows for reflective compositions and tastefully framed silhouettes.
Window-side vantage: left vs. right for mountain and river shots
Leave Fairbanks with the left side favored for river shots; the Nenana corridor runs along that bank and morning light on the water stays clear. This route is known for its balance of river and mountain looks.
On the right side, switch when the track climbs toward Denali’s peaks to catch bold mountain silhouettes; a single hill line along the valley often frames the pass and, if the weather cooperates, the snow cap will glow against blue sky.
Ride the dome car for steady, panoramic framing; dome windows reduce glare, and you can enjoy personal seating while you shoot. If you want to guarantee a window view, ask for passes and check the listed seating plan; sleepers with rooms offer quiet after sunset and a place to regroup between shots. Capture them to share later.
During brief stops by river bends and bridges, walking along the platform reveals new spots for shots; keep your gear ready, and note that some deadheads linger near the windows while the train stays at speed; many travelers treat it like a calm cruise, moving from side to side as light shifts. Road crossings add a fresh perspective.
Things to remember: depart Fairbanks in the morning for the best light. Getting both sides will give you variety, and luck plays a role–if Denali shows itself in clear weather, you will be lucky. frank locals know the best times to shoot, and everyone leaves with stories. If you believe in the power of small moments, the left and right views will keep you engaged, with rooms or dome seating giving you flexible options. Unless cloud cover blocks the peaks, you’ll have a solid gallery.
Light timing: golden hours and alpenglow along the route
Plan to ride southbound on the Denali Star to chase the golden hour as the sun sinks behind the Alaska Range. In clear evenings, the light washes the white fields and glacier faces in pink and copper, and alpenglow lingers as the train glides along the track. To maximize impact, they should settle in the glass-domed area aboard the train about 60 minutes before sunset, then watch as colors turn from pale to radiant along the foothills.
The northern light shifts gradually, letting you track color changes mile by mile. The train’s design is user-friendly, with domes and smaller viewing areas spaced along the car lineup, and the glass-domed cars located near the lounge to keep you comfy while the scenery unfolds. The operators own the route and build a schedule that puts light first, so you’ll see Denali’s peaks glow as you arrive at a sweeping turn.
Alpenglow arrives in distinct pockets as the route winds through river valleys and passes over high ridges. The sun sinks behind the southern peaks, and the turned granite faces and snowfields glow with softer hues while douglas fir stands along the valley lines glow amber. The Denali area offers a reliable window for alpenglow when weather cooperates, especially on clear spring and fall evenings.
For photography, set ISO 400–800, aperture around f/5.6, and aim for shutter speeds near 1/200–1/60 depending on light and motion. Use continuous AF and bursts as the train slides by; keep the domes and glass-domed area clean for maximum clarity. If the crowd crowds the lounge, try the smaller seating zones to stabilize your frame and then rotate back as the light changes.
Arrive at the station early to board; choosing seats in the glass-domed cars gives you optimal viewing. Once aboard, you can enjoy the lounge car amenities and warm beverages while the map of the route indicates when the light will peak over the area. The Denali Star is operating, owned by a company that serves tourism with steady, predictable schedules; the ride along the river and into the foothills offers dynamic color changes as the sun dips toward the horizon.
Keep an eye on the clock for the last-quarter glow as the train nears Denali National Park, where the northern air cools and the light turns cooler pinks, creating lasting memories for they who rode aboard and captured images of the scene on a glass-domed railcar. The combination of domes, white snow, and green douglas fir in the foreground makes this route ideal for photography fans and casual observers alike.
Onboard framing: composing scenes through glass and moving train
Begin by selecting a window seat aboard the Denali Star and depart early from the platform. If you boarded the train, you didnt have to rush–you can settle into a rhythm that keeps the glass frame clean for clear shots. The white ridges rise above the earth, and valleys unfold as the speed settles; keep the lens ready when the sun hits a ridge and a line of freight cars pulls past. If your trip is on a saturday, softer afternoon light lasts longer, giving you more time to compose near Harding Icefield with eklutna Creek glinting in the distance.
The Denali Star is operated by Alaska Railroad, so plan around timetables and rest stops. Frame scenes by leaning into the glass as the train moves; thus you keep a steady view while your body stays relatively still. While eating or resting, stay ready to shoot bursts during each crossing to capture motion without blur. Freight cars in the distance provide scale, and the locomotives pulled past give a sense of depth as the scenery shifts at every turn.
For families, grandparents often prefer a calmer pace; invite them to rest while you test different compositions, then share your best shots during the next break. If someone is willing to trade seats, rotate to keep the glass frame fresh. Leave room for the occasional stop to photograph eklutna lakeside views or a moose along the river; this whole method relies on patience and rhythm.
Notes on subjects and places: depart from Talkeetna with the sun behind you; the route climbs past first switchbacks, crosses near eklutna, and heads northbound along tundra and spruce. If you want to emphasize scale, frame a distant ridge through the window while including foreground branches along the glass. The meaning of each frame emerges when you align foreground, middle ground, and distant peaks, especially near Harding and the eklutna region.
| پہلو | Recommendation | Words to note |
|---|---|---|
| Seat & timing | Choose a window aboard; depart early; consider a saturday departure for softer light | aboard,depart,saturday,northbound,white,valleys |
| Light & movement | Shoot in bursts during crossing; adjust speed to control blur; plan around rest stops | speed,crossing,rest |
| Family dynamics | Willing participants, rotate seats to balance viewing and comfort | grandparents,willing |
| Locations & landmarks | Highlight eklutna near Harding; note located features along the route | eklutna,harding,located |
| Capture storytelling | Leave room for sequence shots that convey scale and time | leave,along,next,thus,meaning |
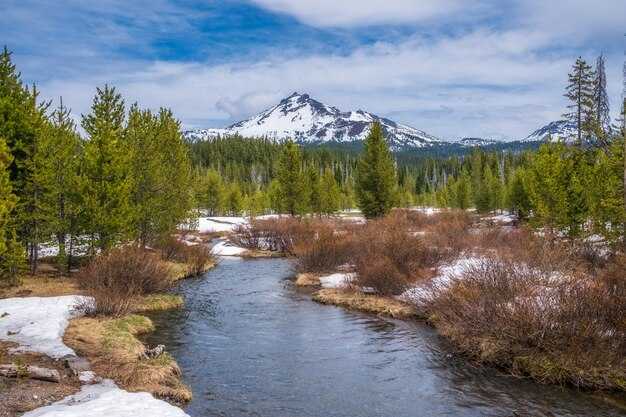
Key photography stops along the route: panoramas near Susitna River and Alaska Range

سوسیتنا ندی موڑ کے نال نال پو پھٹدی چترکاری نال شروعات کرو؛ تختے لگیاں گڈیاں اک پکی سطح دیندیاں نیں، پر ودھیا اداس روشنی لئی پچھم والے پاسے دی کھڑکی ول جھکو۔ بس اینیاں کو تصویراں کھچو، کجھ فریم ای موڈ نوں چھوہندے نیں، 24-70mm لینز نال ISO 100-200 تے، تصویراں دی اک لڑی تے فوکس کردے ہوئے جہڑی دریا دے موڑاں تے الاسکا رینج دے دور دے ٹیکچراں نوں کھچدی اے۔ کنڈکٹر اشارہ دیوے گا جدوں ٹرین موڑ لئی ہلکی ہووے گی، تاں تسیں اپنا ساہ روک سکدے او تے جدوں ٹرین ہموار چل رہی ہووے تاں شاٹس فائر کر سکدے او۔ ایہہ لمحے ڈینالی دے اک خوبصورت نظارے لئی لہجہ مقرر کردے نیں جہڑا تسیں پہلے دن قارئین نال سانجھا کر سکدے او۔.
جیسے ہی راستہ ہیلی کے قریب پہنچتا ہے، سوسیٹنا ویلی الاسکا رینج کے نیچے ایک وسیع قدرتی راہداری میں کھل جاتی ہے۔ ایک وسیع منظر کی طرف بڑھیں اور ایک طویل لینس استعمال کرتے ہوئے فاصلوں کو سکیڑتے ہوئے، اداس پانوراما کی ایک سیریز شوٹ کریں۔ اگر روشنی بدلتی ہے، تو کھڑکی کے زاویوں کے درمیان سوئچ کریں اور دریا پر بہترین عکاسی کے لیے انتظار کریں۔ عملہ آپ کو نشستوں کے درمیان پوزیشن دینے میں مدد کرے گا، لیکن حفاظتی اقدامات کو ذہن میں رکھیں؛ یہ وہ جگہ ہے جہاں ماحول زندہ ہوتا ہے اور آپ ایسی شاٹس جمع کرتے ہیں جو قارئین کو پسند آئیں گی۔.
مزید آگے، الاسکا رینج کا راہداری مزید بلند ہوتا جاتا ہے، اور ہارڈنگ آئس فیلڈ کی چوٹی ایک دندانے دار خاکہ بناتی ہے۔ جب بادل چھٹ جائیں تو ایک الٹراوائیڈ پینوراما کھینچیں، پھر درمیانے زوم پر سوئچ کرکے پہاڑی سلسلوں اور برف سے ساخت کو کھینچیں۔ ان فریموں کو گیلری میں ایک واحد فیچر کے طور پر پیش کریں؛ تصاویر کا سلسلہ میڈیا اور آپ کی سکرین پر ڈسپلے کرنے کے لیے بہترین ثابت ہوگا۔ ٹرین کا ردھم ایک خاموش وادی میں پھسلتے ہوئے جہاز کی مانند محسوس ہوتا ہے، جبکہ پہاڑ منظر کو برقرار رکھتے ہیں۔.
گولڈ اسٹار کار کے اندرونی حصے میں، عملہ اور کنڈکٹر اسٹاپس کو مربوط کرتے ہیں اور چکاچوند کو کم سے کم کرنے کے لیے دروازے بند رکھتے ہیں۔ اگر روشنی تعاون نہیں کرتی ہے، تو کھڑکی کا پردہ گرائیں اور عکاسی کو کم کرنے کے لیے پولرائزر استعمال کریں - بنیادی طور پر دریا اور رج شاٹس کے لیے معیاری حرکت۔ برسٹ میں شوٹ کریں، پھر اپنے آلے پر تصاویر کا جائزہ لیں؛ ان کی بہترین شاٹس ایک فیچر بن جاتی ہیں جسے قارئین میڈیا گیلریوں میں دیکھ اور لطف اندوز ہو سکتے ہیں۔ یہ سیٹ اپ آپ کو زیادہ نمائش سے بچنے میں مدد کرتا ہے اور شاٹس کو صاف رکھتا ہے، اور بنیادی طور پر راستے میں ہر موقع کو زیادہ سے زیادہ کرتا ہے۔.
جب آپ شائع کریں تو عملے کا شکریہ ادا کریں ان کی مدد کے لئے؛ آپریٹنگ شیڈول کا شکریہ، آپ کو منظر کو قید کرنے کے لیے مستقل کھڑکیاں میسر ہیں۔ بہترین تصاویر بنانے والے عوامل یہاں روشنی، وقت اور حرکت پذیر کار پر قدم رکھنے کی رضامندی ہیں جب یہ محفوظ ہو۔ اگر آپ سفری فوٹوگرافروں کا ایک اسکول بنانا چاہتے ہیں تو، یہ حصہ مشق کے لیے بہترین میدان ہے: قارئین آپ کی پیش رفت کو دیکھیں گے جب آپ Susitna سے الاسکا سلسلے تک ایک مربوط تصاویر کا سلسلہ مرتب کریں گے۔ داخلی شاٹس اور بیرونی پانوراماز کو متوازن رکھنا یاد رکھیں، اور سورج کے غروب ہونے سے پہلے ہمیشہ مغرب کی طرف والے زاویوں کی جانچ کریں۔.
ٹرین فوٹوگرافی کے لیے گیئر، سیٹنگز اور حفاظتی تجاویز
اپنی شٹر کو 1/1000s پر سیٹ کریں اور کسی مسافر سیٹ سے شیشے کے گنبد والی کھڑکی سے واضح منظر کے ساتھ شوٹ کریں، ایک واضح فیچر کو فریم میں رکھنے کے لیے ایک ورسٹائل زوم کا استعمال کریں۔.
الاسکایوکان راہداری کے ساتھ ڈینالی سٹار کو قید کرنے کے لیے، صبح کی روشنی، کئی سٹاپس، اور کبھی کبھار کراسنگ کے لیے منصوبہ بندی کریں جو آپ کے سفر کی کہانی میں گہرائی ڈالتا ہے۔ ایک صارف دوست سیٹ اپ استعمال کریں جس پر آپ بسٹرو کار کے آگے یا کسی کار کے داخلی راستے پر انحصار کر سکیں، اور اپنی یونٹ کو اتنا ہلکا رکھیں کہ اگر سائٹ لائن بہتر ہو جائے تو آپ اسے کسی دوسری نشست پر منتقل کر سکیں۔.
ضروری سامان
- ایک باڈی جو تیز ترین اے ایف اور مضبوط اعلٰی آئی ایس او کارکردگی کے ساتھ ہو۔
- دو لینز: ایک معیاری زوم (24-70 ملی میٹر) نزدیکی مناظر کے لیے اور ایک ٹیلی (70-200 ملی میٹر) دور کی خصوصیات کے لیے۔
- اضافی بیٹریاں اور میموری کارڈز
- مائیکرو فائبر کپڑا اور عدسہ صاف کرنے والا محلول شیشے کے گنبد والی کھڑکیوں سے انعکاس کو کم کرنے کے لئے۔
- لینز ہڈ اور پہاڑی یا داخلی راستے پر ساکن شاٹس کے لیے ایک ہلکا پھلکا مونوپڈ یا اسٹیبلائزر۔
- اختیاری پولرائزنگ فلٹر جو کھڑکی سے روشنی ٹکرانے پر چکاچوند کو کم کرنے کے لیے کم استعمال کیا جاتا ہے
- حفاظتی پَٹّی اور ایک چھوٹا بیگ نشست کے نیچے راہداری سے دُور رکھنے کے لیے۔
منظر نامہ کے لحاظ سے ترتیبات
- روشن صبح، صاف آسمان: 1/1000–1/1250 سیکنڈ، f/5.6–f/8، ISO 200–400؛ کسی فیچر پر توجہ مرکوز کریں جیسے کہ پہاڑی کو فریم کرنے والے درخت، یا کراسنگ کا نشان
- ابر آلود یا ہلکی روشنی: 1/800–1/1000s، f/4–f/5.6، ISO 400–800؛ متحرک مضامین کے لیے مسلسل AF (AF-C) استعمال کریں۔
- متحرک مضامین (مسافر گاڑی کی کھڑکیاں، گزرتے ہوئے لوگ): برسٹ موڈ، ایک مستحکم فیچر پر پہلے سے فوکس کریں اور AF-C کے ساتھ ٹریک کریں۔
- تخلیقی حرکت: رفتار کی ترسیل کے لیے 1/125–1/250s کیساتھ پیننگ جبکہ پیش منظر کو واضح رکھا جائے۔
کمپوزیشن اور ونڈشیلڈ تکنیک
- اپنے فریم کو اینکر کرنے کے لیے بار بار آنے والی خصوصیت—درخت، ایک دور کی پہاڑی، یا برفانی ریج—پر ایک واضح نظر کی لائن تلاش کریں۔
- کم سے کم عکاسی کے ساتھ شیشے کے ذریعے فریم کریں: لینس کو قدرے جھکائیں، شیشے کو صاف رکھیں، اور توازن کے لیے آسمان کی طرف زاویہ رکھیں۔
- پیمانہ کے لیے ایک دو مسافروں کو شامل کریں، لیکن جب پیش منظر بے ترتیبی سے پاک ہو تو انتظار کر کے گندگی سے بچیں۔
- اسٹیشن کے داخلی راستوں یا شیشے کے گنبد والے کار کے اندرونی حصے کو ایک ہی فریم میں متضاد عنصر کے طور پر شامل کریں۔
- سفر کی ایک مختصر کہانی بیان کرنے کے لیے کئی لمحات پر محیط ایک سلسلہ کی تصویر کشی کریں، پھر اپنی بالٹی لسٹ کے لیے مضبوط ترین شاٹ کا انتخاب کریں۔
ریلوں پر حفاظت اور آداب
- ہمیشہ بیٹھیں یا ٹرین کی حرکت کے دوران ہینڈ ریل کو پکڑیں؛ گلیاروں یا دروازوں میں جھکنے سے گریز کریں۔
- اپنی بیگ اور سامان کو گزرگاہ فرش سے دور رکھیں؛ ٹرپنگ سے بچنے کے لیے سیٹ ویل یا سیٹ کے نیچے ایک کمپیکٹ بیگ استعمال کریں۔
- گاڑیوں کے سٹیشن یا کراسنگ پر رکنے کے دوران دہلیز پر قدم نہ رکھیں؛ پہلے باضابطہ اعلانات کا انتظار کریں اور اپنے سازوسامان کو محفوظ بنائیں۔
- گاڑیوں کے درمیان حرکت کرتے وقت، آویزاں راستوں کی پیروی کریں اور مجاز دروازے استعمال کریں; بیرونی پلیٹ فارم پر کبھی قدم نہ رکھیں۔
- دوسرے مسافروں کی جگہ کا احترام کریں؛ کونے کی سیٹ سے لی گئی ایک بروقت تصویر اکثر بہترین فریم حاصل کرتی ہے۔
مستقل اور صارف دوست شاٹس کے لیے عملی ٹپس
- داخلی کونے کے قریب پوزیشن حاصل کریں تاکہ ریل کی چکاچوند کم سے کم ہو اور درختوں اور دور کی پہاڑیوں کا نظارہ زیادہ سے زیادہ ہو۔
- آئندہ کے چکروں کے لیے پہلے سے منصوبہ بندی کریں: ایک دہرائی جانے والی خصوصیت (وادی میں داخلی راستہ، درختوں کا جھنڈ) شناخت کریں جس سے متعدد زاویوں سے شوٹ کیا جا سکے۔
- مناظر کے درمیان کھڑکی پر فوری ٹچ اپ کے لیے ایک چھوٹا مائیکرو فائبر کپڑا رکھیں۔
- اپنے ذہن میں ایک مخصوص بالٹی لسٹ فریم مرتب کریں: ایک صبح کی تصویر جو ایک واضح لمحے کے ذریعے ڈینالی کے تجربے کو قید کرے۔
- ٹرین کے اسٹیشن پر رکنے پر شاٹس کا جائزہ لیں تاکہ اگلے سفری حصے کے لیے زاویوں کو بہتر بنایا جا سکے۔