

 10 Tapas Cooking Class – Learn to Make Classic Spanish Tapas at Home">

Attend this 10 Tapas Cooking Class and bring the best of Spanish flavors into your home. The central focus is on simple, repeatable techniques that let you turn pantry staples into party-worthy bites. Expect tomate, garlic, olive oil, and crusty bread to take center stage. It’s a social evening you can host late, turning your kitchen into a meeting point for friends and family.
Through hands-on demos and guided practice, you’ll master 10 classic tapas, from patatas bravas to tortilla española. From the simple tomate to smoky paprika, you’ll pick up techniques that most customers noted would stick; travelers from tours appreciate the pace.
You’ll need only a handful of tools: a skillet, a saucepan, a sharp knife, and a sturdy board. Like many kitchens, you can hide bulky gadgets away to keep the counter clear while you focus on technique. Prepare a two-hour window, set a clean workspace, and lay out small plates for each bite.
The format blends live demos with hands-on practice. Attend at your convenience or replay later if needed; weve included a practical shopping list and a quick mise en place plan so you can start right away.
Join the best class and start hosting tapas nights that friends will remember. This program supports a social vibe over an evening, with clear steps to plan, shop, and cook, so you can share flavors with anyone over great conversation.
Practical guide to mastering classic tapas with authentic flair at home
Begin with a trio of reliable tapas to master this week: gambas al ajillo, patatas bravas with a tomate-based sauce, and a simple tortilla española; theyll build confidence.
Keep a steady focus on three elements per session: pan sear, balance in the sauce, and precise timing for each component.
Traditions from spain guide the flavor choices: use good olive oil, fresh garlic, and pimentón de la vera to mirror regional culture.
Shopping list for week one: peppers of assorted colors, 500 g shrimp, 6-8 potatoes, tomate (or canned tomate), garlic, olive oil, paprika, parsley, salt, and a bottle of horchata for a refreshing non-alcoholic pairing.
Sticking to the plan helps: preheat the pan to medium-high, pat dry seafood, and watch the oil to prevent smoking; resist crowding the pan to preserve crust.
Different textures keep plates interesting: drizzle a simple garlic oil over tortilla wedges, add a lemon twist, and consider a bruschetta-style topping on crusty bread to show personal flair.
Various regional twists exist; travelers and reviewers alike note how the flavors reflect local ingredients, reflecting the diversity of spain’s cuisine.
Points to remember include maintaining clean plating, tasting before serving, and keeping portions small for a shared table.
Workshops and online classes offer practical experience: hands-on sessions last 2-3 hours, cover 3-4 dishes, and provide tasting notes to guide your progress.
Reviewers and travelers often highlight that tasting tapas at home builds a tangible link to spain’s culture; with steady practice, you’ll notice personal growth in speed, balance, and confidence at the stove.
Must-have Pantry, Tools, and Equipment for Spanish Tapas
Buy a 12-inch carbon-steel skillet and a 10-inch heavy-bottom pot; these two handle searing, braising, and emulsions, letting you deliver in long demo sessions without swapping pans.
Pantry staples you should keep on hand for quick, flavorful tapas across regions:
- Olive oil: 1–2 bottles of high-quality extra virgin for base flavor and finishing
- Garlic: 2–3 bulbs, plus paste or finely grated cloves for quick sofrito
- Onions: 4–6 medium; yellow or white for depth
- Potatoes: 2–3 kg total; a mix of thin-skinned for patatas bravas and firm for tortilla
- Canned tomatoes or tomato passata
- Smoked paprika (pimentón dulce and picante)
- Sherry vinegar: 250–500 ml
- Olives, capers, and anchovies
- Fresh citrus: lemon or orange for zest and brightness
- Chili flakes or fresh chiles
- Sea salt, flaky finishing salt
- Canned or bottled seafood: tuna, mussels, or anchovies for quick bites
- Herbs: parsley, cilantro, and bay leaves
Tools to speed prep and keep flavors vibrant:
- Chef’s knife (8–10 inch) and a paring knife
- Cutting boards with non-slip grip
- Microplane zester and a citrus press
- Wooden spoon, silicone spatula, slotted spoon
- Tongs, spider strainer, and a small skimmer
- Measuring spoons, kitchen scale, and an instant-read thermometer
- Grater for manchego or aged cheeses
- Sharp kitchen shears for trimming herbs and seafood
Equipment and serving ware to present tapas beautifully and keep the process smooth:
- Paella pan (paellera) in 32–40 cm; smaller 20–30 cm works for demonstrations
- Cazuela or clay dishes for hot, rustic serving
- Tapas plates, board, and small bowls for variety
- Small ramekins or squeeze bottles for sauces and aioli
- Skewers (metal or bamboo) for shrimp, scallops, or peppers
- Heatproof mats, oven-safe lids, and kitchen towels for safety
- Digital timer and thermometer for precise steps
- Serving tongs and ladles in easy-grip handles
Once you assemble this setup, you can make a steady stream of dishes, from patatas bravas to quick scallops with zesty aioli. Your personal touch shines as you walk through the steps, answer questions, and meet the appetite of customers and younger cooks who attend classes. Love for preparation shows in every plate, and reviewers notice reliable results you cannot hide from curious palates. Thats why the setup matters for steady results across every class.
Knife Skills and Mise en Place for Small-Bite Dishes
Sharpen blades to about 15–20 degrees and organize mise en place in three zones: prep, cut, finish. Secure clothing, roll sleeves, remove jewelry, and keep a damp towel within reach to wipe blades between tasks. This setup minimizes waste and speeds up small-bite work.
Tools matter more than you expect. Equip an 8-inch chef’s knife, a 3-4 inch paring knife, and a serrated knife for crusty bread. Use a honing steel before and after rounds of chopping to maintain an edge; what you received from a well-tuned knife is control and speed. For particularly delicate tasks, switch to a lightweight blade.
Mise en place for tapas starts with prepared prep. Line up prepared ingredients by color and cut size on color-coded boards; label items for vegetarian options. whats common across successful kitchens is a tidy station, and lovers of small bites notice faster plating. In spain, tapas tradition rewards precision and timing.
Cutting techniques: julienne 2-3 mm strips, batonnet 3-4 mm sticks, and brunoise 1-2 mm dice. Use chiffonade for herbs. Keep the blade close to the board and guide with your knuckles; this reduces fatigue even during long sessions.
Workflow and safety. Practice a steady rhythm to prevent labor fatigue; rotate tasks between chopping and finishing. If you travel between hotel kitchens or classes by bike, carry a compact knife roll and a slim board to keep blades safe and ready. Whether you cook solo or in a class, this system scales.
Flavor and plating. Once prep is done, taste a sample and adjust salt and acid to sharpen flavor. Plate items with small, even portions, around 15-20 g per bite. Horchata pairs well between rounds for a refreshing palate cleanser.
Travelers and hotel guests arrive with different preferences. Offering vegetarian options widens appeal. Providing consistent portions and clear labeling helps a person or group know what to expect. Meeting around the prep table with the expert keeps everyone aligned and speeds service.
Overall guidance from this knife and mise en place routine: practice with a simple prep sheet listing cut sizes and order; expert feedback and repetition build confidence.
Authenticity through Flavor: Key Ingredients and Techniques
Begin with a simple, authentic base: tumaca on crusty bread, rubbed with garlic, brushed with olive oil, and a pinch of sea salt. This foundation lets the tomato’s sweetness and the olive oil’s fruitiness paint a toast that tastes bright and well balanced. This base is a part of your core technique.
Choose ingredients that deliver maximum aroma and texture: ripe tomatoes from valley farms, extra-virgin olive oil, coarse sea salt, and just a splash of sherry vinegar. Use garlic for depth; for a smoky lift, introduce a touch of pimentón. Keep each element fresh and prepared close to service for detail and intensity.
Techniques to lock in authenticity: toast bread until the crust is crisp; rub the cut garlic across the warm surface; smear tomato pulp thinly to form a glaze rather than a wet topping; drizzle oil in a slow, steady stream to paint flavor across each piece. This technique, allowing the tomato’s brightness to shine, keeps texture lively and flavors distinct.
Expand the lineup with bright, clean pairings: marinated olives, manchego shards, charred peppers, and a bruschetta-inspired topping for contrast. In Madrid, pan con tomate remains the star, but a small, well-chosen set of companions makes the tasting more rewarding. Overall, this approach should satisfy both purists and curious tasters.
For visiting Madrid, plan a tasting sequence that translates well to home: start with the basics, then build toward more complex combos. If you are visiting, join short food tours to see markets and kitchens; a 25-hour learning plan spread across tutorials should feel more rewarding and manageable.
To support those efforts, assemble a compact toolkit: a sharp chef’s knife, a sturdy board, a microplane for zest, a pastry brush or oil brush, a cast-iron skillet or griddle, and a small spoon for finishing salt. With these tools, you can execute the technique consistently and elevate your cooking at home. This kit is rated for home cooks and builds your skills.
Detail matters: measure salt gradually, taste after each step, and adjust acidity with a splash more vinegar if needed. Your palate will thank you as you move from simple tumaca to a fully layered spread that does not miss the mark and stays true to the classic flavor profile, providing an overall high level of confidence in every plate.
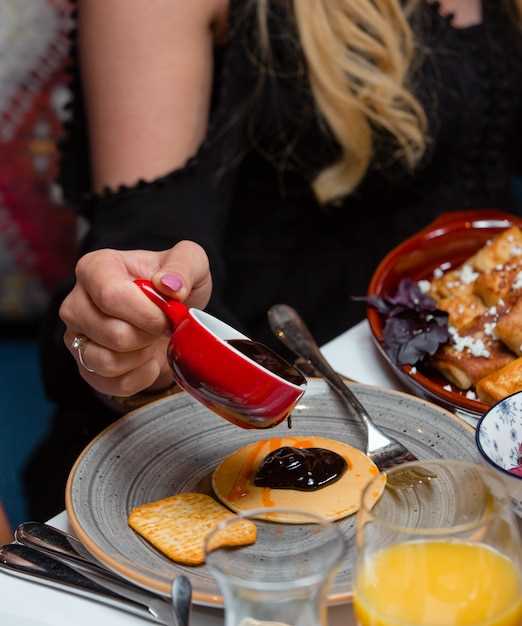
Step-by-Step: Classic Tapas – Patatas Bravas and Gambas al Ajillo
Begin with mise en place for Patatas Bravas and Gambas al Ajillo. In this interactive session, activities include crisping potatoes, sautéing garlic shrimp, a guided tasting, and a quick notes exchange at the table to build memories. This brunch-friendly pairing fits weekend gatherings and helps with learning at home.
Patatas Bravas: Step 1: Cut 500 g potatoes into 2 cm pieces; rinse to remove excess starch and pat dry. Step 2: Fry in oil heated to 180°C until crisp, about 4-5 minutes. Step 3: Sauce: sauté 1/2 onion and 2 garlic cloves in 2 tablespoons olive oil, add 400 g crushed tomatoes, 1 teaspoon smoked paprika, 1/2 teaspoon cayenne; simmer 8-10 minutes and season with salt. Step 4: Toss potatoes with sauce and finish with chopped parsley. Step 5: Serve hot with extra paprika for aroma.
Gambas al Ajillo: Step 1: Pat-dry 300 g shrimp. Step 2: Heat 60 ml olive oil in a skillet until shimmering. Step 3: Add 4 garlic cloves (sliced) and 1/4 teaspoon chili flakes; cook 1-2 minutes until fragrant. Step 4: Add shrimp; cook 2-3 minutes until pink. Step 5: Finish with chopped parsley and a squeeze of lemon; season with salt.
Serving the dishes at the same table encourages a smooth tasting flow. Booking a class provides a recipe code for reuse and access to tutorials. Reviewers highlight clear demonstrations and the way each step builds confidence in home cooking. If you notice discrepancies in heat or salt, adjust by adding a pinch more paprika or a touch more salt to the sauce, then re-taste.
You can adjust different heat levels to suit your crowd.
Optional tours of pantry staples accompany the session for learners who want a broader context.
Table: key ingredients and quick notes
| Dish | Ingredients (per serving) | Brief Steps |
|---|---|---|
| Patatas Bravas | Potatoes 500 g; Olive oil 2-3 tbsp; Crushed tomatoes 400 g; Onion 1/2; Garlic 2 cloves; Smoked paprika 1 tsp; Cayenne 1/4 tsp; Salt | Dice potatoes; Fry until crisp (180°C); Prepare sauce and combine; finish with parsley |
| Gambas al Ajillo | Shrimp 300 g; Garlic 4 cloves; Olive oil 60 ml; Chili flakes 1/4 tsp; Parsley; Lemon; Salt | Sauté garlic in oil; add shrimp; cook 2-3 min; finish with parsley and lemon |
Sauces, Dips, and Quick Fixes: Alioli, Romesco, Mojo
Start with a comfortable alioli base: whisk 1 egg yolk with crushed garlic, add lemon juice and salt, then slowly drizzle olive oil until it thickens into a velvety emulsion; if you cannot use raw egg, blend mayo with garlic and lemon as a reliable base. Eager cooks can use a store-bought aioli base to speed things up.
Romesco blends roasted peppers, almonds, garlic, olive oil, and a splash of vinegar into a lively paste; roast the peppers until charred, then blend with almonds and breadcrumbs for body. In a 3-hour session, you’ll discover its origins in Catalonia and how the smoky, sweet notes promise a punch to grilled vegetables or over crusty bread; this delightful staple stores well in the fridge and stays priced affordably when you make it at home.
Mojo combines garlic, cumin, paprika, olive oil, and vinegar, with optional orange juice for brightness; blitz until smooth and thin with a little water to reach dipping consistency. For a quick fix, whisk by hand and adjust salt to taste; instructors will guide you through experimenting with verde or rojo versions; theyyll help you adjust heat and brightness. The setup is located on a sunny calle near the market, making it easy to locate fresh herbs and citrus for this bright dip. The class promises more creations you can make at home, includes storage tips, and traces the origins of regional mojo styles so you discover how to adapt them to your pantry. If you have questions, the instructors will answer them during the session.