

 21 Most Instagrammable Places in Chicago – Map, Tips, and Photos">

Start at the observatory deck of 360 Chicago for sunrise skyline shots. Read the map through 21 spots to capture the front, the river, and the skyline from multiple angles, so you get the prettiest shots without guesswork.
From Millennium Park’s Cloud Gate to the Chicago Riverwalk, this guide maps each location with practical tips: best hours, access notes, and entry points to avoid crowds. You’ll know exactly where to stand to frame the skyline with Bean’s reflection or the river’s shimmer.
If you visited Chicago before, you’ve seen iconic streets, but these picks push your feed beyond the well-known. Shoot through the glass at the waterfront, look for zahlédnutí of sunlight through bridges, and let the signs along the river guide your path. What this route does is minimize backtracking while maximizing variety.
One architecture highlight is the brick front of harold Washington Library; it’s known for clean lines and dramatic interior light. The interior spaces let you create moody portraits and candid city scenes without crowds, and you can pair exterior shots with the library’s interior arcs for a cohesive set.
For a hanging-lights mood, shoot bridges around twilight where strings of lights hang above the river. Look for hanging lanterns along the bridges and let the Chicago River mirror the skyline as the day fades. Through this approach you cover everything from bright daylight to moody night scenes.
Practical tips: use a fast lens (24-70mm works well for most spots) and a tripod for dusk shots, but be mindful of time limits and crowding near popular sites. The map highlights 21 spots with concrete notes on hours, access, and the most photogenic angles, known to produce absolutely striking results.
Popular anchors include the Bean at Millennium Park, Navy Pier at sunset, the 360 Chicago view from the front, and riverfront vistas that show the skyline between bridges. If you read the signs and plan ahead, you’ll have a smoother shoot, and you’ll walk away with photos that Chicago readers will love.
Practical photo planning for 21 spots and five boat-based skyline views
Plan two golden-hour blocks and five boat-based skyline views, covering 21 spots with a tight shot list and fewer gear swaps.
Create a 21-stop map with a clear angle, light window, and a four‑to‑six minute window per hit to keep pace while walking between nearby locations. This means you’ll finish each day with a compact set of instagmmable shots and room to adjust when the light shifts throughout the evening.
Gear smart: carry two versatile lenses (24‑70mm and 70‑200mm), a lightweight tripod for blue hour, and spare batteries. Set daylight shots to ISO 100–400, f/8–f/11, 1/125s; for blue hour or night on the water, shift to ISO 800–1600 and 2–8s with a steady mount.
Time-of-day plan by area: Buckingham Fountain, Millennium Park, Navy Pier, the Chicago Riverwalk, and Grant Park each reward a different approach. At Buckingham, go wide to capture the fountains with the skyline above; at Millennium Park, keep the Bean in frame with crowd silhouettes; along the Riverwalk, mix reflections and river bends; near the park’s edges, use higher vantage points where possible to add depth. Where possible, walk a few steps to a higher deck or bridge to vary the composition and avoid crowding.
Five boat-based skyline views: book an architecture river cruise for tall towers, a sunset river ride for warm reflections, a lake cruise for broad skyline spans, a blue-hour lake loop for silhouettes, and a post-sunset city cruise for illuminated elevations. These opens prime opportunities to shoot above the waterline, with the city stepping into a nearly monochrome glow. Since boats move, pre‑plan where you’ll stand and when you’ll zoom to frame both foreground interest and the distant towers.
On board and on land, stay flexible: position at the bow for sweeping frames, switch to the stern for calmer water, and use a 70‑200mm for compressing the skyline while a 24‑70mm handles nearby details. Walk between vantage points to keep your momentum steady and avoid missing the light. After visits, grab a quick treat–donuts or a Burdick‑style bite–and note which spots felt most instagmmable for future revisit. This space to adjust light and timing helps you build a concise, compelling set across all 21 spots and five boat views.
Cloud Gate (The Bean) at Millennium Park: optimal angles, light, and crowd management
Plan to shoot Cloud Gate before 9am on weekdays to catch soft light and avoid crowds; no tickets are required. Start at the south-east edge of AT&T Plaza and circle the bean-like sculpture to find clean reflections. Address: 201 E Randolph St, illinois.
Optimal angles: position yourself a few steps to the east of the bean-like curve to frame the skyline with the sculpture; tilt about 15-30 degrees and shoot both the curve and reflections; use a wide-angle lens (14-24mm) for a full panorama and tighter portraits; try to include willis and wacker in frame to anchor location and give a sense of context; photograph a mix of close-up details and wide city views for variety.
Light: golden hour at sunrise or blue hour after sundown yields rich hues on the stainless surface; avoid harsh midday glare by waiting for softer light or overcast skies; move around to catch the reflection from different buildings and get a glimpse of the city into your frame.
Crowd management: arrive early to reduce congestion; move slowly and let others pass; yield to pedestrians on the plaza and keep the walkway clear; shoot in short bursts, then step to the side for a moment while crowds pass; target quieter moments around the edges of AT&T Plaza for cleaner shots.
Nearby options and final tips: after Cloud Gate, explore spots around Millennium Park to extend your photos, including a museum or cultural building nearby; the east side offers nice views toward the lake and willis; grab pizza or other spots at nearby restaurants for a break and continue your sequence onto the riverwalk or into the city block, creating amazing, unique photos that will become a sweet memory of chicago and illinois.
Millennium Park area: framing reflective architecture with color and symmetry
Shoot from the Loop-side plaza at golden hour to frame reflective architecture with color and symmetry, using a wide-angle lens and staying slightly off-center to keep the bean’s curve as the anchor.
harold, our photographer friend, offers a quick glimpse: arrive before the crowd clears, then aim toward the lake and the avenue so the reflection reads clean in your photograph.
The ceiling motifs of the nearby pavilion inspired a rhythm that pairs blue lake light with brick lines. If you shoot from the north side, the reflections align with Michigan Avenue and offer instagmmable symmetry in every frame, though you may need a polarizer to tame glare.
Walk the side ramps to avoid crowds; there is a food booth along the park edge where you can grab a sweet dish. Admission to Millennium Park is free, which gives you freedom to experiment with exposures, like longer shutters to blur pedestrians while keeping the reflection crisp. If you walked from the Lake Street entrance, you’ll notice the avenue view above the water; the city lights merge into one frame that stays instagmmable for years. Photography club members can even apply for a short grant of time to shoot during quieter hours, and a small tiki sign near the food area helps you spot a casual spot to regroup in the lobby if you need a breather or want to compare shots with friends.
For a different angle, dip into the pavilion lobby for an observatory-like impression of lines and curves, which contrasts with the outside reflection. The view isnt static; the light shifts with the hours, so keep your camera ready.
Recommendation: pair the Bean shot with a second frame on the BP Bridge or Crown Fountain to complete a Chicago loop of color and symmetry. Our recommendation helps you build a two-shot sequence that feels cohesive across your feed.
| Spot | Best Time | Angle/Notes |
|---|---|---|
| Cloud Gate (Bean) – Loop side | Golden hour or blue hour | Wide angle; slight off-center; align lake and avenue in the reflection; include some ceiling lines from adjacent pavilions |
| BP Bridge viewing stairs | Pozdní odpoledne | Shoot from the stairs to frame the loop curve against city lines; avoid direct sun glare |
| Crown Fountain edges | Early morning | Move to the side where reflections meet the skyline; use a polarizer for clarity |
Riverwalk and bridges: best vantage points for architectural lines and color palettes
Start on the Randolph Street Bridge balcony for a long, clean view that locks in architectural lines and the river’s color palette as it shifts with light.
-
Randolph Street Bridge – public balcony vantage
From the public balcony, you frame the major lines of the city: vertical towers, horizontal bridge decks, and the river that runs like a metallic ribbon. The view easily slides from pale stone and glass to warmer brick tones, and you’ll notice dots of light dancing on the water as clouds drift by. This is a must-do moment for anyone chasing a balanced composition that looks intentionally curated.
-
Clark Street Bridge – seeing rhythm and repetition
Stand where the arches align with the river’s bend to see how the rhythm repeats across blocks. The west-facing light at late afternoon brings a cool glow on metal, while planters along the railing add fern greens that a photographer can include as a soft contrast. If you’re after a crisp, architectural look, this vantage makes it easy to isolate lines and shapes.
-
Michigan Avenue Bridge – central axis
From the center, you’ll catch a direct view of the skyline and river curve. The palette shifts as you tilt toward sunset; cloud shadows drift across glass façades, opening the scene to airy tones and anish hues in the painted shadows. It’s a classic angle to show how public spaces connect with the city’s cultural core.
-
LaSalle Street Bridge – clean angles
This crossing offers a simpler frame that emphasizes long, horizontal lines. The gate-like railings create a graphic foreground, and the river’s surface mirrors a quiet, different mood when light sits lower in the sky. Bring a wider lens to capture the balance of stone, steel, and water.
-
Wells Street Bridge – foreground texture
Ve Wells získáte živý pocit struktury: nýtované panely, kamenné pilíře a hranu, kde se stýká město a řeka. Mělká hloubka ostrosti pomáhá izolovat geometrii mostu od pozadí věží, zatímco vzdušná vzdálenost vybízí oko, aby se toulalo mezi body odrazů a siluetami budov. Za čtvrté, zkuste vyšší pohled z veřejného prostranství poblíž brány a získejte nový výhled.
Každý bod nabízí něco jedinečného: uvidíte, jak linky vedou oko, jak se barevné palety mění v různých denních dobách a jak řeka přidává odrazné body, které sjednocují snímek. Poté, co vyfotíte Randolph a poté se přesunete směrem ke Garfield Parku, kulturnímu kotvišti na West Side, si všimnete, že v říčním koridoru sídlí kulturní energie; sekvence se stává krásnou studií o tom, jak architektura a krajina konverzují. Pokud chcete silnou sekvenci pro veřejné příspěvky, naplánujte si více sezení: snadno sestavíte soudržný soubor, který vypadá profesionálně, i když zůstává váš vlastní. Jste připraveni sdílet dlouhý příběh, který působí vzdušně i srozumitelně.
Námořní molo a pobřeží jezera: ideální poloha pro široké vodní obzory a západy slunce hodné pohlednic
Postavte se na nejvýchodnější konec hlavní paluby Navy Pier zhruba hodinu před západem slunce, abyste si zajistili široké vodní horizonty, které na fotografiích hodných Instagramu vypadají jako nekonečné jezero. Postavte se k přednímu zábradlí, abyste udrželi hladinu vody čistou, a poté se posuňte do stran, abyste získali siluety panorámy orámované mraky. To stačí k nastavení tónu vaší session.
Kde fotit: pavilón orientovaný na východ nabízí klidné odrazy, zatímco konec mola poskytuje nerušené panorama směrem k jezeru. Využijte cestu podél pobřeží jezera Illinois k zachycení linií horizontu, které se táhnou přes snímek a vytvářejí příležitosti pro různorodé kompozice. Při procházce si vezměte koblihy z nedalekého stánku a popovídejte si s členem cestovního klubu; tato rychlá svačina a stručné tipy udržují uvolněnou atmosféru. Chicagští cestovatelé by toto místo poznali jako centrum pro studium západů slunce.
Pět rychlých úhlů pohledu pro začátek: čelo mola směřující na východ kvůli širokému horizontu; pravostranní zábradlí s městskými světly odrážejícími se na mokré dlažbě; záběr z nízkého úhlu na vodu pro ohýbání hodné pohlednice; vertikální rám zahrnující oblouk mraku nad obzorem; neinscenovaný snímek s dítětem nebo dospělým v popředí pro měřítko. Marcel ze stánku Burdick by ti řekl, že stabilní stativ dělá tyto pohyby čistšími, a tehdy se vyplatí důvěřovat vlastnímu oku. Toto nastavení ti umožní zachytit jak široké, tak i intimní momenty.
Postprodukční poznámky: udržujte pod kontrolou přesvětlená místa, abyste zachovali modré tóny soumraku, zvyšte texturu na vodě a zachovejte věrné barvy illinoiské oblohy. Navy Pier zůstává hodné Instagramu, pokud vyvážíte slunce, světla a odrazy; tento přístup nabízí dostatek rozmanitosti k zaplnění galerie chicagských scén z pobřeží jezera, které jsou vhodné pro děti i dospělé. Vše od odrazů po siluety se spojí, když budete číst značky podél promenády pro bezpečnost a sebevědomě se pustíte do každého záběru.
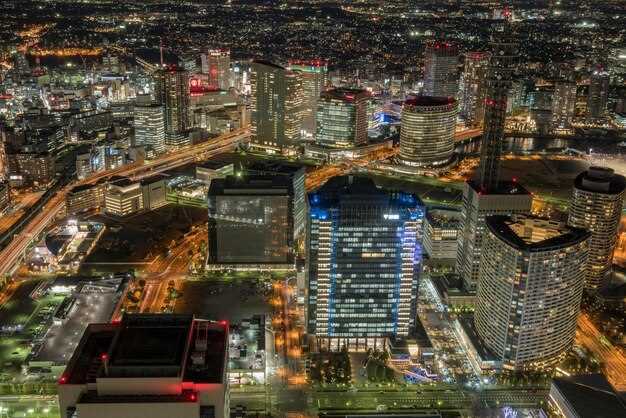
Panoráma Chicaga z lodi: pět tras, tipy pro načasování, vybavení a náměty pro záběry
Zarezervujte si devadesátiminutovou plavbu při západu slunce z Navy Pier a foťte z ruky z levoboku, abyste zachytili teplé světlo na panoramatu města. Vždy plánujte rychlé přepínání mezi širokými a úzkými úhly, abyste zachytili jezero, mrakodrapy a řeku do jednoho záběru, a udržujte jejich detaily ostré tím, že zůstanete poblíž 1/200 s s ISO v rozmezí 100–400.
Trasa 1: Navy Pier na Oak Street Beach Začněte zde s ikonickými siluetami obrácenými k jezeru. Postavte se na zábradlí s náklonem 0–10 stupňů, abyste udrželi klidnou hladinu vody, zatímco se panorama za ní zvedá. Použijte zoom 24–70 mm pro zachycení širokých městských scenérií a úzkých věží, poté přepněte na 70–200 mm pro vzdálené věže vykukující nad linii vln. Široké pobřeží přidává přirozený rám a obloha růžové barvy může jemně sedět v pozadí a obohatit barevný vzhled mnoha snímků.
Trasa 2: Streeterville a pobřeží jezera v Lincoln Parku Plujte na sever podél pobřeží jezera a foťte skleněné věže, jak odrážejí vodu. Z rohu poblíž Halsted Street se mění expozice, takže foťte v rozsahu 24–105 mm, abyste zachytili jak široké panorama, tak detailní fasády. Tato trasa vyžaduje pomalejší, rozvážnější tempo, abyste sladili úhel slunce s vrcholy budov a udrželi viditelnou texturu povrchu jezera.
Trasa 3: Nábřeží řeky Chicago a Wacker Drive Klouzejte mezi říčními kaňony, kde aktivita na nábřeží a říční zákruty vytvářejí dramatické odrazy. Použijte vertikální orientaci k zachycení vysokého souboru mrakodrapů a při zarovnávání linie řeky s horizontem hledejte náklon 0–8 stupňů. Střední teleobjektiv jako 70–200 mm pomáhá izolovat věže proti obloze, zatímco širší objektiv 16–35 mm zachycuje kontext okolních smyček a mostů.
Trasa 4: Burnham Park a průhled na Museum Campus Zaměřte se na jih směrem k areálu muzea, kde se vám naskytne jiný pohled na panorama města s otevřenou vodou v popředí. Moderní siluety, mnohovrstevnaté budovy a symetrie během modré hodiny vytvářejí silné fotografické příležitosti. Udržujte nízké ISO a využijte stabilní úchop, mějte širší objektiv pro kontext prostředí a užší objektiv pro architektonické detaily v blízkosti břehu.
Trasa 5: Prohlídka pláží od Montrose Beach po 31st Street Beach Tento jižní úsek u jezera odhaluje širší linii mrakodrapů vrstvených za otevřenou vodou. Naplánujte si průjezd tak, abyste zachytili slunce zapadající k obzoru, a poté přepněte na delší ohniskové vzdálenosti, abyste zkomprimovali prostor a zdůraznili vzdálenost mezi jezerem a korunami výškových budov. Omezené úhly zde vyžadují promyšlené rámování a pečlivou kompozici, abyste se vyhnuli přeplněnému pozadí.
Časové tipy: Zlatou hodinku plánujte zhruba 30–45 minut před západem slunce, poté začíná modrá hodinka asi 15–25 minut po západu slunce. Pokud srovnáte své záběry s vodou téměř v nulovém náklonu, omezíte kolísání horizontu a udržíte vizuálně čistý strop budov. U vyhlídek na 94. ulici nebo jiných vzdálených vyhlídkových bodů pořiďte rychlou sekvenci v rozsahu 0–6 stupňů a poté ustupte na 8–12 stupňů a porovnejte dopad. Za jasných dnů se může obloha změnit z bledě růžové na sytě růžovou, jak se mění stupně barev, takže si připravte rychlé přepínání mezi širokoúhlými a teleobjektivovými záběry za méně než minutu.
Výbava a nastavení: používejte lehký, stabilizovaný systém a všestrannou sadu objektivů (širokoúhlý 16–35 mm a střední teleobjektiv 70–200 mm). Mějte připravené náhradní baterie a paměťové karty; stabilizace instalovaná v lodi pomáhá udržet stabilní záběry a kompaktní monopod je přijatelný, pokud je povolen. Fotografujte z místa na zábradlí, které je bezpečné a pohodlné pro atletický postoj, a udržujte rovnováhu, když se loď kýve. Pokud jste blogger a zachycujete den na jezeře, zkuste několik záběrů s rozsahem 35 mm–50 mm, abyste dosáhli intimnějších pohledů na panorama města, které míjí nábřeží.
Pět námětů pro snímky, které můžete vyzkoušet na různých trasách: Pravidla: - Poskytujte POUZE překlad, žádné vysvětlení - Zachovejte původní tón a styl - Zachovejte formátování a zalomení řádků: Široká panorama nad vodou s horizontem v dolní třetině a jemným náklonem 0–6 stupňů; pravidlo 2: Odrazy skleněných věží v říčních hladinách při použití střední ohniskové vzdálenosti; prompt 3: Noční světla podél Riverwalku se třpytí na jezeře, dlouhá expozice 2–4 sekundy; prompt 4Rohové orámování dvou mrakodrapů s vodou protékající mezi nimi; Příkaz 5: Silueta lidí na zábradlí s růžovou rosé září na obzoru v pozadí.