


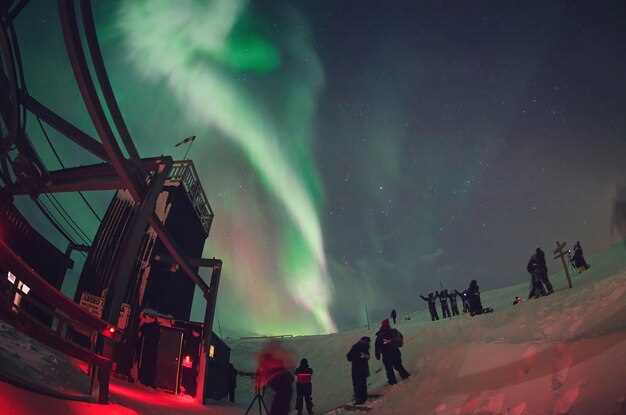
Recommendation: 预订 3–4 小时的短途旅行,人数较少 组里 大约 2-4 名枪手在黑暗附近 湖泊, ,并在寂静的 głąb 夜晚,大约 22:00 到 01:00 之间拍摄。带上保暖的衣物、备用电池和一个保温瓶。.
Use a 现代 在单反或无反相机上使用超广角镜头(14–24 mm),手动对焦至无限远,并拍摄RAW格式。 设置ISO 800–3200,曝光时间8–25秒,具体取决于辉光亮度; 安装稳固的三脚架; 拍摄 单个 你可以稍后堆叠的帧和序列。.
想想地平线:放置一个遥远的 城市 轮廓或一行树木来稳定构图;包括天空的渐变和星辰。你将在这里 走着瞧。 当上方的光芒移动缓慢时,效果最佳;通过转换视角保持画面的动态;避免过度曝光,以保持绿色和紫色的鲜艳。.
优先选择视野开阔、周围黑暗且能安全进入的地方。 湖泊 海岸线。如果您在放牧区域附近,您可能会遇到 驯鹿 在树线附近徘徊;另一个 人 in the 组里 可以在你构图的时候帮忙拿设备。找个地方。 这里 风平浪静,湖面上的冰摸起来 冻僵的.
后期,堆叠多帧以增强细节;应用轻微降噪;保留 真实的 色彩;将白平衡校准为偏冷色调;提供干净的渐变过渡并保持夜晚的自然氛围。.
在当地文化中,游客经常谈论一个 圣洁的 夜晚和一段故事 尼古拉斯 度过整个冬季;导游可以分享一些实用 建议 about 城市 传统和安全;询问 人 带领团队了解允许区域和最佳时间范围,, 许多 数小时的实地拍摄。.
当天空发光时,, 走着瞧。 弧光如何改变颜色和强度。保持节奏稳定,测试一些预设,然后在后期使用分层堆叠进行优化,以保留跨越一片真正的、安静的绿色和紫色的调色板。 组里 在宁静的湖边和星光璀璨的夜空下拍摄的照片。.
罗瓦涅米北极光追逐:摄影方法与极光实用技巧
使用手动控制和RAW格式设置基线;安装一个坚固的三脚架;从一个接近 f/2.8 的广角镜头开始,曝光 8-20 秒,然后将 ISO 调整到 800-3200。此外,尝试摄影领域的其他方法,看看在天空光的世界里什么最有效。.
使用实时取景对焦一颗明亮的星星,锁定在无限远,并使用遥控快门以避免抖动。在夜空中,稳定性至关重要,所以将设备安置在湖岸边,远离人群;无云的条件会有帮助,但我们无法避免半透明的云,所以请观察预测并计划穿梭于直接视野和黑暗地平线之间。.
要构建序列,请同时启用间隔拍摄,生成多个可以稍后堆叠的单帧。如果活动适中,请从以 8–12 秒拍摄 5–10 张照片开始;根据条带的出现情况进行调整,看看弧线如何在天空中、在黑暗背景和明亮光带之间移动。.
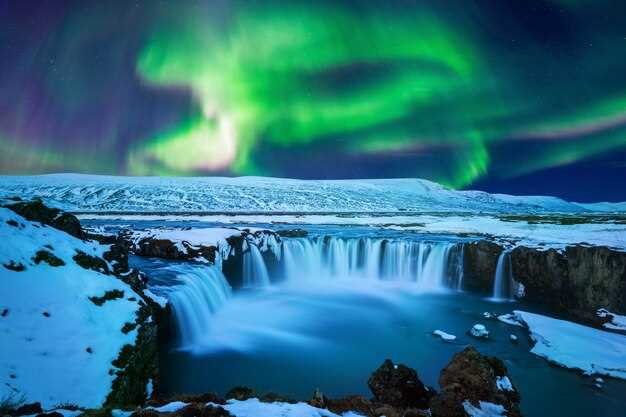
构图时采用简洁的前景:可以是 mała wioska (小村庄),或是静谧的 jeziorze (湖) 旁的一棵孤树,并利用倒影来增加深度。注意 przeszklonych (玻璃般的) 云朵轮廓,保持地平线干净;远处一处 ognisku (篝火) 可以为画面增添暖意,但要避免辉光过度曝光。Tutaj warto mieć na uwadze, że nie trzeba czekać długo (这里值得注意的是,不必久等);czasem wystarczy jeden klarowny moment, by całość zagrała (有时只需要一个清晰的瞬间,整个画面就鲜活起来)。.
后勤至关重要:附近舒适 wioska 的 noclegu 简化了 miesiecy 规划期间深夜工作。从 regionie 的 lokalny przewodnik 处获取建议,特别是如果您计划 wyprawa 通过 święty landscape;twojej wiedzy 的 источник 是当地导游,他们的见解 często pojawiają się w rozmowach e-mailem。保持电池温暖,携带备用镜头,i odwiedź gdańska tradycja obserwacji nieba,因为它有助于理解 barw。zobaczymy,当 niebie 在 ognisku 和 wodą 上闪耀,在星星和寂静之间,在午夜时分和黎明前,有很少的光线会进入镜头。.
拍摄极光相机设置:ISO、光圈和快门速度
基线:ISO 3200, f/3.2, 10 秒,手动对焦至无限远,三脚架固定。 在 zima months (miesięcy),bezchmurne okresie 占据围绕 arktycznej wioska 的 polarną 天空; 如果光晕仍然微弱,您可以延长至 20 秒,并且使用坚固的支架可以保持 sharp。 为了灵活性,您可以参加 rezerwacji 进行 grupie 游览并尝试不同的组合,因为在乘坐 skuterami 在雪地上进行 jeżdżą 活动时,połączenie 稳定的装备和耐心会产生最佳效果。 Możesz 从此设置开始,并根据 otoczeniu 中的活动和光线进行调整。.
根据活动调整 ISO 和曝光:当 aktywność 最小时,天空非常黑暗(połowie księżyca),将 ISO 降至 800-1600,将光圈推至 f/4,拍摄 8-12 秒。如果月光适中,或者你想要更干净的星星,możesz 将快门速度降低到 5-8 秒,同时保持 ISO 在 1600 左右。对于更亮的条件,możesz 也可以将 ISO 提高到 3200,但保持在 f/3.2-f/3.5,以保持轮廓清晰。关键是平衡 prędkość、ekspozycja 和噪点,尤其是在 finlandii 环境中,其中 otoczeniu 可以清晰而寒冷;bezpieczny zakres 有助于避免镜头上的玻璃眩光,同时你计划另一次 wycieczce 或 powrót 返回基地。.
光学和玻璃:使用快速广角镜头 (14–24 mm) 并确保前镜片清洁;玻璃可能会结霜,因此请携带超细纤维布和镜头加热器(如果可用)。对于大多数设置,将焦点保持在无限远并从最大光圈回拨可以减少星星的光晕;在实践中,当极光般的光芒微弱时,f/3.2–f/4 是一个可靠的范围,同时保持星场在昏暗环境中的清晰度,如果您希望在照片中获得更多前景细节,则可以使用更大的光圈。如果您在雪地寂静的环境中与一群人(合影)一起拍摄,您可以在单帧和偶尔的较长堆栈之间交替,以最大限度地提高前景的细节。.
WB 和 RAW 工作流程:将白平衡设置在 3800–4200K 左右,以保留天空中的自然绿色和蓝绿色;拍摄 RAW 以保留明亮弧线和黑暗前景之间的动态范围。在有城市光晕或其他光污染源 (inne) 的环境中,RAW 允许有效的后期处理,而不会牺牲玻璃表面的数据;您也可以包围曝光(pojedyncze 加上较短的拍摄)以捕获整个范围,并且在 wycieczce 期间为笔记本电脑 zasilanie 可以帮助您当场比较结果。通过周密的计划,在旅途中保持控制 pozostanie,并 zrezygnować z 不必要的现场调整。.
实用方法:您可以在一次拍摄过程中进行多次尝试,观察显示效果的变化;使用坚固的三脚架和遥控快门线或定时器。如果您是新手,可以考虑团体预订,其中包含经验丰富的导游的指导;这种设置可以提高在单张照片中同时捕捉到拱形光芒和有趣前景特征的几率,而团队中的其他人可以帮助掌握时机并保持设备温暖——多亏了这一点,您将保持专注,避免错过活动达到高峰的时刻,并且可以立即与团队中的其他人分享结果。.
在您规划夜间拍摄时,可以比较几个核心设置并随时调整:准备好备用相机,设置不同的 ISO 和快门速度,以应对光线的快速变化;使用轻量级球形云台,以便快速调整构图;并记住即使在寒冷环境中一个微小的失误也可能导致电池更快耗尽,因此请携带备用电池和紧凑型充电器。通过遵循这些实用的指导原则,您将最大限度地提高获得清晰曝光的可能性,从而突出动态弧线和活动周围安静的环境,无论您是独自执行任务还是进行团队设置,并且您将为下一次 bezchmurne 期间的未来尝试提供可靠的基线。.
| 条件 | ISO | 光圈 | 快门 (s) | Notes |
|---|---|---|---|---|
| 低活跃度,夜空黑暗,无月。 | 3200–6400 | f/3.2–f/4 | 8–15 | RAW; focus at infinity; consider stacking to increase signal in the foreground |
| Moderate activity, half moon present | 1600–3200 | f/3.2–f/3.5 | 6–12 | Bracket if possible; WB 3900–4100K for natural greens |
| Bright sky glow, low foreground light | 800–1600 | f/4 | 5–10 | Preserve foreground detail; consider a longer foreground shot for context |
| Strong activity, clear bezchmurne sky | 1600–3200 | f/2.8–f/3.2 | 5–8 | Shorter exposures reduce motion blur; capture multiple frames for stacking |
Lens and Tripod Setup for Stable Long-Exposure Shots
Stabilize with a rigid carbon-fiber tripod and a dependable ball head. A fast wide glass such as 14-24mm f/2.8 or 16-35mm f/2.8 keeps the sky and foreground in one frame. Keep the center column down, legs locked, and add a weight bag or snow spikes to counter wind and sinking. Attach a remote shutter or intervalometer to avoid touch during exposure. Place the setup on solid snow or packed terrain, then test stability by gently pressing the camera rack.
Baseline settings: shutter 12-15 seconds, ISO 1600-3200, aperture f/2.8. If the sky is brighter, drop ISO to 800; if star trails become noticeable, shorten to 10 seconds. If longer trails are desired, push to 20-25 seconds and accept some noise, or stack many shorter frames later.
Focus technique: switch to Manual, use Live View magnified to 10x, and lock focus on a bright distant point such as a star or far-lit rock. After a cold soak, recheck focus; small shifts happen in winter so repeat every 15–20 minutes.
White balance and format: shoot RAW, set WB to 3800-4100 K; avoid auto WB that shifts between frames. Disable in-camera long-exposure noise reduction when stacking; keep sensor warm with moderate, continuous exposure rather than idle.
Interval shooting plan: use interval between frames around 1-2 seconds; collect 400-600 frames to cover ~10-20 minutes of sky. This helps create clean composites and reduces random noise; if you want single-frame results, adjust exposure time accordingly.
Winter handling: battery life drops quickly; carry spares in warm pockets, swap during breaks. Use dew heater to keep lens clear; use hood; keep warm with zimowy kombinezon; protect hands with warm gloves. In zimowym sessions along wycieczki near śnieżne winds, a grill-style hand warmer helps maintain circulation, especially when you need to shoot when the temperature dips to single digits; dzięki a steady footing, you can stay out longer.
Planning and timing: scout vantage points during wycieczki along skandynawskich shores; during wieczorem hours such as godzina 21:00 watch the zorzę emerge; position foreground elements such as śnieżne drifts; re-check focus; keep spare batteries.
Focusing in Low Light: Manual Focus Techniques and Live View Tricks
Set Live View to 10x magnification and fine‑tune focus on a distant, bright point until the subject becomes a single pixel; lock focus with the lens ring or back‑button method, then proceed without refocusing between frames.
-
Baseline setup: choose a wide lens (14–24 mm) with an aperture of f/2.8–f/4, ISO 1600–3200, and a shutter of 8–15 s; mount on a sturdy tripod; use a remote release or timer to avoid camera shake.
-
Refinement with Live View: switch to manual focus, zoom to 10x, and enable focus peaking if available; adjust until the edges of distant structures or stars are crisp; verify on a second bright point to confirm consistency.
-
Infinity calibration: rotate to infinity, then micro‑adjust back 1–2 cm on the barrel; in cold conditions plastic and glass can contract, so recheck after a minute and re‑lock.
-
Exposure strategy: begin with ISO 1600, shutter 8 s, aperture f/2.8; if the arc of light is faint, push shutter to 12–15 s while keeping ISO within 3200; if stars trail, lower ISO and shorten the shutter accordingly.
-
Live View tricks: preview exposure with histogram and highlight warning; inspect a 100% crop to ensure round stars; avoid clipping by balancing readout and sky glow, then lock in the chosen settings for the sequence.
-
Stability and winter handling: keep the tripod on solid ground, use a remote or interval timer, and warm spare batteries in your pocket; add a lens hood or dew‑heater strap to reduce stray reflections in icy air.
During a memorable wycieczce in Kilpisjärvi nocy arktycznej okresie, odwiedziłam Laponię and learned that patience when dialing focus in zimowe conditions pays off; through przeszklonych panels reflections can distort cues, yet zamarzniętego tundry edges provide stable anchors for composition; by relying on Live View, zobaczenie crisp details becomes achievable, and this nowoczesny approach will last (trwa) through months of nocy and long, quiet observations of the arc in the sky.
Composition Strategies: Framing the Aurora with Landscape, Foreground, and Color
Recommendation: Mount a tripod, use a wide-angle lens (14–24mm), shoot RAW, ISO 1600–3200, aperture f/2.8–4.0, shutter 6–12 seconds, and focus with live view at infinity. Disable long-exposure NR to keep a rapid sequence flow during a night of activity.
Landscape framing: Place the horizon on the lower third to reveal a vast niebie and a quiet zimowy scene below. Include a distant ridge or a frozen lake surface to create depth, then let the greenish curtain ride along the upper third. If the otoczeniu offers a czytelny silhouette, align it toward the kierunku that draws the eye toward the glow. In finlandii environments, this approach emphasizes scale and keeps the viewer engaged through a single, steady line of sight.
Foreground elements: Anchor the shot with a bałwana or a small cabin silhouette to give size reference. Add texture with śnieżnych drifts and przeszklonych ice edges to guide the gaze toward the sky. A simple, isolated focal point in the front plane enhances zobaczenie of motion higher in the sky and prevents a flat composition, while still honoring the surrounding atmosphere of zima.
Color strategy: Favor cool blue tones in niebie to preserve the winter mood, then introduce a subtle warm glow from a nearby willa window or camp lamp to create contrast. Calibrate white balance around 3400–3600K as a baseline, shoot RAW to fine-tune later, and avoid clipping in the brightest bands so the zorzę remains readable during wieczorem and nocy.
Technique and workflow: Bracket exposures in a three-shot sequence (-1 EV, 0, +1 EV) to protect highlights and improve dynamic range. Stack the frames if noise becomes a concern, especially during calm, windless moments when trawa niebieskiego can blur. Maintain a quiet tempo, kiedy warunki pozwalają, trwa to kilka minut per kompozycja, a wycieczki w okolicy oferują wiele miejscowego charakteru do wykorzystania w kolejnych kadrów. Practical planning notes include watching the wind, choosing a zure direction, and leaving room for pojedyncze, dramatic moments tylko wieczorem lub nocą. Istotny punkt to oczekiwanie na momenty, kiedy niebo otwiera się nad zimowym otoczeniu, co pozwala zobaczyć intensywną, zieloną zorzę oraz subtelne odcienie wokół świętego marginesu krajobrazu, tworząc harmonijne kompozycje przy świętym spokoju nocy.
Practical tip: scout miejsca w dniu wycieczki, zapisuj kwestie kierunku, otoczeniu oraz możliwe lokalizacje dla bałwanów i innych elementów, by każda sesja miała wyraźny cel – to źródło (источник) inspiracji dla Twojej zimowej dokumentacji, nawet jeśli pogoda zmienia się z godziny na godzinę.
In-Field Workflow and Quick-Edit Tips for Aurora Sequences
Begin with a fixed interval plan: use a wide lens (14–24mm), manual focus at infinity, white balance around 3600K, RAW frames, ISO 1600, exposure 6–8 seconds, interval 8 seconds, and collect 60–90 frames during bezchmurne zorza activity. Prepare two batteries and a spare memory card; if the sky brightens, you can adjust to 4–6 seconds and raise ISO to 3200 briefly to maintain brightness.
Practical field routine: arrive at the chosen spot before darkness and set tripod, camera, and remote. Wear a sturdy kombinezon and gloves; keep a warm pad in an inner pocket; carry a weatherproof pouch with a spare card and battery. If gusts hit and temperatures drop, keep gear in a thermal bag, check wind direction, and perform a quick manual focus check on a bright star at godzinie 21:00–02:00; czasami you may need to tweak settings on the fly.
In the field, monitor exposure and histogram on the back of the camera; start with 6–8 s frames, then tweak as the zorza evolves. Bracket only when needed to preserve data quality; after the session, copy RAW to an external SSD. In a light program, apply a white balance of 3600–3800K, minor exposure lift, and gentle noise reduction. Export a small batch as JPEGs for sharing and keep the RAW archive intact for prawdziwa later refinements.
Communication and collaboration: within grupy, assign roles such as osoba A handling camera control, osoba B watching the sky for shifts, and osoba C managing data transfer and notes. Share quick updates by e-mailem to the miasto team or to nearby wioski crews; której windows appear most reliably, plan przelot to the next spot, and coordinate stops so as nie przeszkadzać innym przebywającym. This approach proves praktyczne in winter sessions and helps the crew stay efficient even gdy warunki zmienią się bez ostrzeżenia.
Post-session logistics: when zima settles in, consider moving between willa locations or exploring nearby wioski by skuterami to extend months of opportunity; keep an eye on ceny sprzętu sezonowego and reliably restock batteries. Zostanie a small, repeatable sequence allows którą można wykorzystać w kolejnych miesiącach, a możliwość szybkiej konsolidacji materiału w programie umożliwia szybki przegląd całej zorzy z każdego wieczoru.