


Рекомендація: Book a 3–4 hour tour in a small group of 2–4 shooters near a dark lake, and shoot when the deep night is quiet, between about 10:00 PM and 1:00 AM. Pack warm layers, spare batteries, and a thermos.
Use a modern ultra-wide lens (14–24 mm) on a DSLR or mirrorless, manual focus to infinity, and shoot RAW. Set ISO 800–3200, exposure 8–25 seconds depending on the glow brightness; mount a sturdy tripod; capture Single frames and sequences that you can stack later.
Think about the horizon: place a distant city silhouette or a line of trees to anchor the composition; include the sky’s gradients and stars. Here you will We'll see. the best results when the glow above moves slowly; keep the frame dynamic by shifting perspective; avoid overexposure so greens and purples stay vivid.
Prioritise a place with a broad horizon, dark surroundings, and safe access to a lake shoreline. If you are near grazing areas, you may encounter reindeer wandering near the treeline; another person in the group can handle gear while you frame a shot. Find a spot Here where the wind is steady and the ice on the lake feels frozen.
In post, stack multiple frames to enhance details; apply gentle noise reduction; preserve genuine colour; calibrate white balance toward cooler hues; deliver clean gradient transitions and maintain the natural mood of the night.
In the local culture, visitors often speak of a holy night and a story of Santa Claus across the winter season; a guide can share practical advice about city traditions and safety; ask the person leading the group about permitted zones and the best time windows, many hours of field shooting.
When the sky glows, We'll see. how the arc shifts colour and intensity. Keep your cadence steady, test a few presets, then refine in post using layered stacking to preserve a prawdziwa, quiet palette of greens and violets across a group of shots taken near a quiet lake and under starlit skies.
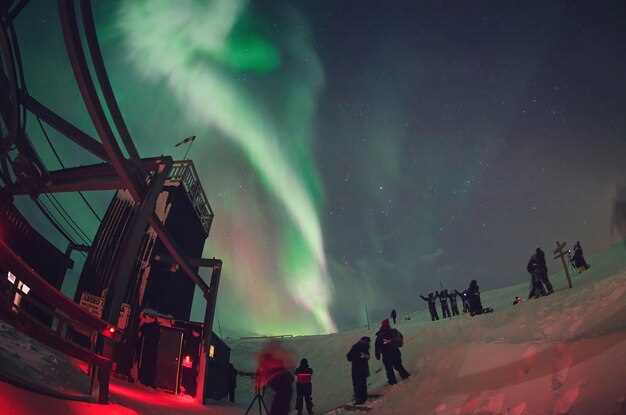
Rovaniemi Northern Lights Chase: Photography Methods and Practical Aurora Tips
Set baseline with manual control and RAW; mount a sturdy tripod; begin with a wide lens near f/2.8 and an 8–20 second exposure, then adjust ISO to 800–3200. Here, also try other methods from the photographic world to see what works best in the world of sky light.
Use live view to dial focus on a bright star, lock at infinity, and employ a remote shutter to avoid shake. In the sky, stability matters most, so position equipment by the lake shore and away from crowds; cloudless conditions help, but glassy clouds are unavoidable, so observe forecasts and plan a drive between direct views and a dark horizon.
To build a sequence, enable simultaneous interval shooting, generating many individual frames that can be stacked later. If activity is moderate, start with 5–10 shots at 8–12 seconds; adjust as bands appear, seeing how the arc shifts across the sky, between the dark background and the bright band of light.
Compose with a simple foreground: a small village or a lone tree by a quiet lake, and use reflections to add depth. Watch for glassy silhouettes of clouds and keep the horizon clean; a distant bonfire or campfire can add warmth in the frame, yet avoid overexposure of glow. Here it's worth bearing in mind that you don't need to wait long; sometimes just one clear moment is enough for everything to work.
Logistics matter: accommodation in a cosy village nearby simplifies late-night work during months of planning. Gather tips from a local guide in the region, especially if you plan an expedition that passes through holy landscape; the source of your knowledge is local guides, and their insights often appear in email conversations. Keep batteries warm, pack a spare lens, and visit Gdańsk's tradition of sky observation, because it helps with understanding colours. We'll see how little light fits in the frame, when the sky shines above the bonfire and water, between stars and silence, around midnight and just before dawn.
Camera Settings for Aurora Photography: ISO, Aperture and Shutter Speed
Baseline: ISO 3200, f/3.2, 10 seconds, manual focus at infinity, tripod secured. In zima months (miesięcy), bezchmurne okresie dominate the polarną sky around arktycznej wioska; you can extend to 20 seconds if the glow remains faint, and pozostanie sharp with a solid mount. For flexibility, you can join a rezerwacji for a grupie excursion and try different combinations, because połączenie steady gear and patience yields the best results during jeżdżą sessions with skuterami over snow. Możesz startować with this setup and adjust based on activity and light in otoczeniu.
Adjust ISO and exposure according to activity: when activity is minimal and the sky is very dark (half moon), drop ISO to 800-1600, push aperture to f/4, and shoot 8–12 seconds. If the moonlight is moderate or you want cleaner stars, you can reduce shutter to 5–8 seconds while keeping ISO around 1600. For brighter conditions, you can also raise ISO to 3200 but stay at f/3.2–f/3.5 to keep silhouettes crisp. The key is to balance speed, exposure and noise, especially in Finnish environments where the surroundings can be crisp and cold; a safe range helps avoid glass glare on the lens while you plan another trip or return to base.
Optics and glass: use a fast wide-angle lens (14–24 mm) and ensure the front element is clean; glass can collect frost, so bring a microfibre cloth and lens heater if available. For most setups, leaving focus at infinity and dialling back from the widest aperture reduces stars blooming; in practice, f/3.2–f/4 is a reliable range when the aurora-like glow is faint, while keeping the star field sharp in dim surroundings, and you may use even wider if you want more foreground detail in the shot. If you shoot with a group (groupie) in a snow-quiet setting, you can alternate between single frames and occasional longer stacks to maximise detail in the foreground.
WB and RAW workflow: set white balance around 3800–4200K to preserve natural greens and teals in the sky; shoot RAW to preserve dynamic range across bright arcs and dark foreground. In environments with city glow or other light_pollution sources (inne), RAW allows effective post processing without sacrificing data from the glass surface; you can also bracket exposures (pojedyncze plus a shorter capture) to capture the full range, and zasilanie of a laptop during a wycieczce can help you compare results on the spot. With careful planning, pozostanie in control during the trip and zrezygnować z niepotrzebnych adjustments in the field.
Practical approach: you might run several passes during one session (trip) to see how the display evolves; use a sturdy tripod and a remote release or intervalometer. If you are new to this, consider a group booking (reservation) that includes guidance from experienced guides; such a setup increases the odds of capturing both the arching glow and interesting foreground features in a single shot, while others in the group can help with timing and keeping equipment warm–thanks to that, you’ll stay focused and avoid missing moments when the activity peaks, and you can share the results with the rest of the team without delays.
When you're planning for a night shoot, you can compare a few core settings and adjust on the fly: keep a second body ready with a different ISO and shutter to cover fast changes in light; use a lightweight ball head for quick framing changes; and remember that even a single misstep in the cold can drain batteries faster, so bring spares and a compact charger. By following these practical guidelines, you’ll maximise the probability of obtaining clean exposures that highlight the dynamic arcs and the quiet environment surrounding the activity, whether you’re on a solo mission or in a group setup, and you’ll have a reliable baseline for future attempts during the next bezchmurne period.
| Condition | ISO | Aperture | Shutter(s) | Нотатки |
|---|---|---|---|---|
| Low activity, dark sky, no moon | 3200–6400 | f/3.2–f/4 | 8–15 | RAW; focus at infinity; consider stacking to increase signal in the foreground |
| Moderate activity, half moon present | 1600–3200 | f/3.2–f/3.5 | 6–12 | Bracket if possible; WB 3900–4100K for natural greens |
| Bright sky glow, low foreground light | 800–1600 | f/4 | 5–10 | Preserve foreground detail; consider a longer foreground shot for context |
| Strong activity, clear cloudless sky | 1600–3200 | f/2.8–f/3.2 | 5–8 | Shorter exposures reduce motion blur; capture multiple frames for stacking |
Lens and Tripod Setup for Stable Long-Exposure Shots
Stabilise with a rigid carbon-fibre tripod and a dependable ball head. A fast wide glass such as 14-24mm f/2.8 or 16-35mm f/2.8 keeps the sky and foreground in one frame. Keep the centre column down, legs locked, and add a weight bag or snow spikes to counter wind and sinking. Attach a remote shutter or intervalometer to avoid touch during exposure. Place the setup on solid snow or packed terrain, then test stability by gently pressing the camera rack.
Baseline settings: shutter 12-15 seconds, ISO 1600-3200, aperture f/2.8. If the sky is brighter, drop ISO to 800; if star trails become noticeable, shorten to 10 seconds. If longer trails are desired, push to 20-25 seconds and accept some noise, or stack many shorter frames later.
Focus technique: switch to Manual, use Live View magnified to 10x, and lock focus on a bright distant point such as a star or far-lit rock. After a cold soak, recheck focus; small shifts happen in winter so repeat every 15–20 minutes.
White balance and format: shoot RAW, set WB to 3800-4100 K; avoid auto WB that shifts between frames. Disable in-camera long-exposure noise reduction when stacking; keep sensor warm with moderate, continuous exposure rather than idle.
Interval shooting plan: use interval between frames around 1-2 seconds; collect 400-600 frames to cover ~10-20 minutes of sky. This helps create clean composites and reduces random noise; if you want single-frame results, adjust exposure time accordingly.
Winter handling: battery life drops quickly; carry spares in warm pockets, swap during breaks. Use dew heater to keep lens clear; use hood; keep warm with a winter kombinezon; protect hands with warm gloves. In winter sessions along wycieczki near snowy winds, a grill-style hand warmer helps maintain circulation, especially when you need to shoot when the temperature dips to single digits; thanks to steady footing, you can stay out longer.
Planning and timing: scout vantage points during trips along Scandinavian shores; during evening hours such as 9:00 PM watch the aurora emerge; position foreground elements such as snow drifts; re-check focus; keep spare batteries.
Focusing in Low Light: Manual Focus Techniques and Live View Tricks
Set Live View to 10x magnification and fine‑tune focus on a distant, bright point until the subject becomes a single pixel; lock focus with the lens ring or back-button method, then proceed without refocusing between frames.
-
Baseline setup: choose a wide lens (14–24 mm) with an aperture of f/2.8–f/4, ISO 1600–3200, and a shutter of 8–15 s; mount on a sturdy tripod; use a remote release or timer to avoid camera shake.
-
Refinement with Live View: switch to manual focus, zoom to 10x, and enable focus peaking if available; adjust until the edges of distant structures or stars are crisp; verify on a second bright point to confirm consistency.
-
Infinity calibration: rotate to infinity, then micro-adjust back 1–2 cm on the barrel; in cold conditions plastic and glass can contract, so recheck after a minute and re-lock.
-
Exposure strategy: begin with ISO 1600, shutter 8 s, aperture f/2.8; if the arc of light is faint, push shutter to 12–15 s while keeping ISO within 3200; if stars trail, lower ISO and shorten the shutter accordingly.
-
Live View tricks: preview exposure with histogram and highlight warning; inspect a 100% crop to ensure round stars; avoid clipping by balancing readout and sky glow, then lock in the chosen settings for the sequence.
-
Stability and winter handling: keep the tripod on solid ground, use a remote or interval timer, and warm spare batteries in your pocket; add a lens hood or dew-heater strap to reduce stray reflections in icy air.
During a memorable trip in Kilpisjärvi during the Arctic night period, I visited Lapland and learned that patience when dialling focus in winter conditions pays off; through glazed panels reflections can distort cues, yet frozen tundra edges provide stable anchors for composition; by relying on Live View, seeing crisp details becomes achievable, and this modern approach will last through months of night and long, quiet observations of the arc in the sky.
Composition Strategies: Framing the Aurora with Landscape, Foreground, and Colour
Рекомендація: Mount a tripod, use a wide-angle lens (14–24mm), shoot RAW, ISO 1600–3200, aperture f/2.8–4.0, shutter 6–12 seconds, and focus with live view at infinity. Disable long-exposure NR to keep a rapid sequence flow during a night of activity.
Landscape framing: Place the horizon on the lower third to reveal a vast sky and a quiet winter scene below. Include a distant ridge or a frozen lake surface to create depth, then let the greenish curtain ride along the upper third. If the surroundings offer a legible silhouette, align it toward the direction that draws the eye toward the glow. In Finnish environments, this approach emphasises scale and keeps the viewer engaged through a single, steady line of sight.
Foreground elements: Anchor the shot with a snowman or a small cabin silhouette to give size reference. Add texture with snowy drifts and glazed ice edges to guide the gaze toward the sky. A simple, isolated focal point in the front plane enhances seeing the motion higher in the sky and prevents a flat composition, while still honouring the surrounding atmosphere of winter.
Colour strategy: Favor cool blue tones in the sky to preserve the winter mood, then introduce a subtle warm glow from a nearby villa window or camp lamp to create contrast. Calibrate white balance around 3400–3600K as a baseline, shoot RAW to fine-tune later, and avoid clipping in the brightest bands so the aurora remains readable during the evening and night.
Technique and workflow: Bracket exposures in a three-shot sequence (-1 EV, 0, +1 EV) to protect highlights and improve dynamic range. Stack the frames if noise becomes a concern, especially during calm, windless moments when trawa niebieskiego can blur. Maintain a quiet tempo, kiedy warunki pozwalają, trwa to kilka minut per kompozycja, and trips in the area offer plenty of local character to exploit in subsequent shots. Practical planning notes include watching the wind, choosing a zure direction, and leaving room for pojedyncze, dramatic moments tylko wieczorem lub nocą. An istotny punkt is waiting for moments, kiedy niebo otwiera się nad zimowym otoczeniu, allowing you to see the intense, green aurora and subtle tones around the świętego marginesu of the landscape, creating harmonious compositions with the świętym spokoju of the night.
Practical tip: scout locations on the day of the trip, jot down aspects of direction, surroundings and possible locations for snowmen and other elements, so that each session has a clear purpose – this is a source (источник) of inspiration for your winter documentation, even if the weather changes from hour to hour.
In-Field Workflow and Quick-Edit Tips for Aurora Sequences
Begin with a fixed interval plan: use a wide lens (14–24mm), manual focus at infinity, white balance around 3600K, RAW frames, ISO 1600, exposure 6–8 seconds, interval 8 seconds, and collect 60–90 frames during cloudless aurora activity. Prepare two batteries and a spare memory card; if the sky brightens, you can adjust to 4–6 seconds and raise ISO to 3200 briefly to maintain brightness.
Practical field routine: arrive at the chosen spot before darkness and set up tripod, camera, and remote. Wear a sturdy boiler suit and gloves; keep a warm pad in an inside pocket; carry a weatherproof pouch with a spare card and battery. If gusts hit and temperatures drop, keep gear in a thermal bag, check wind direction, and perform a quick manual focus check on a bright star at 9 PM–2 AM; sometimes you may need to tweak settings on the fly.
In the field, monitor exposure and histogram on the back of the camera; start with 6–8 s frames, then tweak as the zorza evolves. Bracket only when needed to preserve data quality; after the session, copy RAW to an external SSD. In a light program, apply a white balance of 3600–3800K, minor exposure lift, and gentle noise reduction. Export a small batch as JPEGs for sharing and keep the RAW archive intact for prawdziwa later refinements.
Communication and collaboration: within the group, assign roles such as Person A handling camera control, Person B watching the sky for shifts, and Person C managing data transfer and notes. Share quick updates by e-mail to the city team or to nearby village crews; which windows appear most reliably, plan flight to the next spot, and coordinate stops so as not to disturb others present. This approach proves practical in winter sessions and helps the crew stay efficient even when conditions change without warning.
Post-session logistics: when zima settles in, consider moving between willa locations or exploring nearby wioski by skuterami to extend months of opportunity; keep an eye on ceny sprzętu sezonowego and reliably restock batteries. Zostanie a small, repeatable sequence allows którą można wykorzystać w kolejnych miesiącach, a możliwość szybkiej konsolidacji materiału w programie umożliwia szybki przegląd całej zorzy z każdego wieczoru.