

 2025-yil uchun Osakaning eng yaxshi 12 ta tungi manzarali joyi | Ajoyib tungi ko'rinishlar">

Tavsiya: Begin your evening at the Floating Garden Observatory in Umeda Sky Building for a breathtaking view that makes the city glow as dusk deepens. This first stop defines the atmosphere you’ll chase across the 12 listed sites, each chosen for clear sightlines and memorable moments.
From the neon riverside to historical towers, the listed spots offer distinct vibes. You’ll find modern decks with glass rails, quiet corners near shrines, and riverside paths that invite you to enjoy the light show from sunset through the evening. Check opening times, access points, and safety notes so you can enter each vantage point smoothly and maximize your time.
Grab the official guide in our store to access a printable map and a concise plan. Enter expoid as the passcode to unlock a bonus sheet with angle tips, lighting cues, and a route that covers many viewpoints in one night. For travelers planning future trips, kawaguchiko-inspired detours are noted to broaden your horizons and give you new inspiration for after-dark photography.
Need a quick wrap-up? The guide highlights practical tips for a smooth evening: begin at Umeda, then visit Osaka Castle Park, Shinsekai, and Tempozan Harbor, ending with a harbor view. This approach keeps movement simple, and savoring the night atmosphere becomes effortless as you move from one site to another.
12 Best Osaka Night View Spots 2025 – Stunning Nightscapes; Japan Photo Tour 2025 Itinerary
Recommendation: book bookings for a 2‑night, 3‑day Osaka night‑view loop that covers all 12 spots and leaves time for savoring each perspective.
-
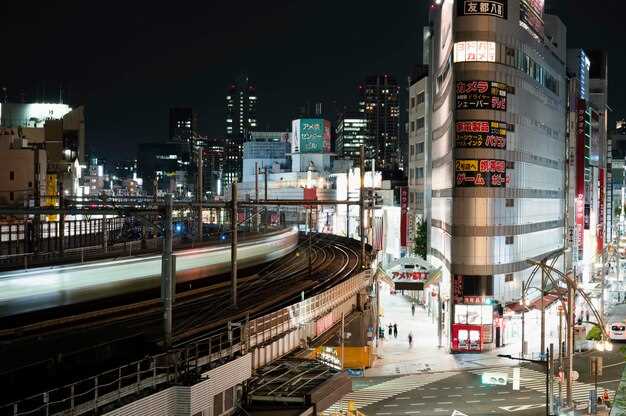
Umeda Sky Building Floating Garden Observatory
incredibly elevated, this deck offers breathtaking 360° views over the skyline. Best time is after sunset, when city lights bloom and reflections ripple on the glass surfaces. Tips: bring a wide-angle lens to capture the size and depth, use a stable tripod, and shoot a sequence to create a seamless night panorama. daytime departure from your hotel helps you avoid crowds.
- What to shoot: elevated city lights, river reflections, and distant outskirts.
- Gear: wide-angle lens, tripod, remote shutter.
- Notes: tickets can be purchased online; charges are listed on the official site.
-
Abeno Harukas 300
a towering vantage point where the skyline size feels epic. It takes patience to reach the outdoor terrace, but the night palette is incredibly rich. Creating a set of layered frames here yields a strong, immersive scene with deep reds and blues.
- Best practice: shoot from the observation deck near sunset and transition to night shots.
- Gear: wide-angle for the breadth; long exposure for traffic trails.
- Notes: purchase tickets in advance; departure times are posted on-site and online.
-
Hep Five Ferris Wheel Over Umeda
this classic ride provides a movable perch above the neon maze, with incredibly smooth rotation and a dynamic skyline backdrop. Savoring each stop on the wheel gives a unique perspective of Osaka’s glow.
- Best shot: from the gondola at dusk, capture the city as it shifts from day to night.
- Gear: compact camera or phone with a stabilizer; consider a short interval timer for motion shots.
- Notes: check ride hours and costs; this is a great pre‑dinner option to maximize time after departure from daytime plans.
-
Tsutenkaku Tower & Shinsekai Skyline
the silhouette of Shinsekai glows against the river and port lights, offering a deep, nostalgic mood. This spot is perfect for creating contrast between traditional neighborhoods and modern towers.
- Best time: blue hour into early night.
- Gear: wide-angle lens; use a tripod for longer exposures.
- Notes: observe local procedures for crowd control; charges vary by observation level.
-
Dotonbori Canal & Ebisu Bridge Viewpoints
a living panorama where restaurant signs reflect on the water and the crowd adds motion lines to your frame. It’s an incredibly kinetic moment that rewards a well‑timed shot.
- Best practice: shoot from the canal edge with a slow shutter to smooth water.
- Gear: wide‑angle and a small tripod or handheld long‑exposure setup.
- Notes: arrival is easier with a local transit pass; purchase tickets for nearby viewpoints if needed.
-
Nakanoshima Riverside Night Promenade
a calm, reflective stretch where the water mirrors the city’s LED embroidery. It’s ideal for wide-angle compositions that foreground the arc of bridges and softly lit buildings.
- Best practice: walk the riverside loop to catch multiple angles.
- Gear: wide-angle lens; tripod for long exposures near the waterline.
- Notes: transport options are abundant; plan a short hop between spots to stay fully mobile.
-
Sakuranomiya Riverbank (Autumn Foliage at Night)
if you’re visiting in foliage season, the trees glow with warm lights along the river, creating a lush frame against the dark water. Savoring the foliage glow alongside city lights yields one of the most serene shots of the route.
- Best time: after the sun dips; foliage becomes a halo around lights.
- Gear: wide-angle to include sky and tree lines.
- Notes: watch for pedestrian paths; there are no excessive charges after purchase of a transit pass.
-
Maishima Seaside Park & Port Lights
a harbor‑edge vista where container cranes silhouette the horizon and the water reflects a mosaic of color. This is a prime spot for long‑exposure experiments to reveal color trails across the bay.
- Best practice: shoot with a sturdy tripod and remote timer; consider a multi‑shot panorama.
- Gear: wide‑angle, sturdy tripod, neutral density filter if needed.
- Notes: check park access hours; there are no hidden charges for basic viewing.
-
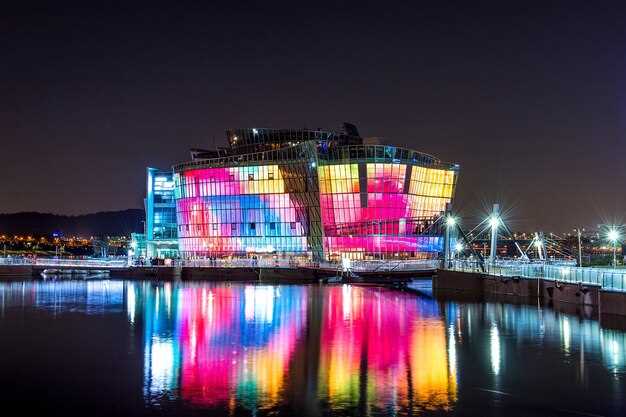
Tempozan Harbor Village & Cosmo Clock 21
the rotating clock and ferris wheel frame a dramatic port skyline. Night reflections on the water add depth, making this spot incredibly cinematic.
- Best practice: shoot across the water toward the wheel for mirrored light paths.
- Uskunalar: g'ildirak va fonni qamrab olish uchun keng burchakli ob'ektiv; tiniq akslar uchun tripod.
- Eslatma: G'ildirakka chiptalar paket takliflarni o'z ichiga olishi mumkin; yorug'lik o'zgarishini maksimal darajada oshirish uchun quyosh botgandan keyin jo'nashni rejalashtiring.
-
Shinsaibashi Riverside kuzatuvi
shahar chiroqlari kanalga tushadigan savdo yo'laklari yaqinidagi zamonaviy nuqta. Bu aks olish suratlarini mashq qilish va bir kechada turli xil nuqtai nazarlarni solishtirish uchun yana bir joy.
- Eng yaxshi vaqt: do'konlar charaqlab turgan, ammo kechki olomon kelishidan oldin, soat 19:00 dan keyin.
- Uskunalar: Binolar siluetlari uchun keng burchakli obyektiv; imkoni bo'lsa, kichik tripoddan foydalaning.
- Eslatmalar: Tumanlar oʻrtasida tez oʻtish uchun transport smart-kartalarini xarid qiling; qoʻshni maydonchalarga tez kirish uchun minimal toʻlovlar mavjud.
-
Osaka vokzal siti panoramali paluba
Ufqning shimoliy chekkasi shahar nurining keng, panoramik ko'rinishini taqdim etadi. Bu butun yo'nalishning kuchli yakuni bo'lib, shahar o'lchami va ritmi ishdan keyin qanday o'zgarishini ko'rsatadi.
- Tavsiya: olomonning harakatdan sokinlikka o'tishini ko'rish uchun taxminan soat 20:00–21:00 atrofida keling.
- Uskunalar: keng burchakli ob'yektiv; barqaror, uzoq ekspozitsiyalar uchun tripod.
- Eslatma: palubaga kirish tartib-qoidalarini tekshiring; to'lovlar va kirish vaqtlari mavsumga qarab o'zgaradi.
-
Kema Sakuranomiya Park Kuzatuv Maydonchasi (So'nggi Nur Showsi)
Ufqlar rangini o'zgartirishi va shahar chiroqlari o'rnashishi bilan daryo bo'ylab keng ko'rinish bilan yakunlang. Bu yaqinda olingan tasvirlar kechasini tahlil qilish va kelgusi kunda kunduzgi suratga olish uchun ideal joy.
- Eng yaxshi amaliyot: kunning oxirgi nur sochishini qorong'u tungi ohanglar bilan uyg'unlashtirib olish uchun vaqtni to'g'ri hisoblash.
- Uskunalar: keng linza keng ko'rinishlar uchun; yuqori aniqlikdagi suratlar uchun xotira kartalari tayyor.
- Eslatma: transport vaqtlarini oxirgi tekshirish turar joyingizga bexavotir qaytishingizni ta'minlaydi.
Ushbu tavsiyalar Osakani sevuvchilar va qit'alararo mehmonlar uchun tunni to'liq qamrab oladi, bir joydan ikkinchisiga aniq o'tishni ta'minlaydi. Yo'nalish transportni rejalashtirish, tumanlar o'rtasida qulay harakatlanish, keng burchakli va batafsil suratlar aralashmasiga urg'u beradi. Moslashuvchan passni sotib olib, kun tartibiga rioya qilsangiz, ortiqcha to'lovlardan qochishingiz va shaharning hayratlanarli, yorqin aksini aks ettiruvchi portfel yaratishga e'tiboringizni qaratishingiz mumkin – va yana ko'p narsalar.
Amaliy tungi suratga olish sayohati rejasi
Dotonbori kanalidagi Ebisu ko'prigidan, "ko'k soat"da, nam qoplamadagi akslarni ushlab, kechaning kayfiyatini o'rnating, so'ngra kengroq ko'rinish uchun Umeda osmono'par binolari tomon boring. Bahorda havo tiniq va akslar yumshoqroq yorug'likda porlaydi.
Kurs yorqin yoritgichlar va tarixiy fasadlar bilan to'ldirilgan to'rtta asosiy tumanni qamrab oladi. U retro belgilar va zamonaviy minoralar o'rtasidagi yorqin kontrastlarni his qilish imkonini beradi, shu bilan birga masshtab uchun kadrdagi insonni kiritish imkoniyatini beradi. Sayr davomida siz atmosfera bilan to'yingan holda odimlay olasiz va olomon lahzalari hamda sokin akslar orasidan kadrlar tanlashingiz mumkin.
Uskunalar bo'yicha ixcham tripod, zaxira batareya va tezkor ob'ektiv (24-70mm yoki 35mm) olib keling. Agar kichik qo'shimcha ob'ektiv sotib olish yordam bersa, zich kompozitsiyalar uchun 50mm qo'shing. RAW formatida foydalaning va tungi ranglarni saqlab qolish uchun oq balansni taxminan 5000K ga sozlang. Ikkita amaliy usul kadrlarni aniq saqlashga yordam beradi: statik sahnalar uchun uzoq ekspozitsiyalar va harakatlanuvchi olomon uchun qisqa ekspozitsiyalar. Har bir to'xtash joyida gistogrammani tekshiring va yoritishdagi yorqin joylarni himoya qilish uchun ekspozitsiyani sozlang.
Ko'cha ko'chasida Washoku sahnalarini, masalan, kechki payt ishlaydigan izakaya vitrinalarini qayd etib o'ting va Osaka qal'asi hududidagi tarixiy lavhalarga ishora qiling. Yo'nalish tumanlarni birlashtirib, qadimiy burchaklar neon kelajak bilan uchrashadigan, yoritish o'zgarishi bilan boy ranglari o'zgarib turadigan shaharni aks ettiradi. Tarixiy joylar atrofida Hideyoshi davri haqidagi ma'lumotlar paydo bo'ladi va siz ularni davrlar o'rtasidagi uzluksizlikni ko'rsatish uchun zamonaviy yorug'lik bilan ramkalashingiz mumkin.
Vaqt muhim: bekatlar orasidagi piyoda masofa taxminan 4 soatni tashkil etadi; marshrut sizni bepul piyoda yurish zonalarida ushlab turadi, prefektura zonalaridagi ba'zi kuzatuv maydonchalari kirish to'lovlarini talab qiladi. Har bir bekatda tezkor xulosa sizga ekspozitsiyani va kadr tanlovini sozlashga yordam beradi, shuningdek, ob-havo yoki olomon zichligiga qarab o'zgartirishingiz mumkin.
Suratdan so'ng, Shinsaibashi yoki Nambada "washoku" taomini tatib ko'ring va oqshomni yakunlang, so'ngra bir chashka issiq choy bilan RAW fayllaringizni ko'rib chiqing. Agar shahar bo'shashidan oldin biron bir nuqtaga qaytishni istasangiz, bu sizning energiyangizni ikkinchi urinish uchun saqlaydi.
| Stop | Tuman | Eng yaxshi vaqt | Diqqat markazi | Uskuna bo'yicha maslahatlar | Eslatmalar |
|---|---|---|---|---|---|
| Dotonbori Esplanadasi | Chuo / Raqam | 18:30–19:15 | Akslar, neon, olomon | Tripod, 24–70 mm, masofadan boshqariladigan zatvor; olomondan asrang | Bepul ko'rish joylari; belgilarga e'tibor bering; atrofdagi shovqin |
| Umeda Skyline (Floating Garden) | Kita | 19:30–20:15 | Shahar silueti, yoritilganlik | Tripod; uzoq ekspozitsiya 2–6s; uzoqdagi binolar uchun 70–200ni ko'rib chiqing | Kirish uchun to'lov olinadi; paluba qoidalari har xil bo'ladi. |
| Osaka qal'asi bog'i | Chuo | 21:00–21:45 | Qal'a fasadi, xandaq akslari | Tele yoki keng; tripod; past ISO 200–400; ND ixtiyoriy | Dam olish kunlari yoritish; suv yuzasini kuzatish |
| Shinsekai va Tsutenkaku | Naniwa | 22:00–22:45 | Retro belgilar, ko'cha hayoti | Keng 24–70; tezroq zatvor 1/60–1/125; kichik shtativ | Serhosha ko'cha rangi; olomon bor |
| Nakanoshima daryosi bo'yi / Daryo bo'ylab sayr qilish joyi | Kita / Chuo | 23:00–23:45 | Reflective water, modern bridges | Wide angle to 35mm; tripod; bracket exposures | Great for illuminations; calmer scene |
Why each spot matters and optimal shooting windows
Begin with Umeda Sky Building, blue hour, to anchor your night sequence; considering its mirrored surface and the Kita skyline, this must-see starting point sets the tone. headed to the next spots, you can follow a logical loop for efficiency.
-
Umeda Sky Building, Floating Garden Observatory – Why it matters: its silhouette defines Osaka’s north-side glow, and the surface glass mirrors the river and streetlights for a layered composition. Optimal window: blue hour into early night; enter via the south entrance and take the elevator straight up. For visiting families, many children enjoy the calm lower decks, making this a perfect first shot.
-
Abeno Harukas 300 – Why it matters: the most expansive panorama, with lines that sweep from bay to skyline; you gain a rare sense of scale in a single frame. Optimal window: after sunset through about 9–10 pm when city lights settle. Tip: book a quick climb before the crowds peak; breakfast at the hotel offers a quiet morning follow-up if you stay nearby.
-
Dotonbori Canal from Ebisu Bridge – Why it matters: the neon field reflects off the water surface, creating a dynamic, almost kinetic vibe that many visitors chase. Optimal window: just after sunset and into late evening when signs glow vividly. Shooting method: use a stable stance and a 2–4 second exposure to smooth the surface; should you be visiting with kids, choose a spot on the riverwalk away from potholed crowds.
-
Nakanoshima Island Riverside Park – Why it matters: a serene island setting known for its elegant riverside geometry and modernist banks; the riverscape provides a rich counterpoint to the city’s neon. Optimal window: blue hour, then a few minutes into darkness when street lamps flicker on. Within easy reach of museums and cafés, this spot invites a discovery of quiet angles away from traffic.
-
Osaka Castle Park (Nishinomachi) – Why it matters: heritage layers with illuminated stone walls and moats create a timeless frame. Optimal window: after blue hour when castle lighting becomes prominent; shoot from the Nishinomachi side for an unobstructed moat line. Enter the grounds early to set up before crowds; this spot is known for dramatic contrasts, especially on clear nights.
-
Tempozan Harbor & Ferris Wheel – Why it matters: waterfront reflections plus the Ferris Wheel’s glow deliver a rich palette of color against dark water. Optimal window: after sunset, when the wheel turns and boat lights flicker. Shooting tips: embrace a longer exposure to render the wheel’s spokes; many locals photograph from the harbor promenade, which gives a wider surface to work with after hours.
-
InterContinental Osaka – Why it matters: a premium vantage from a top-tier hotel with a dedicated lounge that overlooks the city. Optimal window: after sunset to late night; use the lounge terrace if you can, or the floor-to-ceiling windows for steadier frames. If you stay here, the hotel’s breakfast service is a gentle follow-up option for a morning recap of your night shots. intercontinental osaka
-
St. Regis Osaka – Why it matters: refined glass and a city-facing bar highlight the quieter side of Osaka’s glow. Optimal window: post-sunset hours when interior lighting blends with the skyline. Shooting method: handheld but stabilized with a monopod if possible; the end result is a composition with a rich, cinematic mood. The lounge area also serves as a comfortable retreat after long shoots.
-
Namba Parks Rooftop Garden – Why it matters: a contemporary rooftop with angled terraces that yield multiple reflections of the city lights. Optimal window: after blue hour, stretching into early night; walk the upper levels to capture different silhouettes. Many visitors use this spot as a mid-route checkpoint because it sits within the shopping complex, making it convenient for quick breaks and a bite before continuing the night.
-
Shinsekai & Tsutenkaku Tower – Why it matters: a historic district bathed in retro neon that offers a different textural glow than the riverfront spots. Optimal window: after 8 pm when signs hit full brightness; shoot from street level toward the tower to catch vertical lines against the night sky. For a complete arc, head into the alleyways below the tower for intimate, colorful patches of light.
-
Osaka Station City skyline viewpoints – Why it matters: a compact, modern frame where glass towers reflect rail lines and busy pedestrian flow. Optimal window: just after sunset when the station lights begin to dominate; use a wide-angle to capture multiple skyscrapers and the surrounding surface of the urban grid. This spot is especially known for its clean lines and easy access for a quick shoot before heading to the next location.
-
Toyotomi heritage area around Osaka Castle – Why it matters: the Toyotomi-era legacy adds depth to night shots with historical textures near water and stone. Optimal window: after dark when castle lamps illuminate the surrounding grounds, giving an almost cinematic contrast. Discovery of this area reveals a method to blend modern lights with aged stone, and it’s a great finale to a visiting itinerary for those leaning into Osaka’s history after a full night of city images.
Camera settings and lens choices for Osaka nightscapes
Set a sturdy tripod and shoot RAW in manual mode. Use ISO 100–400, aperture f/4–f/8, and shutter speeds ranging from 4 to 20 seconds to balance glow and motion. Start with a 14–24mm lens for sweeping skyline shots, switch to 24–70mm for mid‑city views, and keep a 70–200mm handy to isolate bright signage or reflections. This plan gives crisp edges and balanced color across the Osaka night view. Apply these settings across multiple spots to capture the spectrum of city lights youll encounter.
For color accuracy, set white balance around 3200–4200K or shoot RAW and adjust in post. Use bracketed shots of -2, 0, +2 EV for dynamic range, especially near bright neon. If your model handles noise well, youll push ISO to 800–1600 for shadow detail; keep exposures long enough to preserve glow without blowing highlights. The right mix of focal lengths–14–24mm for wide panoramas, 24–70mm for mid‑edges, and 70–200mm for tight highlights–lets you unify compositions across locations, and provides several ways to frame the scene.
Look for spots with a clear view and minimal obstructing elements. Theres obstructing reflections on glass near riverside promenades–step back or shoot from a slight elevation to avoid glare. Use a lens hood and shield the view from strong light sources. If you head toward the west bank for the Dotonbori corridor, you can catch long, reflective water shots that feel calmer and more cinematic after midnight.
Discovery begins with a prefectural plan that coordinates timing and access. In osaka-, mix riverside nights with cultural spaces to create contrast, and note a unesco reference if you visit historic districts. These ideas apply across every part of your route; choose transportation carefully–subway, JR, or rideshare–to keep options open and the pace steady. When headed west, youll find the best vantage points open and free, savoring the moment as you collect a cohesive set of captures for your osaka-night exploration.
2-day and 3-day route options to cover the 12 spots
Choose the 3-day option for a relaxed pace to capture five or more photo moments across the central area.
Selected 12 spots: Namba canal view, Dotonbori neon, Shinsaibashi, Nakanoshima Riverside, Toyotomi Park night view, Osaka Castle night view, Shinsekai and Tsutenkaku, Umeda Sky Building Floating Garden Observatory, Harukas 300, Tempozan Ferris Wheel, Cosmo World waterfront, Osaka Bay area from the port.
Two-day route (compact, high impact). Day 1 centers on the central area: start at Namba canal view, then ride Dotonbori lights to Shinsaibashi, cross to Nakanoshima Riverside for a calm riverside shot, visit Toyotomi Park at dusk and finish with Osaka Castle night view from the hill. Day 2 covers the Umeda district with Umeda Sky Building Floating Garden Observatory, Harukas 300, Shinsekai and Tsutenkaku, and a final pass along Tempozan Bay area and the Osaka Bay waterfront for a last skyline capture near Cosmo World.
Three-day route (spacious pacing). Day 1 repeats the core spots (Namba canal view, Dotonbori, Shinsaibashi, Nakanoshima Riverside) plus a late session at Toyotomi Park. Day 2 adds Osaka Castle night view and Shinsekai. Day 3 concentrates on Umeda Sky Building, Harukas 300, Tempozan Ferris Wheel, and the Osaka Bay waterfront, finishing with a broad view from the port area. This plan leaves room to adjust for weather or crowds, and the updated list helps you pick the five favorites to maximize each evening.
Practical tips: The updated list helps you choose the five favorites. Select spots with a central area mindset and plan around light conditions. Before you go, check tripadvisors for the latest tips and registered recommendations. For dietary needs, nearby eateries offer a variety of options; also, if you crave a paris mood, stroll along the Namba canal for lake-like reflections after dark. Wear light clothing and comfy shoes, and keep a compact camera or smartphone ready for quick photo stops.
Night access, crowds, and safety tips for urban photography
Arrive 60 minutes before blue hour at namba and Dotonbori viewpoints, then walk a prepared loop to the Tempozan ferris wheel and the riverside cityscape, finishing near Akashi if you have time.
Check the procedure for rooftop or interior access with a local organization that handles urban photography permissions. Public spots stay open late, but rooftop and interior overlooks often require permission from the property manager. When access is granted, carry a brief digital copy of approval and respect posted rules.
Crowds shift after 9:30 pm; move with the flow, keeping a low profile and minimal gear noise. For juftliklar va sayyoh silhouettes, shoot from side angles and elevated stair landings where you can still clear the walkway. In busy districts like Namba, Dotonbori, and the Akashi waterfront, late hours bring vibrant reflections but also higher risk of jostling–plan a compact yurish route and quick frame grabs so you don’t disrupt others.
Gear and technique: use a lightweight tripod or monopod, set manual exposure, and shoot RAW for post-processing flexibility. Focus on deep koʻk va neon rangli yoritgichlar; barqaror shahar manzaralari uchun f/5.6–8 da ISO 400–800 dan 1/125–1/200 s gacha foydalaning. Ichki shisha orqali suratga olayotganda, avtomatik oʻzgarishlarning oldini olish uchun spot oʻlchash va manual fokusni yoqing. Qimmatbaho narsalaringizni himoyalangan joyda saqlang va jihozlarni beqarorlashtirishi mumkin boʻlgan hoʻl yoʻlakka e’tibor bering.
Piyoda yo'nalishlari yaxshi rivojlangan va tungi fotosurat uchun xavfsiz: dan boshlang namba, daryo qirg'og'iga o'ting, Tempozan charxpalagiga qarab boring, so'ngra uzoqroq sessiyaga tayyor bo'lsangiz, Akashi hududlariga boring. Bu joy sizga mukammal muvozanati gastro-ishqiboz yorug'lik va osmon chiziqlari, uchun ideal discovery va bir nechta dubllar. Tugatganingizdan so'ng, oling nonushta yaqin atrofdagi kafeda mahalliy aholi bilan suratlar muhokama qiling va kelajakdagi tashrif uchun yondashuvingizni o'tkirlashtiring.
Yaponiyaga fotosayohat 2025 nimani o'z ichiga oladi va qanday qilib bron qilish mumkin?
Toʻliq paketga buyurtma bering va daryo boʻyidagi eng yaxshi quyosh botishi va neonlar joylarining old qatoriga kirishni taʼminlang; tungi manzaralardan bahramand boʻlish Dotonbori, Toyotomi Park va Biwa qirgʻoqlari kabi sevimli joylarda ekskursiya bilan suratga olish orqali osonlashadi, bu esa shahar jilosini sokin koʻl boʻyidagi lahzalar bilan uygʻunlashtiradi.
Yettita yetti otish kunlari, tanlangan mehmonxonalarda olti kecha, mahalliy gidlar, xususiy tahrirlash kuni va tanlangan nuqtai nazarlarga erta kirish, shuningdek, real vaqt rejimida kadrlashni yaxshilash uchun to'rtta joyida taqdimotlar kiradi.
Kuzatuv sessiyalari Otanidan boshlanib, Biva sohili bo'ylab davom etadi, quyosh chiqishidagi tahrirlar va shom mashqlari bilan, so'ngra Osakaning sohilidagi ko'cha fotosuratlarini olish uchun neon chiroqlar bilan yoritilgan ko'chalar bo'ylab tungi sayr - odatda sevimli fotosuratlaringizni diversifikatsiya qilish uchun suv, osmon chizig'i va ibodatxona siluetlari o'rtasida almashinasiz.
Bron qilish usuli oddiy: bizning portalimiz orqali onlayn bron qiling, sanalarni tanlang, mehmon ma'lumotlarini kiriting hamda hisobingizni himoya qilish uchun parol yarating; joylarni yakunlash uchun rezervasyonlarga 48 soatlik blokirovka qo'yiladi, shundan so'ng to'liq yo'nalish va xarita belgilari bilan tasdiqlash xati yuboriladi.
Tasdiqlaganingizdan so'ng aniq uchrashuv vaqtlari, olib ketish joylari, uskunalar bo'yicha tavsiyalar va kunlik qisqacha reja olasiz; shuningdek, turnirdan keyingi taqdimotlarga kirish huquqi va guruhdan tanlangan fotosuratlari joylangan galereyaga havola yuboriladi, shu orqali dunyo bilan fikr almashishingiz va kelajakdagi suratga olishlarni rejalashtirishingiz mumkin.
Natijani maksimal darajada oshirish uchun tavsiyalar: ko'p funksiyali to'plam (keng 14-24 va standart 24-70), kam yorug'likda suratga olish uchun ixcham tripod va tez o'tish uchun kichik sumka olib keling; an'anaviy ta'mlardan bahramand bo'lish uchun ikki kechada vashoku kechki ovqatlari mavjud va agar siz Osaka qal'asi yaqinidagi Hideyoshi davri joylarini yoki Biva ko'li bo'yidagi quyosh botishini o'rganmoqchi bo'lsangiz, marshrutni moslashtirishimiz va Otani kuzatuv nuqtalari kabi joylarni reja kiritishimiz uchun oldindan xabar bering.