

 12 המקומות הטובים ביותר לתצפית לילה באוסקה 2025 | נופי לילה מדהימים">

המלצה: התחילו את הערב שלכם במצפה הגן הצף שבבניין אומדה סקיי לתצפית עוצרת נשימה שגורמת לעיר לזהור ככל שהדמדומים מעמיקים. עצירה ראשונה זו מגדירה את האווירה שתרדפו אחריה ב-12 האתרים הרשומים, שכל אחד מהם נבחר בזכות קווי ראייה ברורים ורגעים בלתי נשכחים.
מניאון לצד הנהר ועד מגדלים היסטוריים, המקומות המופיעים מציעים אווירות מובחנות. תוכלו למצוא מרפסות מודרניות עם מעקות זכוכית, פינות שקטות ליד מקדשים ושבילים לצד הנהר המזמינים אתכם ליהנות ממופע האורות משקיעה ועד הערב. בדקו זמני פתיחה, נקודות גישה והערות בטיחות כדי שתוכלו להיכנס לכל נקודת תצפית בצורה חלקה ולמקסם את הזמן שלכם.
רכשו את המדריך הרשמי בחנות שלנו כדי לקבל גישה למפה הניתנת להדפסה ולתוכנית תמציתית. Enter expoid כסיסמה לפתיחת דף בונוס עם טיפים לצילום זוויות, רמזים לתאורה ומסלול שמכסה נקודות תצפית רבות בלילה אחד. למטיילים המתכננים נסיעות עתידיות, מצוינים מעקפים בהשראת קוואגוצ'יקו כדי להרחיב את אופקיכם ולתת לכם השראה חדשה לצילום בלילות.
צריך סיכום מהיר? המדריך מדגיש טיפים מעשיים לערב חלק: התחילו באומדה, לאחר מכן בקרו בפארק טירת אוסקה, שינסקאי ונמל טמפוזן, וסיימו בתצפית על הנמל. גישה זו שומרת על תנועה פשוטה, ולטעום את אווירת הלילה הופך למאמץ כשאתם עוברים מאתר אחד למשנהו.
12 המקומות הטובים ביותר לתצפית על נופי הלילה של אוסקה 2025 – נופי לילה מדהימים; מסלול צילום ביפן 2025
המלצה: להזמין סיורים מודרכים של לופ תצפיות הלילה של אוסקה בן 3 ימים ו-2 לילות, שיכסה את כל 12 הנקודות וישאיר זמן להתענג על כל פרספקטיבה.
-
מצפה הגנים התלויים של בניין אוּמֶדָה סקיי
ממוקם בגובה רב במיוחד, הסיפון הזה מציע נופי 360° עוצרי נשימה על קו הרקיע. הזמן הטוב ביותר הוא אחרי השקיעה, כשאורות העיר פורחים והשתקפויות מנצנצות על משטחי הזכוכית. טיפים: הביאו עדשה רחבת זווית כדי לתפוס את הגודל והעומק, השתמשו בחצובה יציבה וצלמו סדרה ליצירת פנורמה לילית חלקה. יציאה מהמלון בשעות היום תעזור לכם להימנע מהמונים.
- מה לצלם: אורות עיר מוגבהים, השתקפויות נהר ופרברים מרוחקים.
- ציוד: עדשה רחבת זווית, חצובה, שלט רחוק.
- הערות: ניתן לרכוש כרטיסים באינטרנט; החיובים מפורטים באתר הרשמי.
-
אבנו הארוקס 300
נקודת תצפית נישאה שבה קו הרקיע מרגיש אפי בגודלו. צריך סבלנות כדי להגיע למרפסת החיצונית, אבל פלטת הלילה עשירה להפליא. יצירת סט של מסגרות מרובדת כאן מניבה סצנה חזקה וסוחפת עם אדומים וכחולים עמוקים.
- מומלץ: לצלם ממרפסת התצפית סמוך לשקיעה ולעבור לצילומי לילה.
- ציוד: עדשה רחבת זווית למרחבים; חשיפה ארוכה לשובלי תנועה.
- הערות: רכשו כרטיסים מראש; זמני היציאה מתפרסמים באתר ובאינטרנט.
-
הגלגל הענק Hep Five מעל אוּמֶדָה
הנסיעה הקלאסית הזו מספקת עמדת תצפית ניידת מעל מבוך הניאון, עם סיבוב חלק להפליא ורקע דינמי של קו הרקיע. עצירה בכל נקודה בגלגל מעניקה פרספקטיבה ייחודית על הזוהר של אוסקה.
- צילום מוצלח: מהגונדולה בשעת בין הערביים, לתפוס את העיר כשהיא עוברת מיום ללילה.
- ציוד: מצלמה קומפקטית או טלפון עם מייצב; כדאי לשקול טיימר מרווחים קצר לצילומי תנועה.
- הערות: לבדוק שעות פעילות ומחירים של הנסיעה; זוהי אפשרות מצוינת לפני ארוחת הערב כדי למקסם את הזמן לאחר היציאה מהתוכניות של שעות היום.
-
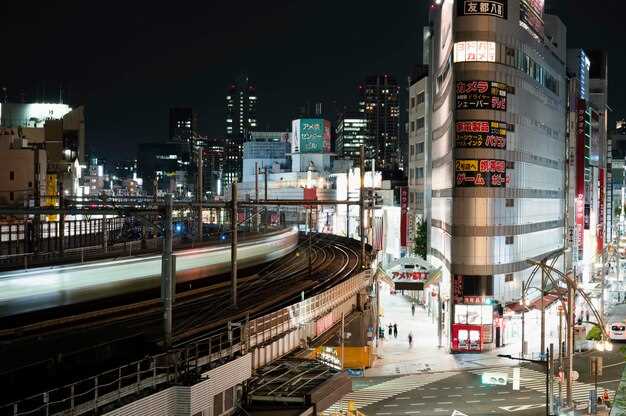
מגדל צוּטֶנְקָאקוּ וקו הרקיע של שינסקאי
צללית שינסקאי זוהרת על רקע אורות הנהר והנמל, ומציעה אווירה נוסטלגית עמוקה. המקום הזה מושלם ליצירת ניגוד בין שכונות מסורתיות ומגדלים מודרניים.
- הזמן הטוב ביותר: שעת הדמדומים אל תוך הלילה המוקדם.
- ציוד: עדשה רחבת זווית; השתמשו בחצובה לחשיפות ארוכות יותר.
- הערות: יש להקפיד על נוהלי המקום לפיזור קהל; העלויות משתנות בהתאם לרמת הפיקוח.
-
תצפיות על תעלת דוטונבורי וגשר אביסו
פנורמה חיה שבה שלטי המסעדות משתקפים במים והקהל מוסיף קווי תנועה למסגרת שלך. זהו רגע קינטי להפליא שמתגמל צילום מתוזמן היטב.
- מומלץ: לצלם מקצה התעלה עם צמצם איטי כדי להחליק את המים.
- ציוד: עדשה רחבת זווית וחצובה קטנה או סט-אפ צילום בחשיפה ארוכה נייד.
- הערות: ההגעה קלה יותר עם כרטיס מעבר מקומי; רכשו כרטיסים לנקודות תצפית סמוכות במידת הצורך.
-
טיילת הלילה הנהרית של נאקאנושימה
מקטע רגוע ומהורהר שבו המים משקפים את רקמת הלד של העיר. אידיאלי לקומפוזיציות רחבות זווית המציגות את קשתות הגשרים והבניינים המוארים בעדינות.
- מומלץ: לצעוד בלולאה לאורך הנהר כדי ללכוד זוויות שונות.
- ציוד: עדשה רחבת זווית; חצובה לחשיפות ארוכות ליד קו המים.
- הערות: אפשרויות תחבורה הן רבות; תכננו קפיצה קצרה בין נקודות כדי להישאר ניידים לחלוטין.
-
סאקוראנומיה ריברבנק (שְלֵכת סתו בלילה)
אם אתם מבקרים בעונת השלכת, העצים זוהרים באורות חמים לאורך הנהר, ויוצרים מסגרת שופעת על רקע המים הכהים. ההתענגות על זוהר השלכת לצד אורות העיר מניבה את אחת התמונות השלוות ביותר במסלול.
- הזמן הטוב ביותר: אחרי שהשמש שוקעת; העלווה הופכת להילה סביב האורות.
- ציוד: זווית רחבה כדי לכלול את קו השמיים וקו העצים.
- הערות: שימו לב לשבילי הולכי רגל; אין חיובים מופרזים לאחר רכישת כרטיס נסיעה.
-
מאישימה Seaside Park & Port Lights
מראה קצה הנמל שבו מנופי מכולות מצללים את קו האופק והמים משקפים פסיפס של צבעים. זהו מקום מצוין לניסויי חשיפה ארוכה כדי לחשוף שבילי צבע על פני המפרץ.
- מומלץ: לצלם עם חצובה יציבה וטיימר מרחוק; לשקול פנורמה מרובת צילומים.
- ציוד: עדשה רחבת זווית, חצובה יציבה, פילטר צפיפות ניטרלית אם יש צורך.
- הערות: יש לבדוק את שעות הגישה לפארק; אין עמלות נסתרות עבור צפייה בסיסית.
-
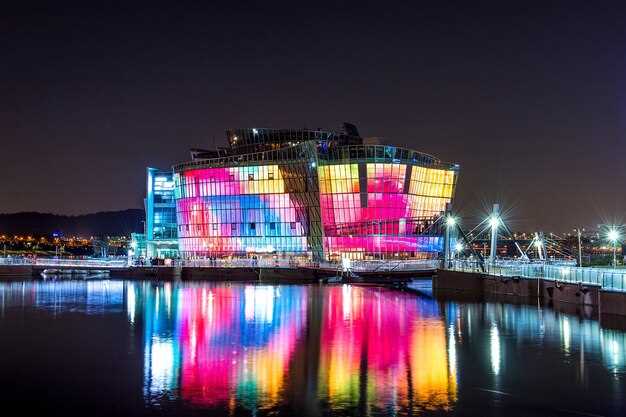
טֶמְפּוּזָן הארבור וִילֵיג' ושעון קוסמו 21
השעון המסתובב וגלגל הענק יוצרים מסגרת דרמטית לקו הרקיע של הנמל. השתקפויות הלילה על המים מוסיפות עומק, מה שהופך את המקום הזה לקולנועי במיוחד.
- מומלץ: לצלם לרוחב המים לכיוון הגלגל לתעבורת אור משוקפת.
- Gear: wide-angle to capture the wheel and backdrop; tripod for crisp reflections.
- Notes: tickets for the wheel may include package deals; plan your departure after sunset to maximize light changes.
-
Shinsaibashi Riverside Overlook
a modern vantage near shopping corridors where city lights spill onto the canal. It’s another spot to practice reflection shots and to compare different vantage points in a single evening.
- Best time: after 7 PM when shops glow but before late crowds arrive.
- Gear: wide‑angle for building silhouettes; use a small tripod if possible.
- Notes: purchase transit smart cards to hop between districts quickly; there are minimal charges for quick entries to nearby decks.
-
Osaka Station City Panorama Deck
the northern edge of the skyline provides a broad, panoramic take of the urban glow. It’s a strong finish to a complete route, illustrating how the city’s size and rhythm shift after hours.
- Best practice: arrive around 8–9 PM to catch the transition from bustle to stillness.
- Gear: wide-angle lens; tripod for steady, long exposures.
- Notes: check the deck’s access procedures; charges and entry times vary by season.
-
Kema Sakuranomiya Park Lookout (Final Light Show)
wrap up with a broad view across the river as the skyline changes color and the city lights settle. It’s a perfect spot to reflect on a night of recent captures and set up for a potential next day of daytime shoots.
- Best practice: time it to capture the last glow of daylight fading into deep night tones.
- Gear: broad lens for sweeping scenes; memory cards ready for high‑detail captures.
- Notes: a final check of transit times ensures a smooth departure back to your lodging.
These recommendations organize a complete night loop for osakas enthusiasts and intercontinental guests alike, with a clear flow from one spot to the next. The route emphasizes transportation planning, smooth hopping between districts, and a mix of wide-angle and detail shots. By purchasing a flexible pass and following the day‑of procedures, you can avoid excess charges and focus on creating a portfolio that reflects the city’s breathtaking, luminous afterglow–and more.
Practical Night Photography Tour Outline
Begin at Ebisu Bridge on the Dotonbori canal at blue hour to lock in reflections on wet pavement and set the mood of the night, then proceed toward the Umeda skyline for a broader view. In spring, the air is crisp and reflections pop in softer light.
The course covers four main districts with a number of lively illuminations and historical facades. It allows you to experience vivid contrasts between retro signage and modern towers, while giving you opportunities to include a person in the frame for scale. During the walk, you adjust your pace to absorb the atmosphere and choose frames between crowd moments and quiet reflections.
Gear-wise, bring a compact tripod, a spare battery, and a fast lens (24–70mm or 35mm). If purchasing a small extra lens helps, add a 50mm for tighter compositions. Use RAW and set white balance around 5000K to preserve nighttime colors. Two practical methods keep shots sharp: long exposures for static scenes and short exposures for moving crowds. During each stop, check histogram and adjust exposure to protect highlights in illuminations.
Incorporate cultural context by noting Washoku scenes at street level, such as late-night izakaya displays, and point to historical plaques in the Osaka Castle area. The route threads together districts, reflecting a city where ancient corners meet neon futures, with rich colors that shift as illuminations change. Hideyoshi-era references appear around historic sites, and you can frame them with modern light to show continuity between eras.
Timing matters: the walk between stops spans about 4 hours; the route keeps you in free walking zones while certain observation decks in prefectural zones carry entry charges. A quick recap at each stop helps you adjust exposure and frame choices, and you can adjust based on weather or crowd density.
After the shoot, sample a washoku meal in Shinsaibashi or Namba to complete the evening, then review your RAW files over a hot cup of tea. This keeps your energy up for a second pass if you wish to revisit any vantage before the city empties.
| עצור | מחוז | Best Time | Focus | Gear Tips | הערות |
|---|---|---|---|---|---|
| Dotonbori Esplanade | Chuo / Namba | 18:30–19:15 | Reflections, neon, crowds | Tripod, 24–70 mm, remote shutter; protect from crowds | Free viewpoints; watch signage; ambient sound |
| Umeda Skyline (Floating Garden) | Kita | 19:30–20:15 | City skyline, illuminations | Tripod; long exposure 2–6s; consider 70–200 for distant buildings | Entry charges apply; deck rules vary |
| Osaka Castle Park | Chuo | 21:00–21:45 | Castle facade, moat reflections | Tele or wide; tripod; low ISO 200–400; ND optional | Illuminations on weekends; watch water surface |
| Shinsekai & Tsutenkaku | Naniwa | 22:00–22:45 | Retro signage, street life | Wide 24–70; faster shutter 1/60–1/125; small tripod | Vibrant street color; crowds present |
| Nakanoshima Riverside / Riverside Walk | Kita / Chuo | 23:00–23:45 | Reflective water, modern bridges | Wide angle to 35mm; tripod; bracket exposures | Great for illuminations; calmer scene |
Why each spot matters and optimal shooting windows
Begin with Umeda Sky Building, blue hour, to anchor your night sequence; considering its mirrored surface and the Kita skyline, this must-see starting point sets the tone. headed to the next spots, you can follow a logical loop for efficiency.
-
Umeda Sky Building, Floating Garden Observatory – Why it matters: its silhouette defines Osaka’s north-side glow, and the surface glass mirrors the river and streetlights for a layered composition. Optimal window: blue hour into early night; enter via the south entrance and take the elevator straight up. For visiting families, many children enjoy the calm lower decks, making this a perfect first shot.
-
Abeno Harukas 300 – Why it matters: the most expansive panorama, with lines that sweep from bay to skyline; you gain a rare sense of scale in a single frame. Optimal window: after sunset through about 9–10 pm when city lights settle. Tip: book a quick climb before the crowds peak; breakfast at the hotel offers a quiet morning follow-up if you stay nearby.
-
Dotonbori Canal from Ebisu Bridge – Why it matters: the neon field reflects off the water surface, creating a dynamic, almost kinetic vibe that many visitors chase. Optimal window: just after sunset and into late evening when signs glow vividly. Shooting method: use a stable stance and a 2–4 second exposure to smooth the surface; should you be visiting with kids, choose a spot on the riverwalk away from potholed crowds.
-
Nakanoshima Island Riverside Park – Why it matters: a serene island setting known for its elegant riverside geometry and modernist banks; the riverscape provides a rich counterpoint to the city’s neon. Optimal window: blue hour, then a few minutes into darkness when street lamps flicker on. Within easy reach of museums and cafés, this spot invites a discovery of quiet angles away from traffic.
-
Osaka Castle Park (Nishinomachi) – Why it matters: heritage layers with illuminated stone walls and moats create a timeless frame. Optimal window: after blue hour when castle lighting becomes prominent; shoot from the Nishinomachi side for an unobstructed moat line. Enter the grounds early to set up before crowds; this spot is known for dramatic contrasts, especially on clear nights.
-
Tempozan Harbor & Ferris Wheel – Why it matters: waterfront reflections plus the Ferris Wheel’s glow deliver a rich palette of color against dark water. Optimal window: after sunset, when the wheel turns and boat lights flicker. Shooting tips: embrace a longer exposure to render the wheel’s spokes; many locals photograph from the harbor promenade, which gives a wider surface to work with after hours.
-
InterContinental Osaka – Why it matters: a premium vantage from a top-tier hotel with a dedicated lounge that overlooks the city. Optimal window: after sunset to late night; use the lounge terrace if you can, or the floor-to-ceiling windows for steadier frames. If you stay here, the hotel’s breakfast service is a gentle follow-up option for a morning recap of your night shots. intercontinental osaka
-
St. Regis Osaka – Why it matters: refined glass and a city-facing bar highlight the quieter side of Osaka’s glow. Optimal window: post-sunset hours when interior lighting blends with the skyline. Shooting method: handheld but stabilized with a monopod if possible; the end result is a composition with a rich, cinematic mood. The lounge area also serves as a comfortable retreat after long shoots.
-
Namba Parks Rooftop Garden – Why it matters: a contemporary rooftop with angled terraces that yield multiple reflections of the city lights. Optimal window: after blue hour, stretching into early night; walk the upper levels to capture different silhouettes. Many visitors use this spot as a mid-route checkpoint because it sits within the shopping complex, making it convenient for quick breaks and a bite before continuing the night.
-
Shinsekai & Tsutenkaku Tower – Why it matters: a historic district bathed in retro neon that offers a different textural glow than the riverfront spots. Optimal window: after 8 pm when signs hit full brightness; shoot from street level toward the tower to catch vertical lines against the night sky. For a complete arc, head into the alleyways below the tower for intimate, colorful patches of light.
-
Osaka Station City skyline viewpoints – Why it matters: a compact, modern frame where glass towers reflect rail lines and busy pedestrian flow. Optimal window: just after sunset when the station lights begin to dominate; use a wide-angle to capture multiple skyscrapers and the surrounding surface of the urban grid. This spot is especially known for its clean lines and easy access for a quick shoot before heading to the next location.
-
Toyotomi heritage area around Osaka Castle – Why it matters: the Toyotomi-era legacy adds depth to night shots with historical textures near water and stone. Optimal window: after dark when castle lamps illuminate the surrounding grounds, giving an almost cinematic contrast. Discovery of this area reveals a method to blend modern lights with aged stone, and it’s a great finale to a visiting itinerary for those leaning into Osaka’s history after a full night of city images.
Camera settings and lens choices for Osaka nightscapes
Set a sturdy tripod and shoot RAW in manual mode. Use ISO 100–400, aperture f/4–f/8, and shutter speeds ranging from 4 to 20 seconds to balance glow and motion. Start with a 14–24mm lens for sweeping skyline shots, switch to 24–70mm for mid‑city views, and keep a 70–200mm handy to isolate bright signage or reflections. This plan gives crisp edges and balanced color across the Osaka night view. Apply these settings across multiple spots to capture the spectrum of city lights youll encounter.
For color accuracy, set white balance around 3200–4200K or shoot RAW and adjust in post. Use bracketed shots of -2, 0, +2 EV for dynamic range, especially near bright neon. If your model handles noise well, youll push ISO to 800–1600 for shadow detail; keep exposures long enough to preserve glow without blowing highlights. The right mix of focal lengths–14–24mm for wide panoramas, 24–70mm for mid‑edges, and 70–200mm for tight highlights–lets you unify compositions across locations, and provides several ways to frame the scene.
Look for spots with a clear view and minimal obstructing elements. Theres obstructing reflections on glass near riverside promenades–step back or shoot from a slight elevation to avoid glare. Use a lens hood and shield the view from strong light sources. If you head toward the west bank for the Dotonbori corridor, you can catch long, reflective water shots that feel calmer and more cinematic after midnight.
Discovery begins with a prefectural plan that coordinates timing and access. In osaka-, mix riverside nights with cultural spaces to create contrast, and note a unesco reference if you visit historic districts. These ideas apply across every part of your route; choose transportation carefully–subway, JR, or rideshare–to keep options open and the pace steady. When headed west, youll find the best vantage points open and free, savoring the moment as you collect a cohesive set of captures for your osaka-night exploration.
2-day and 3-day route options to cover the 12 spots
Choose the 3-day option for a relaxed pace to capture five or more photo moments across the central area.
Selected 12 spots: Namba canal view, Dotonbori neon, Shinsaibashi, Nakanoshima Riverside, Toyotomi Park night view, Osaka Castle night view, Shinsekai and Tsutenkaku, Umeda Sky Building Floating Garden Observatory, Harukas 300, Tempozan Ferris Wheel, Cosmo World waterfront, Osaka Bay area from the port.
Two-day route (compact, high impact). Day 1 centers on the central area: start at Namba canal view, then ride Dotonbori lights to Shinsaibashi, cross to Nakanoshima Riverside for a calm riverside shot, visit Toyotomi Park at dusk and finish with Osaka Castle night view from the hill. Day 2 covers the Umeda district with Umeda Sky Building Floating Garden Observatory, Harukas 300, Shinsekai and Tsutenkaku, and a final pass along Tempozan Bay area and the Osaka Bay waterfront for a last skyline capture near Cosmo World.
Three-day route (spacious pacing). Day 1 repeats the core spots (Namba canal view, Dotonbori, Shinsaibashi, Nakanoshima Riverside) plus a late session at Toyotomi Park. Day 2 adds Osaka Castle night view and Shinsekai. Day 3 concentrates on Umeda Sky Building, Harukas 300, Tempozan Ferris Wheel, and the Osaka Bay waterfront, finishing with a broad view from the port area. This plan leaves room to adjust for weather or crowds, and the updated list helps you pick the five favorites to maximize each evening.
טיפים מעשיים: The updated list helps you choose the five favorites. Select spots with a central area mindset and plan around light conditions. Before you go, check tripadvisors for the latest tips and registered recommendations. For dietary needs, nearby eateries offer a variety of options; also, if you crave a paris mood, stroll along the Namba canal for lake-like reflections after dark. Wear light clothing and comfy shoes, and keep a compact camera or smartphone ready for quick photo stops.
Night access, crowds, and safety tips for urban photography
Arrive 60 minutes before blue hour at namba and Dotonbori viewpoints, then walk a prepared loop to the Tempozan ferris wheel and the riverside cityscape, finishing near Akashi if you have time.
Check the procedure for rooftop or interior access with a local organization that handles urban photography permissions. Public spots stay open late, but rooftop and interior overlooks often require permission from the property manager. When access is granted, carry a brief digital copy of approval and respect posted rules.
Crowds shift after 9:30 pm; move with the flow, keeping a low profile and minimal gear noise. For זוגות ו תייר silhouettes, shoot from side angles and elevated stair landings where you can still clear the walkway. In busy districts like Namba, Dotonbori, and the Akashi waterfront, late hours bring vibrant reflections but also higher risk of jostling–plan a compact הליכה route and quick frame grabs so you don’t disrupt others.
Gear and technique: use a lightweight tripod or monopod, set manual exposure, and shoot RAW for post-processing flexibility. Focus on עמוק blues and neon highlights; use ISO 400–800 at f/5.6–8 with 1/125–1/200 s for stable cityscape frames. When shooting through interior glass, enable spot metering and manual focus to avoid auto tweaks. Keep valuables secured and watch for wet pavement that can destabilize a setup.
:מסלולי הליכה מפותחים היטב ובטוחים לצילום לילי: התחילו ב namba, חצו את הנהר, המשיכו לכיוון גלגל הענק טמפוזאן, ואז עשו סיבוב לאזורי אקאשי אם אתם מעוניינים בסשן ארוך יותר. המקום מציע מושלם איזון של פודי זוהר וקווי רקיע, אידיאלי עבור discovery וכמה טייקים. אחרי שתסיימו, קחו breakfast בבית קפה סמוך ועברו על תמונות עם מקומיים כדי לחדד את הגישה שלכם לביקור עתידי.
מה כלול בסיור הצילום ליפן 2025 ואיך להזמין
הזמינו את החבילה המלאה כדי להבטיח גישה לשורה הראשונה לנקודות השקיעה הטובות ביותר ולניאונים לאורך הנהר; ההנאה מנופי הלילה הופכת לקלה ללא מאמץ עם צילומים מודרכים במוקדים מועדפים כמו דוטונבורי, פארק טויוטומי וחופי ביווה, השילוב המושלם בין זוהר אורבני לרגעים שלווים על שפת האגם.
מה כלול: שבעה ימי צילום, שישה לילות במלונות שנבחרו בקפידה, מדריכים מקומיים, יום עריכה פרטי, גישה מוקדמת לנקודות תצפית נבחרות, וכן ארבע מצגות במקום לחידוד המסגור בזמן אמת.
תצפיות מתחילות באוטאני וממשיכות לאורך חוף ביווה, עם עריכות בזריחה ותרגילי שקיעה, ואז הליכה ברחובות מוארים באורות ניאון אל תוך הלילה כדי לתפוס צילומי רחוב בטיילת של אוסקה – בדרך כלל תחליפו בין מים, קו רקיע וצלליות של מקדשים כדי לגוון את המועדפים שלכם.
שיטת ההזמנה פשוטה: הזמנה אונליין דרך הפורטל שלנו, בחרו את התאריכים שלכם, הזינו את פרטי האורחים וצרו סיסמה לאבטחת החשבון; ישנה עצירה של 48 שעות על ההזמנות כדי לייצב את המושבים, לאחר מכן נשלח אישור עם המסלול המלא וסימני מפה.
מה שתקבלו לאחר האישור כולל את זמני הפגישה המדויקים, נקודות האיסוף, הצעות לציוד ותוכנית יומית תמציתית; יחד עם זאת, תינתן לכם גישה למצגות שלאחר הסיור וקישור לגלריה עם צילומים נבחרים של הקבוצה, כדי שתוכלו להשוות רשמים עם העולם ולתכנן צילומים עתידיים.
המלצות למקסום התוצאות: הביאו ערכה מגוונת (רחבה 14-24 וסטנדרטית 24-70), חצובה קומפקטית לצילום בתנאי תאורה חלשה, ותיק קטן למעברים מהירים; ארוחות וואשוקו זמינות בשני ערבים כדי לחוות טעמים מסורתיים, ואם תרצו לחקור אתרים מתקופת הידייושי ליד טירת אוסקה או שקיעה על שפת אגם ביווה, ספרו לנו מראש כדי שנוכל להתאים את המסלול ולהוסיף נקודות כמו נקודות התצפית של אוטאני לתוכנית.