


Recommendation: start at shojiko in the north zone; reach by afternoon; rent a bike to maximize the promenade along the water’s edge; this plan makes traveling enjoyable.
Choose a selected loop linking the north shore with east viewpoints; boating options appear at several piers; this schedule reveals a diverse feel across the terrain; attractions range from shrines to panoramas.
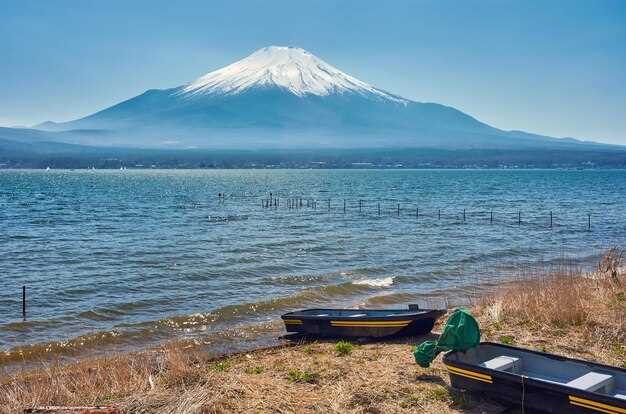
Along the way, fujis shimmer on the horizon for those who linger on the promenade; restaurants near shojiko serve seafood, grilled vegetables, miso; seasonal produce; purchasing a bento box at a local cafe allows a flexible lunch between excursions.
Warning: weather shifts by months; leave spare time for quiet margins; check wind conditions before boating; direction signs point toward the east shore or the north marina; purchasing a day pass increases flexibility; to maximize views, plan a late afternoon transition toward the eastern lookout.
Known for its diverse surroundings, this north shore circuit remains selected by travelers traveling during months with milder weather; boating options on shojiko provide a backdrop for afternoon memories; this journey will leave a lasting feel of calm and a slower pace.
Practical Itinerary and Access
Start from shibuya, ride JR Chuo Line to Otsuki, transfer to a local express toward Kawaguchiko Station; total fare around 2,100–2,400 yen; first train circa 6:15, last return near 18:00; this timing fits a tight loop with minimal risk of missing connections, allowing a smooth move between viewpoints.
From Kawaguchiko Station entrance, walk to the Kachi Kachi Ropeway entrance; ropeway round trip 1,000–1,300 yen; summit deck provides orange glow over distant hills, ideal for photographs just after sunrise.
Exploration plan for hikers: a short hill loop near the ropeway, 2–3 km, surface smooth, stroller friendly where needed; photography technique: ISO 100, 1/125, bracketing 3 shots; maintain form with a steady pace, finish near a cafe offering hot tea; providing a moment for a traveler, kids, willer, favorite regards before next move.
Oshino Hakkai ponds offer visited spots with blue reflections; village mood suits japanese traveler seeking exploration; rest stops provide hot tea, benches, restrooms; cold breeze makes a brief hill ascent feel bracing, a favorite choice for hikers seeking an enjoyable morning.
Cheapest lodging near Kawaguchi district serves a japanese traveler budget; hostels charge roughly 2,500–4,500 yen per person per night; shared spaces, lockers, bilingual staff; check-in windows start around 15:00; rental bikes connect to observation hill routes, providing a quick move back to favorite viewpoints.
This route connects Shinjuku to Kawaguchi area; travel time about 2 hours; tickets around 2,000–2,500 yen; peak departures late morning fit exploration windows; check schedules prior to departure; during colder months wear gloves, scarf, hat; entrance to trails opens 7:00, making a sunrise run realistic for hikers with a willer in the group.
2–3 Day Itinerary Across Kawaguchiko, Saiko, Yamanakako, Shojiko, and Motosuko
Base Kawaguchiko to start; stays within 10–15 minute stroll from the station; background reveals a compact hub with direct routes to each shoreline; price for mid-range stays ranges 8,000–18,000 JPY per person per night; luggage storage available at many properties; meals nearby run 1,000–2,000 JPY per person. Transportation options include buses, rental bikes.
Day 1 begins Kawaguchiko shoreline. North vantage chosen for sunrise glow from the promenade near Oishi Park. Background highlights a compact transit loop linking lakefront spots. The ropeway ticket costs roughly 1,000–1,600 JPY; express style ride delivers a direct route to a high overlook above the surface. Photography technique favors a low angle at sunrise. Purchasing a to-go lunch saves time. This plan, providing flexible stops, keeps pace. Meals nearby range 1,000–2,000 JPY.
Afternoon transfer to Saiko via local transport; same ticket type covers this leg; a lakefront stroll leads to village charm; gardens line the shore; spot for souvenirs found at small shops. Overnight options available within Saiko village provide a relaxed version of this route; price range 5,000–12,000 JPY for budget stays. Some dining options may be expensive.
Day 2 moves to Yamanakako, north shore scenery on a gradual climb toward a hilltop vantage. Morning meals at lakeside cafes cost 800–1,400 JPY; local routes loop around the shore, suitable for a casual rider. Transportation involves a local bus to Shojiko, price 300–600 JPY for a single ride; staying near the port area keeps luggage logistics simple.
Shojiko invites a quiet spot with gardens, small springs, a wooden lookout; a short hike to a ridge yields expansive views across the basin; souvenirs sold at village stalls. In this version of the plan, a compact planner, a willer, helps map this day with minimal backtracking.
Day 3 centers on Motosuko, the western shoreline with the best chance to capture a distant crest when weather cooperates. The direct bus route from Shojiko takes about 40 minutes; a surface-level stroll along the shore reveals a scenic perspective. Luggage lockers exist at the village desk; this spot offers a recreational atmosphere, optional stops for souvenirs before return. Needed items include a light jacket, water, sunscreen. Always check weather conditions.
Top Viewpoints and Photo Spots by Lake
Begin at Kawaguchiko’s north shore at dawn to capture fujisan rising behind blooming cherry, reflections crisp on glassy water; three hues in skies while haze lingers, an easy day-trip pick from Tokyo.
What follows is a compact list of the most reliable photo locations by the water body, each chosen for universal appeal, clarity of light, practical access, based on local conditions.
Three principal spots anchor this section, each chosen for universal appeal, clear light, minimal crowds; pmentrance along the path eases access for a comfortable stay.
Spot A: Kawaguchiko North Bank – Best time: sunrise; Access: paved promenade near parking; Photo note: fujisan framed by cherry blossoms, reflections over water; this vantage is a favorite for many shooters.
Spot B: Kachi Kachi Ropeway Summit – Best time: late afternoon; Access: ropeway ticket required; Photo note: sweeping horizon, hazy mornings possible, three colored skies provide drama; picked by many enthusiasts for a wide view; power of the panorama adds impact.
Spot C: Lake Motosuko Shoreline – Best time: blue hour; Access: car recommended; Photo note: tranquil water, distant mountains, pmentrance along the shore; this spot is popular for quiet souvenirs, reflections.
| Spot | Best Time | Access | Photo Notes | Remarks |
|---|---|---|---|---|
| Kawaguchiko North Bank | Sunrise | Paved promenade; parking available | fujisan framed by cherry blossoms; reflections on calm water | favorite for beginners |
| Kachi Kachi Ropeway Summit | Late afternoon | Ropeway ticket required | Sweeping horizon; three skies; hazy mornings possible; powerful panorama | popular pick; picked by many |
| Lake Motosuko Shoreline | Blue hour | Car recommended | Calm reflections; distant mountains; pmentrance along the shore | quiet option; souvenirs nearby |
Souvenirs, favorite memories, practical guidance – this article helps what to choose for your route; spending on meals at nearby restaurants supports the area; the significance of each capture rises based on skies, haze; universal value lies in memories of pmentrance, cherry blossoms, fujisan; what to shoot, what to skip; a partner boosts day-trip efficiency.
Transit Options: From Tokyo by Train, Bus, and Car
Recommendation: Start with JR Chuo Line Rapid from Tokyo Station to Otsuki; switch to Fujikyu Railway to Kawaguchiko Station; this route minimizes travel time; keeps costs predictable; suits weekends crowds; yields a steady rhythm for a base near the climbing grounds for climbers; solid transportation plan. Timetables updated monthly; link: https://www.jreast.co.jp/e/
Train details: Tokyo Station to Otsuki roughly 60–75 minutes; fare around 1,000–1,300 yen; Otsuki to Kawaguchiko about 40–50 minutes; fare 500–700 yen; total around 2 hours; costs near 1,500–2,000 yen; peak seasons might adjust times.
Bus option: Shinjuku to Kawaguchiko Station takes about 2.5 hours; cost typically 2,000–2,600 yen; seats reserved; weekends busier; without advance booking, you face a higher chance of sold-out; schedule updates on official pages; link: https://www.fujikyu.co.jp/en
Car route: Road from Tokyo via Tomei Expressway toward Gotemba; travel time 1.5–2.5 hours depending on traffic; tolls around 4,000–6,000 yen one-way; paid parking near Kawaguchiko Station; winter driving requires winter tires; also parking near district centers; plan alternate routes if snow.
Bicycles: Bicycles available around Kawaguchiko Station; some hotels provide free bikes; you can explore the lake waters; parking costs near beaches; special parking zones exist near popular spots; offering flexible routes for family trips.
Preparation tips: Clothing suitable for winter months; keep an eye on weather rituals; bring a trekking stick; winter traction devices useful; pack waters; spare layers; arrival schedules often update; check latest notices before leaving hotel.
Arriving: A special, near sense of heritage greets travellers; grounds around the district reveal traditional rituals; paid parking remains common near access points; updated links publish costs, schedules; worlds of possibilities await; the sight of the towering silhouette dominates the skyline. Link: https://www.jreast.co.jp/e/
Seasonal Planning: Best Times, Weather, and Climbing Window
Target the official climbing window: early July through mid-September; begin from the east-side main trail before dawn to reach the summit for sunrise.
-
Spring (late March–May)
- Grounds come alive with konohana blossoms along the lower approaches; visiting the otsuki area offers blossom views and regional strolls.
- Costs stay modest before peak season; advance bookings for lodging or onsen stays are wise for a stress-free visit; this period pairs well with nearby baths and springs after a day outdoors.
- Best for: gentle treks, photography of scenery, and a calmer visitor flow before crowds arrive.
-
Summer (June–August)
- The main climbing window is widest; expect excited visitor crowds and full services at trailheads. If you drove from otsuki, you can reach the trailheads with relative ease–plan parking in advance.
- Start sub-dawn (often before 3:30 a.m.) to reach the summit by sunrise; descend by the afternoon to avoid heat and afternoon storms.
- Costs rise with lodging, tolls, and bus passes; the cheapest option is to base in surrounding towns within fujigoko and commute by regional transport.
- Evening downtime includes baths and springs to decompress, with skies that frequently deliver spectacular colors after sunset.
-
Autumn (September–November)
- Regional foliage paints the slopes, offering some of the most scenic viewpoints; skies are often clear, producing crisp,Photogenic scenery.
- Visiting strategy emphasizes advance planning to lock in lodgings; costs remain reasonable, and the surrounding towns provide excellent culinary and onsen options.
- Best for: long, comfortable days of trekking and photography, with the same exceptional light for afternoon sessions.
-
Winter (December–February)
- Snow on higher sections makes climbs risky; many routes close and onsen towns operate with limited hours; for visiting, stay in the surrounding grounds and enjoy seasonal baths.
- No license is required for casual hiking on lower paths, but always check local advisories; safety gear is essential if you stray toward higher elevations.
- Costs drop in this season, yet travel logistics tighten; if you’re exploring into the regional area, focus on ground-level viewpoints and starry skies rather than summit ascents.
Details to consider: plan for the same day break between ascent and descent, carry adequate layers for the afternoon chill, and verify forecasted winds on the main trailhead. For a balanced itinerary, mix quiet mornings with scenic afternoons at popular viewpoints around fujigoko, then unwind in nearby baths before driving back to your base. Always advance-check trail conditions and weather, especially if you intend to visit motosuko or other east-side access points.
Stay and Base Options: Quick Picks by Lake and Budget
Base directly in shimoyoshida for best value and quick connection to viewing spots across the water. Parking is wide in the district, and listed guesthouses offer clean rooms at modest rates, with their simple terraces and easy access to transport. The area’s significance lies in easy access to bus lines and the ropeway shuttle, letting you stay in one place without frequent moves.
Mid-range option near the pier area provides nice charm and solid comfort. Parking is often included, and same approach: most properties offer free Wi-Fi and in-room tea. From here you can rent a boat for a gentle crossing or walk to a viewing site that looks toward the water.
Premium base on the eastern shore offers famous service and refined stays. It’s expensive but worth it for night-time views and a private on-site pub where beer is served; you can leave your luggage and still enjoy a long stroll along the waterfront. If you plan a hike, the fifth station can be reached by bus from the same base.
Budget-friendly strategy: stay in shimoyoshida but reserve early and renting gear if spring crowds are large. If renting, check parking availability and the same area.
Choose a base with a direct connection to the ropeway and cable car. dont rely on a single spot; uncover other spots across the lake for sunrise viewing.