


Recommendation: start at shojiko in the north zone; reach by afternoon; rent a bike to maximize the promenade along the water’s edge; this plan makes traveling enjoyable.
Choose a selected loop linking the north shore with east viewpoints; boating options appear at several piers; this schedule reveals a diverse feel across the terrain; attractions range from shrines to panoramas.
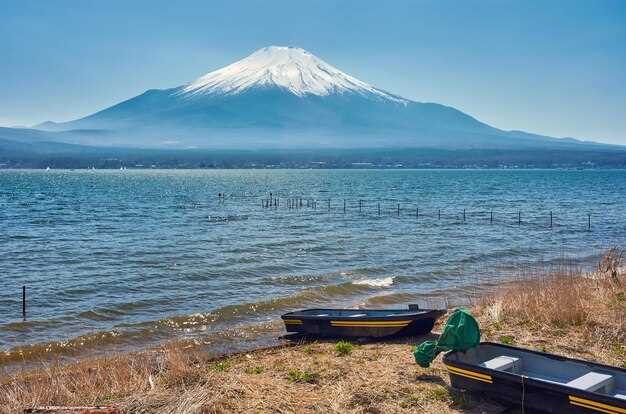
Along the way, fujis shimmer on the horizon for those who linger on the promenade; restaurants near shojiko serve seafood, grilled vegetables, miso; seasonal produce; purchasing a bento box at a local cafe allows a flexible lunch between excursions.
Warning: weather shifts by months; leave spare time for quiet margins; check wind conditions before boating; direction signs point toward the east shore or the north marina; purchasing a day pass increases flexibility; to maximize views, plan a late afternoon transition toward the eastern lookout.
Known for its diverse surroundings, this north shore circuit remains selected by travelers traveling during months with milder weather; boating options on shojiko provide a backdrop for afternoon memories; this journey will leave a lasting feel of calm and a slower pace.
Practical Itinerary and Access
Start from shibuya, ride JR Chuo Line to Otsuki, transfer to a local express toward Kawaguchiko Station; total fare around 2,100–2,400 yen; first train circa 6:15, last return near 18:00; this timing fits a tight loop with minimal risk of missing connections, allowing a smooth move between viewpoints.
From Kawaguchiko Station entrance, walk to the Kachi Kachi Ropeway entrance; ropeway round trip 1,000–1,300 yen; summit deck provides orange glow over distant hills, ideal for photographs just after sunrise.
Exploration plan for hikers: a short hill loop near the ropeway, 2–3 km, surface smooth, stroller friendly where needed; photography technique: ISO 100, 1/125, bracketing 3 shots; maintain form with a steady pace, finish near a cafe offering hot tea; providing a moment for a traveler, kids, willer, favorite regards before next move.
Oshino Hakkai ponds offer visited spots with blue reflections; village mood suits japanese traveler seeking exploration; rest stops provide hot tea, benches, restrooms; cold breeze makes a brief hill ascent feel bracing, a favorite choice for hikers seeking an enjoyable morning.
Cheapest lodging near Kawaguchi district serves a japanese traveler budget; hostels charge roughly 2,500–4,500 yen per person per night; shared spaces, lockers, bilingual staff; check-in windows start around 15:00; rental bikes connect to observation hill routes, providing a quick move back to favorite viewpoints.
This route connects Shinjuku to Kawaguchi area; travel time about 2 hours; tickets around 2,000–2,500 yen; peak departures late morning fit exploration windows; check schedules prior to departure; during colder months wear gloves, scarf, hat; entrance to trails opens 7:00, making a sunrise run realistic for hikers with a willer in the group.
2–3 Day Itinerary Across Kawaguchiko, Saiko, Yamanakako, Shojiko, and Motosuko
Base Kawaguchiko to start; stays within 10–15 minute stroll from the station; background reveals a compact hub with direct routes to each shoreline; price for mid-range stays ranges 8,000–18,000 JPY per person per night; luggage storage available at many properties; meals nearby run 1,000–2,000 JPY per person. Transportation options include buses, rental bikes.
Day 1 begins Kawaguchiko shoreline. North vantage chosen for sunrise glow from the promenade near Oishi Park. Background highlights a compact transit loop linking lakefront spots. The ropeway ticket costs roughly 1,000–1,600 JPY; express style ride delivers a direct route to a high overlook above the surface. Photography technique favors a low angle at sunrise. Purchasing a to-go lunch saves time. This plan, providing flexible stops, keeps pace. Meals nearby range 1,000–2,000 JPY.
Afternoon transfer to Saiko via local transport; same ticket type covers this leg; a lakefront stroll leads to village charm; gardens line the shore; spot for souvenirs found at small shops. Overnight options available within Saiko village provide a relaxed version of this route; price range 5,000–12,000 JPY for budget stays. Some dining options may be expensive.
Day 2 moves to Yamanakako, north shore scenery on a gradual climb toward a hilltop vantage. Morning meals at lakeside cafes cost 800–1,400 JPY; local routes loop around the shore, suitable for a casual rider. Transportation involves a local bus to Shojiko, price 300–600 JPY for a single ride; staying near the port area keeps luggage logistics simple.
Shojiko invites a quiet spot with gardens, small springs, a wooden lookout; a short hike to a ridge yields expansive views across the basin; souvenirs sold at village stalls. In this version of the plan, a compact planner, a willer, helps map this day with minimal backtracking.
Day 3 centers on Motosuko, the western shoreline with the best chance to capture a distant crest when weather cooperates. The direct bus route from Shojiko takes about 40 minutes; a surface-level stroll along the shore reveals a scenic perspective. Luggage lockers exist at the village desk; this spot offers a recreational atmosphere, optional stops for souvenirs before return. Needed items include a light jacket, water, sunscreen. Always check weather conditions.
Top Viewpoints and Photo Spots by Lake
Begin at Kawaguchiko’s north shore at dawn to capture fujisan rising behind blooming cherry, reflections crisp on glassy water; three hues in skies while haze lingers, an easy day-trip pick from Tokyo.
What follows is a compact list of the most reliable photo locations by the water body, each chosen for universal appeal, clarity of light, practical access, based on local conditions.
Three principal spots anchor this section, each chosen for universal appeal, clear light, minimal crowds; pmentrance along the path eases access for a comfortable stay.
Spot A: Kawaguchiko North Bank – Best time: sunrise; Access: paved promenade near parking; Photo note: fujisan framed by cherry blossoms, reflections over water; this vantage is a favorite for many shooters.
Spot B: Kachi Kachi Ropeway Summit – Best time: late afternoon; Access: ropeway ticket required; Photo note: sweeping horizon, hazy mornings possible, three colored skies provide drama; picked by many enthusiasts for a wide view; power of the panorama adds impact.
Spot C: Lake Motosuko Shoreline – Best time: blue hour; Access: car recommended; Photo note: tranquil water, distant mountains, pmentrance along the shore; this spot is popular for quiet souvenirs, reflections.
| Spot | Best Time | アクセス | Photo Notes | Remarks |
|---|---|---|---|---|
| Kawaguchiko North Bank | Sunrise | Paved promenade; parking available | fujisan framed by cherry blossoms; reflections on calm water | favorite for beginners |
| Kachi Kachi Ropeway Summit | Late afternoon | Ropeway ticket required | Sweeping horizon; three skies; hazy mornings possible; powerful panorama | popular pick; picked by many |
| Lake Motosuko Shoreline | Blue hour | Car recommended | Calm reflections; distant mountains; pmentrance along the shore | quiet option; souvenirs nearby |
Souvenirs, favorite memories, practical guidance – this article helps what to choose for your route; spending on meals at nearby restaurants supports the area; the significance of each capture rises based on skies, haze; universal value lies in memories of pmentrance, cherry blossoms, fujisan; what to shoot, what to skip; a partner boosts day-trip efficiency.
Transit Options: From Tokyo by Train, Bus, and Car
Recommendation: Start with JR Chuo Line Rapid from Tokyo Station to Otsuki; switch to Fujikyu Railway to Kawaguchiko Station; this route minimizes travel time; keeps costs predictable; suits weekends crowds; yields a steady rhythm for a base near the climbing grounds for climbers; solid transportation plan. Timetables updated monthly; link: https://www.jreast.co.jp/e/
Train details: Tokyo Station to Otsuki roughly 60–75 minutes; fare around 1,000–1,300 yen; Otsuki to Kawaguchiko about 40–50 minutes; fare 500–700 yen; total around 2 hours; costs near 1,500–2,000 yen; peak seasons might adjust times.
Bus option: Shinjuku to Kawaguchiko Station takes about 2.5 hours; cost typically 2,000–2,600 yen; seats reserved; weekends busier; without advance booking, you face a higher chance of sold-out; schedule updates on official pages; link: https://www.fujikyu.co.jp/en
Car route: Road from Tokyo via Tomei Expressway toward Gotemba; travel time 1.5–2.5 hours depending on traffic; tolls around 4,000–6,000 yen one-way; paid parking near Kawaguchiko Station; winter driving requires winter tires; also parking near district centers; plan alternate routes if snow.
Bicycles: Bicycles available around Kawaguchiko Station; some hotels provide free bikes; you can explore the lake waters; parking costs near beaches; special parking zones exist near popular spots; offering flexible routes for family trips.
Preparation tips: Clothing suitable for winter months; keep an eye on weather rituals; bring a trekking stick; winter traction devices useful; pack waters; spare layers; arrival schedules often update; check latest notices before leaving hotel.
Arriving: A special, near sense of heritage greets travellers; grounds around the district reveal traditional rituals; paid parking remains common near access points; updated links publish costs, schedules; worlds of possibilities await; the sight of the towering silhouette dominates the skyline. Link: https://www.jreast.co.jp/e/
Seasonal Planning: Best Times, Weather, and Climbing Window
Target the official climbing window: early July through mid-September; begin from the east-side main trail before dawn to reach the summit for sunrise.
-
春(3月下旬~5月)
- 低い場所ではコノハナサクラが咲き始め、大月エリアを訪れると、桜の景色を眺めながら地域を散策できます。.
- ピークシーズン前は費用が控えめです。ストレスなく訪問できるよう、宿泊施設や温泉の事前予約をお勧めします。この時期は、一日のアウトドアの後に近くの温泉や湧き水と組み合わせると良いでしょう。.
- 穏やかなトレッキング、景色の撮影、そして人混みが押し寄せる前の穏やかな訪問に最適。.
-
Summer (June–August)
- 登山シーズン本番。ハイカーで賑わい、登山口では各種サービスが充実するでしょう。大月方面から車でお越しの場合、登山口までは比較的アクセスしやすいですが、事前に駐車場の計画を立てておきましょう。.
- 夜明け前(午前3時30分より前の場合も多い)に出発し、日の出までに山頂に到達する。暑さや午後の雷雨を避けるため、午後には下山する。.
- 宿泊費、通行料、バスの乗り放題パスなどで費用はかさむため、最も安く済ませるには、富士五湖周辺の町に拠点を置き、地域の交通機関で通勤することです。.
- 夕暮れ時の休憩には、心身をリラックスさせるお風呂や温泉があり、夕焼け後には空がしばしば息をのむような色彩を見せてくれます。.
-
秋(9月~11月)
- その土地ならではの草木が斜面を彩り、屈指の景勝地となっています。空は澄み渡ることが多く、鮮明で写真映えのする風景が広がります。.
- 訪問戦略では、宿泊施設を確保するための事前計画が重要です。費用は手頃なままで、周辺の町では素晴らしい料理や温泉を楽しむことができます。.
- 以下に最適: 長時間かつ快適なトレッキングや写真撮影。午後のセッションでも変わらない最高の光を楽しめます。.
-
Winter (December–February)
- 高所の積雪により登山は危険を伴います。多くの登山道が閉鎖され、温泉街は時間短縮営業となります。訪問の際は周辺施設に宿泊し、季節の湯をお楽しみください。.
- 低い場所を気軽にハイキングするだけであれば許可は不要ですが、現地の注意報は必ず確認してください。標高の高い場所に立ち入る場合は安全装備が必須です。.
- この時期は費用が抑えられる一方、旅行の手配は難しくなります。地方を探索するなら、山頂を目指すよりも、地上からの景色や星空に焦点を当てましょう。.
考慮すべき点:登頂と下山の間には同じ日の休憩を計画し、午後の冷え込みに備えて十分な重ね着を用意し、主要な登山口での予報風を確認してください。バランスの取れた旅程のために、静かな朝と富士五湖周辺の人気のある展望台での景色の良い午後を組み合わせ、その後、近くの温泉でリラックスしてから拠点に戻るように運転してください。本栖湖やその他の東側のアクセスポイントを訪問する場合は、特に、常にトレイルの状況と天候を事前に確認してください。.
滞在・拠点オプション:湖畔・予算別おすすめ
宿泊は下吉田に拠点を置くのが一番お得で、対岸の撮影スポットへのアクセスも便利です。この地区は駐車場が広く、宿泊施設も清潔な部屋を手頃な料金で提供しており、シンプルなテラスや交通機関へのアクセスの良さが魅力です。バス路線やロープウェイシャトルへのアクセスが容易なため、頻繁に移動することなく同じ場所に滞在できます。.
桟橋エリアに近いミッドレンジのオプションは、素敵な魅力と確かな快適さを提供します。駐車場が含まれていることが多く、多くの場合と同様に、ほとんどの施設で無料Wi-Fiと室内でお茶を楽しめます。ここからボートをレンタルして穏やかなクルージングを楽しんだり、水面を見渡せる展望台まで歩いて行くこともできます。.
東海岸沿いの高級拠点では、定評あるサービスと洗練された滞在を提供しています。高価ですが、夜景やビールが飲める専用の館内パブがあるので、それだけの価値はあります。荷物を預けて、ウォーターフロント沿いをゆっくり散歩することも可能です。ハイキングを計画している場合は、同じ拠点からバスで五合目まで行くことができます。.
予算を抑えるなら、下吉田に宿泊し、早めに予約。春の観光客が多い場合は、ギアをレンタル。レンタルする場合は、駐車場があるか、同じエリアかを確認。.
ロープウェイやケーブルカーに直結した拠点を軸に選びましょう。一箇所に頼らず、湖の周辺で日の出鑑賞に適した他の場所も探しましょう。.