

Make your booking today for the Rome 1-Hour Pasta Making Class and start cooking in less than an hour. An expert instructor guides you through a very fast, hands-on routine so you can turn flour, eggs, and water into silky dough, then cut it into fresh pasta shapes you’ll be proud to serve.
Within 60 minutes, you’ll move from ingredients to finished strands, learning the essential ratios, using the best list of steps, and a spritz of olive oil to finish. You’ll practice kneading, rolling, and cutting, then boil a small batch to taste right away, so you can appreciate the creation as it happens and feel ready to recreate it later at home. What you learn will mean a quick dinner upgrade at home. During the session you will have hands-on practice throughout the class.
Whether you’re cooking with a family of two or a group with ages spanning generations, this class keeps the pace friendly and clear. The ingredients stay simple and accessible, and the texture you reach is satisfying for everyone, from a happy teenager to a happy grandparent. The creation becomes dinner with a quick sauce, plus a spritz of lemon to brighten the plate. We also acknowledge diverse traditions, including jewish home cooking, with adaptable options so guests can respect dietary needs without sacrificing flavor. Many guests have been amazed at how quickly the dough becomes delicate ribbons.
Arriving 10 minutes early to settle in and avoid waiting; your booking includes all ingredients, aprons, and tools. The instructor demonstrates, and you’ll see how the dough prepares to yield silky sheets you can roll with confidence. If you’re lingering after class, you can compare sauces with fellow participants and plan your grocery list for a quick meal later at home.
What to Expect in a 60-Minute Private Pasta Class in Rome
Start with the hands-on kneading and rolling; the 60-minute private class in Rome gives you direct pasta-making practice you can carry home. andrea leads the session from a warm terrace kitchen, where the guest experience feels friendly and vegetarian-friendly. insideat the compact setup, ingredients are prepared for speed and clarity, keeping the line of dough smooth and easy to manage. since the class is private, the pace takes focus without feeling rushed. this class takes 60 minutes to complete. dont worry if you miss a detail–the next step comes quickly.
By the end you learned a simple, reliable method for mixing flour and eggs into a soft dough, resting, then rolling to a silky thickness before cutting into ribbons. keep your foot flat to stabilize the dough when you roll. the teacher demonstrates options for tagliatelle or fettuccine, or a classic straight line cut, and you practice until the motion feels natural. the hands-on phase finishes with the dough cooked to al dente and tossed with a quick, responsive sauce. prepared mise en place and clear steps make it easy to recreate at home, and vegetarian-friendly options stay on the menu if you prefer. Your hands will feel involved and confident as you shape the pasta.
Private format means you wont share attention with another guest; the money needed for a focused session is well spent. Every guest can customize fillings to fit taste or dietary needs. The added tips are reviewed at the end, so you leave with practical, ready-to-use techniques. the terrace vibe keeps things warm and welcoming, and you’ll feel good about the results you can replicate. if you ever need adjustments for posture or foot comfort, tell the teacher and you’ll receive guidance to stay involved and keep the momentum going. the skill you gain from this experience will stay with you long after you leave Rome.
Dough fundamentals: flour quality, egg ratio, and hydration
Start with a concrete recommendation: use 100 g of finely milled 00 flour and 1 large egg (about 50 g). If it feels dry, add 1–2 teaspoons of water and knead until the dough forms a smooth, cohesive ball.
Two main points define flour quality: for silk sheets, choose 00 flour with protein roughly 9–12%. To add bite, mix 70% 00 with 30% durum semolina. Weigh flour by weight for accuracy, not cups, to keep hydration predictable.
Egg ratio and hydration: classic fresh pasta uses 1 large egg per 100 g flour; for richer dough, add a yolk or a second egg per 100 g flour. The dough should come together and be supple without being sticky; if sticky, add a pinch more flour or 1–2 tsp water. Rest the dough for 30–45 minutes, covered, so gluten relaxes. This means being mindful of hydration helps the dough stay forgiving during rolling.
Let the dough rest 30–45 minutes, covered, in a cosy afternoon or night session. This rest relaxes gluten and helps the dough roll out perfectly. If you want to compare, I highly recommend testing two hydration levels side by side; take a quick tour of your pantry to pick flour types and note what you prefer. This approach works anywhere, from countryside kitchens to city counters, and it sets your guiding points for the next batch. If you must pause, leave it covered and resume later. If you're interested, run a second batch with a different flour to compare. If you want to taste, boil a tiny scrap to check doneness.
Roll to 0.2–0.4 mm, dust with only a light dusting of flour, and cut. Boil salted water 2–3 minutes until al dente, then toss with a splash of cooking water. For longer storage, dry sheets in a cool oven (60°C) for 15–20 minutes, then store covered. A finish with shaved truffle and a glass of prosecco heightens the night. If you want to optimize, last batch will benefit from a 10-minute rest before rolling. Fellow cooks can reuse the tips anywhere, from countryside kitchens to a cosy apartment, but avoid ghetto shortcuts and stick to quality ingredients. Leftover scraps fried briefly in a dry pan yield crispy edges that pair nicely with herb oil or butter.
Kneading and resting: achieving the right texture in minutes
Knead for 6–8 minutes by hand, then rest for 15 minutes to lock in the texture you want, giving you a good foundation for rolling and shaping.
Two practical dough paths keep you flexible in your plan:
- Egg-based dough (classic Italian): mix 100 g fine flour (00 preferred) with 1 large egg and a pinch of salt. Rest the mixture 10 minutes before kneading, then work until smooth. This yields a rich, chef-worthy base perfect for cacio sauces.
- Vegan dough (egg-free): combine 100 g fine flour with 70–80 ml warm water and 1 tsp olive oil. Knead until cohesive, then rest 15 minutes. This version stays tender and easy to roll in any location, such as by the marina or at home.
Kneading technique you can feel: push with the heel of your hand, fold back, rotate a quarter turn, and repeat, gradually backing off the force as the dough tightens. Stop when the dough is elastic, slightly tacky, and springs back to a light poke. If it sticks, add a pinch of flour and continue; if it tears, knead a bit longer and re-check the texture with a gentle pull.
Resting matters for texture and control. Cover with plastic wrap or a damp cloth and let it sit at a comfortable room temperature. In a dry location, 15 minutes suffices; in a warmer, more interactive kitchen, 20–30 minutes helps the grip calm down. Emphasizing a steady rest prevents tearing and makes your next steps smoother, whether you’re cooking for yourself, friends, or a small class.
Rolling and shaping quick guide:
- Divide dough into 4 pieces; keep the rest covered to avoid drying out.
- Flatten each piece with your palm to about 2 cm thick to ease feeding into a rolling setup.
- Roll using a pasta machine or a pin. Start on the thickest setting, then gradually thin to 1–2 mm for tagliatelle or sheets for lasagna-style shapes.
- Dust lightly with fine flour; avoid over-flouring to keep a good bite. If the dough sticks to the surface, wipe and re-flour sparingly.
- Rest the cut pasta briefly on a clean surface to relax before cooking or drying for later use.
Tips to stay on track: plan your workflow like a chef, keeping the main steps in sequence and avoiding rushing. If you were teaching this in a class, interactive feedback helps you adjust on the fly, and you’ll notice the dough responds differently by location and humidity. Time spent resting is time well spent, adding to the authentic Italian texture you want to enjoy with a simple sauce such as cacio, or olive oil and garlic.
Common issues and fixes: if the dough feels stiff, add 1–2 tablespoons of water (or a splash more oil for vegan dough) and knead until cohesive; if it’s too sticky, dust with a touch more flour and knead briefly. For those who want a quick check, the dough should pass a gentle windowpane test without tearing excessively, indicating enough gluten development to hold shape in sauce-rich dishes.
Whether you’re in a quiet kitchen or a bustling market location near a marina, these steps keep you on track and confident. The currency of your pasta-making session is momentum and texture, not speed. With consistent kneading and mindful resting, you’ll produce fine dough that holds its shape and offers authentic bite, letting you enjoy your own results and share with others in a good, interactive cooking plan.
Rolling and cutting: sheets, ribbons, and shaping variations
Begin by rolling freshly prepared dough to sheet thickness of 0.3–0.5 mm using a pasta machine on the widest setting, then gradually switch to thinner settings until the sheet feels almost translucent. This is the recipe for truly even sheets. Cooks with a pizza-making background will recognize the same dough-handling logic returning back to the basics.
Let the sheet rest 10–15 minutes to relax gluten, then re-roll to 0.5 mm for a silkier texture. Dust lightly with semolina or flour to prevent sticking, and keep the sheet even by rotating and turning. This prep sets you up for clean cuts and a satisfying result. This step is welcomed by beginners and experts alike.
For ribbons, cut with a machine or knife to 6–8 mm widths for fettuccine, about 8 mm for tagliatelle, and up to 25 mm for rustic pappardelle. A fluted cutter adds texture; a straight cut keeps edges clean. Totally consistent widths come from using a dedicated cutter set and practicing back-to-back cuts to build speed.
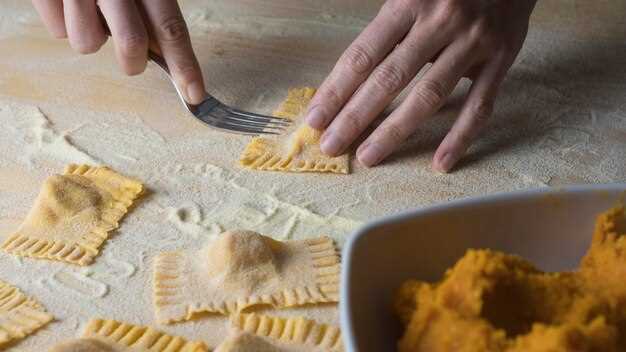
Shaping variations: coil long ribbons into nests to dry, twist sheets into small pillows for stuffed pasta frames, or lay ribbons flat for a classic presentation. A patient hand yields even tension and minimizes tearing, a skill highlighted by the expert guides.
Whether in a hotel kitchen, a town studio, or a touristy setup, this approach stays affordable and delivers value in any currency. The sets of steps let you spend a trip learning hands-on technique, guided by an expert with patient explanations. This prepares you to cook back home with confidence, and the dessert pairing–tiramisu–completes the meal, a della family recipe that feels totally modern and satisfying. A clear refund policy is in place if schedules change.
Boiling and doneness: timing, salt, and al dente checks
Start timing the moment the water returns to a rolling boil after you drop freshly made pasta in. Salt the water generously–about 1 tablespoon per 4 liters–to create a sea-like base that helps the starches stay distinct and lets sauces cling.
Fresh pasta typically finishes in 1.5 to 3 minutes, depending on shape and thickness. Thin shapes finish closer to 1.5–2 minutes; thicker sheets move toward 2–3 minutes. Use a timer and taste tests to confirm; timing matters, but texture acts as the final judge.
Do a bite test: pull a strand with tongs, bite through the center. It should offer a firm bite with a hint of chew in the core. If you see a pale white core in the center, cook 15–30 seconds more.
Reserve a splash of the starchy cooking water before draining. This water helps emulsify the sauce and loosen stubborn strands. Toss the pasta into the pan with its sauce and add a little of the reserved water to finish–through the steam and heat, the sauce coats every shape.
Whether you cook indoors or on a quick tour of the kitchen, keep the pot open and the heat brisk until the last minute to avoid overcooking. If you plan a light sauce, finish at al dente and taste for chew rather than waiting for the perfect soft edge.
Marilee and marilees share practical tweaks: taste a strand every 2 minutes during the final stretch, check the bite, and doesnt rely solely on the package timing. Keep pepe and a few fresh herbs ready to finish the dish for a more enjoyable vibe.
After draining, reserve a small amount of the cooking water and add it to the sauce as you toss. This open, starchy liquid helps the sauce cling between the strands and prepares it to finish smoothly.
In a Rome 1-Hour class, teams can match each shape to a quick sauce–from a velvety butter and sage to a bright tomato sauce–so the experience remains enjoyable and you can make food pairing choices that fit your tastes and schedule.
Note: this section is about boiling, doneness, and finishing; it doesnt replace medical advice. Whether you take cipro or not, this guide stays focused on pasta and sauces. tiramisu awaits as a light dessert to close a fresh, indoors tour of flavors after years of practice.
Sauce pairing and speed: quick sauces that suit 60-minute pasta
Begin with a 6–8 minute garlic-lemon olive oil sauce built on quality ingredients: 2 tablespoons extra-virgin olive oil, 2 minced garlic cloves, a pinch of red pepper flakes, zest and juice of 1 lemon, salt and black pepper. Toss with 300–320 g pasta (shapes such as spaghetti, linguine, or fettuccine) cooked al dente. This bright base lets you savor brightness without heaviness.
Tomato-basil quick sauce (pomodoro): heat 1 tablespoon olive oil, sauté 2 minced garlic cloves 30 seconds, add 400 g canned crushed tomatoes, pinch of sugar, salt, pepper; simmer 8–10 minutes, tear in fresh basil and finish with a drizzle of olive oil. This refreshing option pairs well with long shapes; add a splash of pasta water to help cling.
Pesto in minutes: blitz 2 cups fresh basil leaves, 1/3 cup grated parmesan, 1/4 cup pine nuts, 2 garlic cloves, 1/3 cup olive oil, and salt to taste. Toss with hot pasta and, if needed, a splash of the reserved pasta water. Printed recipe cards help you replicate the steps in workshops; handmade pesto elevates quick weeknights.
Creamy option and dairy-free alternative: melt 2 tablespoons butter, whisk in 1/2 cup cream and 1/2 cup grated parmesan until smooth; adjust with pasta water and salt. For dairy intolerance, swap to cashew cream or silken tofu with a squeeze of lemon. This sauce finishes in about 6–7 minutes, keeping the 60-minute pace.
Bologna-inspired quick ragù: brown 150 g ground pork with 1 finely chopped onion, add 1 tablespoon tomato paste, splash of red wine, and a splash of beer for depth; simmer 6–8 minutes, then toss with pasta. This nod to bologna shows how meat sauces can be assembled fast; it pairs nicely with tagliatelle or pappardelle.
Pairing by shapes and speed tips: match oil-based or tomato sauces with spaghetti or linguine; chunky ragù or pesto cling to rigatoni, penne, or fusilli; thick, creamy sauces suit broad shapes like fettuccine or pappardelle. While pasta boils, finish the sauce in parallel; keep utensils handy–tongs, spoon, whisk–to move quickly. Handmade shapes make every bite feel more substantial.
In afternoon workshops, weve tested these kinds of sauces with others eager to learn, seeking quick meals; a review notes a fabulous lift in speed and flavor. The aromas are refreshing and welcomed at the table, and the feeling of accomplishment lasts beyond the meal. Printed tips accompany each session, and handmade techniques stay central to our cuisine; savor the moment as you build cooking confidence.