

 Rome 1-Hour Pasta Making Class – Learn to Make Fresh Pasta in 60 Minutes">
Make your بُوکنگ today for the Rome 1-Hour Pasta Making Class and start cooking in less than an hour. An expert instructor guides you through a very fast, hands-on routine so you can turn flour, eggs, and water into silky dough, then cut it into fresh pasta shapes you’ll be proud to serve.
Within 60 minutes, you’ll move from ingredients to finished strands, learning the essential ratios, using the بہترین list of steps, and a spritz of olive oil to finish. You’ll practice kneading, rolling, and cutting, then boil a small batch to taste right away, so you can appreciate the تخلیق as it happens and feel ready to recreate it later at home. What you learn will mean a quick dinner upgrade at home. During the session you will have hands-on practice throughout the class.
Whether you’re cooking with a خاندان of two or a group with ages spanning generations, this class keeps the pace friendly and clear. The ingredients stay simple and accessible, and the texture you reach is satisfying for everyone, from a خوش teenager to a خوش grandparent. The تخلیق becomes dinner with a quick sauce, plus a spritz of lemon to brighten the plate. We also acknowledge diverse traditions, including jewish home cooking, with adaptable options so guests can respect dietary needs without sacrificing flavor. Many guests have been amazed at how quickly the dough becomes delicate ribbons.
Arriving 10 minutes early to settle in and avoid waiting; your بُوکنگ includes all ingredients, aprons, and tools. The instructor demonstrates, and you’ll see how the dough prepares to yield silky sheets you can roll with confidence. If you’re lingering after class, you can compare sauces with fellow participants and plan your grocery list for a quick meal later at home.
What to Expect in a 60-Minute Private Pasta Class in Rome
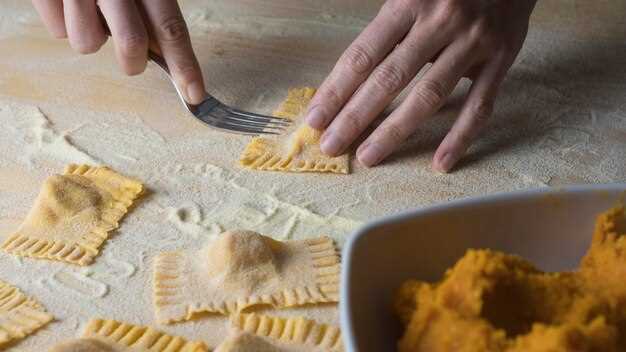
Start with the hands-on kneading and rolling; the 60-minute private class in Rome gives you direct pasta-making practice you can carry home. andrea leads the session from a warm terrace kitchen, where the guest experience feels friendly and vegetarian-friendly. insideat the compact setup, ingredients are prepared for speed and clarity, keeping the line of dough smooth and easy to manage. since the class is private, the pace takes focus without feeling rushed. this class takes 60 minutes to complete. dont worry if you miss a detail–the next step comes quickly.
By the end you learned a simple, reliable method for mixing flour and eggs into a soft dough, resting, then rolling to a silky thickness before cutting into ribbons. keep your foot flat to stabilize the dough when you roll. the teacher demonstrates options for tagliatelle or fettuccine, or a classic straight line cut, and you practice until the motion feels natural. the hands-on phase finishes with the dough cooked to al dente and tossed with a quick, responsive sauce. prepared mise en place and clear steps make it easy to recreate at home, and vegetarian-friendly options stay on the menu if you prefer. Your hands will feel involved and confident as you shape the pasta.
Private format means you wont share attention with another guest; the money needed for a focused session is well spent. Every guest can customize fillings to fit taste or dietary needs. The added tips are reviewed at the end, so you leave with practical, ready-to-use techniques. the terrace vibe keeps things warm and welcoming, and you’ll feel good about the results you can replicate. if you ever need adjustments for posture or foot comfort, tell the teacher and you’ll receive guidance to stay involved and keep the momentum going. the skill you gain from this experience will stay with you long after you leave Rome.
Dough fundamentals: flour quality, egg ratio, and hydration
Start with a concrete recommendation: use 100 g of finely milled 00 flour and 1 large egg (about 50 g). If it feels dry, add 1–2 teaspoons of water and knead until the dough forms a smooth, cohesive ball.
Two main points define flour quality: for silk sheets, choose 00 flour with protein roughly 9–12%. To add bite, mix 70% 00 with 30% durum semolina. Weigh flour by weight for accuracy, not cups, to keep hydration predictable.
Egg ratio and hydration: classic fresh pasta uses 1 large egg per 100 g flour; for richer dough, add a yolk or a second egg per 100 g flour. The dough should come together and be supple without being sticky; if sticky, add a pinch more flour or 1–2 tsp water. Rest the dough for 30–45 minutes, covered, so gluten relaxes. This means being mindful of hydration helps the dough stay forgiving during rolling.
Let the dough rest 30–45 minutes, covered, in a cosy afternoon or night session. This rest relaxes gluten and helps the dough roll out perfectly. If you want to compare, I highly recommend testing two hydration levels side by side; take a quick tour of your pantry to pick flour types and note what you prefer. This approach works anywhere, from countryside kitchens to city counters, and it sets your guiding points for the next batch. If you must pause, leave it covered and resume later. If you’re interested, run a second batch with a different flour to compare. If you want to taste, boil a tiny scrap to check doneness.
Roll to 0.2–0.4 mm, dust with only a light dusting of flour, and cut. Boil salted water 2–3 minutes until al dente, then toss with a splash of cooking water. For longer storage, dry sheets in a cool oven (60°C) for 15–20 minutes, then store covered. A finish with shaved truffle and a glass of prosecco heightens the night. If you want to optimize, last batch will benefit from a 10-minute rest before rolling. Fellow cooks can reuse the tips anywhere, from countryside kitchens to a cosy apartment, but avoid ghetto shortcuts and stick to quality ingredients. Leftover scraps fried briefly in a dry pan yield crispy edges that pair nicely with herb oil or butter.
Kneading and resting: achieving the right texture in minutes
Knead for 6–8 minutes by hand, then rest for 15 minutes to lock in the texture you want, giving you a good foundation for rolling and shaping.
Two practical dough paths keep you flexible in your plan:
- Egg-based dough (classic Italian): mix 100 g fine flour (00 preferred) with 1 large egg and a pinch of salt. Rest the mixture 10 minutes before kneading, then work until smooth. This yields a rich, chef-worthy base perfect for cacio sauces.
- Vegan dough (egg-free): combine 100 g fine flour with 70–80 ml warm water and 1 tsp olive oil. Knead until cohesive, then rest 15 minutes. This version stays tender and easy to roll in any location, such as by the marina or at home.
Kneading technique you can feel: push with the heel of your hand, fold back, rotate a quarter turn, and repeat, gradually backing off the force as the dough tightens. Stop when the dough is elastic, slightly tacky, and springs back to a light poke. If it sticks, add a pinch of flour and continue; if it tears, knead a bit longer and re-check the texture with a gentle pull.
Resting matters for texture and control. Cover with plastic wrap or a damp cloth and let it sit at a comfortable room temperature. In a dry location, 15 minutes suffices; in a warmer, more interactive kitchen, 20–30 minutes helps the grip calm down. Emphasizing a steady rest prevents tearing and makes your next steps smoother, whether you’re cooking for yourself, friends, or a small class.
Rolling and shaping quick guide:
- Divide dough into 4 pieces; keep the rest covered to avoid drying out.
- Flatten each piece with your palm to about 2 cm thick to ease feeding into a rolling setup.
- Roll using a pasta machine or a pin. Start on the thickest setting, then gradually thin to 1–2 mm for tagliatelle or sheets for lasagna-style shapes.
- Dust lightly with fine flour; avoid over-flouring to keep a good bite. If the dough sticks to the surface, wipe and re-flour sparingly.
- Rest the cut pasta briefly on a clean surface to relax before cooking or drying for later use.
Tips to stay on track: plan your workflow like a chef, keeping the main steps in sequence and avoiding rushing. If you were teaching this in a class, interactive feedback helps you adjust on the fly, and you’ll notice the dough responds differently by location and humidity. Time spent resting is time well spent, adding to the authentic Italian texture you want to enjoy with a simple sauce such as cacio, or olive oil and garlic.
Common issues and fixes: if the dough feels stiff, add 1–2 tablespoons of water (or a splash more oil for vegan dough) and knead until cohesive; if it’s too sticky, dust with a touch more flour and knead briefly. For those who want a quick check, the dough should pass a gentle windowpane test without tearing excessively, indicating enough gluten development to hold shape in sauce-rich dishes.
Whether you’re in a quiet kitchen or a bustling market location near a marina, these steps keep you on track and confident. The currency of your pasta-making session is momentum and texture, not speed. With consistent kneading and mindful resting, you’ll produce fine dough that holds its shape and offers authentic bite, letting you enjoy your own results and share with others in a good, interactive cooking plan.
Rolling and cutting: sheets, ribbons, and shaping variations
Begin by rolling freshly prepared dough to sheet thickness of 0.3–0.5 mm using a pasta machine on the widest setting, then gradually switch to thinner settings until the sheet feels almost translucent. This is the recipe for truly even sheets. Cooks with a pizza-making background will recognize the same dough-handling logic returning back to the basics.
Let the sheet rest 10–15 minutes to relax gluten, then re-roll to 0.5 mm for a silkier texture. Dust lightly with semolina or flour to prevent sticking, and keep the sheet even by rotating and turning. This prep sets you up for clean cuts and a satisfying result. This step is welcomed by beginners and experts alike.
For ribbons, cut with a machine or knife to 6–8 mm widths for fettuccine, about 8 mm for tagliatelle, and up to 25 mm for rustic pappardelle. A fluted cutter adds texture; a straight cut keeps edges clean. Totally consistent widths come from using a dedicated cutter set and practicing back-to-back cuts to build speed.
تغیرات کو تشکیل دینا: خشک کرنے کے لیے لمبی پٹیوں کو کنڈلیوں میں گھونسلے کی شکل دیں، بھرے پاستا کے فریموں کے لیے شیٹوں کو چھوٹے تکیوں میں موڑیں، یا ایک کلاسیکی پیشکش کے لیے پٹیوں کو چپٹا بچھائیں۔ ایک صابر ہاتھ یکساں تناؤ پیدا کرتا ہے اور ٹوٹ پھوٹ کو کم کرتا ہے، یہ ایک ایسی مہارت ہے جسے ماہر رہنما اجاگر کرتے ہیں۔.
چاہے کسی ہوٹل کے باورچی خانے میں ہو، کسی ٹاؤن اسٹوڈیو میں، یا کسی سیاحتی مقام پر، یہ طریقہ سستا رہتا ہے اور کسی بھی کرنسی میں قدر فراہم کرتا ہے۔ مراحل کے سیٹ آپ کو ہاتھ سے تجرباتی تکنیک سیکھنے میں خرچ کرنے دیتے ہیں، ایک ماہر کی رہنمائی میں جو صبر کے ساتھ وضاحت کرتا ہے۔ یہ آپ کو گھر واپس اعتماد کے ساتھ کھانا پکانے کے لیے تیار کرتا ہے، اور میٹھے کی جوڑی – ٹیرا مسو – کھانے کو مکمل کرتی ہے، ایک ڈیلا فیملی ترکیب جو مکمل طور پر جدید اور اطمینان بخش محسوس ہوتی ہے۔ شیڈول تبدیل ہونے کی صورت میں ایک واضح ریفنڈ پالیسی موجود ہے۔.
اُبالنا اور پکنا: وقت، نمک اور اَل ڈینٹے کی جانچ
تازہ پاستا ڈالنے کے بعد پانی کے دوبارہ اُبلنے کے لمحے سے وقت گننا شروع کریں۔ پانی میں کافی مقدار میں نمک ڈالیں - تقریباً 4 لیٹر میں 1 بڑا چمچ - تاکہ سمندر جیسا محلول بنے جو نشاستوں کو الگ رکھنے میں مدد دے اور ساس کو چپکنے دے۔.
تازہ پاستا عام طور پر اپنی شکل اور موٹائی کے لحاظ سے 1.5 سے 3 منٹ میں تیار ہو جاتا ہے۔ پتلی اشکال 1.5-2 منٹ کے قریب مکمل ہوتی ہیں۔ جبکہ موٹی شیٹس 2-3 منٹ کی طرف بڑھتی ہیں۔ تصدیق کے لیے ٹائمر اور چکھنے کے عمل کا استعمال کریں۔ وقت کی اہمیت ہے، لیکن ساخت حتمی جج کے طور پر کام کرتی ہے۔.
بائٹ ٹیسٹ کریں: چمٹے سے ایک تار کھینچیں، بیچ میں سے کاٹ لیں۔ اس میں ایک سخت بائٹ ہونی چاہیے اور کور میں چبانے کا ہلکا سا اشارہ ہونا چاہیے۔ اگر آپ کو بیچ میں ہلکا سفید کور نظر آئے تو 15-30 سیکنڈ مزید پکائیں۔.
ڈھلنے سے پہلے نشاستے والے پکوان کے پانی کی ایک چھینٹ بچا لیں۔ یہ پانی ساس کو ایملیسیفائی کرنے اور ضدی تاروں کو ڈھیلا کرنے میں مدد کرتا ہے۔ پاستا کو اس کی ساس کے ساتھ پین میں ڈالیں اور ختم کرنے کے لیے بچا ہوا تھوڑا سا پانی شامل کریں – بھاپ اور گرمی کے ذریعے، ساس ہر شکل کو لپیٹ لیتی ہے۔.
چاہے آپ گھر کے اندر کھانا پکائیں یا باورچی خانے کا فوری دورہ کریں، زیادہ پکنے سے بچنے کے لیے آخری منٹ تک برتن کو کھلا رکھیں اور آنچ تیز رکھیں۔ اگر آپ ہلکا سا ساس بنانے کا ارادہ رکھتے ہیں، تو اسے ال ڈینٹے پر ختم کریں اور کامل نرم کناروں کا انتظار کرنے کے بجائے چبانے کے لیے چکھیں۔.
ماریلی اور ماریلیز عملی تبدیلیاں بانٹتی ہیں: آخری مرحلے کے دوران ہر 2 منٹ میں ایک تار کو چکھیں، بائٹ چیک کریں، اور صرف پیکیج کے وقت پر انحصار نہ کریں۔ پیپے اور کچھ تازہ جڑی بوٹیاں ڈش کو ختم کرنے کے لیے تیار رکھیں تاکہ زیادہ لطف اٹھایا جا سکے۔.
نکالنے کے بعد، پکانے والے پانی کی تھوڑی مقدار محفوظ کر لیں اور اسے ساس میں ڈال کر ٹاس کریں۔ یہ کھلا، نشاستے والا مائع ساس کو دھاگوں کے درمیان چپکنے میں مدد کرتا ہے اور اسے آسانی سے ختم کرنے کے لیے تیار کرتا ہے۔.
روم کے 1 گھنٹے کے کورس میں، ٹیمیں ہر شکل کو فوری چٹنی کے ساتھ ملا سکتی ہیں- مخملی مکھن اور سیج سے لے کر روشن ٹماٹر کی چٹنی تک- تاکہ یہ تجربہ خوشگوار رہے اور آپ ایسے فوڈ پیئرنگ کے انتخاب کر سکیں جو آپ کے ذوق اور شیڈول کے مطابق ہوں۔.
نوٹ: یہ سیکشن ابلنے، پکنے اور ختم کرنے کے بارے میں ہے؛ یہ طبی مشورے کی جگہ نہیں لیتا۔ چاہے آپ سیپرو لیں یا نہیں، یہ گائیڈ پاستا اور ساس پر مرکوز رہتا ہے۔ تیرامیسو ایک ہلکے میٹھے کے طور پر برسوں کی مشق کے بعد ذائقوں کے ایک تازہ، انڈور دورے کو ختم کرنے کے لیے منتظر ہے۔.
ساوس کا جوڑا اور رفتار: تیز ساوس جو 60 منٹ کے پاستا کے لیے موزوں ہیں۔
اعلیٰ قسم کے اجزاء پر مبنی 6–8 منٹ میں تیار ہونے والا لہسن، لیموں اور زیتون کے تیل کا سوس بنائیں: 2 کھانے کے چمچ اضافی کنوار زیتون کا تیل، 2 باریک کٹی ہوئی لہسن کی کلیاں، ایک چٹکی لال مرچ کے فلیکس، 1 لیموں کا چھلکا اور رس، نمک اور کالی مرچ۔ 300-320 گرام پاستا (جیسے سپگیٹی، لِنگوئینی یا فِٹُٹشینی) کے ساتھ مِکس کریں جسے اَل ڈینٹے پکایا گیا ہو۔ یہ روشن بنیاد آپ کو بھاری پن کے بغیر تازگی سے لطف اندوز ہونے دیتی ہے۔.
ٹماٹر-تلسی فوری سوس (پومودورو): 1 کھانے کا چمچ زیتون کا تیل گرم کریں، 2 باریک کٹی ہوئی لہسن کی کلیاں 30 سیکنڈ تک بھونیں، 400 گرام ڈبہ بند کچلے ہوئے ٹماٹر، چٹکی بھر چینی، نمک، کالی مرچ ڈالیں؛ 8-10 منٹ تک ابالیں، تازہ تلسی کے پتے توڑ کر ڈالیں اور زیتون کے تیل کی بوندوں کے ساتھ ختم کریں۔ یہ تازگی بخش انتخاب لمبی شکلوں کے ساتھ اچھی طرح مل جاتا ہے؛ چپکنے میں مدد کے لیے پاستا کا پانی چھڑکیں۔.
پیسٹو منٹوں میں: 2 کپ تازہ تلسی کے پتے، 1/3 کپ پسی ہوئی پارمیسان، 1/4 کپ چلغوزے، 2 لہسن کے جوئے، 1/3 کپ زیتون کا تیل اور حسب ذائقہ نمک ڈال کر بلینڈ کریں۔ گرم پاستا میں ڈالیں اور اگر ضرورت ہو تو محفوظ شدہ پاستا کا پانی تھوڑا سا شامل کریں۔ چھپے ہوئے نسخے کے کارڈ ورکشاپس میں اقدامات کو دہرانے میں آپ کی مدد کرتے ہیں۔ ہاتھ سے بنایا ہوا پیسٹو جلدی میں بنائے جانے والے ہفتے کے رات کے کھانوں کو مزید لذیذ بنا دیتا ہے۔.
ملائی والا آپشن اور ڈیری فری متبادل: 2 کھانے کے چمچ مکھن پگھلائیں، 1/2 کپ کریم اور 1/2 کپ پسی ہوئی پرمیسن ڈال کر ہموار ہونے تک پھینٹیں؛ پاستا کا پانی اور نمک ڈال کر حسبِ ضرورت کریں۔ ڈیری سے عدم برداشت کی صورت میں، کاجو کریم یا سلکن ٹوفو اور لیموں کا رس شامل کریں۔ یہ سوس تقریباً 6-7 منٹ میں تیار ہو جاتی ہے اور 60 منٹ کی رفتار برقرار رہتی ہے۔.
بولونیا سے متاثر فوری رگُ: 150 گرام قیمہ کو 1 باریک کٹی پیاز کے ساتھ بھونیں، 1 کھانے کا چمچ ٹماٹو پیسٹ ڈالیں، تھوڑی سی سرخ شراب، اور ذائقے کے لیے تھوڑی سی بیئر ڈالیں؛ 6-8 منٹ تک پکائیں، پھر پاستا کے ساتھ ملائیں۔ بولونیا کا یہ انداز بتاتا ہے کہ گوشت کے ساس کتنی جلدی تیار کیے جا سکتے ہیں؛ ਇਹ ٹیگلیٹیل یا پاپارڈیل کے ساتھ بہترین ذائقہ دیتا ہے۔.
شکلوں اور رفتار کے لحاظ سے جوڑا بنانا: تیل پر مبنی یا ٹماٹر کے ساس کو سپگیٹی یا لنگوینی کے ساتھ ملائیں؛ رگٹونی، پینے، یا فوسیلی سے موٹے راگو یا پستو چمٹ جاتے ہیں؛ گاڑھا، کریمی ساس وسیع شکلوں جیسے فیتوچینی یا پاپارڈیل کے لیے موزوں ہیں۔ جب تک پاستا ابلتا ہے، ساس کو متوازی طور پر تیار کریں؛ برتنوں کو آسانی سے دستیاب رکھیں – چمٹا، چمچ، وسک – تاکہ تیزی سے حرکت کی جا سکے۔ ہاتھ سے بنی شکلیں ہر لقمے کو زیادہ ٹھوس محسوس کراتی ہیں۔.
دوپہر کی ورکشاپوں میں، ہم نے ان قسم کے ساسز کو سیکھنے کے خواہشمند دیگر افراد کے ساتھ آزمایا ہے، جو فوری کھانے کے خواہاں ہیں؛ ایک جائزہ میں رفتار اور ذائقہ میں زبردست اضافہ درج ہے۔ خوشبوئیں فرحت بخش اور میز پر خوش آمدید کہتی ہیں، اور تکمیل کا احساس کھانے کے بعد بھی قائم رہتا ہے۔ ہر سیشن کے ساتھ چھپی ہوئی تجاویز ہوتی ہیں، اور دستکاری کی تکنیکیں ہمارے کھانے میں مرکزی حیثیت رکھتی ہیں۔ کھانا پکانے کا اعتماد پیدا کرتے ہوئے اس لمحے سے لطف اٹھائیں۔.