

 帆船入门基础课程 - 自信扬帆起航">
Choose a concrete starter option: a two-hour horas package from local recreational sailing schools that includes a compact sailboat, a smart card for progress tracking, life jackets, and a concise safety briefing. The provided instruction covers wind awareness and basic handling, so youll have a clear plan for your first practice on the water.
On the water, the equipment setup stays simple and accesible. The provided life jackets and a 更大 sailboat keep handling manageable for beginners. Youll practice angle of attack, basic trims, sail shapes, and steering to build a solid foundation for recreational sailing.
saborea the moment as you gain confidence: youll move from gentle maneuvering to steady steering in light wind, with a friendly coach who tailors tips to your pace. A package approach may include multiple sessions and a compact sailboat you can reuse for the next class. Youll start recognizing wind shifts and respond quickly.
Reserve a slot that fits your schedule: many clubs offer open times throughout the week, and you can rack up horas fast with focused practice. If you crave a simple plan, choose a package that covers several sessions, a basic card with progress milestones, and the chance to sail on a sailboat that’s bigger than a trainer. This setup keeps the experience accesible and recreational, enabling new sailors to build confidence on the water.
Foundational Skills for New Sailors: Safe, Practical Steps to Start

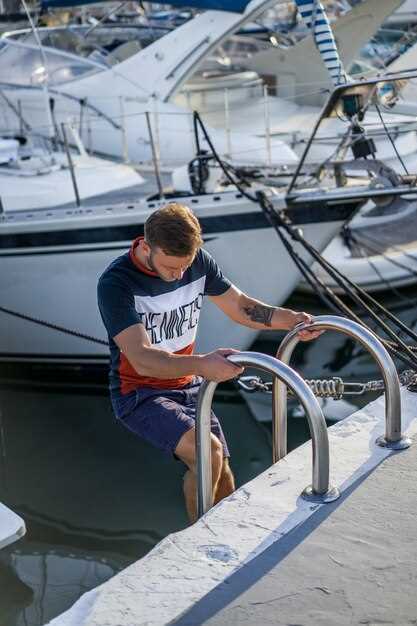
Start with a 15-minute safety check and gear confirmation before every session. Verify everyone wears a properly fitted PFD, secure loose lines, test the whistle on your life jacket, and confirm a plan to return to shore if conditions shift.
Master two simple knots: bowline and figure-eight, and practice a basic cleat hitch. These keep lines secure and make adjustments quick and predictable.
For beginners, practice tacking and gybing in light wind across a small open area. Do five cycles per session, with a partner at the helm to guide and remind about headroom, hand position, and sail trim.
Balance and trim: keep your weight centered, knees slightly bent, and hands relaxed on the tiller. Maintain smooth sheet control and clear communication with your crew to avoid sudden movements.
Safety drills: perform a self-rescue drill and practice returning aboard in calm water. If you fall overboard, re-board with the boat on a safe tack and use a PFD. Repeat until you feel confident handling real scenarios, ever ready to respond.
Choose practice spots with calm confines: a lake or reservoir with open water, surrounded by natural features like mountains. Start near shore and gradually move to larger water as your skills grow; keep an eye on light conditions and wind shifts; always have a shore-by plan and a buddy.
Record progress. Beginners can keep a simple log: date, wind, course, and horas of practice. Use it to identify patterns and set small milestones–like a five-minute sustained tack on a single point of sail, and note adjustments to sail trim.
For families and beginners, pair practice with short explorations of nearby lugares. A great session can end at crystal-clear lake locations surrounded by mountains, with duración of daylight to review what you learned. If you visit viennas, you can explore maria sites such as karlskirche, and enjoy a teatro or chino stop for a cultural break–descubra new ideas and their children will see how safety and skill connect with everyday life. Their confidence will grow as you are offering safe tasks and maintain a calm, open atmosphere that invites more practice and larger challenges.
Choosing a Beginner-Friendly Boat and Rig
Choose a 14–16 ft dinghy with a simple fractional-sail rig and a wide, stable beam; this setup delivers quick confidence gains and forgiving handling in light to moderate winds. The boat should feel like an emperor–steady, predictable, and easy to steer, with crystal-clear feedback from every maneuver.
Look for a hull with a soft turn of speed, a broad cockpit, and a centerboard that moves freely; a larger cockpit helps with coaching a learner, and bins to store lines, snacks, and safety gear keep the deck tidy.
Rig options: start with a two-sail rig (mainsail + jib) or a simple fractional mainsail with a small jib; this gives solid control for beginners and easier reefing. Weigh the pros and fines of each setup against your preferencias for stability versus speed.
Before you commit to renting or buying, run a pre-tour check: inspect halyards, the mast step, standing rigging, rudder, and sail condition; verify the centerboard moves freely and can be reefed quickly. Ensure you can reduce sail in minutes so you stay in control at your learning spot.
Packing matters: build a ready kit with crystal-clear safety briefings, snacks, water, sunscreen, and a small repair kit. Use bins to organize spare parts and tools so the deck stays tidy. Follow safety rules and maintain a calm attitude on the water.
Booking tips: reserve a test sail to evaluate handling and comfort. If you plan to sail solo, ask about bareboat options and whether instructor support is included. Use tarjeta to pay and keep entradas receipts for charges; consider estaciones when planning trips to align with favorable winds.
Language and culture: in francophone areas, learn a few français phrases to ask for wind updates, dock help, or local seaworthy tips. If your plan includes a visit to a weltmuseum, look for arquitectónicas hull features that influence buoyancy and stability, which can inform your next practice session. Note your preferencias for a marina route that stays within calm estaciones for safer initial days.
Learning mindset: start at a safe spot where wind and current are predictable, then gradually test larger sails as confidence builds. Reserve regular practice times, and keep the focus on control, balance, and smooth trim rather than speed.
Ropework, Knots, and Simple Rigging You Need
Begin every practice with three knots: bowline, figure-eight on a bight, and clove hitch, tied on a supplied line about 5–7 meters long. This trio covers the tasks you need on deck: securing fenders, tying to a cleat, and fastening a painter. Practice at distances from the anchor point: 1–2 meters, then 3, then 5, to build control under wind and movement. Keep tails long and check each knot after a gust; the correct setup is a perfect start for safe handling ever on the water.
Bowline creates a loop that stays open under load but won’t slip once tightened. To tie: form a small loop, bring the working end up through the loop, wrap around the standing part, and back down through the loop, then pull tight. Practice with a spare line until you can repeat the motion without looking. This knot works well for a masthead halyard or a stern line you need to grab quickly, and maria keeps a log of fixes to improve every time.
Figure-eight on a bight acts as a stopper and a secure bend for halyards or anchor lines. Tie a simple figure-eight, then pass a bight through to create a non-slip loop. It holds under load and unties readily after you release pressure. Use it when you need a dependable anchor point or to join two lines for a longer length when access is limited on a small deck; saborea the moment as you practice near bosques or by a sheltered island, with southerly breezes testing the knot’s grip upon movement.
Clove hitch offers fast, adjustable attachment to rails, posts, or cleats. Wrap around the object twice, pass the working end under the last turn, and snug. For extra security, add a half-hitch on the standing part. Practice tying it at different distances from the post to see how tightness shifts with deck movement and wind. It shines when you need a temporary tie-in during a self-guided sail or on a calm island, where the kind of rigging you choose matters as much as the breeze. Remember to keep the line supplied and ready, so you can move from one spot to another with confidence, using tips you can share with them on your next session when access to the water is smooth and transporte options are clear.
Rigging basics you will use often include the halyard, sheet, and painter. Mark each line, keep a compact toolkit aboard, and replace worn rope promptly; never rely on a frayed line. Upon returning to shore, review the setup and note improvements. If you plan viajes, saborea the moment and plan a brief practice by the water near viena, visiting karlskirche and hofburg as a self-guided pause. Maria notes the tweaks that yield the cleanest pulls, and you’ll notice safer handling with distance between lines and hands. When you prep for practice, ensure access to harbor rules; not paying attention can incur fines. A well-packed kit and a spare line keep your crew safe, with tips you can share with them on your next session, and a clear path to take transporte to your next practice site with confidence and calm. This approach helps you stay safe, self-guided, and prepared for the next outing, no matter the weather or harbor conditions, and it gives you practical, concrete results you can apply tomorrow.
Understanding Wind, Tacking, and Points of Sail
Start with a controlled tack in light winds to learn wind awareness and boat balance. This bienvenida to practical tips that work on these waters; first, scan wind direction, then set a modest heading for your tack and keep the sail trimmed. This kind of practice builds calm confidence and helps you feel the boat respond at the start of every maneuver.
Think in terms of four main points of sail. Close-hauled keeps you about 45 degrees to the wind; a beam reach is roughly 90 degrees; a broad reach around 135; running is 180 degrees with wind coming from behind. Move between these with small course changes while keeping the boat flat and the sails balanced. For a boater, this awareness underpins safe handling in international waters and when you charter a boat.
To tack, turn the bow through the wind, switch the sails, and trim them for the new course. As you pass through the wind, ease the main and jib on the new tack and hold a steady tiller input to keep the track true. Have them on deck or the helm, and keep the boat well balanced. Under load, maintain a smooth helm to reduce lurching and keep the boat feeling responsive.
Gear and planning matter. Wear a windbreaker in cooler weather; keep a PFD within reach. For international trips or a short charter day, review markers and local rules before you go; also bring a small book of tips and a quick reference card about the four points of sail. Also plan a cultural stop: a museum visit, such as weltmuseum, or a lake visit near mattsee. If you see fish surface, you know you are in good waters. Adventure awaits as you practice; after a session, consider a teatro performance or a concert by Vivaldi, or read about Sisi in a quick guide.
After a few sessions, you will read wind shifts more quickly and pick the right point of sail without overcorrecting. Use the mainsail and runners to keep lines tidy, and rehearse each tack from both directions until the motion feels natural. This show of skill boosts confidence, and you will respect the wind more with every outing.
Safety Procedures: Launch, Be Safe, and Self-Rescue Basics
Launch only after checking the weather and wearing a PFD. Use a designated launch place and have a witness nearby; participate in a brief safety check with your crew before every recreational trip.
- Pre-launch readiness
- Weather and water: check forecast, wind direction, and wave height. For beginners, target wind under 15 mph (13 knots) and waves under 0.5 m. Note histórico tides and currents if applicable; plan your course to stay within a safe distance from shore. Watch mountains on the horizon for changing wind shadows and gusts that can affect your craft.
- Gear and storage: inspect the boat and rigging; store spare parts and a bailer in bins; ensure one PFD per person and a whistle; keep a spare paddle accessible. Keep items organized so youll find what you need quickly.
- People and plan: ensure licensed skipper or supervising adult is on board; assign roles; reserve a clear route that keeps you in a designated area near the shore; discuss contingencies if conditions shift.
- Area and environment: choose a pleasant, sheltered place for launch; mark a safe boundary and set a meet-up point in case you need help; confirm weather with a witness before you head out.
- 启动和水上安全
- 登船:让船头顶风或顶流从码头靠近;保持身体重心,利用三个支撑点上船。.
- 水上技巧:根据航向调整风帆;保持稳定速度;观察波浪和其他船只;与河岸和岩石保持安全距离。.
- 沟通和监督:使用哨子来警示他人;告诉你的见证人你的计划、位置和预计返回时间;保持信息畅通,以便参与保持协调。.
- 自救基础知识
- 落水:保持冷静,将面部露出水面,并发出求救信号;如果可以,抓住系缆或船只以保持连接。.
- 重新登船:调整船只位置,使船头顶风,转动到船体上,然后从下风侧滑回船上;固定绳索并移动到稳定位置。.
- 独自安全:如果您无法重新进入,请漂浮并呼喊求助;在您的预留距离内游到指定的安全区域,并等待救援。您将用救生衣保持漂浮,并保持绳索易于取用。.
- 行程总结
- 固定装备:如有需要,冲洗后晾干,放入箱中存放;记录任何需要维修的问题;犒劳自己一下,享受saborea时刻(小吃或饮料),庆祝努力的成果。.
- 回顾与练习:讨论哪些方面做得好,哪些方面需要改进;为下次休闲旅行计划几次安全演习;如果时间允许,可以考虑快速参观一下世界博物馆或附近的世外桃源,以负责任的方式庆祝。.
年龄限制:监护、未成年人及课程访问权限
在报名之前,务必向帆船学校核实最低年龄和监护要求。对于未成年人,大多数项目要求父母或监护人在码头上、该区域内以及视线范围内陪同上课。如果您的孩子未满 12 岁,请注意会有监督设置和强制性弃权声明;一些俱乐部和学校提供家长支持的课程,以确保体验安全而有趣。目前,许多项目都提供德语材料,以帮助家庭了解安全规则和期望。.
年龄较大的青少年在通过安全检查后可以单独参加,但年龄较小的儿童通常需要持续的监督。许多地区的标准政策是,监督成人需在码头或学习区域附近,随时准备在过渡期间提供协助。如果无法安排监督,请考虑预订玛丽亚的私人或半私人课程,她会亲切地协调替代方案并帮助您找到合适的时间。.
无障碍性很重要。 确保学习区域无障碍,并且从停车场到船只的路径对于婴儿车或轮椅是安全的。 在碧绿水域附近的岛屿上,许多项目营造出一种适合初学者的氛围,感觉就像天堂。 附近的场地可能包括博物馆或世界博物馆,提供多种时间选择。 现场商店通常备有零食和装备,因此您可以轻松找到所需物品。 着装要求包括非高跟鞋; 选择跑鞋或防水鞋,以确保在甲板上的安全。.
实际步骤包括携带所需表格和签署的弃权声明;检查是否有迟到取消或缺席课程的罚款或费用。如果您寻求灵活性,请询问不同的课程时长以及最适合的年龄段。需要指导吗?玛丽亚和她的团队可以帮助您选择符合您孩子水平和家庭日程的课程。如果您正在游览茨维塞尔或附近地区,请计划一天,包括参观博物馆、观看剧院表演以及进行一次轻松的练习;带着明确的期望,让您的年轻水手安全起航,全身心投入到这次体验中。请在第一节课之前确认任何语言需求或家长参与偏好。.