


Begin with four trips to switzerland during the cold season, and lock in four non-refundable tickets for a 4-13 day window. This approach concentrates sightings, reduces last-minute changes, and ensures a stable transportation plan. Use a trottibike for quick moves between tower viewpoints and river venues, and map your route to maximize dawn and dusk activity that yields the richest sightings. Also check that your ticket remains valid for the entire window.
procedures for planning include checking weather forecasts, securing validity windows for your ticket, and paying cash when possible. This plan also accounts for potential delays. Plan a steady itinerary with a clear story of locations; estimate the number of sightings you expect and build in backups. Also align transportation options so you stay within safe speeds.
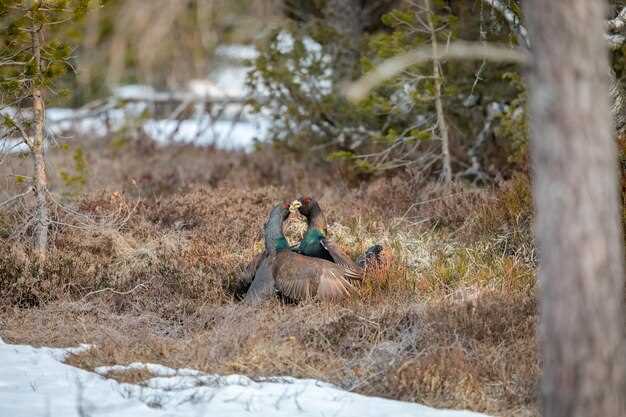
Choose vantage points such as a high tower and riverside decks to catch flying fauna and ground activity. Being mindful of distance helps minimize disturbance and preserves natural behavior. Meet at a full dawn for the best light, where the golden glow on fur and feathers enhances color. Move slowly, staying within your trails and minimizing disturbance to beings you observe.
In terms of location, your base is switzerland with a mix of alpine villages and valley routes. Target four to five sightings sites and keep a log of full day sequences. Use transportation to minimize fatigue; this reduces risk of missing reactions from fauna. Book a ticket and confirm you can access remote trails into the valleys using public or local transportation.
Some participants are unable to commit fully; being flexible helps you adjust, so avoid non-refundable options and choose plans with a clear cancellation policy. For the ones who join, keep a running story of sightings to share with peers. Include notes about the validity of permits and links to local vendors accepting cash.
Prepare a simple practical checklist: four-season layers, a compact lens kit, a lightweight tripod, and a weatherproof bag. This plan helps you stay steady while you count sightings, and you can reroute quickly if terrain changes. Your trottibike setup should include a spare battery and a small kit to repair tires, enabling you to cover speeds of travel and make quick stops at vantage points. Finally, document your story with concise captions to build a robust archive into the shared pool for travel ones and fellow enthusiasts.
Riding the Mountain Cart: Best Routes for Snowy Wildlife Encounters
Recommendation: Start with the oberland loop and secure prior reservations; arrive at the lodge 15 minutes before departure; the driver will provide a route flyer and a brief safety brief, then you’ll begin the ascent with steady speeds and a clear stop at the first bridge.
Route 1: Oberland Ridge Circuit runs 9-11 km, with a two-hour to three-hour window depending on stops. The climb beyond the bort point delivers focused encounters with roaming clients of the high country; the on-board ecology notes explain how snow cover shapes food webs and movement. Speeds stay in a controlled 4-13 km/h range, and every ride includes calm pauses at lookout bridges to observe from safe vantage points. Walks at designated pullouts let you compare tracks, while the coach explains animal behavior and seasonal shifts.
Route 2: Lake-View Passage skirts a frozen lake for 6-9 km, then climbs to a sheltered overlook where you can listen for distant calls and watch for tracks along the shore. The driver guides short walks to safe vantage sites and provides a concise pass with route notes; a brief stop near the lake allows you to photograph and note echoing sounds in the frost. Prior reservations ensure there is full access to carts and a smooth blend of mobility and observation; if canceled for weather, the system slots you into a later date with no loss of value, while no-shows are charged.
Route 3: Mountain Crest Trail offers 7-9 km of varied terrain through stands that hold winter light well. You’ll pass a scenic bridge and glide along pine corridors where fox tracks and ptarmigan footprints appear after fresh snowfall. The driver maintains steady cadence to maximize viewing chances; there are short walks to widen sightlines toward distant ridges, and the site provides a compact guide to flora and fauna ecology. Reservations keep loads balanced throughout the day; if a session is canceled, you’ll receive a full reroute option to another time, and you can enjoy more experiences on a different day.
Winter Gear Checklist: Camera, Batteries, Lenses, and Insulation
Pick a weather-sealed, compact mirrorless body with fast AF and solid high-ISO performance, pair it with a versatile zoom around 24–105mm and a longer tele like 70–200mm or 100–400mm, and carry two high-capacity batteries plus a compact charger.
- Weather-sealed body with reliable autofocus in low light
- Two spare batteries; keep one warm in an inner pocket to extend life
- Compact charger and a USB-C power bank for on-site topping up
- Two lenses: standard zoom (roughly 24–105mm) and tele (70–200mm or 100–400mm)
- Two memory cards of different speeds; assign a dedicated case, keep them separate
- Lightweight tripod or monopod with a small ball head for steady framing
- Lens cleaning kit: microfiber cloth, blower, and a silica gel pouch
- Waterproof rain cover for your pack and moisture-absorbing pouches
- Two base layers plus mid-layer fleece and a windproof, insulated shell for comfort
- Gloves with tactile fingertips or convertible mittens to maintain dexterity
- Warm hat, thermal socks, and sturdy boots with good traction for icy surfaces
- Hand warmers and foot warmers as needed; keep them in reachable pockets
- Packable towel and spare lens wipes; keep a dry bag inside for damp gear
- Room in your bag for a compact rain cover and a small first-aid kit
Power and care
- Charge everything before travel, and plan to charge mid-day if you have a warm place to reconnect
- Keep spare batteries in an inner layer; cold drains are slower when tucked close to your body
- Avoid rapid transitions between cold and heated spaces; use a dry pouch to acclimate gear
- Use a small station or locker at the facility for changes between trail and vehicle breaks
Insulation and on-site workflow
- Base layers of merino or synthetic fabric; mid-layer fleece for insulation
- Outer shell with wind and water resistance; ensure seams are taped for snow exposure
- Fingerless or touchscreen-compatible gloves for quick focus adjustments
- Camera bag with a dedicated insulated pocket; keep the bag off the ground on damp days
- Attach a lens hood and use a lens coat on longer lenses to reduce wind chill impact
- Keep a small towel handy to wipe condensation from viewfinder or LCD when moving between warm rooms and the outdoors
Here, travel planning around schynige and other park trails includes pre-dawn arrivals and times that align with soft light; these facilities offers shelter, charging points, and warm spaces for quick regrouping at altitude. October conditions at high stations can shift quickly, so understanding these variables helps you stay in control when you encounter natural, diverse subjects near your station or on nearby trails. The weather lottery around the valley can cancel plans, so carry a compact, ready setup and be prepared to adapt using your backup gear and warm layers.
Focusing Fast: Lens Choices and Settings for Snowy Action Shots
Recommendation: lock in a versatile tele kit with fast AF; three core configurations cover alpine terrain: 70–200mm for contextual frames near the window, 300–600mm for distant movement, and a dedicated 600mm prime for tight portraits. Choose weather-sealed glass with a reliable focus motor to stay in focus as subjects move there and around you.
Settings: shutter speed 1/1000–1/2000 s; ISO 400–3200; aperture f/4–7.1; enable Auto ISO with a minimum shutter of 1/1000 s and RAW capture; balance speed and depth to preserve texture in snow and fur.
AF and tracking: use AF-C, back-button focus, and dynamic tracking with a low sensitivity; set a focus limiter around 5–20 m to reduce changes in framing as subjects cross ridgelines; bracket a couple of frames at different exposures to guard against white highlights; most reliable results come from steady panning along known routes, accounting for changes in light.
Exposure and metering: snow brightens the scene; meter with evaluative metering; use exposure compensation +0.3 to +1.0 EV; check histogram to avoid clipping in highlights or crushing shadows; if the sky dominates, fine-tune WB and compensation; consider a gray card to validate white balance when light shifts; validity matters for long sessions.
Gear and planning: pack spare batteries, high-speed cards, microfiber cloth, and a lens hood; use a monopod for balance with large glass and long walks; include breakfast and a thermos to stay alert during long waits; in the Oberland region, rides up to vantage points lead to mammoth panoramic frames; there is a golden window at dawn or dusk. For bookings, choose refundable reservations and verify a clear refund policy; some trips use third-party operators with a number of payments required. Check the validity of deposits and the refund terms. John from the guide team notes the value of timing, and a reliable Tissot watch helps track the minute changes at first light; spent hours on exposed trails demand proper balance between pace and patience; never miss the window to shoot from the station or on the walks around the trailhead; a lucky lottery of moments may occur, so be ready to switch lenses and ride the change in light. Always choose the best vantage, organize three routes, and ensure every detail aligns with your itinerary.
Composition Tricks: Framing Creatures with Alpine Backdrops
First, frame the subject against a clean alpine backdrop. Place the creature about one-third from the edge to follow the rule of thirds, and use natural frames–pine branches, rock openings, or fence lines–to add depth. Shoot from eye level for connection, then climb lookouts above the village to gain a grand vantage of peaks and ridges. In the Oberland, altitude yields dramatic scale with the Jungfrau massif visible in the distance. During a photographer workshop, make three to five variations on the same site and compare results on the LCD, including different foregrounds and focal lengths. Plan your dates and breakfast stops at a local shop to keep energy steady; if you join a company-led trip, confirm the policy and whether refunds are available. Avoid third-party tickets with vague terms; opt for a clear, non-refundable option if you trust the operator. Until you practice, you’ll refine your timing and composition, and your images will feel closer to authentic classics. Marmots and other creatures often pause near lookouts, so keep ready fast glass and a faithful focus on the eyes. If camping is part of the itinerary, select a campsite close to the site with a known facility and short walk to a grand vantage. A well-timed shot can feature a distant village and cloud shadows drifting above the ridges, with a Tissot-branded watch on your wrist for a subtle sense of place; local cafés accept cash and can become useful anchors during early-morning shoots in the valley. Photographer guidance during the breakfast window, including the chance to review frames, can sharpen your craft until you’re fluent in the classics of alpine framing.
Camera Setups and Framing Techniques
Use a telephoto range (200–600 mm) to compress mountains behind the subject, and switch between true eye-level and elevated vantage points to reveal depth. Set shutter speeds from 1/1250 to 1/3200 s when subjects are active, and use apertures around f/7.1–f/8 to keep the subject sharp while maintaining a soft background. Enable continuous AF with back-button focusing and consider burst mode to capture fleeting expressions; bracket if the lighting shifts behind clouds. Keep lookouts in the frame by inviting a portion of the foreground (branches or rock) to lead the eye toward the animal, and vary your distance to test intimacy versus scale. When birds fly through the scene, time the capture for their passing moment and adjust focus accordingly to avoid losing the subject in motion.
Site Planning and Logistics
Dates should align with a clear window for altitude visibility; in many cases a grand vantage can be found near a village hub in the Oberland region, with Jungfrau in view. If you’re camping, select a site close to facilities and with easy access to lookout trails, noting that certain tickets are non-refundable and last-minute changes may be restricted by the policy. For train or transport, check ticket options ahead of time; third-party arrangements can be convenient but verify cancellation terms and whether a cash deposit is required. In a typical program, you’ll visit a shop to stock essentials, including snacks that fuel dawn shoots, and you’ll meet the photographer-led group at the designated site each morning. Breakfast breaks help reset attention and keep energy high for long hours of work in high altitude. The plan often includes a few classic routes around the village, with opportunities to shoot Marmots at close range, tucked near rock ledges or grassy pockets that hold their line of sight. The dates and site choices are made to maximise light, so arrive early, aim for a faithful interpretation of the landscape, and respect the local policy about wildlife distances and camping boundaries.
| Aspect | Practice Tip | Notes |
|---|---|---|
| Vantage | Begin at eye level, then test lookouts above the village for scale | Altitude affects depth; Jungfrau visible in clear weather |
| Framing | Use natural frames (branches, rock openings) to guide attention | Foreground adds depth; avoid clutter |
| Settings | Shutter 1/1250–1/3200 s, Aperture f/7.1–f/8, ISO 200–800 | Bracket when lighting shifts |
| Logistics | Dates, breakfast stops, and tickets; prefer transparent policy and non-refundable options | Third-party terms should be clear |
| Subjects | Marmots and birds; stay ready for moments at close range | Move slowly; avoid startling wildlife |
On-Trail Safety, Comfort, and Etiquette with Wildlife and Fellow Riders
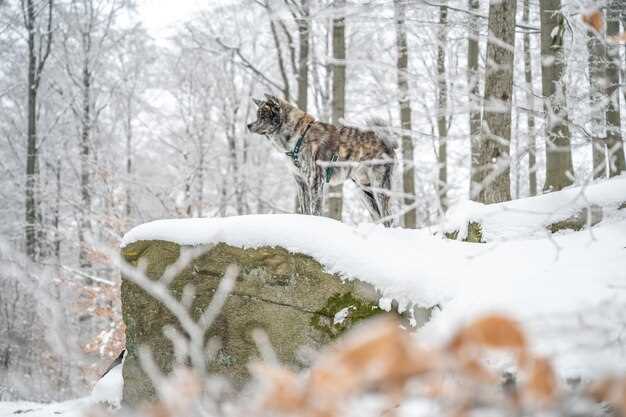
Always keep at least 100 meters from wolves and other wildlife; never approach, feed, or block their path. Use a telephoto lens to photograph from a safe distance, with natural behavior preserved and enabling authentic experiences of the landscape through a snow-covered backdrop. Plan an adventure through variable conditions, and pack extra days for potential cancellations or access changes.
Respect other riders by yielding to uphill traffic and maintaining a single-file line on narrow sections; step aside at widened spots to let others pass. When stopping for views or gear checks, announce your intent with a clear here signal so the group can coordinate without startling wildlife or creating congestion.
Dress in layered, moisture-wicking systems with a wind shell; bring traction aids for icy segments. Carry snacks and water, monitor altitude effects, and pace yourself on climbs into higher passes to avoid fatigue. For camping or longer forays, store food securely and keep scents away from campsites to prevent attracting visitors. This approach also supports recreation value.
Gear and etiquette for exploring high-alpine terrain: stay above sensitive ground cover, respect wildlife signs, and return to marked paths if you encounter disturbances. Keep the group compact, avoid loud movements, and note that birds may be flying above; pass carefully near bald rocky outcrops to minimize impact on animals nearby.
Booking reminders: prior to departure, verify details, including ticket times and any cancellations policy. Coordinate with guides john from the jungfrau shop to arrange gear and timepieces such as a canon camera or a tissot watch. For customers seeking authentic experiences and classics, plan a morning hike or a drive through ridges for steady light. Just being mindful of weather shifts and carry extra snacks.
Tour Inclusions, Upgrades, and Post-Trip Photo Delivery
Book the 4-13 day trips with cabins or a room, include parking passes, and request a professional guide. This setup boosts chances to photograph coyotes, moose, and deer around yellowstone, with smooth getting around via scheduled shuttle transfers from meeting point to trailheads.
Inclusions cover lodging in cabins or a room, day-use parking near the base, and a concise briefing with the guide each evening. They offer workshops on framing, exposure, and post-processing to help you maximize images along the trail.
Upgrades include a private shuttle for early starts, mountain-view cabins, and a larger room option. A chico pickup can be added, while parking logistics are handled on site, and you gain priority access to trails during peak hours.
Post-trip delivery comes via a secure file link, with high-resolution images ready for download. Turnaround typically runs 3-5 days after the final day, and you’ll receive a private profile gallery for convenient viewing and sharing.
Payment is by debit on file, with a 20% non-refundable deposit to confirm reservations. The program keeps a profile for each guest to tailor the pace around their experience, ensuring it fits anyone from first-timers to seasoned shooters.
All trips include check-in with the guide, support from our team, and day-use coordination around parking and trail access. The experience centers on encounters with animals such as coyotes, moose, and deer around yellowstone, with images delivered for personal use and portfolio sharing.