

 A Real Italian Pizza-Making Class – Learn Hands-On Neapolitan Pizza in Italy">

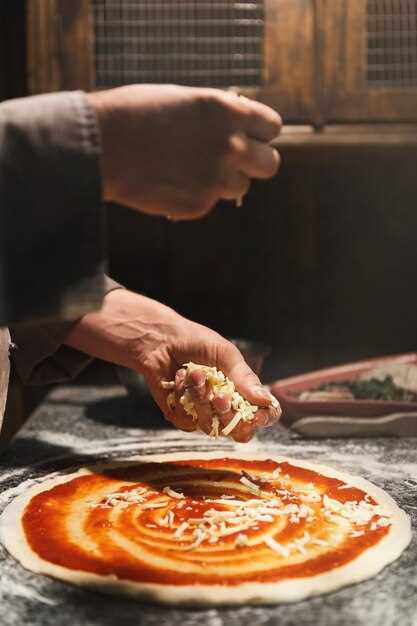
Book a hands-on Neapolitan class with a family-run kitchen for your best start. For a reliable starting point, this choice delivers direct practice with local instructors, so youd gain confidence shaping dough, spreading tomatoes and tomato sauce, and blistering the crust in a wood-fired oven.
Whether you are a beginner or returning student, the course keeps the focus on core dough handling, tomato sauce, and the smooth workflow from shaping to baking, with immediate feedback during each hands-on exercise.
Most sessions run over two or three days with easy access to well-equipped kitchens, and the ingredients come fresh from local farms, including ripe tomatoes. You’ll see delicious results in every dish, from the bright tomato sauce to the glossy crust, with ongoing support from the instructor and a clear plan for practice at home after class.
Access is designed around needs of families and travelers, with language options and years of experience behind the method. Over the years, the program has welcomed 41menglish-speaking guests, and the focus stays on authentic flavor so you can recreate the same dishes for your family.
Pizza Masterclass in Naples: Hands-On Neapolitan Baking with Dinner
private, small-group experience in Naples delivers authentic, hands-on Neapolitan baking with dinner included. youre guided by an instructor who provides personal feedback as you manage dough, shape pizzas, and operate the wood-fired oven. the three-hour session concludes with a dinner service featuring fresh tomato toppings and a homemade dessert lineup, including tiramisu. the experience emphasizes sistine-level attention to detail and world-class service, with focused dough management, time, and water balance for adult participants.
What you learn and do:
- Hands-on baking: stretch dough, form the cornicione, and bake in a wood-fired oven under the instructor’s watch.
- Skills practiced: dough management, fermentation timing, and oven management to produce the most blistered crust.
- Flavors: tomato-based sauce, basil, and mozzarella handling to capture the iconic Neapolitan profile.
- Dinner: enjoy pizzas you baked, plus a private dessert course featuring tiramisu and seasonal sweets.
- Included: dough kit, ingredients, water for shaping, and a small tasting plate to close the evening.
- Group size: small, with personal attention; private options available to tailor the experience for adult guests.
- Specialty: authentic Neapolitan technique and the art of blistered crust.
- excursion1 option: after class, a short private excursion to the historic center for a roman architectural vibe and sistine-inspired arts atmosphere nearby.
- sistine: attention to plating and presentation that echoes masterworks.
- roman influences appear in the toppings and plating, connecting Naples with ancient roman culinary ideas.
- what you gain: practical skills you can apply at home, plus memories of a world-class evening in Naples.
- Time management is emphasized to keep the class engaging and within the schedule.
Concludes with practical tips you can reuse: maintain dough hydration, manage kitchen humidity, and time your bake for the most blistered crust, so your homemade pizzas echo Napoli’s iconic flavors.
Dough technique: mixing, autolyse, and room-temperature fermentation
Autolyse by mixing flour and water for 20–30 minutes at 20–22°C, around 60% hydration.
After autolyse, add salt (about 2% of flour weight) and mix 5–7 minutes by hand or 3–4 minutes with a mixer to develop structure. Use steady pressure and stop when a windowpane stretches without tearing. This approach is designed to balance chew and extensibility for a light, blistered crust. This design is aimed to give you consistent results.
Room-temperature fermentation: transfer to a lightly oiled container and keep at about 21°C for 4 hours. The duration is around 4 hours; perform two gentle folds at 60 and 120 minutes to align gas cells and strengthen the dough. If the room gets warmer, shorten folds or reduce time; if cooler, extend by 30–60 minutes. After bulk ferment, divide dough into portions and rest 15–20 minutes before shaping. The timing matters for flavor development and dough strength, so track it in a log for future sessions.
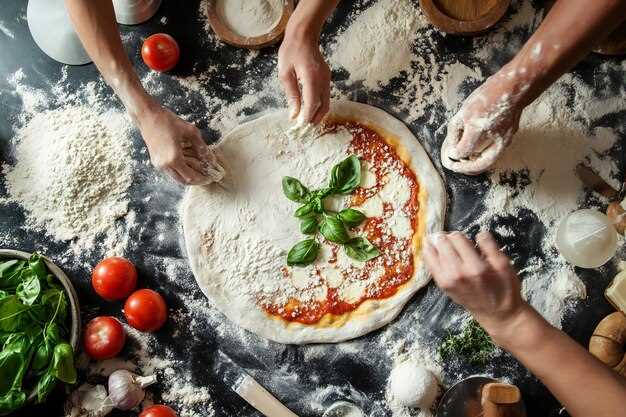
In our class, the process includes a walking tour of the pizzeria’s kitchen, which helps public participants connect dough technique with oven performance. Pricing for the workshop reflects years of field testing and includes a short tour. The session begins with a brief equipment check and moves into hands-on practice, with interactive tips that you can apply at home or in a pizzeria setting. The atmosphere stays enjoyable for every guest. For person18 in a group, we tailor rounds so everyone can spend time with dough, ensuring high value for each learner. After work, we review dough sheets, then enjoy a cold beer while the balls rest and the aroma fills the room. That holiday vibe enhances the learning experience and encourages you to explore, discover, and create your own signature crust.
| Step | Timing | Temp | Hydration | Notes |
|---|---|---|---|---|
| Autolyse | 20–30 min | 20–22°C | 60% | Hydrate flour; enzymes soften gluten; easier kneading |
| Mixing & Salt | 5–7 min | Room | 60% | Add salt gradually; windowpane test |
| Bulk Fermentation | 4 hours | 21°C | 60% | Two folds at 60 and 120 min |
| Divide & Bench Rest | 15–20 min | Room | 60% | Portion dough, rest before shaping |
| Shaping & Final Rest | 15–30 min | Room | 60% | Ball dough; ready to sheet or top |
Shaping skills: achieving the perfect cornice and even stretch
Rest the dough 15 minutes, then shape by hand using gentle circular motions to preserve the cornice and achieve an even stretch.
For a reliable base, aim for 60-65% hydration with tipo 00 flour, and keep the dough at 22-24°C during shaping. If youre a foodie, this hands-on phase rewards you with a resilient skin that doesn’t tear under light pressure. Use your fingertips to press from the center toward the edge, leaving a 2-3 cm cornice; rotate the ball as you work to maintain even tension.
Flip the dough onto a floured surface and gently pull outward with the backs of your fingers, not with a full palm press. This engages the gluten network and prevents over-stretching. Test the curl by lifting the dough and letting gravity reveal the rim; the center should remain elastic and the edge intact.
In the pizzaiolo tradition, the motion is a rhythm: through each minute of shaping you discover how the dough responds. The oldest technique combines gravity, careful rotation, and light touch; you’ll feel the dough cling to your knuckles and adjust by turning 90 degrees every few seconds.
When the shape holds its rim and the center accepts a thin sheet without tearing, transfer to a floured peel or board. If you can see a hint of the tomato through the crust, you’re ready to add toppings. The final crust should show a strong, airy cornice and a center that supports the toppings without collapsing. Like a true master, you balance texture and flavor for a dinner that satisfies every foodie in the group.
In a kitchen setting, raise your awareness of temperature and surface: too much flour dries the edge, too little leads to sticking. After shaking the dough for alignment, give it a brief rest of 1-2 minutes before the first sauce sweep; this small pause helps control elasticity and makes each minute of cooking predictable. Travel moments become richer when you see how technique translates to sights you encounter in Italy.
Booking details matter: the class requires a non-refundable deposit in euros to reserve your space, ensuring you and your fellow travelers stay focused on the hands-on craft. Your travel plan can align with a final dinner where the dish you shaped becomes the centerpiece, and your pizza- base performs under the oven’s heat as toppings crown the crust.
As you practice, remember that every move builds confidence: the joy of seeing a uniform cornice appears after you master the rhythm. By the end, you’ll feel like a pizzaiolo, able to repeat the move for every pizza, every time, and you’ll be ready to enjoy a satisfying final product during your trip or when you return home. Discover how this skill transforms making into a shared experience, where base, tomato, and toppings come together in harmony.
Live-fire oven control: heat management and bake timing for blistered crust
Set the oven to 480°C (900°F) and preheat with a lively, clean burn for 20 minutes, then stabilize at 440-460°C (850-860°F) to form a blistered crust.
Work with a two-zone heat pattern: keep the main flame toward the front of the chamber to create a hot front for quick lift and blistering, while pulling coals to the back or sides to maintain a controlled heat profile. Feed small, dry wood pieces every 2-3 minutes to renew heat without spiking the dome. Rotate the pizza after 25-30 seconds and glide it along the dome curve to expose all edges to heat. Use a long-handled peel with flour or semolina to prevent sticking.
Bake timing: a 30–32 cm pizza bakes in 60-90 seconds in these conditions; watch for leopard spots on the rim and a firm bottom. If you see pale crust or undercooked toppings, shift the pizza toward the front and sustain heat for an additional 15 seconds before rotating. Remove when the bottom is crisp, edges blistered, and cheese begins to color. Record the timing for each dough batch to build a reliable workflow that improves with every bake.
With instructor access, andrea shares a practical recipe and источник that align with high culinary standards. You gain access to support and hands-on guidance, which helps you translate heat management into final dishes. The course costs include a non-refundable deposit and hour-long sessions, with hour-by-hour planning that covers on-site practice and tasting. Costs and attractions surrounding the locale highlight good value for your experience, and you can study the lines of andrea to see how theory becomes action. The products used are carefully sourced to ensure consistency, supporting a culinary approach that remains good and approachable for your level. This method gives you a clear path to move from a live-fire setting into confident execution in your own kitchen, and perhaps in a professional kitchen attractions where this skill shines.
Authentic toppings: tomatoes, mozzarella, basil, and regional variations
Start with a Margherita as your baseline: the base should be thin, blistered, and flavorful. Use crushed San Marzano tomatoes to form a bright sauce, torn mozzarella di bufala, and a few torn leaves of fresh basil. In napoli, this simple lineup creates the truest balance: tomato acidity, cheese creaminess, and herb lift coming together under high heat. Bake until the edges blister, then finish with a light drizzle of olive oil. This approach keeps your starting point clear for students, showing how the three core toppings combine to make a tasty classic.
Regional variations vary by region and culture, turning a basic formula into a local story. In Campania, cooks may add cherry tomato halves, extra basil, and buffalo mozzarella; in Sicily, sun-dried tomatoes, olives, and provola appear; in the north, prosciutto and mushrooms often appear on a crisp base. Each version demonstrates how a few ingredients can transform texture and flavor, which is a key learning point in your educational kitchen.
Technique matters: the sauce should stay bright and not watery; the cheese should melt without pooling; leaves of basil should be added after baking to preserve aroma. The choice of tomato product, whether fresh or canned, varies seasonally and is a real value driver in the kitchen. This is where local suppliers, management of stock, and attention to moisture make the difference. Pair the toppings with a simple pasta dish to illustrate how flavors balance across courses.
Classroom plan for hands-on practice: start with a three-day plan that spans days 1–3 and covers the classic base, then regional riffs. Provide an apron to every student, weigh ingredients for consistency, and record observations in a review notebook. In terms of budget, expect prices to range by market but allow about €1.50–€2.50 per can of tomatoes and €1–€3 per mozzarella ball in a Naples market. Pizzas from a local pizzeria can cost from €6 to €12, depending on toppings. Your educational goal is to show how balance, value, and technique come together, and each student drafts a personal recipe card to take home.
Culture and experience: here in napoli, you feel the city’s pace in the piazza and the chatter around food stalls. Napoli attractions like the waterfront and historic churches add depth to your learning, connecting street food with tradition. After class, lead a tasting with gelato or a light dessert to complete the meal and invite a short review from participants. This approach shows how local ingredients create value and how the culinary culture travels from kitchen to table.
Dinner experience: what’s served, wine pairings, and culinary culture
Start with handmade mozzarella on a thin Neapolitan crust, layered with a bright marinara, and finish with a few slices of salami; pair it with a glass of local wine for a balanced, memorable first bite.
- What’s served: the menu includes antipasti and bread, marinara and mozzarella pizzas, and a small wine tasting; toppings such as mushrooms, olives, prosciutto, and salami appear across courses, and everything is prepared on site by the chefs.
- Texture and balance: timing matters as the dough stretches and the oven heats; this makes the experience approachable for all levels of cook.
- Practical notes: you receive a brief glossary card and a tasting plate; access to the ovens and dough stations is part of the session; non-refundable bookings are standard policy.
- Wine pairings: a local white like Frascati or Vermentino pairs with Marinara-based pizzas, while a red such as Chianti or Aglianico complements meat toppings; the pairings reflect regional terroir and balance acidity with fat.
- Course rhythm: timing is guided by the chefs, so you can watch, ask, and replicate at your own pace; timing matters as much as technique when the dough reaches the ideal stretch and blistering rims.
Cultural note: iconic Neapolitan technique is taught by chefs who know the rhythm of a small, warm kitchen. Years of practice shape the tone here, and 41menglish-speaking guests from around the world join the sessions, which foster conversation about tourism and local life. A quick mention of regional ingredients helps guests connect. Here, management keeps the flow steady, you can access the oven, dough station, and toppings area, and thats why the atmosphere feels welcoming. The program is designed for hands-on learning and cannot be rushed, with plenty of opportunities to ask questions and practice making dough, sauce, and cheese integration. If you want a longer evening, you can plan a small outing after the meal to explore the town’s dining scene. The experience includes clear booking terms; budget-conscious travelers will find value in the pacing, portions, and the chance to taste real mozzarella and marinara in a single evening.
Budget note: this option fits within a reasonable budget while delivering memorable flavor and skill.