

Book your 9,000-foot tandem jump with Wanaka's trusted operators at least two weeks ahead to secure a slot including your birthday celebration and preferred sunrise light. This practical step sets up smooth logistics, shorter waits, and clear skies for takeoff.
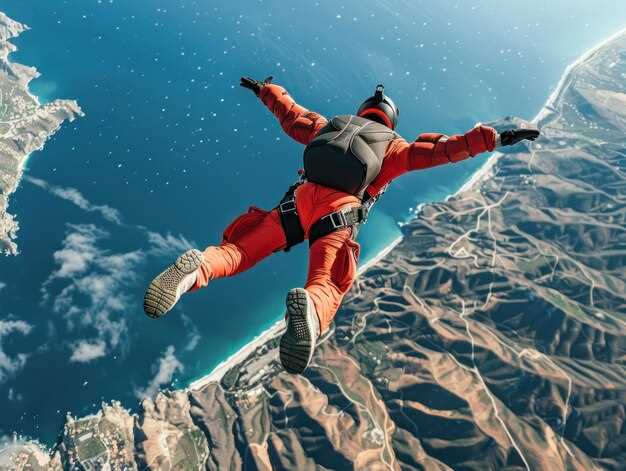
From the moment you step into the aircraft, this experience gives you a front-row look at New Zealand’s alpine terrain. The Wanaka drop zone sits near the lake where snow fields meet jagged peaks. As you are climbing to 9,000 feet, the ground falls away and the world narrows to a single horizon; the freefall, with speeds up to 200 mph depending on wind, delivers a rush you’ll feel in your chest and ears.
Packages include both footage and photos, captured by a certified camera team, including a memory card with your best frames. You'll notice the look on your face and the relief that settles after the parachute opens when you land.
In Wanaka, guide josef leads the briefing with a calm, precise style that puts first-timers at ease–an approachable mix of warmth and safety. He explains harness checks, the countdown, and exit timing, and he acknowledges local terms like mphindi of anticipation before the engine roars. In the air, the instructor cues the moves that keep you aligned with the ground and the panoramic scenery, noting what to do so your actions stay crisp when it’s your turn to jump. You’ll hear small words like komwe or omwe that help you focus. The moment is owoneka with a camera capturing your brave expression as you step into the air.
There is a final debrief after landing, a chance to review your memories and trade notes with other thrill-seekers who have been in Wanaka’s sky. The town’s cafes and viewpoints give you a place to soak it all in and to compare what you saw where the lake meets the mountains. Anything you want to know about weather, gear, or procedures, the team is ready to answer so you can book with confidence.
Practical Guide for Your Wanaka Jump
Put on the jumpsuit provided, fasten the harness correctly, secure the chest strap, and double-check your goggles and gloves with your tandem partner 15–20 minutes before the aircraft doors open. Make sure that the fit feels snug and secure.
Dress in layers for the cold air at altitude: moisture-wicking base layer, a fleece or lightweight jacket, and windproof outerwear. Wear snug athletic shoes, remove loose jewelry, and bring a compact water bottle. For the camera, bring a small action cam or secure your existing footage setup; you can keep it on until you reach the exit, then pass it to the instructor if needed. The lake and surrounding peaks make your experience visually stunning, so protect devices from water and wind. If you need recommendations on packing, ask your guide.
During the briefing, listen closely to safety cues, the what and when of exit, and the jump sequence. If you have questions, ask now; the operator offers a quick Q&A to clarify gear, exit position, and what to expect during freefall, which lasts roughly 25–40 seconds from a 9,000-foot jump, depending on weight and posture. After the freefall, the parachute opens around 5,000 feet, yielding a calm canopy ride over lake and mountains. If you need clarity on any step, ask.
Footage is a big part of the memory. The operator may offer on-site video or you can arrange to have your own camera recorded. For best results, mount the camera on a helmet or wrist, and confirm with the staff which moments will be captured. If you want extra shots, ask for a second operator; some packages include a short 60–120-second clip of the landing zone. This footage is golden, and it’s possible to purchase it as a keepsake that marks your experiences.
Landing occurs on a designated field near the lake; keep your feet together and knees slightly bent as you touch down, then step clear of the wind path and gather your gear. Prepare to land smoothly. After landing, slowly stand, drink water, stretch your legs, and reflect on what you just went through. If you shot footage, review with your instructor and collect your certificate or digital copy if offered. If you went with a friend, compare angles you captured and swap tips for future jumps.
Safety and scheduling: If conditions push the jump, the operator will reschedule–don’t worry; Wanaka runs multiple sessions daily during peak season. You can adjust to a new time or option to reschedule. Bring a concise set of questions: what days have the best visibility for lake reflections, whether you want to add a second jump later in your stay, or if you need to change the package. Anything that helps you feel ready is worth asking. The advice here is based on current safety guidelines.
Practical tips and culture: Park in the designated area, carry a light snack for after the flight, and take time to savor the lake view. The crew may greet you with a warm bwino as you arrive, and when you finish, say thanks and ndowa to acknowledge the moment. If you’re creating a group memory, a little humor can ease nerves–you might hear the nickname yowoneka tossed around in good fun among your crew.
Best time to book is late spring to autumn for clear skies; aim for morning slots around 9–11 am for stable winds and excellent lake views. Bring a compact base layer, sunglasses, and a small towel for after the jump. Remember: safety decisions override plans; if weather dictates a delay, the team will offer a new window. This approach helps you end with perfect footage of the lake and mountains.
What to Expect During a 9,000-Foot Tandem Jump
Put on a snug jumpsuit and harness, secure your goggles, and listen to the safety briefing from a Wanaka-based company. Have weight and medical questions ready, sign the consent, and keep loose items stowed so you stay comfortable at altitude. The team, including your instructor, prepares you for the exit with clear signals and a calm pace, keeping adrenaline under control while you stay excited.
Before you ascend, your group receives weather and wind checks, then boards either a helicopter or a fixed-wing plane to reach the 9,000-foot mark. The flight is short, and the crew explains the exit, body position, and hand signals in plain terms. The ascent offers beautiful views of the mountains and lake, helping you settle into the moment with your couple of fellow jumpers and your instructor by your side. Some operators even use local codes like sangalalani,omwe,zithunzi as quick cues during training, which can make the process feel personal and efficient.
As you approach the drop point, your body comes under control. You remain brave and attentive, with the instructor keeping you in the correct posture. You’ll feel the wind strengthen as you lean into the fall, and your heart rate climbs in a healthy rush. Freefall lasts roughly 25–40 seconds, depending on weight and wind, after which the canopy deploys around 3,000–5,000 feet above the ground. Your view turns panoramic–the valley, mountains, and water below–while your instructor maintains steady steering and keeps you within safe zones for the glide.
The canopy ride lasts several minutes, giving you a chance to savor the scene and adjust to altitude changes. You’ll learn basic steering, turning, and the flare technique from your instructor, who stays in control while you enjoy the sensation, even if this is your first jump. Landing occurs in a designated zone with a gentle pedal and a small run-out, and your knees absorb the impact so you land smoothly. This phase often feels like a natural pause after the rush of freefall, a moment to breathe and grin at the people around you.
For those who want keepsakes, video or photo options capture your experience from two camera angles, with the operator providing your choice of footage and stills. If you’ve trained with a company before, you know what to expect since they’ve been refining the flow for years, and their experienced staff are ready to assist your safety and comfort every step of the way. The overall process is designed to keep you within safe limits while delivering a memorable, adrenaline-fueled moment over stunning Wanaka scenery.
| Phase | What to Expect |
|---|---|
| Check-in and briefing | Documentation, gear fit, safety briefing, weight confirmation; questions welcomed |
| Transfer to altitude | Aircraft or helicopter ascent to 9,000 ft; final gear and signals check |
| Exit and freefall | Exit with instructor; 25–40 seconds of freefall; harness control and arched position |
| Canopy deployment | Deployment around 3,000–5,000 ft; steady steering and scenic drift |
| Landing | Flare and touchdown in a designated zone; absorb impact with knee bend |
| Post-jump | Video/photos delivery, debrief, weather check for next slot |
Best Seasonal Windows for Wanaka Skyjump
Plan your Wanaka 9,000-foot skyjump during the warm, stable days of late spring through summer, specifically November through February, for the best combination of clear skies, gentle winds, and dramatic mountain-and-water views over queenstown and Wanaka. Zealands landscapes offer a unique backdrop that makes each drop feel epic, and the conditions here are usually most reliable when days run long and dry enough for back-to-back jumps.
-
Spring window: late September to November
- Specifics: Early-season sun and cooling air create crisp mornings with improving visibility by mid to late October. Cloud ceilings commonly rise above 4,000–6,000 feet, giving you a clear frame for the drop at height.
- Why it works: Fewer crowds than peak summer, so passengers can take their time to soak in the scenery and plan photos. The mountain and water reflections are vivid on calm days, delivering smile-worthy frames for stories and birthday albums.
- Tips: Book morning flights when winds are typically lighter, and consider a mid-morning option to maximize warm sun on your back while you watch the alpine range literally glow. If you want to photograph a kid or teen’s first jump, this window offers a calm, family-friendly rhythm.
- Practical note: Bring a lightweight, windproof layer; include a beanie and gloves for the climb to altitude, and plan for a quick change after the jump to celebrate with a hot drink.
-
Summer window: December to February
- Specifics: Warm days, long daylight, and clear evenings characterize this period. Typical visibility stretches over the basin, with the peak of sunshine allowing extended photo opportunities. The 9,000-foot drop feels expansive with blue-water reflections and broad mountain silhouettes.
- Why it works: This is the most reliable window for stable weather and consistent scheduling, so you can line up multiple seats for passengers, especially around long holidays. Families and groups often return with fresh stories from a single trip.
- Tips: Aim for late morning to early afternoon slots to avoid mid-afternoon convection while keeping the temperature comfortable. Bring sunscreen, sunglasses, and a light rain shell just in case cloud edges drift in from the mountains.
- Practical note: Queenstown and Wanaka act as launch pads for day trips; you can combine your jump with climbing or boat-based activities on the same day, then toast your birthday with a sunset view over the water.
-
Autumn window: March to April
- Specifics: Cooler mornings gradually give way to crisp, clear afternoons. Cloud builds are less frequent than spring, and visibility often remains strong through late afternoon. Expect a quieter atmosphere with shorter wait times for the helicopter or plane.
- Why it works: Shoulder-season pricing and fewer crowds make this an attractive option for passengers who want a high-adventure experience without peak-season lines. The fall light can frame the mountain silhouettes in golden tones as the sun lowers toward the horizon.
- Tips: Book a mid-morning flight to catch stable air with comfortable temperatures. Pack a light fleece and a windbreaker; you’ll stay comfortable during the climb and the short post-jump cooldown by the lake.
- Practical note: If you’re celebrating a birthday, this window offers a serene backdrop for post-jump photos and a cozy meal nearby, with opportunities to chat with guides about local climbing routes and other activities.
-
Winter window: June to August
- Specifics: Colder air and higher chances of cloud cover require tighter scheduling, but clear, cold days still occur. When you do get a window, ceilings above 6,000–8,000 feet are common, and visibility can be excellent after a frost-free morning.
- Why it works: For dedicated adventurers, winter skies deliver a stark, dramatic contrast against snow-capped peaks and dark blue lakes. It’s possible to combine a jump with nearby snow activities or hot springs to maximize the day’s warmth after the drop.
- Tips: Reserve a daytime slot with flexible rebooking in case of cloud or wind shifts. Layer up aggressively and prepare for wind chill at altitude. If you’re normally sensitive to cold, consider a second warm layer to wear after landing.
- Practical note: The quiet season can make it easier to pace your day and chat with guides about mountain routes or rescue-themed stories, turning a single jump into a full-day adventure with omwe insights from locals who know the area well.
Booking guidance and planning tips: aim for a window with a stable ceiling, low wind shear, and a forecast of dry air–these conditions maximize the chance to complete the full 9,000-foot drop and still have time for photos, story-upload posts, and a celebratory meal after the smile-inducing ride. If you want to pair the jump with Queenstown-based activities, arrange a morning jump, then a climbing session, a lakeside walk, or a coffee crawl to soak in the views. For groups, confirm seats early; you’ll often find several passengers sharing the same memory and adding to the day’s warm energy. Including a birthday person can add a special shout-out during the landing, making the moment even more memorable. The entire experience gives you a vivid record of zealands scenery and a chance to back a claim that you’ve stood at height, dropped safely, and conquered a bold goal.
Weather, Safety Briefings, and Jump Ground Rules
Check the wind forecast and cloud base two hours before your jump and lock in with the crew for a confirmed slot; if crosswinds are above 20 knots or cloud base is under 3,500 feet, reschedule to the next window to keep safety high and adrenaline experience optimal.
Wanaka's alpine setting creates rapid weather shifts. Usually, mornings offer calmer air, but gusts rise near ridges as the mountains influence the flow. Most windows require light or moderate winds aloft and clean visibility. The crew tracks updates with portable wind meters, visual cues from the mountains, and local notes such as dziwani indicators and zonse signals to decide if a jump goes ahead. Weather windows can be short, so the team aims to fit most experiences into a single morning or late afternoon slot.
During safety briefings, the crew walks you through gear checks, body position, and the landing pattern. Each jumper wears a properly secured harness, reserve handle accessible, altimeter visible, and a helmet on tandem runs. They verify the main parachute, reserve parachute status, and any AD device if present. Expect guidance on exit stance, arch posture, and altitude cues; hand signals for turns, brakes, and flare timing are demonstrated. They share practical advice from past adventures and stories, including contingencies for equipment glitches or unexpected wind shifts.
Ground rules keep the operation orderly: follow commands without delay, stay clear of the aircraft doors and exit path until your turn, and move to the door only when signaled by the crew. Keep hands away from moving parts, secure loose gear, and avoid standing in the downwind path of others. Spectators stay in designated areas, and alcohol or drugs are not permitted within 24 hours of the jump. If you need a quick walk or a breath of fresh air, coordinate with the crew. Everyone completes the equipment check; report any loose straps or damaged gear immediately. These rules protect you, your tandem partner, the pilot, and the ground crew. They apply across activity lines, including paragliding, biking, or post-jump walks, and can be part of a birthday or combos of experiences with malo or josef you meet along the way.
Prep tips: bring layers, sunscreen, and a compact snack; arrive hydrated; wear snug footwear for the ride up and water-resistant outerwear for damp mornings. If you’re curious about the area, ask the crew for local context on mawส่วนwongwa on mawonekedwe? and the region’s terrain, including how the wind shifts around the zonse areas. If you’re traveling with friends, plan a post-jump plan to swap stories and share adrenaline moments. Some guests even combine a tandem jump with a short biking route or a gentle walk to take in the landscape, including the nearby mountains and lakes, and to celebrate a birthday with a small gathering and memorable experiences.
What to Pack, Dress Code, and Gear Tips
Pack a lightweight, weather-ready kit: moisture-wicking base layer, a thin fleece or mid-layer, and a compact windproof shell. From a perspective of practical safety, this setup handles Wanaka's 9,000-foot jump, where temps can drop quickly and wind bites. Coming to the briefing with this system keeps you warm before ascent and comfortable after the final exit.
What to pack: base layer, mid-layer, wind shell, beanie, gloves, socks, sturdy closed-toe shoes, sunglasses or goggles, sunscreen, lip balm, a moisture-wicking neck gaiter, and a compact water bottle. Fabrics should dry quickly to limit soak during ascent; avoid cotton. ndowa and abel may appear in local paperwork, so have your IDs and waivers ready for the crew there.zonse of extras: small energy snack and a lightweight rain shell, if the forecast calls for cloud or drizzle. Keep electronics secured in a small bag that stays with you on the flight.
Dress code: fitted layers only, no loose items that could snag on the harness. There are no pockets on the harness, so keep essential items in a compact chest or waist pack. Long pants and sleeves protect against wind chill above the river and during the final exit. Shoes must be secure, closed-toe, and provide good grip. Hair tied back; jewelry left at home to minimize snag risk. Although conditions vary, this setup keeps you agile and being calm at the moment of exit there on the platform.
Gear tips: the crew provides a helmet and goggles, but you can bring your own if they fit properly; ensure a snug, anti-fog seal. For control and body position, adopt a paragliding-inspired yendani stance and keep a light, compact arch during the exit. Use a camera strap that stays clear of the lines, and store any extra gear in a secure pocket. Above all, focus on the horizon and the river below; the final moment comes quickly. Komwe guides remind you to stay with the crew and listen for hands-on cues, dziwani shifts in wind can change posture in seconds, so hold your line firm but relaxed. There, bino choices in gear setup help you move smoothly, and a well-fitted harness keeps everything aligned. Magolovesi terrain may appear below, so keep your eyes up and your balance steady, abel trust in the instruction to keep you safe.
Booking, Prices, and Onsite Check-in Process
Book early to lock in the best time and price for your 9,000-foot jump in Wanaka. Reserve online, or contact the Wanaka skydiving desk by phone or email. A small deposit usually holds your slot, with the balance due on check-in. If youre flexible, midweek slots are easier to secure, so consider Tuesday or Thursday. On arrival, you’re transported from central Wanaka to the lumphani shuttle hub and then to the airfield. A guided safety briefing runs 10-15 minutes, giving you a clear perspective on the jump, the gliding motion, and the procedures. If you’ve tried paragliding, you’ll notice the similar thrill under a controlled, guided program. Some guests, who were new to skydiving, gain confidence quickly because the team explains each step clearly. After the briefing, you’ll meet your instructor and photographer, and passengers in your group can review the plan and catch a few practice taps of the harness. The check-in area also serves as a place to collect the first photos and stories from the moment.
Prices for the 9,000-foot jump typically start around NZD 399 per person, with peak-season rates near NZD 499. Add-ons include a photos package NZD 99-149, a video NZD 199, or a combined option around NZD 450-550. GST is included in the published prices. Most groups usually book together to share transport and slot costs, and groups of 4+ participants can qualify for a small discount. Locations for check-in, gear, and the post-flight lounge are clearly signposted, so you can move between spaces without confusion. Passengers can review photos before purchase, and you can also opt for a post-jump tasting session at the lodge to celebrate the moment, with the on-site cook serving light bites. The goal is to leave you with memorable stories and a smooth path to the jump.
On the day, arrive 60 minutes before your slot and head to the check-in desk. Show photo ID and your booking reference, sign the waiver, and confirm your weight so gear fits correctly. A concise safety briefing follows, and your harness is sized by the instructor. You’re transported to the aircraft with your group, and a guide such as chidwi may be on-site to answer questions and share local tips. The flight to the jumping location is short, and the jump itself is led by your instructor who handles the controls while you feel the wind on your face and the sensation of gliding. After landing, collect your photos and videos at the base, review the moment with your group, and head back to the lounge. If you want to celebrate, you can join a post-jump tasting session at the lodge with a light meal and a chat with the cook about the day’s adventures. The crew is always ready to help you plan next steps, so you leave with clear memories and a few new stories.