


Arrive at first light to see basalt rocks glow as the patagonian plain awakens. Travel guides that rely on local knowledge map routes that respect border controls and leaving no trace in fragile pockets. The benitez crew often leads small groups from the trailhead, sharing practical tips for wind shifts, footing, and a walk that lets you get close without overstepping bounds.
That varied scenery unfolds with jagged spires, lava lobes, and pale dust that gleams under the magellan glow. The fuego field offers a fascinating contrast between scorched lava and tufted grasses; however, if clouds roll in, the view remains still and compelling. To plan for magellan winds, arrive with a light pack and sturdy boots.
To maximize safety, размотрити a 4–6 km loop that begins before sunrise and finishes near the staging area. This walk takes roughly 2–3 hours at a relaxed pace; bring 1.5–2 liters of water, sunscreen, and a windproof layer. If conditions are too windy, hedge the route by sticking to sheltered hollows and avoiding exposed ridges. outdoorindexcl provides a quick risk checklist to guide decisions about leaving the main trail and staying on designated paths, which is well aligned with travel goals. If you want a deeper encounter, guides can adjust the route to include longer, more varied options than the standard loop.
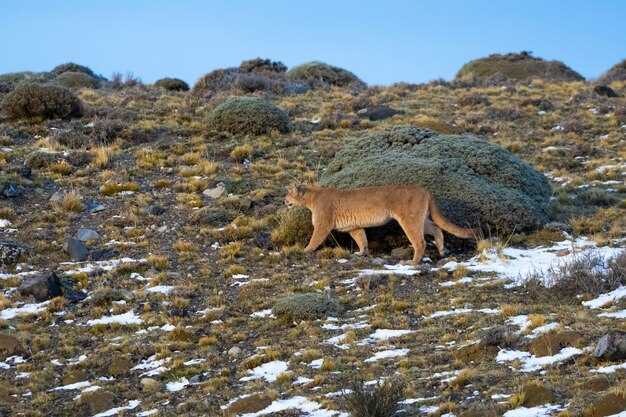
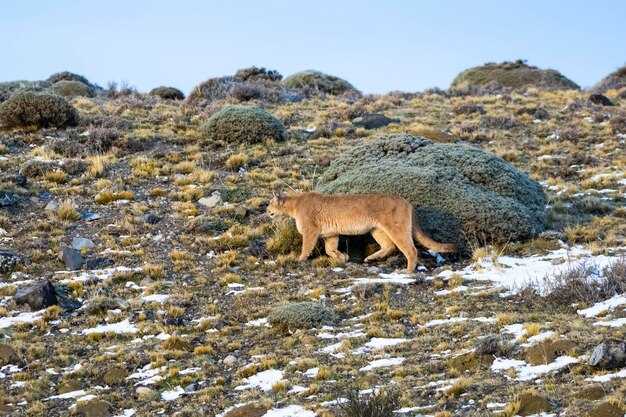
Fauna is lean but rewarding, with guanacos, viscachas, and a handful of birds often seen along rocky rims. Keep a respectful distance, avoid chasing, and note that sightings were common in morning sessions. The best moments come when you stand still and listen to the wind, then move slowly to spot signs of life near the stones.
4-6 Hour Arid Plains Circuit: Route, Trailheads, and Sunrise Viewpoints
Start at garganta trailhead at dawn to catch the first light, enter the arid ridge system, and keep a steady pace to avoid overheating later. During the ascent, you’ll notice fossil-bearing outcrops and wind sweeping across the hills. Crowds are typically light in the first hour and already thin by the time you reach the saddle near the Gregorio nexus.
Route overview: To enter the crest, follow the marked spur from garganta. The loop runs approximately 11-14 kilometers, with cumulative elevation gain around 300-500 meters. The path begins at garganta and climbs toward the gregorio junction (near the basalt platform). From there, it arcs along elevated benches to a sunrise viewpoint with expansive views of distant hills and rugged flats. The areas along the crest are known for fossil fragments and a wind-blown, natural feel. The views along the crest are remarkable. Start early to maximize shade; leaving by 08:00 yields a comfortable pace for most visitors.
Sunrise viewpoints: three main lookouts line the crest. The environment here is stark yet alive, shaped by wind. At the garganta overlook you’ll see the first light skim across reddish ridges. Vista Norte offers a panoramic sweep of near flats and far hills; a final overlook provides a broad natural panorama as you prepare to descend. Falcon sightings are common in the early hours, and you may spot inhabitants of the high plain as they begin their day. Keep distance from wildlife and give them space.
Practical tips: bring at least 2 liters of water per person, a light fleece for wind, and sunglasses. Enter near garganta and the gregorio junction by 07:00 to maximize shade. Keep to established paths to protect natural features; fossils should be left in place and recorded in a field file if you note any notable finds. Crowds are light before 08:00, and visited areas include garganta and vista norte. For solitude, start early and move steadily to catch the sunrise viewpoint glow during the short window each morning.
| Сегмент | Растојање (km) | Elevation gain (m) | Процењено време | Белешке |
|---|---|---|---|---|
| Garganta to Gregorio junction | 3.5 | 180 | 60-75 min | fossils visible in ledges; near gregorio sector |
| Gregorio junction to Vista Norte | 4.2 | 120 | 50-70 min | falcon sightings; wind-swept benches |
| Vista Norte to Garganta overlook | 4.0 | 150 | 60-90 мин. | final descent; crowds minimal early |
Wildlife Spotting Checklist: Species, Seasons, and Best Times of Day
Start at first light and push into the cool hours; this window yields the highest odds for observing peregrine falcons and caracaras as they mount thermals and patrol vast, desolate airspace above the open flats and morada rock outcrops, where the extensive expanse invites you to pause and scan the horizon from a safe distance, which is usually better than midday sessions.
Seasonal timing: spring through early summer (roughly November–February) concentrates activity around breeding sites, with fledglings overhead and adults calling from the sarmiento formation. What you should watch for varies by season and wind direction; during these months, cliffs and open shelves host regular sightings, while autumn and winter bring clearer skies for long-distance views, though movement diminishes. Lunar phases can intensify night-time observations along road verges.
Top species to watch and behavior cues: peregrine falcon and crested caracara dominate open sectors, often seen perched on ashes-streaked rocks, as well as passing flocks that skim cliff faces between ridgelines. Some rock ledges fell sharply to the lowlands, creating roosts favored by raptors. In addition, mainland residents such as guanacos may appear at greater distances, offering three reliable sighting windows during the day. Listen for distinct calls; the caracara’s rattle and the peregrine’s high-pitched scream cut through wind and distance.
Best times and field tactics
Plan primary sessions from dawn to around 10:00, then again from 16:00 to dusk; during these windows, thermals rise and prey-searches intensify. Move along the road slowly, scan rocky outcrops and the ashes around morada-strewn areas, and avoid dense vegetation that hides silhouettes. Focus on the southernmost sectors where winds funnel through sarmiento formation channels, increasing sightings by observers already familiar with the rhythm of three key spots near the formation.
Equipment and ethical notes: carry binoculars with 8–10x magnification, a pocket notebook, and a lightweight tripod for stable scopes. Respect wildlife by staying at least several dozen meters away from roosts and water sources; avoid chasing birds or flushing animals from covers. This practice helps conserve the fragile climate balance and ensures future chances for yourself and others. источник
Gear and Clothing for Patagonian Desert: Packing List and Layering Strategy
Start with a compact three-layer system: base, mid, outer shell. Depending on time of day, the temperature range can swing quickly; this setup takes the chill off wind and dust. Instead of carrying two bulky jackets, plan for a single versatile shell you can layer up or down along rural routes bordering the hill, keeping everything light and functional for true weather shifts and ancestral knowledge of wind.
Layering Strategy
- Base layer: moisture-wicking top and bottom, Merino wool or high-performance synthetics; cotton is off. Target 150–250 g per piece; change daily to stay dry during long kilometers of exposure through dusty air, mind the view for caracaras on the delgada hill.
- Mid layer: fleece or light down; compresses to pocket size, about 200–350 g; add on cool mornings at Cerro viewpoints or when wind intensifies.
- Outer shell: waterproof, windproof, breathable 3‑layer garment; essential for sudden squalls and dust storms; choose a jacket and pants that pack into a 20–30 L pack.
- Insulation for nights: pack a compact puff jacket or synthetic vest; it takes minimal space and adds warmth when temps drop on the borderlands.
- Head and hands: beanie or fleece cap, sun hat for day, lightweight gloves; ensure UV protection and wind resistance; on delgada hill ridges, this setup helps a lot; those moments with caracaras can appear among natural overlooks.
- Feet: sturdy hiking boots or trail runners, wool or synthetic socks, spare pair; consider gaiters to keep dust out on arenas and rocky stretches.
- Accessories: sunglasses with 100% UV, broad-spectrum sunscreen, lip balm SPF, buff; keep a small file of emergency contacts or route notes in your pocket for quick reference.
- Wildlife-aware note: observe from a safe distance; those moments with caracaras or other natives can appear near natural overlooks on ascents; mind your footing and leave no trace.
Packing List for the Route
- Backpack: 20–40 L with weatherproof cover; organize with dry bags for clothing, electronics, and food; plan to arrive at the local villa before sunset if weather shifts force shelter.
- Hydration: 2–3 L capacity, use a bladder or bottles; plan for kilometers of exposed route through arenas and dusty air; carry a lightweight filter or purification tablets as a backup.
- Clothing kit: extra base layer, mid layer, and a compact insulated layer; include delgada and alta items for variable temperatures; pack a spare pair of socks and underwear.
- Protection: sunscreen SPF 50+, lip balm, sunglasses, hat; dust masks if wind picks up.
- Navigation and safety: map, compass, GPS backup, whistle; laminated field file with route notes; local guide contact details for Chilean guidance; plan to reach Cerro vantage points and nearby settlements such as a quiet villa.
- Gear and electronics: headlamp, spare batteries, power bank, solar charger; water filter or purification tablets if you plan to source from streams.
- First aid and repair: basic kit, blister care, tape, sewing kit, duct tape, spare laces for boots; compact repair kit for gear.
- Miscellaneous: compact towel, soap, hand sanitizer; lightweight stove or high-energy snacks for long trips; if you plan a detour to fossil sites, note mylodon remains near Diablo areas.
- Notes for travelers: when you arrive in a Chilean rural setting, take time to consult locals and guides; tourist visits often include Cerro overlooks and wildlife viewing that enriches the experience while staying mindful of the environment among fragile ecosystems.
Getting There: Access Routes from Puerto Natales and Nearby Towns
Plan the visit with a local operator; visiting this enormous, remote reserve is safest with a guided transfer from Puerto Natales. The Chilean operator handles permits, gear, and emergencies, letting you focus on the scenery.
From Puerto Natales, the typical approach heads east toward the cerro belt and then continues along long gravel sections. Expect roughly 450–520 kilometers total, with a travel time of about five to seven hours in dry conditions, depending on road quality and wind.
Alternative starts exist from punta Arenas and other nearby towns; these itineraries add roughly 130–230 kilometers and may require a longer day or an overnight near the access gate. If youre starting from punta Arenas, plan for extra time and a flexible schedule.
Seasonal conditions vary, and snow or strong winds can block high passes. Mind the forecast, carry extra water and clothing, and verify road status with your local guide before leaving. A well-equipped vehicle and spare fuel will keep you moving through the open stretches, still when the weather shifts.
As you approach, the image of enormous plains, cratered cerros, and lava-formed features comes into view. Native birds, including the black-chested variety, may be seen along watercourses on the left side of some trails, and the rock faces carry ines in their weathered surfaces. Seeing this terrain up close is a highlight of any visit; everything feels calm and vast, and the well-marked trails are designed for secure exploration by a guided team.
There are five main trails and multiple side paths; each route takes you across the high plain to lookout points near the cerro rims. The left-hand trail begins at the higher edge and climbs gradually, while other routes thread across drier flats. For safety, do not go off marked paths, and keep to the schedule your guide provides.
If you would prefer a gentler pace, a multi-day program with an overnight near the access gate would let you take in the image and close views, while staying mindful of conditions.
If you plan to extend your trip to bordering areas, remember that border procedures apply only at official crossings; for access to the core conservation area, you stay on Chilean soil. Cross-border travel would require proper permits and a formal border clearance, which your operator can arrange if you intend to visit across the plain.
Photography Tips: Desert Landscapes, Night Skies, and Composition Rules
Use a sturdy tripod and a wide-angle lens; for night shots, set 15–25 seconds at f/2.8–4 and ISO 3200 to capture the Milky Way, then bracket a foreground exposure around f/8–11, 1/125s, ISO 100–200 to reveal rocks and a tarn. Use a remote shutter to avoid shake and shoot several frame types for stacking.
Composition rules: place the horizon on the lower third to emphasize the enormous sky, or on the upper third when the foreground features dominate. Leading lines from ridgelines and rocks guide viewers into distant views, including torres silhouettes, located beyond the morada ridge. If a black-chested bird lands on a rock, it becomes an interesting focal point that adds life to the scene.
During daylight, look for color and texture: shoot during golden hour when patagonian stone layers glow; tarns reflect soft light, and the rocks show rugged textures. This part of the tour offers views that are likely to appear in guides. Approximately two hours after sunrise, light softens and shadows lengthen. That lets you capture more mood and depth in the scene.
Night-sky technique: protect the night by choosing remote spots far from light pollution; use stacking or long exposures of approximately 20–30 seconds per frame for a static sky; capture 10–20 frames to create smooth trails. The magellanic glow and other stellar features will be visible on clear nights; bring spare batteries and memory cards, and come with companions to share the experience.
Be mindful of location specifics: several overlooks are located along the morada ridge; mention gregorio if you hire a local guide; throughout your shoot, stay on marked paths to protect delicate soil and to ensure you capture views that include rocks that anchor the scene.