


Plan ahead: a reservation guarantees a defined entry window and reduces wait times. If you find a suitable slot, you can map a concise route that minimizes backtracking. also, you should be able to pack light layers for cooler mornings; with a little prep, you can start the day strong and avoid rushing.
Access is managed by a daily quota through an authorization-based system. A reservation confirms a time block, typically in the morning or late afternoon; windows span roughly 7:00–11:00 and 13:00–17:00, with occasional seasonal adjustments. Check the official department page for the latest schedules and traveling guidance before you depart. If you drove, allow extra time for parking and shuttle options.
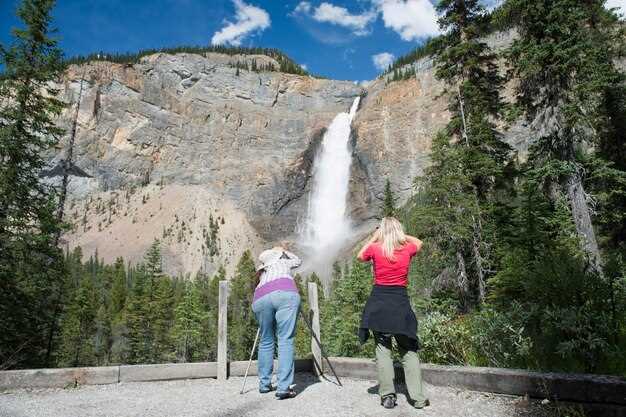
Parking can fill quickly on weekends; overflow spaces line the exit road and drivers may be directed to neighboring pullouts. Plan to arrive 15–25 minutes before your window and stay between gates until your time begins. The route runs along a scenic corridor where you can spot деревьев and горы in the distance; for the best photo выбор of viewpoints, pace your visit and use the boards marking access. This guidance also helps наших travelers keep to the plan and reduce congestion.
For those seeking уединенной moments, choose a quieter time slot and walk along the edge, pausing at windows that frame the gorge. Every pause offers a chance to насладитесь the air, the sounds, and the view between деревьев and горы. The scenery is famous for its world class backdrop, a favorite of many traveling groups.
each traveling party should check current conditions during busy seasons on the department site; for наших travelers, adjusting plans to fit the windows helps keep crowds manageable. In our world of travel, a bit of advance planning yields greater enjoyment and better access to viewing points.
Access Permit Essentials: Coverage, Eligibility, and Validity
Plan ahead: obtain authorization before your westbound excursion; use the official portal or a mobile option, confirm the exact time windows, and keep a digital copy for arrivals. Check tripcheck for current conditions and any notices that could affect your route.
Coverage includes access to designated pullouts, the bridge approach, and adjacent zones during the permitted interval. The document outlines a limited daily window, and the allowed vehicle or group size must align with posted limits. Respect signs, stay on the intended path, and adjust if conditions change; however, safety remains paramount.
Eligibility applies to travelers planning a trip within the restricted corridor during the active window; native operators, guides, and small groups serving the area should secure a permit. The authorization is not transferable and must reflect your planned party composition; please ensure names, vehicle details, and arrivals estimates match the permit data.
Validity and administration: the window is calculated and shown on the permit, with date, start and end times, and any mileage or location limits noted. Conditions like basalt features, bridge proximity, and column or lock areas may influence access. Arrivals should occur within the specified hour and mile markers; if adjustments are needed, reapply before the planned trip to avoid penalties.
How to Apply: Online Steps, Fees, and Confirmation
Open an online account now and complete the request in a single session to lock in your preferred time window, which is very straightforward. Start by selecting the access type that matches your plans: hikers, a lodge stay, or visits around primary routes and places around the historic district. If you're planning a day on snow around tillamook country, consider лыжах options and the nearby water features for daylight use.
Steps: Create a profile on the official site; choose your access category; enter each человек details; pick days and windows; add additional participants; submit and pay. The form is designed to minimize errors. The profile stores name, age, and home location for each participant, with brief notes if someone is native to the area.
Fees are shown before submission; base rate per person, with second member discounts when eligible; totals are calculated as days multiplied by the primary rate plus any additional charges for weekends or special routes. The totaling amount is visible in the summary; payments are accepted by card or digital wallet, and a receipt appears within minutes.
Confirmation arrives by email and can be viewed in your account under a dedicated section. It includes a unique reference number and a status window; save the brief note and display it on arrival. If plans shift, you can modify up to several days before the chosen date through your portal.
Practical tips and regional notes: from a wealth of places near tillamook, a guest may combine a lodge stay with outdoor explorations. нашим отделением provides guidance for hikers and travelers; check water flow alerts and route closures. The department offers historic sites, native trails, and opportunities to spot eagle and other wildlife. For лыжах trips, plan around daylight windows and consider second shifts or early closures; for вина enthusiasts, some local shops offer tastings; each человек in your group should be listed with full details, and the total will reflect additional rules. Also avoid plunges on slick rock by sticking to marked routes and appropriate weather days.
Best Visit Windows: Timing, Seasons, and Crowd Management on Interstate 84
Choose early-morning windows this season: prior to 9:00, this hour-long block yields calm crowds, open parking, and crisp visibility at the primary viewpoints, and you'll be able to move comfortably with fewer pedestrians.
Spring and autumn bring moderate weather and extended light; page-wide cascades offer daylight spans toward the horizon. Spring mornings are cool, afternoons mild. Autumn colors peak while crowds drop in shoulder weeks. Summer crowds rise and daylight lasts longer; winter offers quiet with shorter daylight and potential snow on approaches. Prior patterns were different, so plan accordingly.
To manage flow, spread visits across several sites along the cascades, follow posted signage, and rotate routes to prevent bottlenecks. If you want time to savor each viewing, allow longer blocks and plan a viewpoint stop every 20–30 minutes. Keep to the right on pedestrian paths, yield to those already viewing, and minimize blocking of key egress points. This approach keeps lines shorter above and reduces congestion at the most popular segments. A column of guests moving in a single direction helps maintain rhythm and prevent crowding here.
Best viewing windows include sunrise through mid-morning and late afternoon, when light angle enhances color and texture. Expect calmer conditions during weekdays; weekends can bring larger crowds. For prime wildlife moments, note that birds (птиц) frequent water edges and tree lines around the main routes. When you reach the crown overlook, take a moment for a wide panorama and then move on to the next site to avoid backtracking. A historical crown overlook connects to past routes, adding a sense of place. Following tips help: choose routes that minimize backtracking and keep the pace manageable for viewing. This ensures you cover the most important views with minimal back-and-forth.
Facilities near key clusters include a столовая option and other amenities; around this area, space and queues spans vary by season. находиться details are listed on the page, and наших volunteers provide real-time updates at the sites.
Return prepared: bring water, sun protection, sturdy footwear, and a camera; plan to return for a second pass if weather or crowds permit; this approach maximizes the number of sites covered and the quality of viewing across the cascades. Here, united across the ranges, different viewpoints align to offer a cohesive route.
Typical Mt Hood Tour Itinerary: Portland Start to Multnomah Falls and Nearby Sights
Begin with a dawn departure from Portland and park early at latourell lot to lock in a convenient spot before crowds arrive; after arrivals, take a short stroll to an overlook where a sturdy bridge frames the river and rugged rock faces.
Mid-morning, follow a well-marked route through the Cascades, stopping at a couple of turnout views; the park department maintains a small museum display and a visitor desk with services such as restrooms and water–treat these as quick checkpoints before continuing.
For lunch, pack a bag lunch and sit at a sheltered, уединенной clearing with a крошечный птиц chorus nearby; or choose a bench near the main trail where shade sits and you can reflect on the wealth of scenery that surrounds the route.
Afternoon options include an ascent toward timberline, where the air turns crisper and the views become dramatic; the queen of the peaks rises over the crater basin, and parking remains available at the lodge area if you arrive early or late in the season; arrivals here are frequent, but late afternoon tends to slow down.
As you loop back toward the city, plan the exit to avoid backtracking; between rock formations and pine stands, you can count on a wealth of photo opportunities; travel conditions are most reliable in late spring through early autumn, with the totaling number of visitors peaking on weekends.
Practical Timing and Parking Tips
Start from the city core and target latourell within 60 to 90 minutes of departure; parking fills quickly on bright weekends, so get there by 8:30–9:00 a.m.; each lot has a clear exit and signs marking the main routes to lookouts and restrooms.
Scenic Stops and Practical Services
Plan a 90-minute loop including a short exploration pause, a museum corner at the visitor center, a lunch stop, and a final overlook before heading back; carry water, dress in layers, and watch for seasonally slick rock along shaded sections.
What to Bring and Safety Tips for a Smooth, Safe Trip
Pack a compact rain shell and sturdy footwear to handle changing conditions through the day along the gateway valley road.
To prepare, assemble a kit and plan with your group. Use this streamlined checklist to prepare and minimize surprises.
- Water bottle and lightweight snacks to stay hydrated and fueled while exploring overlooks and vista viewpoints.
- Layered clothing, including a light fleece and wind shell, to adapt to cool mornings and warmth later in the day.
- Rain gear (compact jacket or poncho) and a hat with sun protection for variable conditions along the valley.
- Sturdy footwear with good traction for rocky sections and slick surfaces near natural features.
- Navigation tools: map, offline app, or printed directions, plus a power bank for devices.
- Small first aid kit and blister care essentials.
- Flashlight or headlamp for evening strolls and low-light overlooks.
- Sunscreen, sunglasses, and a light blanket for chill moments at a vista or overlook.
- Camera or binoculars to maximize views and capture dramatic panoramas along the road and around bends.
- Compact emergency items and a whistle for group safety; carry a basic kit that can serve a guest services team if needed.
- For lodging plans, confirm check-in time in advance and bring any personal items you may need if there is a short wait before access.
- Bridal parties should coordinate with guest services to align photo stops with timed access windows and avoid blocking key routes.
- Choose a time window that fits your plans to avoid crowds and enjoy better light for photos.
Safety tips
- Stay on marked paths and behind railings at overlooks; loose rock and damp surfaces require caution, protecting you and guests around you.
- Keep your group together: designate a lead, a sweep, and a point person for communication; in windy conditions, hold children close and use a tether if needed.
- Drive and park only in designated lots; during peak times, timed access may be in effect, so plan for parking logistics and avoid stopping in travel lanes.
- Check current conditions with the general department or guest services for any alerts affecting access or road status.
- Be prepared for rapid weather changes; pack an additional layer and use eye protection and sunscreen for bright sun along ridges and open sections.
- Overlooks and viewpoints offer spectacular views, but keep a safe distance from rails; do not lean over edges and supervise companions at all times.
- Respect natural habitats and avoid disturbing wildlife; carry out all trash and leave surroundings as you found them.
- In case of an emergency, contact local responders; know your location and nearest trailhead or overlook for quick guidance.
- Make longer stops at the best vista points to maximize scenery and rest, especially for groups and families.