

 32 Best Places to Take Photos in Los Angeles – The Ultimate LA Photo Spots Guide">

Start with beverly at golden hour to kick off your photo journey. This angle shows how light defines each frame and sets a welcoming mood for the rest of the guide. In the 32 spots we cover across california, you’ll find everything from sunlit coastlines to urban architecture.
They wont stay the same from year to year, so begin with the Venice canals and then chase pacific light along the coast. Pasadena offers a gentler vibe with ivy, brick, and quiet courtyards that invite a clean angle for portraits and detail shots.
In the heart of downtown and near the hills, outdoor scenes meet city grit: concrete sidewalks, glass facades, and building textures you can’t fake. Use the available lighting at dawn or dusk for dramatic shadows, and consider reflections in glass towers to double the impact.
Some spots are quiet and empty before crowds arrive, giving you a calm canvas for place-specific shots. Over the years, neighborhoods shift, so this guide highlights locations that feel current while staying timeless as you’re visiting california.
Planning tips: they wont wait for perfect weather, so check the blue hour, scout parking near the chosen building, and map a route that flows from beverly to hollywood to pasadena. Taking notes on lighting and using angles și strong lines can turn a simple place into a compelling frame.
Neighborhood- and Lighting-Focused Itinerary for Practical LA Photography
Begin at sunrise along Echo Park Lake to catch calm water, palm silhouettes, and reflections from the downtown towers. In several places around the lake, light looks soft below the hills, so shoot with a 35mm to keep scenery and people in one frame. I personally prefer to start with a few test frames, then adjust exposure to preserve highlights in the water and set the tone for your day.
From Echo Park, drive to Downtown LA to catch the first daylight glow on glass canyons. For a canon camera, set RAW, use a 24–70mm lens, ISO 100, and aperture around f/8 for crisp lines. This routine simply keeps your photography records clean and universal, while letting you frame the best angles without extra gear.
Evening on the Westside: stroll Santa Monica Promenade and the Venice boardwalk. The neon signs rise as the sun drops, and you can bracket to capture color shifts. Look for flowers along planters and a mural tagged grimes that adds an edgy vibe. Visitors arent shy about posing, and the boardwalk looks draw attention from locals and visitors alike.
Night shoots around Downtown and Hollywood require a tripod and patience. Wait for the best neon reflections on wet streets, then extend shutter speeds to make streams of red and white light. Vinyl records glow in storefronts, adding warmth to your frames. Additionally, if you spot universal street textures, grab a quick shot that makes a simple picture.
Below is a simple, repeatable routine to cover neighborhoods and light: 1) sunrise Echo Park, 2) late morning DTLA, 3) afternoon Beverly Hills and Melrose for color, 4) golden hour Griffith Park, 5) blue hour Venice or Santa Monica. Wait times between spots are usually 15–25 minutes, simply to regroup and check new frames from the day. After each stop, make quick notes on what the view offered and how you might frame a better picture for visitors, since this route usually yields more diverse looks.
Santa Monica Beach at Sunrise: Access, Parking, and Composition Techniques
Arrive 45 minutes before sunrise for the early morning light that makes the shoreline sweet and very photogenic. Set up on the public beach access along Ocean Avenue to capture the full view of the california coast during the blue hour while the city wakes.
Getting there is straightforward: drive to santa monica, then follow Ocean Avenue to the beach. If you ride public transit, the Big Blue Bus stops near the Promenade and you can walk to the sand. Parking options include public lots along Ocean Avenue and garages near the Pier; use the city parking map and a mobile payment app to reserve a spot close to the sand for easy access to pictures. They often offer short-term parking and flexible hours, especially in the off-peak season.
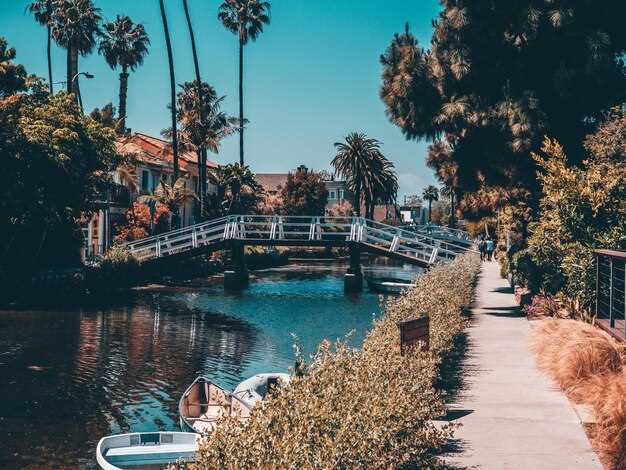
Composition tips: frame the pier or a palm at one of the rule-of-thirds intersections, letting the shoreline along the sand lead the eye toward the sun. Include a canal element from the venice canal area to connect santa monica with venice and add depth. For a full beach view, zoom to 24-70mm and use a slower shutter to smooth the water; for candid street scenes, shoot at 50–85mm and let silhouettes enter the frame. If you have access to an aerial view, a drone reveals the sprawling coastline and how the city sits beside the sea. Remember to respect flight rules; during the blue hour, bracket exposure to capture both highlights and shadows. They’ll appreciate a sequence that transitions from night to dawn in your video and pictures. Bring a camera with a comfortable grip, and choose a style that matches your mood, whether bright and sweet or moody and cinematic. The feel on the sand changes with weather, so keep the composition flexible and shot angles fresh. If you’re staying nearby, a hotel hall can be a quiet space to review your shots before you enter the day. If you want a broader city view, drive to Griffith Observatory for a contrasting vantage point that highlights the California coast and the sprawling city beyond.
| Aspect | Strategie | Why it helps |
|---|---|---|
| Cel mai bun moment | Blue hour and early morning light | Soft color, gentle shadows, fewer people |
| Access | Public beach access along Ocean Avenue; walk from the Promenade if needed | Fast start to your shoot with minimal detours |
| Parcare | Public lots and garages near the Pier; check a parking app for nearby spots | Short walk to sand, easier gear management |
| Echipament | Camera with versatile lens (24-70mm), tripod for stability, optional drone for aerials | Flexibility across wide and tight compositions |
| Subiecte | Pier silhouette, palm lines, canal references from venice, people at a distance | Creates depth, scale, and narrative |
Downtown LA and the Skyline at Blue Hour: Best Vantage Points and Lens Choices
Start at Grand Park’s north terrace to frame the skyline against a clean wall; with a 16-35mm you capture nearly the full view including City Hall’s spire and the cluster of towers. Take a 3-shot panorama and stitch for a wide, panoramic result. Shoot at f/8, ISO 100, 2-6 seconds, and blend the frames later for a crisp, seamless photo. Arrive early to beat crowds and catch the first glow on the windows across the area, then switch to tighter frames for local details. Within easy walking distance you’ll find a small bookstore where reflections add a literary angle to your scenery shots.
Next, move to OUE Skyspace for an aerial-like vantage above the city core; the deck’s glass corners produce reflections you’ll want to minimize. Bring a 24-70mm or 16-35mm lens, use a tripod or brace against the railing, and shoot at moderate shutter speeds to balance lights and darks. If glare appears, tilt the lens slightly or angle away from the glass. Plan for blue hour windows of 30-40 minutes; driving there from Malibu means you can catch the first stars over the towers after a smooth ride. The security team is usually discreet, so you can stay focused on your shots and still be respectful of the space.
From Pershing Square’s south edge or the Library terrace behind the hall, you get a cleaner vertical sweep of Downtown’s silhouette with street lamps beginning to glow. A 70-200mm lens helps compress distance and accentuate the glow in the windows. Early twilight yields rich blues and warm ambers; listen for the City Hall bell and frame it as a momentary accent in a long exposure. If you want a hidden vantage, try the back stairs near the Records building façade for a quiet, less crowded angle that still places the skyline in your frame.
Lens choices at a glance: ultra-wide 14-24mm or 16-35mm for grand cityscapes, standard zoom 24-70mm for flexible framing, and telephoto 70-200mm for compression and detail. For distant lights, 100-300mm can isolate a row of illuminated windows. Use a sturdy tripod, remote trigger, and RAW–you’ll need room to bracket exposures and blend if necessary. Additionally, plan a short loop through nearby spots–driving between views takes about 10-15 minutes, leaving time to pace your shoot and spend 60–90 minutes at each location. Mary would approve of the deliberate pacing; canals along the river offer subtle reflections that complement the main skyline when you need a quiet moment. Early sessions let you grab nearly perfect light, while the wall textures and hall silhouettes add depth to your photos.
Griffith Park and Observatory: Trails, Safety, and Framing Cityscapes
Begin at the front steps of Griffith Observatory at dawn for a sweet, amazing light moment. From there, follow the Mount Hollywood Trail to a panoramic overlook that frames downtown LA and the valley beyond. If youre new to the park, plan to spend some time here to get both wide vistas and intimate city details.
Trails and safety: Stay on marked routes such as the Mount Hollywood Trail and the Observatory loop. During busy hours, arrive early to avoid crowds; bring water, sunscreen, and a hat. Park in the front lots or along the park roads, and keep valuables out of sight. Security patrols the area, so follow posted signs and stay within the trail corridor. If you need a quick break, step to a quiet corner and reset your shot.
Framing cityscapes: For iconic visuals, position yourself on the plaza edge facing downtown. Use a telephoto to compress the skyline and catch a bridge silhouette against the hills, or wait for a cloud break to reveal a clean line. In morning light, colors pop and the bottom of the frame glows with warmth. Popular vantage points let you look across the city while staying within reach of the observatory hall for a change of perspective.
Portrait opportunities: The grounds offer elevated angles to shoot a portrait with the city in the background. Have your subject stand at the railing in the front of the plaza, then frame them with the dome or the hills peeking through. Look for some candid moments as you walk the trails, and you personally adjust your shot to balance light and contrast. Youre ready to make a strong, natural portrait within the LA backdrop.
Plus planning tips: If you want a classic LA vibe, combine Griffith views with a quick stroll toward rodeo drive or culver City backdrops. Youre likely to grab a few versatile angles: a wide cityscape, a tight portrait, or a panoramic sequence you can stitch into a story. Spend a few minutes testing angles, then getting to venice for canal textures and different light.
Bottom line: Griffith Park offers accessible trails, clear safety guidelines, and framing options that balance nature and city. By starting early, you maximize light and minimize crowds; you can make a memorable portfolio piece that shows your love for LA and your growth as a photographer.
Venice Beach and Abbot Kinney: Timing, Angles, and Street Photography Tips
Begin at sunrise along Venice Beach, where the concrete boardwalk glows and early pedestrians become your subject. Stay along the public stretch, and shoot with a 24-70 lens to capture the motion of skaters, joggers, and vendors. Take a few seconds to frame a pink wall as a backdrop for portraits, and keep a short video clip ready to merge into your story later.
Timing: arrive 30–45 minutes before sunrise for blue light, then ride the golden hour for the next 60 minutes. Wait for crowds to shift around the public railings, capture the moment when the first surfers ride the tiny waves, and keep the shutter at 1/200–1/320 to freeze action taken by vendors. Use the second light along the shore to highlight colors and texture of the boardwalk’s concrete seams. This approach yields amazing, worthy frames.
Angles: drop to knee level for low-angle shots along the boards, then climb a short rise or a hill behind the lanes to frame the abstract lines of the bridges and the storefronts. Shoot along Abbot Kinney with symmetry in mind: align the line of boutique storefronts, windows, and murals, and shoot from corners to reveal the pink accents and flowers painted on walls. Look for a reflection in a storefront window to create a graphic composition. Hills add perspective when you shoot from higher viewpoints.
Abbot Kinney: this destination gives you color and texture in one walk. Start near Venice Blvd, then move along the blocks with boutiques and cafés; seek a bookstore tucked between murals for a quiet interior moment. Use a longer lens for portraits against mural backdrops, and a 16mm lens for wide street scenes. You can find a mansion-style home behind the main street where the canyons rise–great backdrops for candid shots with a friend or two. Locals who lived here welcome your curiosity; sure, greet them with a feliz smile. Save a frame for a quick interview-style shot to capture friendship and local vibe.
Practicalities: plan transportation in advance, as parking along Venice can be tough. Use rideshare or bike routes; carry a light bag with extra batteries for both camera and phone, and shoot a mix of stills and short clips to build a story for your guide. If you want a cozy stop, duck into a bookstore or cafés; capture candid moments of locals and visitors who linger, which makes the day feel feliz and warm. When you wrap, save your favorite frames as favorites and label the location for quick reference in your next shoot. Just remember to keep the crowd in mind and to respect the public space, especially near intersections and bridges.
Hidden Rooftops and Public Overlooks: Quick Access with Clear Permissions
Begin with Griffith Observatory’s front terrace for a long, panoramic city view at night; this public space delivers dramatic silhouettes and clean lines that are ideal for taking pictures of the City of Angels. Arrive early for parking flexibility and to secure a clear line of sight to downtown lights.
-
Griffith Observatory – front terrace: vederi panoramice nocturne asupra centrului, orizont iconic, echipament compact funcționează bine, spațiu public cu reguli afișate, accesibilitate ușoară din parcarea principală.
-
Punct de belvedere spre podul 6th Street: perspectivă lungă, dramatică de-a lungul arcadelor, ideală pentru a surprinde linia orizontului și traseele luminate ale traficului, cel mai bine după apusul soarelui când luminile se aprind; accesul pietonal este public și direct.
-
OUE Skyspace LA (centru DTLA) – punct de observație Skyspace: panoramă cu zgârie-nori, cu o atmosferă curată și modernă; acces pe bază de bilet, verificați politica privind aparatele foto la intrare, excelent pentru fotografii nocturne cu luminile orașului pe fundal.
-
Perch LA – terasă pe acoperiș: design de inspirație europeană și vibrații urbane calde; deschisă în timpul programului restaurantului cu acces public, solicitați permisiunea pentru trepiede sau filmări mai lungi pentru fotografii cu expunere îndelungată.
-
Platforma Culver City – grădină pe acoperiș: punct de observație elevat cu o perspectivă relaxată și pitorească spre oraș; acces prin zonele publice ale The Platform, coordonați-vă cu conducerea pentru intervale de filmare extinse în perioadele de vârf scăzute.
Sfaturi pentru a menține accesul rapid și permisiunile clare:
- Sună înainte sau verifică site-ul locației pentru program, politica privind aparatele foto și orice restricții ale evenimentului – asta te scutește să ratezi momentul perfect pentru o fotografie reușită.
- Un setup ușor pentru deplasări rapide pe pasarele; un corp compact și un zoom versatil pot acoperi cadre lungi și largi fără a căra echipament greu.
- Planifică o filmare nocturnă după evenimentele de la locațiile din apropiere; luminile orașului răspund bine la filmările și fotografiile cu expunere lungă, iar o ratare a momentului optim poate fi evitată printr-o simplă verificare a calendarelor de evenimente.
- Respectați regulile afișate și limitele proprietății private; întrebați întotdeauna dacă nu sunteți sigur cu privire la utilizarea trepiedului sau la filmările lungi, în special pe acoperișuri și în piețe private.
- Pentru culori optime, filmează în timpul orei albastre și după, când luminile încep să contureze orizontul; vei găsi cadre panoramice spectaculoase, care merită capturate ca fotografii și video.
- Menține lentilele curate și evită reflexiile, unghiind cadrele de-a lungul marginilor de sticlă; acest lucru oferă prim-planuri clare și o siluetă mai ascuțită a orașului.
Când planifici, gândește-te cum fiecare loc ar putea face parte dintr-o secvență mai lungă: din fața orașului până la un orizont îndepărtat, apoi o încadrare arhitecturală mai apropiată pe un pod din apropiere. Dacă pierzi un moment într-un punct de belvedere, poți cronometra adesea o săritură rapidă la următoarea opțiune de-a lungul traseului, menținând filmarea eficientă și camera pregătită. Această abordare se potrivește atât vizitelor ocazionale, cât și proiectelor mai deliberate, permițându-ți să construiești un set curat, cinematografic, care să prezinte Orașul Îngerilor din unghiuri multiple și accesibile.