

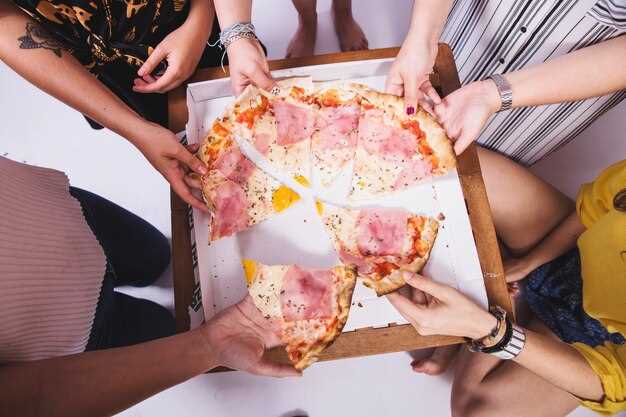
Book the 10:30 class today to secure a hands-on Rome pizza and gelato session near the piazza and start tasting within minutes.
During the practical session, you mix dough, knead by hand, and shape two pizza styles while a local provider explains the recipes behind the toppings.
It continues with a gelato station where you craft two flavors, followed by tastings of your own creations and a short description of each flavor profile.
First, you learn the basics in english with attention from an attentive instructor, then you try the oven technique behind a traditional wood-fired oven.
Our meeting point sits in a quiet quarter near a chapel, a short stroll from the bustling lanes, making the experience easy to reach.
You'll sample wines as you discuss pairing ideas, and the guide includes tips on timing, temperature, and sauce balance, with attention to each step.
The description of the day highlights a brief trip to a local gelato lab and a side of regional products, giving you a full taste of Rome.
Choose this provider for a memorable, hands-on experience, designed for english-speaking travelers who crave tangible skills and tasty rewards.
Rome Traditional Pizza and Gelato Making Class – Hands-On Experience; Fresh Pasta Making with Wine Recipes near the Vatican
Book the class before your Vatican visit to secure a spot and make the most of a full afternoon of pizza, gelato, and fresh pasta making. Included are hands-on dough kneading, sauce balancing, and shaping pasta under the guidance of italian chefs, including marco, who treats you like a friend and shares practical tips you can reuse at home.
The session actively builds skill through small, doable steps: rolling the dough, stretching sheets for fresh pasta, and creating a simple wine-inspired sauce. The menu varies with the season and the chef’s inspiration, which makes every visit unique. You’ll leave with a slice of pizza, a bowl of handmade pasta, and a dessert of gelato that showcases Italian love of simplicity and nature. Whether you have prior kitchen experiences or are a first-timer, the experiences here feel accessible.
Dining runs as a shared dinner where you can ask questions, adjust flavors, and keep pace with cooks who highlight inclusion and flexibility. The setting near the Vatican is easy to combine with a stroll through nearby countryside streets, and the experience has been noted by many travelers as practical and enjoyable. If you’re wanting a memorable, bottomless energy experience, this class delivers results that feel personal and well organized; expect approximately three hours of hands-on immersion, with timing around 12pm as a common option.
Hands-on Pizza Making: kneading, shaping, and baking Rome-style crust
Begin with 500 g tipo 00 flour, 350 ml water, 10 g salt, and 2 g fresh yeast. Mix until a shaggy mass forms, then rest 15 minutes. Knead by hand 8–10 minutes, keeping the surface lightly floured and the dough damp to the touch. When it becomes smooth, elastic, and slightly tacky, you’ve reached the right texture. This behind-the-bench step reveals how hydration and timing shape your Rome-style crust.
In the pizzaiolo approach, actively push and fold the dough to develop gluten without tearing. The environment matters: a steady room temperature and a clean, flour-dusted counter help you sense when the dough holds its shape. Work early in the session so you keep momentum, and use an included bowl with a touch of oil to ease the next rise. Some sessions explore higher hydration versus низкой hydration to show how moisture affects texture.
Shaping follows kneading. Divide into four balls of roughly 230–260 g each. Gently press from the center outward with fingertips, leaving a thicker edge to form the cornicione. Rotate the dough as you shape to maintain an even circle and avoid tearing. This step builds your flexibility and confidence as you learn to manage different doughs.
Bake to finish: preheat a stone or steel to 260–290°C and slide the dough onto the hot surface. In a typical half-day class, bake each pizza 6–8 minutes, until the bottom is deeply browned and the rim blisters. A Rome-style crust should be crisp on the bottom and soft inside, with a lacy texture that cooks quickly in a hot oven. Include a drizzle of olive oil and a quick finish of fresh herbs for a signature aroma. Chefs share secrets about how to judge doneness by color and aroma.
Our half-day program includes hands-on rotation behind the line with chefs and fellow students. You’ll see how farmers’ wheat and fresh ingredients influence texture and flavor, and you’ll leave with coherent steps to recreate the look and feel of a true pizzaiolo crust in your own kitchen. The duration is structured to give enough time to practice, observe, and express your progress with confidence.
| Step | Duration |
|---|---|
| Mix, rest, and knead | 23–28 minutes |
| Fermentation and bench rest | 60–120 minutes |
| Divide and shape | 5–7 minutes per dough |
| Bake on stone/steel | 6–8 minutes per pizza |
Gelato Basics: base ingredients, flavor development, and churning technique
Start with a simple, well-balanced base: 2 parts whole milk, 1 part heavy cream, and 0.8 parts sugar per part dairy; whisk in 1–2 egg yolks for silk, add a pinch of salt, and then rest the base in the fridge for a 3-hour chill to mellow flavors and emulsify fat. Treat each part of the mix as a separate layer to fine-tune texture and sweetness.
Base quality matters. Use milk and cream located from trusted sources, keep everything cold, and avoid older ingredients that can skew texture. Behind each batch, maintain a clean station to prevent disease, and you’ll notice the creaminess stays consistent even as plans for the day evolve. If you shop by цене, you’ll find good, affordable dairy that supports your 3-hour prep window while you test flavors.
Flavor development hinges on layering. Start with a backbone such as vanilla, cocoa, or coffee, then add fruit purée, roasted nuts, or spice in small doses. Heat fruit briefly to drive off water, cool, and fold in, particularly when you want a bright citrus or berry note. Rinascimento-inspired patience pays off: give flavors time to mingle, letting memories rise and come through in the aroma. The final profile should echo romes markets and the bustle of a piazza, creating a sense of place for your guests to enjoy.
Churning technique determines texture and mouthfeel. Chill the base to about 4–6 C before spinning, then run at a moderate speed to keep overrun around 20–25%. Churn until the mixture is smooth and just scoopable; this usually takes 8–12 minutes depending on your machine. Use a thermometer and timer to be precise, and plan a short maturation if you want a deeper flavor. There, you’ll see how giving the base time yields a richer gelato that your guests happily eat and remember. Pair a tasting with a quick e-bike ride to a nearby piazza; it links the craft to the setting and makes the learning part of a larger plan, and memories keeps growing. If you have a compact setup, you can still reach a fine result.
Tips for home and workshop: keep equipment clean, taste often, and adjust sweetness or fat to reach a balanced profile; plans for future batches should note how each testing round moves closer to a master finish. For a full experience, include both dairy and non-dairy options and tailor techniques to the ingredients you have on hand; however, maintain the core steps: base, flavor, churn, and maturation. Eating gelato with friends turns a simple recipe into lasting memories. This keeps memories vivid for guests.
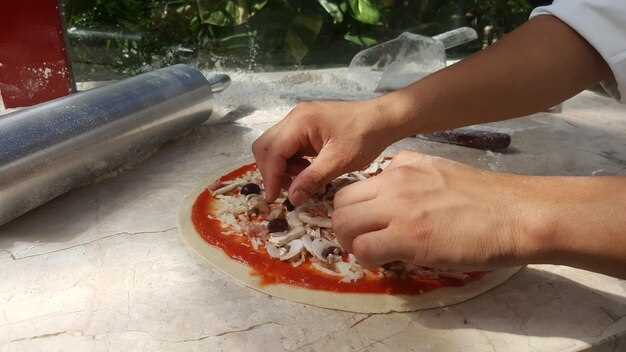
Fresh Pasta Workshop: dough ratios, rolling sheets, and cutting shapes by hand
Begin with a standard batch: 400 g 00 flour and 4 large eggs (about 200 g total), a pinch of salt, and 1 tbsp olive oil. Knead 8–10 minutes until the dough is smooth and elastic, then wrap and rest 30 minutes to relax the gluten. Consider scaling: 100 g flour per egg is a practical guide you can adjust to fit the group dining, whether regular meals or a leisure session along a piazza.
Egg-free option: 450 g flour, 250 ml water, 1–2 tbsp olive oil, a pinch of salt. Knead 10 minutes, rest 30 minutes. weve found that resting the dough greatly improves elasticity and makes rolling easier, whether you choose eggs or a water-based dough.
Divide the dough into 4 pieces; keep them covered. Roll by hand or with a machine set to the widest gap, then progress to 0.6–0.8 mm for tagliatelle. If rolling by hand, aim for about 1.5–2 mm on the first pass, then thin to 0.6–0.8 mm. Let sheets rest 5–10 minutes between passes to prevent sticking. The exact thickness varies where you roll, whether by hand or with a machine, but the target remains evenly thin ribbons.
Cut shapes by hand: cut ribbons 6–8 mm wide for tagliatelle, 1.8–2 cm for pappardelle, and longer lengths for fettuccine. For lasagna sheets, stop at 0.8–1.0 mm and stack with light flour between layers. Gather finished ribbons into small nests and dust lightly with flour to keep them loose. This masterful process rewards patience and yields cooks the chance to master the rhythm of a professional kitchen in a workshop setting.
Tips for success: dust with semolina or cornmeal to reduce sticking, keep dough covered to maintain moisture, and rest between passes if it thickens. In cookly fashion, mobility matters: in small spaces, a compact board and a rolling pin still produce perfect sheets. The process is forgiving when you keep a steady, even pressure and avoid tearing the dough, which is often the result of rushing, where the method varies with space, you adjust accordingly.
Pairing and plating: the moment you drizzle a creamy sauce or melt gooey cheese into the ribbons, you feel the italian soul in every bite. This workshop highlights secrets gathered from italys kitchens: rest, roll, cut, and finish with a quick toss in hot water, then a splash of olive oil and parmesan. Whether you’re cooking for regular dining or a leisure session with friends along a piazza, the joy comes from the craft and the shared dining experience, come and enjoy.
This is a master class in the craft of pasta, a professional approach to a humble dough. The process yields perfection that you can repeat at home; weve seen participants gain confidence and introduce guests to the aroma and texture of fresh pasta. Secrets lie in consistent thickness, gentle handling, and timely resting–essentials that translate from the workshop to your own kitchen, often bringing nature-inspired simplicity to your table and cementing pasta as a true italian staple.
Wine Pairings for Pasta Dishes: regional notes and tasting steps
Begin with a crisp Verdicchio or Frascati for olive oil–based pasta; youll keep the ingredients bright and your pasta-making craft clear as you explore navona region nuances with your instructor. Share insights, recreate a few pairing tweaks during adventures, and thank the team for the guidance and Delights of the tasting day.
- Navona/Lazio staples: cacio e pepe, amatriciana. Pairings: Frascati, Trebbiano d’Abruzzo. Tasting steps:
- Look: pale straw to light gold, with a clean rim
- Smell: citrus zest, almond, mineral
- Taste: bright acidity, salt from pecorino or guanciale, and a balanced finish with subtle fat
- Finish: keep notes on how the wine mirrors or counters the sauce
duration: 4–6 minutes; price: €20–€40 per bottle in local osterie; guidance: instructor directs the session
- Southern tomato-based sauces: ragù or pomodoro with garlic and basil. Pairings: Lacryma Christi del Vesuvio Rosso, Aglianico del Taburno. Tasting steps:
- Look: ruby to garnet, medium viscosity
- Smell: cherry, plum, a hint of smoke
- Taste: fruit-forward opening, then drying tannins that refresh the palate
- Finish: note how acidity counters sweetness and fat in the sauce
duration: 5–7 minutes; price: €18–€38 per bottle; guidance: instructor offers guidance and prompts for comparison
- Creamy or mushroom-based sauces: Emilian–Romagna or Piedmont styles. Pairings: Chardonnay from Friuli or Gavi, Pinot Grigio blends. Tasting steps:
- Look: pale to medium gold, clean clarity
- Smell: quince, pear, light almond, with Mineral hints
- Taste: high acidity cuts richness, wine length complements the cream
- Finish: assess how long the wine lingers and whether fat feels balanced
duration: 6–8 minutes; price: €22–€50 for notable bottles; guidance: instructor demonstrates adjustments with different ingredients
Several regional notes emerge when you prepare for a wine-pasta pairing session: use staple sauces as anchors, test with a small croquettes starter to gauge texture interplay, and keep a tasting log so your palate can recreate successes later in your travels around Navona and beyond. Источник: regional pairing guide and classroom notes.
Practical Logistics: booking tips, what to bring, and getting to the Vatican area
Book the private 12pm slot at least two weeks in advance to secure an intimate, hands-on experience. For a small group, a private booking is ideal, keeping you with them for the first step and letting the instructor tailor the pace to your level. This luxury option offers a focused, back-to-basics process that makes every moment personal.
When booking, look for offers that are interactive and include dining elements plus a set of recipes you can recreate at home. Check cancellation terms and group size limits, and verify that organic ingredients are used. If considering dietary needs, confirm substitutions ahead of time and ask whether the process can be adjusted without compromising quality. There are things to check, including whether the class is listed as regular or private, and whether the booking includes access to a kitchen space suitable for cooking classes.
What to bring is simple and practical: comfortable shoes, a compact bag, a bottle of water, and a hair tie. A lightweight apron is often provided, but bringing your own can feel more personal during the crunch of flour and sauce. Bring a notebook or device to capture recipes and notes; you can turn the notes into recipes for your home kitchen. For hygiene, pack hand sanitizer to reduce disease risk, and plan to arrive at the central meeting point to stay connected to the flow of activities.
Getting to the Vatican area from central Rome is straightforward. Take Metro Line A to Ottaviano-San Pietro or Cipro; exit near the Vatican walls and walk about 10–15 minutes to reach the central square. If you prefer buses, routes from Termini connect to Piazza Risorgimento with a short stroll. To avoid crowds, consider arriving a bit earlier than the 12pm session; then you can combine your visit with a quick dining stop or a private tasting before heading back.