

 Magic Island Lagoon – Odkryj Krystalicznie Czyste Wody, Groty i★">

Start at dawn and slip into a swimsuit for a calm, sunlit inlet. On the hawaiian coast, water clarity often reaches 10–15 meters, so visibility is great for snorkeling along a shallow reef edge just beyond the breakers. Pack reef-safe sunscreen, a quick-dry towel, and a hat to stay comfortable as you explore the whole shoreline from the beachfront to the sheltered cove.
On the main beach, lifeguards are on duty 9:00–17:00; follow posted guidelines and stay within the lifeguard-patrolled zone. For newcomers, a licensed guide can display safe routes for snorkeling and kayaking and tailor a plan that works for your whole group and shows them safe routes.
Beyond the shore, you can navigate a sheltered inlet by kayak and pass lava-tube grottos along the beach where light dances on polished rock. Guided tours typically last 2 to 3 hours, include safety briefings, buoyancy tips, and a chance to swap between swims and calm paddles.
What to bring and wear: a swimsuit, water shoes, rash guard; bring a waterproof bag and a bottle of water. A kayak rental on the beachfront makes it easy to combine a paddling session with a snorkeling leg. For families, choose tours that stay close to shore and offer gear for all ages, plus a quick dolphin sighting display.
To protect the habitat for fish and reef life, choose operators with sustainable practices. Respect coral, don’t touch marine life, and rinse gear after trips. This hawaiian haven keeps a thriving underwater world for fish, parrotfish, and wrasse. The future you plan with mindful choices will help these worlds endure, letting you escape the noise of vegas crowds and truly make memories that last a lifetime for the whole family, both on land and in the water.
Magic Island Lagoon: Discover Crystal Waters, Caves & Traveler’s Photos
Plan a dawn visit along the oceanfront path for the softest light and the best reflections. Bring sturdy shoes for rocky patches, a hat, water, and a light layer; you’ll find the moment just right for capturing the whole setting and the dramatic lava-block silhouettes.
The area teeming with locals and visitors offers opportunities for adventures for everyone in your family. kekoa village nearby adds a delightful cultural stop, and you’ll probably enjoy sampling hawaiian snacks before or after a beach stroll.
What to do and how to photograph
- Arrive early to beat crowds and to catch glassy water that makes colours pop along the beach and rocky shore.
- Walk or ride the oceanfront boardwalk to reach grottos and lava-tube alcoves; these features feel jurassic in scale and create dramatic frames.
- Place people in the foreground for scale–this helps your display of the whole scene feel more cinematic and scenic.
- Seek lines and reflections that include the setting sun or dawn sky; shoot from slightly low angles to emphasize the blocky lava formations and the gentle waves.
Praktyczne wskazówki dla odwiedzających
- Shoes with grip are essential on slick rocks; wear comfortable footwear and bring a spare pair if you plan to wade.
- Weather can shift quickly; however, mornings stay calmer and offer the best light for beach photography.
- Carry water, sunscreen, and a lightweight towel; respect the local space and avoid stepping on fragile areas near the grottos.
- Respect locals and hawaiian culture; ask permission before attempting portraits of people and parts of kekoa offerings shown by vendors.
- Stay within designated areas; the whole shoreline features natural displays that are best enjoyed from the approved paths, not the block edges or unstable ledges.
Whether you’re after the great family photographs or a quiet moment, this setting offers chances for future memories. You’ll probably leave with a delightful portfolio, a sense of passion for the coast, and motivation to plan another visit when the weather aligns for even more stunning light and dynamic scenes along the beach and beyond.
What to pack for a lagoon photography day
Start with a compact, weather-sealed kit: one body, two versatile lenses, three spare batteries, and a fast memory card kept in a dry bag. Add a lightweight tripod or monopod and a polarizing filter to enhance color display and cut glare off shallow water.
Save space by choosing items that cover multiple needs: a cooler for drinks and snacks keeps energy steady, while a microfiber cloth handles salt spray between shots.
- Gear and storage: dry bag for phones and filters, spare charger, and a compact backup lens or two if you want flexibility without carrying a second body. Ensure enough room for three focal options to cover reef edges and gentle shelves.
- Protection and safety: reef-safe sunscreen, a wide-brim hat, water shoes, and a light rain shell. Observe fire restrictions and keep a safe distance from wildlife and restricted areas; always respect shoreline erosion zones and currents near the jungle edge.
- Personal comfort and readiness: quick-dry clothing, a change shirt, lip balm, and insect repellent. Know restrooms near the parking lot or access point to minimize time off the water.
- Hydration and nourishment: abundant water or electrolyte drinks; keep snacks in the cooler for long shooting blocks, and plan for enough breaks to avoid fatigue.
- Logistics and local tips: plan to start from a hotel near the access points, and use three main sites along the coast at Kualoa for varied backgrounds. TripAdvisor reviews providing access tips and named spots can help finalize your day. The area offers a haven of scenery and a display of light at different angles; staying organized helps you maximize sessions and capture more moments.
- Water activity gear: if you’ll be kayaking or roving near shore, bring PFDs, a dry bag for valuables, and a compact towel. Check weather windows and whether wind gusts will affect stability; keep gear secure during wading or board transfers.
Whole-day planning should include easy access to a cooler, a plan for three shoots at distinct reef faces, and pockets for extra memory cards. This activity benefits from a deliberate plan and staying mindful of conditions; if rain appears, switch to sheltered viewpoints and adjust timing to catch the best light without rushing.
Camera settings for vivid turquoise water and shaded caves
Start in Manual, shoot RAW, 1/320s at f/8, ISO 100, WB 5200K. Bracket ±0.3 and ±0.7 EV to cover the whole spectrum from bright sites to shaded caverns; latest mirrorless bodies deliver clean color and low noise, most effective when you stay within ISO 400–800 in bright sun.
Use a wide-angle lens (14-24mm full-frame, 10-17mm on crop) to capture the whole reef scene; fit a polarizer to cut reflections from the glass surface; shoot slightly underexposed (-0.3 EV) to preserve turquoise hue and maximize color depth; youll get more dimension than you expect.
For shaded grottos within lagoons: switch to 1/60–1/80s, f/5.6–8, ISO 400–800; apply +0.3 to +1.0 EV to brighten shadows; enable live view and magnify focus; WB 4800–5200K preserves blue-green tones; consider a second shot with WB 4200K for a warmer mood. This approach works well during morning exploring.
Color and mood: shoot RAW for latitude; in post, boost turquoise hues modestly, avoid oversaturation; adjust hue and saturation for lagoons without shifting reef colors; for the village and waikiki scenes, you can enjoy the transformed light across the year.
Lens and composition: choose a wide 16-35mm or 8-15mm for the whole reef/arch; keep horizon level; frame to include reef edges and rock formations; use a fast, stable platform on land and move slowly to avoid blur; you can enjoy the scene without forced shortcuts.
Gear notes: amagi components and other latest optics stabilize close-up shots; if glare persists, a glass filter helps manage glare on bright mornings; you can soak color by bracketing and blending in post, then compare results to see which version works best for most sites. This approach ensures truly vibrant results.
Morning sessions with granddaughters exploring the coast near lagoons are ideal: transforming the whole experience and giving you a reason to push your camera work; from waikiki to a nearby village, enjoying the moment, soak in the light, and youll produce Hollywood-worthy tones that feel natural and well balanced.
Getting there: best routes, parking, and transit near Magic Island Lagoon
Plan your visit around parking strategy: the east lot behind the shoreline park offers the simplest access, with a short, shade-dappled walk to the gate. This option draws a group and young lovers, especially on vibrant afternoons, so arrive early to secure a spot. If that space is full, on-street meters along the adjacent boulevard provide additional options, including other nearby lots. Bring cans or bottles to the recycling bins, and leave no trace. Something practical to remember: plan a return route in case the first option is full.
Best routes to reach the peninsula allow a straightforward approach from central areas: head toward Ala Moana Park boundary via Kalakaua Ave or Dole St, then follow the signs toward the harbor edge and main promenade. The walk from the gate to the shore is brief, providing a quick window for photos and enjoying the scenery. If you are indulging in a group outing, a single carpool makes parking easier and reduces stress. Street corners may host magicians and buskers, making the stroll something truly memorable and made for fun.
The public transit option is reliable: TheBus ferries lines connecting downtown, Waikiki, and the adjacent marina; alight at the Ala Moana Blvd stops near Atkinson Dr, then stroll along the seawall to the access gate. A short ride saves parking hassles and is friendly for a budget plan. For those traveling with gear for diving or beach days, you can bring equipment on board where allowed. Use a mobile app to track arrival times and reduce waiting in the hot sun. For a dash of color, nearby nights sometimes showcase street acts that echo a vegas vibe, making the return stroll memorable.
Facilities nearby include restrooms, shade trees, and water fountains; there are options for boating and launching small craft from nearby marinas, with dedicated times. If you are indulging in a lazy afternoon, bring a blanket or towel to enjoy the rock outcrops while watching the water. Photographers and film crews often film along the shoreline; obtain required permissions for filming in certain zones; refill water bottles and dispose of waste properly; many visitors plan to stay mid afternoon for the best light. For diving enthusiasts, a nearby cove offers shallow spots for practice in safe conditions, with lifeguards on duty during peak season.
Etiquette tips: keep noise to a minimum, respect wildlife, and avoid fires; there are no designated fire pits; avoid leaving trash; use provided cans and recycling bins; respect signs about currents and diving restrictions; the area is continuously maintained, with ongoing improvements to signage and safety features to keep visitors safe while enjoying the scenery. A reminder: if you are traveling with a group, designate a meeting point and plan a time to regroup, bringing extra water and snacks for the afternoon.
For visitors seeking a famous sunset backdrop, the vantage points along the promenade deliver a truly memorable experience, with rocks and breakers framing the horizon. The site is popular with families, groups, and solo travelers alike; the afternoon light is ideal for filming and photos, and the surroundings invite enjoying the moment with magicians performing on weekends and the feel of a valley nearby. Being near the water, it’s a great place for resting in shade, grabbing a snack, and planning your next outing, whether you prefer boat trips or a quiet reading spot. In short, the route and packing plan make it easy to enjoy the scenery again and again, bringing a sense of calm after a busy day in the city; thank you for considering this stop, and see you again soon.
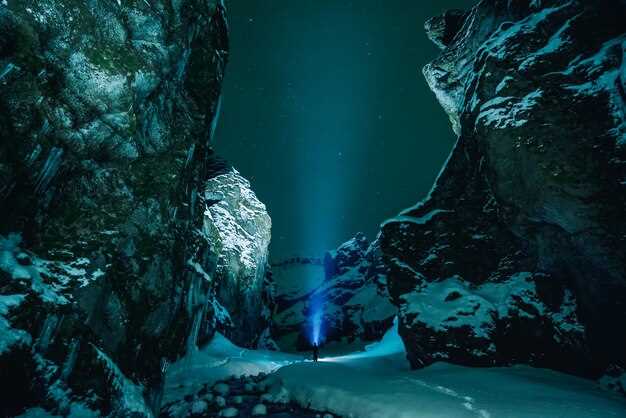
Safety and access guidelines for cave exploration and water zones
Before you enter this lagoon system and adjacent caverns, check weather conditions and tide windows; strong swells or sudden rain can render passages dangerous. Limit entry to daylight hours for visibility and plan an exit route; this makes the experience safer and more enjoyable.
Go with a licensed guide or a knowledgeable oahu-based operator; lifeguard presence adds a layer of safety, and many hawaiian tours tailor routes to families. Never go solo; for kids, keep within arm’s reach and wear a properly fitted life jacket at all times.
Wyposażenie ma znaczenie: noś kask ochronny z zamontowanym światłem, używaj solidnych butów do wody, miej ze sobą suchy worek, weź gwizdek i apteczkę pierwszej pomocy. Kaski marki Amagi lub podobny sprzęt ochronny to rozsądna opcja; weź zapasowe baterie. Miej łódź gotową do wiosłowania, jeśli pogoda zapewnia spokojne odcinki laguny, co może zamienić rutynową aktywność w prawdziwą wycieczkę rodem z filmu.
Zasady dostępu: trzymaj się wyznaczonych tras i stosuj się do umieszczonych znaków; unikaj zamkniętych wejść i nie przeciskaj się przez wąskie szczeliny. Zachowaj bezpieczną odległość od ścian skalnych i dzikiej fauny w płyciznach. Nie łów ryb w strefach objętych ograniczeniami w pobliżu wejścia; chroni to bogate życie morskie i zapewnia bezpieczeństwo wszystkim w pobliżu.
Ostrzeżenia dotyczące stref wodnych: nie nurkuj ani nie sprintuj przez zalane wodą przejścia; poruszaj się powoli i trzymaj stopy do przodu, aby uniknąć wzburzania osadów. Jeśli woda jest mętna lub prądy się nasilają, wycofaj się w bezpieczniejsze miejsce. Nie dotykaj stalaktytów ani stalagmitów; są kruche, a ich dotykanie stwarza zagrożenie. Trzymaj się w zasięgu wzroku przewodnika i grupy i zawróć, jeśli widoczność spadnie poniżej akceptowalnego poziomu.
Etykieta środowiskowa: przylegająca linia brzegowa może być ostoją dzikiej przyrody; unikaj głośnych dźwięków, nie zabieraj muszli ani kamieni i zabieraj ze sobą wszystkie śmieci. Pamiętaj o cieniu dostępnym w naturalnych osłonach; oszczędzaj go dla komfortu i bezpieczeństwa podczas przemieszczania się między strefami. Miejsce to często oferuje podwójne atrakcje, łącząc spokojne wiosłowanie z surową eksploracją, a sceneria może przypominać wizualizacje rodem z Hollywood, wzbogacając doświadczenie przy jednoczesnym poszanowaniu siedliska.
Planowanie i komunikacja: przejrzyj ten plan ponownie przed rejsem lub inną wodną wyprawą; podziel się swoim planem podróży z kimś na brzegu i potwierdź aktualne informacje o pogodzie. Przy odpowiednim przygotowaniu i uprzejmej współpracy, pełny plan podróży pozostaje bezpiecznym i satysfakcjonującym hobby zarówno dla rodzin, jak i doświadczonych odkrywców.
| Kategoria | Wytyczne | Best practices |
|---|---|---|
| Pogoda i czas | Sprawdź prognozę, unikaj wejścia podczas złej pogody lub wysokiej fali; światło dzienne jest bezpieczniejsze. | Obserwuj bieżące aktualizacje; jeśli nie masz pewności, odłóż i zaplanuj ponownie. |
| Wyposażenie | Kask z czołówką, kamizelka ratunkowa, buty do wody, wodoszczelny worek, gwizdek, apteczka. | Użyj sprzętu Amagi, jeśli jest dostępny; sprawdź baterie i zabezpiecz luźne przedmioty. |
| Grupa i nadzór | Nigdy nie idź samemu; trzymaj dzieci w zasięgu ręki; wyznacz lidera i osobę zamykającą grupę. | Poinformować kontakt brzegowy o harmonogramie; w miarę możliwości zapewnić obecność ratownika. |
| Dostęp i oznakowanie | Przebywaj na wyznaczonych szlakach; przestrzegaj zamknięć i lokalnych zasad dostępu; mogą być wymagane sąsiednie pozwolenia. | Przed wejściem zapytaj przewodników lub strażników o aktualne obostrzenia. |
| Zachowanie w jaskiniach i strefach wodnych | Unikaj dotykania formacji; zakaz nurkowania; zachowuj odległość od ścian i skał. | W razie słabej widoczności lub wzrostu prądu, natychmiast się wycofać. |
| Dzikie zwierzęta i środowisko | Nie łowić w pobliżu punktów wejścia; minimalizować hałas; nie usuwać naturalnych obiektów. | Szanuj obfitość życia i cienia; filmuj dyskretnie, aby chronić środowisko. |
| Gotowość na sytuacje kryzysowe | Znać najbliższego ratownika lub kontakt alarmowy; mieć plan i gwizdek. | Udostępnij plan podróży i miej naładowany telefon; zaplanujcie wspólnie strategię wyjścia. |
Najlepsze miejsca na zdjęcia: uchwycenie krystalicznych wód i dramatycznych faktur jaskiń
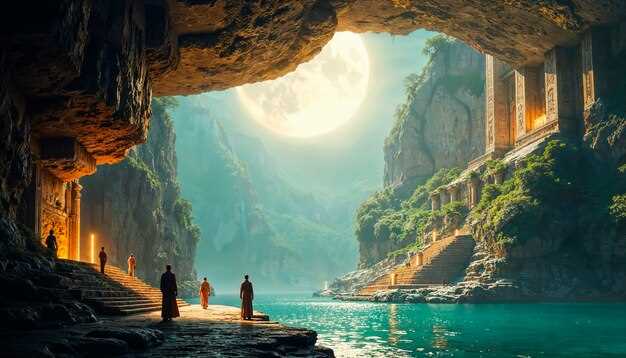
Rozpocznij na klifowym tarasie nad doliną tuż po wschodzie słońca aby wykorzystać możliwości w delikatnym, bocznym świetle. Ustaw aparat w tryb manualny; ISO 100; przysłona f/9–11; czas otwarcia migawki 1/8–1/2 s, aby uzyskać jedwabiste odbicia na gładkich taflach wody. Użyj polaryzatora, aby pogłębić błękity i zredukować odblaski. Zabierz obiektyw szerokokątny (16–35 mm) do rozległych krajobrazów i teleobiektyw (70–200 mm) do ciasnych tekstur na ścianie skalnej. Parkowanie w pobliżu dolnego wejścia jest proste, ale przyjedź wcześnie, aby zająć dobre miejsce.
Dwa na miejscu: wąski korytarz groty z warstwowymi teksturami wapienia; gdy słońce pada pod kątem przez szczelinę, promienie przecinają mineralne ściany i tworzą dramatyczne oświetlenie krzyżowe. Aby to uchwycić, fotografuj przy f/8–f/11, ISO 200, 1/60–1/125 s. Użyj statywu do dłuższych ekspozycji. Aby uzyskać szczegóły, przełącz się na 100–200 mm i kadruj tekstury na tle jasnego otworu. Odkryj egzotyczne tony i układ odbić.
Wskaż trzy: wycieczki łodzią wypływają z nabrzeża; fotografuj z pokładu, aby uchwycić cienie życia morskiego i skalne ściany z nowej perspektywy. Jeśli szukasz różnorodności, oddal się od brzegu, aby znaleźć spokojniejsze trasy; rób ciaśniejsze kadry linii pływów i gry kolorów.
Dostrzeż cztery.: strefa nadmorska w pobliżu udogodnień hotelowych; scena obejmuje grupy rodzinne i miejscowych grających w siatkówkę o złotej godzinie; użyj obiektywu 70–300 mm, aby wyizolować faktury na tle słońca; zaparkuj w pobliżu parkingu i wejdź na piasek.
Praktyczne uwagi: zabierz dodatkowe baterie i karty pamięci; załóż wygodne buty na ścieżki w dolinie; źródło światła przenikające szczeliny skalne dodaje ciepła we właściwym momencie. Szereg punktów widokowych – taras hotelowy, półki skalne i nabrzeże – oferuje różne poziomy głębi i koloru. Niezależnie od doświadczenia w fotografii, możesz tworzyć niezapomniane obrazy, które ujawniają egzotyczne światy, przyjemne tekstury i chwile do dzielenia się z rodziną.
Rezerwacja sesji zdjęciowej z przewodnikiem i uzyskiwanie dostępu do pakietu Zdjęcia Podróżnika
Zarezerwuj wcześniej przez oficjalne biuro lub listę tripadvisor, aby ensure sesji. Aby uzyskać najlepsze światło, wybierz późne popołudnie lub wczesny wieczór, zwykle około dwóch godzin; przewodnik poprowadzi Cię przez egzotyczną linię brzegową, zacienione miejsca i płytkie sadzawki, z paddle momenty i szczere portrety, którymi wszyscy będą się cieszyć i które staną się częścią magicznego wspomnienia, które będziesz cenić jeszcze długo po powrocie z podróży.
Pakiet Zdjęcia Podróżnika zapewnia prywatną galerię online, JPG o wysokiej rozdzielczości, oraz edytowane selekcje, które możesz pobrać i udostępniać. Otrzymujesz prawa do użytku osobistego, link dla znajomych oraz opcje zamówienia odbitek lub niestandardowej fotoksiążki. Roczna opcja pamiątkowa oferuje aktualizowane wybory co roku, pomagając dodawać więcej wspomnień z przygód w światach podróży, ze starannie wyselekcjonowanymi array pamiątek pasujących na każdą kieszeń.
Porady dotyczące rezerwacji: wait czas można skrócić, znając miejsce spotkania, zapoznając się z zasadami anulowania i zmiany terminu oraz potwierdzając wszelkie dodatki przed przyjazdem. Popołudniu i wieczorem można cieszyć się głębszymi tonami; cień i spokojna woda sprawiają, że sesje są komfortowe zarówno dla rodzin, jak i par w różnym wieku. Dla momentów miesiąca miodowego pakiet oferuje magiczne wspomnienia, które wykraczają poza zwykłe zdjęcia z podróży, a recenzje na Tripadvisor konsekwentnie chwalą liczne atrakcje i sprawnie działający proces podczas kilku godzin zabawy.
Nawet w godzinach szczytu zespół dba o minimalne czasy oczekiwania i dobrą organizację procesu.
W dniu wycieczki przewodnik dba o dobrą organizację i dzieli się ciekawostkami historycznymi na temat danego miejsca. Następnie, pocztą elektroniczną lub SMS-em otrzymasz link do galerii zdjęć z podróży – możesz pobrać pliki, zapisać ulubione i zamówić pamiątki. To wszystko sprawia, że z łatwością możesz odświeżać wspomnienia co roku, zamieniając każdy etap podróży w pamiątki, którymi można się cieszyć w różnych momentach i różnych zakątkach świata. Krajobrazy inspirowane słowem "aina" dodają egzotycznych barw Twoim wspomnieniom, przypominając, że całe doświadczenie było czymś więcej niż tylko chwilą.
Region ten honoruje dziedzictwo ainu poprzez kolory i faktury, które inspirują sesję.
Pakiet zdjęć podróżnika – co zawiera: dostawa, formaty i prawa użytkowania
Rekomendacja: Otrzymaj dostawę w pełnej rozdzielczości w formatach TIFF i JPEG, aby zapewnić przyszłościowe obrazy do druku, publikacji internetowych i mediów. Pakiet obejmuje bezpieczną dostawę w chmurze w ciągu 24–48 godzin po półdniowej sesji, a także nazwane, zorganizowane archiwum i opcjonalny transfer na USB. Spodziewaj się barwnego widoku przestrzeni ośrodka i oaz w dżungli, z lagunami w tle dodającymi luksusowego charakteru.
Formaty i struktura: zestaw materiałów obejmuje JPEG-i w wysokiej rozdzielczości (z zarządzaniem kolorami w sRGB i Adobe RGB), TIFF-y gotowe do druku oraz oryginalne pliki RAW na żądanie po certyfikacji. Pliki są nazywane według sesji i zorganizowane w sposób ułatwiający import do systemów marketingowych hotelu lub parku; konfiguracje parkingów i kolacji są skatalogowane wśród scen, a zestaw można wykorzystać do galerii online, katalogów rocznych lub innych projektów. Od sesji zdjęciowej po dostawę, metadane zapewniają możliwość wyszukiwania i spójność wszystkiego, zarówno podczas wieczornych, jak i dziennych aktywności.
Prawa użytkowania: zapewniają ogólnoświatowe, wieczyste, niewyłączne prawa do użytku osobistego i marketingu ośrodków wypoczynkowych we wszystkich mediach. Licencja obejmuje posty w mediach społecznościowych, broszury, banery internetowe oraz najwyżej oceniane doświadczenia, przewodniki zakupowe i kampanie roczne; odsprzedaż na stronach ze zdjęciami stockowymi wymaga jednak odrębnej licencji. Do ostatecznych plików dołączona jest notatka certyfikacyjna wyjaśniająca zakres, autorstwo i własność. To rozwiązanie może wspierać przyszłe kampanie, a rozmowa z zespołem pozwoli dostosować zakres do luksusowych doświadczeń i programów kulturalnych, w tym kolacji i innych immersyjnych aktywności.