


Plan a dawn Embarcadero stroll for hue and a moment at the alcazar-inspired courtyard to capture a painting moment that blends story and light. This bonus shot anchors your list of top photo spots for the city.
From there, take a walking route of about half-mile through the city’s districts to the Palace of Fine Arts. The eucalyptus trees along the path add a fresh scent and a soft breeze that makes the tone pop in your frame. Crowds form early, unfortunately, so arrive before peak hours to keep shots clean.
Capture a tight angle on Lombard Street’s curves, then climb to a vantage near Coit Tower for a panorama over the bay. A quick snack break–cake or a simple avocado toast–recharges you for the next stop while you maintain momentum in your recreation plan.
As dusk settles, still chase moody silhouettes along the Golden Gate Bridge and Crissy Field, and slightly foggy conditions can soften the lines and create a hue wash that looks great in a vertical frame. If you spot a vintage sign or mural with a classic cafe name, pause to frame it for a tiny narrative detail that adds personality to your feed.
15 Most Instagrammable Places in San Francisco: Top Photo Spots; – San Francisco Instagram Spots Shops
Alcatraz Island Start your shoot at sunrise to catch the fortress against the deep blue; the iconic silhouette is taken from the ferry deck or the shore, giving you dramatic light while you map the rest of your route. You’ll find spots everywhere for closeups of the rock and water, and the view literally commands attention.
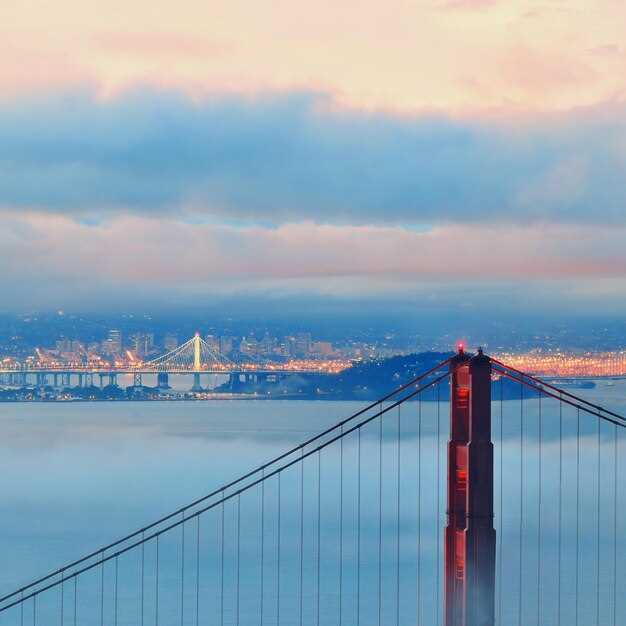
Golden Gate Bridge – Crissy Field Overlook First light makes the bridge glow and the coastline opens up with a downhill slope toward the bay. Shoot from Battery Spencer for gigantic city silhouettes, or from Crissy Field for a flatter horizon that makes the bridge stand out. A simple phone or inexpensive lens can capture the scene anywhere in the vicinity; the view gives you a classic SF vibe.
Painted Ladies @ Alamo Square The lined Victorians are lovely and instantly iconic. hellen swears by this spot for its glow, and you can shoot toward the housing row for a color block that pops in films and social feeds. The nearby hills let you angle the shot to include the city in the background, with a cozy, friendly vibe.
Lombard Street (Crooked Street) The downhill bends create a playful chance to capture the curve against the skyline. Pan the frame to include the ornate brick, the green medians, and passersby; it’s a frequent subject in films. For a quick, inexpensive take, shoot from the sidewalk as cars descend and bikes drift by; the vantage is included in most city guides.
Coit Tower The elevation above the Financial District gives you a clean panorama of the bay and skyline. A handheld shot from the base captures the tower with the city stretching everywhere below. In the late afternoon, the light softens the facade’s white, making the scene camera-friendly.
Lands End & Point Bonita Lighthouse The stony coast here frames the rugged Pacific and headlands. Walk the trail to the lighthouse, then turn to the cliff views; you’ll get dramatic silhouettes as waves crash. The trail is a perfect place to capture a natural, outdoor vibe with a rugged mood.
Twin Peaks The city unfolds with gigantic elevation above you, a dream for panoramic shots. Sunset here floods the streets with a warm glow that you can’t miss, and the view looks impressive both in color and in monochrome. You can do a quick, inexpensive shoot; the wide horizon makes every shot feel grand.
Palace of Fine Arts The curved colonnade and tranquil lagoon create reflections that look straight out of a studio set. Use a long lens to compress the distance and capture the water with the stone details; this spot is a magnet for lovers of architecture and calm tones. The area around the lagoon has a steady stream of visitors, so you can wait for a moment when the crowds thin, letting your image live with less clutter.
Japanese Tea Garden Lanterns glow along stone bridges and mossy paths, creating a tranquil palette that feels instagrammable. It’s an inexpensive backdrop for intimate portraits, with natural light turning the foliage into a soft tapestry. Shoot in the early morning while the tea-house aromas mingle with camera clicks, and you’ll find this spot included in most city photo guides.
Chinatown Alleys & Dragon Gate Narrow lanes glow with red lanterns and steam, perfect for cinematic closeups. The lanterns, signs, and textures give every frame a strong sense of place, and you can shoot a busy street scene or a quiet corner away from the crowds. The alleyways invite a playful composition that feels film-inspired.
Ferry Building & Embarcadero The terminal rises above a bustling waterfront, with ferries gliding in and out. Shoot from the waterfront promenade to catch the sails and the stainless steel of the terminal reflecting sunset. This spot works well with a dramatic skyline backdrop and a clean color palette.
Golden Gate Park – Conservatory & Redwoods The park hosts lush greenery, with a redwood grove nearby that evokes a national park vibe within city limits. Capture the glasshouse with vibrant plants in the foreground, or shoot the meadows and playground areas for lively, action-based portraits. The scene is a favorite of films and casual photogs alike.
Fisherman’s Wharf & Piers The waterfront is alive with buskers, street artists, and markets, providing a texture-rich backdrop for bustling street scenes. The area is popular with visitors, but you can frame empty space in the mid-ground for a clean, editorial look. Street-level angles capture the energy of the city everywhere along the Embarcadero.
Nob Hill & Russian Hill Vistas Steep stairs, grand mansions, and cable cars create dramatic foregrounds. The elevation yields sweeping city views that glow at dusk, with the skyline framed by flags and lines of traffic. It’s a friendly, photogenic spot that pairs well with nearby cafes and shops.
Muir Woods National Monument Just a short drive north, towering redwood giants create a tranquil, evergreen stage for intense nature shots. The trunks literally dwarf the understory, and the light filtering through the canopy is magic for slow shutter or wide-angle frames. Park passes are included, and the visit remains inexpensive for a day among giants.
Practical Guide to SF Photo Spots
Start with a must: Alamo Square at first light; the main skyline frames the Painted Ladies, and the look of the scene is like a painting, delivering images that pop on mobile feeds.
For water-and-sky drama, Crissy Field and Baker Beach shine; time shots for golden hour and let the windmill on the distant hill anchor your composition.
Move to central viewpoints: Coit Tower and Telegraph Hill offer crisp city lines; if you hit an issue with crowds, wait for a gap and shoot from a lower angle; swing down to Lombard Street for diagonal curves and signs that guide the eye.
In Golden Gate Park, wander the woods and garden paths; the Dutch Windmill stands among trees and flowers, making a natural backdrop for portraits and landscapes.
Street art and murals in the Mission and Chinatown provide rapid color; hike amongst walls for a combination of texture and light.
Across the Embarcadero, cupids sculpture Cupids Span give bold silhouettes at sunset; the marina area has houseboats and reflections to pair with cupids.
Finish at the Ferry Building Market and along Market Street for candid images of people, an umbrella, and signs; this central hub blends food, craft, and harbor life into one vibrant frame.
Carry enough memory cards, an umbrella for rain, and a lightweight tripod for dusk shots.
| Spot | Best Time | Visual Vibe | Tip |
|---|---|---|---|
| Alamo Square | Sunrise | Iconic skyline with Painted Ladies | Use a wide lens; foreground lawn adds depth |
| Crissy Field | Golden hour | Wide ocean horizon, bridge distance | Stabilize for long exposure; bring a lens hood |
| Coit Tower | Late afternoon | City lines with crisp edges | Align the tower with surrounding hills |
| Golden Gate Park Windmill | Midday to late afternoon | Historic windmill among woods | Frame with trees and blue sky |
| Cupid’s Span, Embarcadero | Sunset | Silhouettes over water, cupids accents | Use a polarizer for reflections |
| Ferry Building Market | Late morning | Market life, signs, and harbor views | Shoot through crowds for character |
| Mission Murals | Afternoon | Vibrant color blocks, people in motion | Respect permissions; stay aware of pedestrians |
| Marina Houseboats | Dusk | Reflections on water with colorful shapes | Capture from the boardwalk; watch for glare |
Best Angles, Framing, and Composition for Each Location
-
Golden Gate Bridge
Shoot from Battery Spencer at sunrise to compress the span into a dramatic, clarion line across the bay. Use a 70-200mm lens to isolate the structure from water and sky.
- Angle: vertical frame to emphasize the cables, or a tight horizontal to minimize water while keeping the bridge as the focal point.
- Foreground: add the rugged shoreline or a sailboat to remind viewers of scale without crowding the frame.
- Lines and perspective: keep them straight; crooked lines pull attention away from the bridge itself.
- Backdrops: a clear sky or soft fog creates a stronger contrast; plan for a backdrop that makes the red stand out.
- Timing: golden hour yields warmer tones; capture a greater range of color shifts, and shoot from fewer crowds at dawn to reduce population in frame.
-
Alcatraz Island
Position yourself on the Angel Island ferry route or from the Embarcadero to photograph the island with the skyline behind using a middle telephoto.
- Angle: shoot from slightly above the waterline to flatten the sea and reveal the fortress silhouette against the sky.
- Foreground: water ripples or distant boats provide variety without overpowering the island.
- Framing: include a sliver of the Bay Bridge as a backdrop for context, but keep the prison as the focal point.
- Light: aim for clean morning light to reduce haze; the clarion contrast helps the stone textures pop.
- Shot type: photographing from the water adds a dramatic, travelogue feel that many followers welcome.
-
Fisherman’s Wharf
Capture the bustle by aligning the pier lines toward the boats and seals, then drop in a few human elements to show energy without clutter.
- Angle: point your lens along the wooden pilings to create leading lines toward the waterfront attractions.
- Foreground: nets, crates, or lobster pots add rustic texture within a busy scene.
- Timing: midday light can be harsh; use a polarizer to cut glare and highlight the water’s depth.
- People: fewer people in frame can offer a more cinematic feel; wait for a moment when the crowd thins at the end of the day.
- Backdrop: include a hint of the Shops at the waterfront for context, but keep them as supporting elements rather than the main subject.
-
Lombard Street
First, stand at the foot of the zig-zag to capture the curve with cars weaving through; this vantage yields a strong, cinematic line.
- Angle: shoot slightly upward with a wide to normal lens to exaggerate the switchbacks.
- Framing: place the curve off-center to create a dynamic, multi-layered composition.
- Foreground: the curb and planted borders provide a rustic texture that contrasts with the smooth street.
- Timing: blue hour adds a dramatic glow; crowds are common, so shoot early for fewer pedestrians.
- Style: keep lines straight to avoid a crooked look that can distract from the route’s geometry.
-
Painted Ladies, Alamo Square
Frame the row with the park trees in foreground and the skyline beyond, using a mid-wide lens for balance.
- Angle: a low angle from the lawn foreground adds depth and makes the houses look grander.
- Framing: include a few blossoms or a flower bed to bring color variety into the frame.
- Timing: golden hour creates warm, inviting tones; the soft light helps the pastel facades pop.
- Context: show the surrounding city as a distant backdrop to emphasize the historical row on a quiet afternoon.
- Travel note: many photographers travel here with a tripod to guarantee a crisp preventive long exposure on calmer days.
-
Palace of Fine Arts
Use the lagoon as a leading line toward the rotunda, and shoot a symmetrical composition from the central bridge.
- Angle: a low vantage on the bridge provides a strong reflection and a more intimate feel.
- Foreground: lily pads or a shallow reflection add a gentle, rustic texture.
- Framing: keep the octagonal rotunda centered to emphasize balance and calm in the scene.
- Lighting: overcast days keep shadows soft; sun peeking through the columns creates a clarion highlight.
- Special tip: capture during a slower population moment to avoid distractions and keep the architecture as the star.
-
Crissy Field / Battery Spencer
Stand at Battery Spencer for dramatic harbor views with the bridge leading toward the city.
- Angle: long lens from Battery Spencer compresses the bridge into a bold, single arc with the water as backdrop.
- Foreground: waves and surfers at Crissy Beach add motion without overwhelming the frame.
- Framing: keep a wide enough frame to include sea and sky; use a vertical crop if the wind creates motion in the flags.
- Light: shoot at blue hour for a celestial feel; dusk can reveal the city lights in a clarion contrast.
- Travel note: construction cranes in the distance sometimes appear in the skyline; include them as part of the greater context rather than trying to exclude them.
-
Coit Tower
Begin with a straight-on vertical composition from the base plaza to emphasize height against the cityscape.
- Angle: shoot from the ground with a 24-70mm to keep the tower dominating the frame while the street below adds context.
- Foreground: nearby trees or benches provide a hint of the urban texture without stealing focus.
- Framing: align the tower along a third-line to strengthen the architectural presence.
- Lighting: early morning or late afternoon brings softer shadows on the tower’s façade.
- Composition note: portraits of the city beneath frame work well for a canvas-like backdrop in social feeds.
-
Chinatown Gate
Capture the oversized gate from Grant Avenue with the street’s perspective lines pulling toward the gate.
- Angle: shoot at a slight low angle to emphasize the gate’s arch and color gradient.
- Foreground: lantern strings or stone steps provide texture and a sense of place.
- Framing: a tight crop around the gate concentrates the viewer’s attention on the architecture and inscriptions.
- Color: rich reds and golds pop best in indirect light; avoid blown highlights on painted surfaces.
- Continuity: the row of shops behind the gate adds variety without stealing focus from the landmark.
-
Ferry Building Marketplace
Line the clock tower with the pier’s diagonal boards for a strong leading line toward the building’s façade.
- Angle: shoot from the Embarcadero at a slight upward tilt to emphasize height against the blue sky.
- Foreground: ferry silhouettes and seagulls create a lively street-level scene without clutter.
- Framing: incorporate a narrow strip of Bay Bridge in the distance as a subtle backdrop.
- Light: blue hour adds a calm tone; if shooting in daylight, use a polarizer to reduce reflections on glass.
- Note: photographng early mornings reduces crowds and helps the market look welcoming rather than packed.
-
Lands End / Sutro Baths
Follow the cliff path to a rugged vantage with the ocean as a dramatic backdrop.
- Angle: shoot along the ruined baths with the sea crashing over rocks for a raw, textured frame.
- Foreground: sea spray, seaweed, or tide pools add variety and a rustic feel.
- Framing: use the path’s railing as a leading line toward the horizon.
- Light: sunset produces warm tones and long shadows that accentuate texture on the ruins.
- Context: be mindful of crowds; during fewer visitors, the site feels more solitary and dramatic.
-
Baker Beach
Position with the Golden Gate Bridge looming behind the sand and dunes for a classic composition.
- Angle: low-angle shots along the beach emphasize the bridge’s silhouette against the sky.
- Foreground: footprints or tidal patterns create lines that lead to the bridge.
- Timing: early morning or late afternoon reduces glare and provides warmer light.
- Beaches: include sea stacks or distant water birds to weave in natural variety.
- Notes: fewer people in frame convey a sense of solitude that followers often seek.
-
Twin Peaks
Take a broad panorama from the overlook to capture the city’s scale with a touch of fog for atmosphere.
- Angle: a wide 16-35mm frame reveals the geography of the city and the hills beyond.
- Framing: place the skyline slightly off-center to create negative space that emphasizes height.
- Foreground: trees and hillside contours provide natural texture that anchors the shot.
- Timing: sunrise or blue hour adds soft color transitions; the greater contrast helps the lights pop.
- Travel note: this vantage point is well travelled; shoot at off-peak times to minimize crowds in the foreground.
-
Japanese Tea Garden (Golden Gate Park)
Frame the ponds with stepping stones and bridges to create a calm, reflective composition.
- Angle: shoot from a low angle near the water to accentuate the curves of the bridges and the koi.
- Foreground: lotus and lily pads give a natural pop of color and texture.
- Framing: symmetrical shots highlight the garden’s ordered beauty without feeling sterile.
- Light: soft midday light works with the greenery to prevent harsh shadows on water surfaces.
- Notes: the garden’s variety of greens and flowers makes a lush backdrop for portraits and scenes alike.
-
Ocean Beach
Use the long, empty shoreline to capture motion and mood with a wide frame and a slow shutter.
- Angle: a straight-on horizon keeps the beach feeling expansive and peaceful.
- Foreground: wet sand patterns or foam trails guide the eye toward the horizon.
- Lighting: sunset or blue hour adds depth; a longer exposure softens waves into a smooth texture.
- Beaches: capturing surfers or walkers at a distance provides a sense of scale without crowding.
- Note: keep an eye on construction cranes in the distance; they can add urban texture if included intentionally.
Optimal Lighting and Best Times of Day
Shoot 60 minutes after sunrise and 60 minutes before sunset to capture warm, directional light that adds depth and texture. In San Francisco, fog, water and elevation changes create dynamic mood shifts, so check a reliable forecast and have a backup plan. This approach yields iconic frames and access to intricate details, giving painting-like color on façades and cliffs. Don’t settle for dead, flat light in the middle of the day; instead, chase soft shadows and rich tonality that locals and visitors alike love, and bring tons of angles to your repertoire. Grab a pastry from a nearby bakery before you start, then carry a small bag with a blanket for picnics after the shoot, so you can compare shots while the light shifts around the city. Keep the workflow flexible by swinging the lens between vantage points to find the best combination of color and contrast.
-
Alamo Square / Painted Ladies – Best light runs 8:00–9:30 am and again 4:30–6:00 pm. The soft morning glow on the row of houses highlights intricate trim and color, while the skyline behind stays legible. Access to the park is straightforward, and you can position chairs or a blanket for casual, candid shots. The alamo area nearby is a convenient starting point, and you’ll notice how the light works around the facades, creating a painting-like feel that many photographers loved.
-
Crissy Field and Golden Gate Bridge – For iconic silhouettes, target blue hour 20–30 minutes after sunset or the warm hues of late afternoon light about an hour before sunset. The water reflects color from the sky, and the bridge takes on a glow that pops against darker clouds. Tonal shifts here are dramatic, with access wide enough to set a tripod on the boardwalk and test multiple angles.
-
Twin Peaks – Dawn and dusk yield the broadest variety of city views. At dawn you’ll catch gentle light washing the streets, while dusk brings city lights starting to sparkle. If fog is rolling in, use the sentinel-like contrast between lights and shadows to frame the city as a layered portrait.
-
Ferry Building and Embarcadero – Early morning light along the piers creates crisp reflections on the water; plan a shot that includes the clock tower and rolling mist over the bay. Arrive 40–60 minutes before blue hour to secure the best access to viewpoints, plus you’ll beat the crowds that leave after sunrise.
-
Lombard Street and Russian Hill – Late afternoon light on the winding street emphasizes the curves and texture of the pavement and surrounding facades. This light direction keeps the red brick walls warm and helps the intricate pattern of the stairs pop in photos.
-
Lands End, Muir Woods and nearby waterfalls – If you visit after a rainy period, the forest paths reveal intricate branches and waterfall spray that catch soft greens and browns in the light. Golden hour among these trees creates a natural painting effect, with a backdrop that feels almost cinematic. In misty conditions, shoot near the edge routes where fog drifts around cliff faces for a surreal, almost magical mood.
Access, Routes, and Crowd Management
Plan to arrive before 8 a.m. on weekdays and use the full transit network (MUNI, BART, and Caltrain connections) to reach spots with minimal parking hassle. Bring a long lens, a compact tripod, and a plan for a longer morning window to catch soft light and avoid crowds.
Plot a practical loop: Crissy Field for sea-light, along the Embarcadero to the Ferry Building, then up to Alamo Square for the Painted Ladies, and finally into Golden Gate Park where the pond and Stow Lake offer picturesque angles. If you include a rowboat ride on Stow Lake, you gain a different reflection shot and a calmer backdrop at the bottom of a broader shot. For variety, consider other pathways that lead to lesser-known vantage points along the park’s perimeter.
Lines are often lined with photographers at popular sites; plan your approach to rotate subjects and keep flow smooth. Use signage and clear directions to direct new arrivals away from fixed viewpoints, and keep buffers at key spots. On weekends, the morning window may have ended earlier as crowds build, so switch to lesser-known viewpoints to keep shots clean. After you wrap the first round, step back for a quick refresh and adjust your angles.
Nearby shops along Hayes Valley and the Mission, plus cafés, help sustain a longer shoot. For a quick treat, look for miette pastries and a coolbrith coffee near the park edge. The источник notes that midday crowds spike, so prioritize the main spots early and pivot to other vantage points after lunch. The loop contains a mix of iconic views and other corners that keep your feed fresh and authentic.
If you plan to visit Alcatraz, the former prison, book ferries separately to avoid squeezing into peak queues. Golden Gate Park paths reveal intricate routes and bottom staircases that reward patient shooters–carry a compact tripod and protect your gear around other visitors. The activities-friendly schedule helps you cover multiple spots in a day while giving locals space to enjoy the city. Using these tips, you can assemble compelling posts without disrupting neighbors or other travelers.
Gear and Mobile Photography Tips for Street Shots
Use one solid setup: shoot with your phone’s main camera, stabilize with two hands or a small grip, enable gridlines, and shoot in RAW if available. For shooting on busy streets, lock exposure for a few seconds and use bursts; daylight targets 1/200s at ISO 100–200; indoors 1/60–1/125s with ISO 400–800; adjust as needed. If lighting is difficult, use exposure compensation +/- to protect highlights or shadows. Back up copies to google and keep local backups. Protect home and personal data by avoiding public share links until you’re ready.
Keep a clean workflow: shoot in bursts, then pick the best frame after reviewing on your screen. Use gridlines to align architecture with the horizon; test a quick HDR if your device supports it, but avoid over-processing. For night, enable a longer exposure by tapping and holding, and stabilize against a pole or railing to avoid blur. Absolute detail matters; zoom with your feet instead of digital zoom. You don’t necessarily need heavy gear to get strong results.
Look for telling details: a rose in a street planter, a plant creeping along a sign, or wildflowers along a curb. When you pass through japantown or along Howard Street, scan for reflections in glass, patterns on buildings, and bold color blocks. Look for signs and storefront glass. Keep an eye on pickpocketing in crowded spots, and only carry essentials. To pull the viewer in, place a clear subject in the foreground and let a busy background fall into blur; sort depth by moving closer or stepping back. If a corner is overshadowed by shadows, brighten it slightly in processing. Compare with others, but keep your own voice and rhythm.
Protect your gear and data: keep devices close, use a case with grip, and avoid flashing credentials on public networks. Getting the shot requires situational awareness and respect for pedestrians; doing quick checks after a few frames helps you refine your technique and keep momentum on busy streets. If space is tight, plan your approach so you don’t block anyone or create hazards.
In post, keep colors honest; reduce shadows slightly, boost contrast on street edges, and avoid oversaturation on neon. Save final picks as JPEGs for fast sharing, and keep a separate RAW copy for edits. If you shoot near island neighborhoods or parks with wildflowers, label files with location tags to ease sorting. Worthy images often come from patience and quick decisions rather than waiting for the perfect moment. Build a personal archive that reflects your evolving style, not just a single frame.
Nearby Shops and Pairing Photo Ops with Shopping
Start the morning in Union Square, where storefronts spill color onto the sidewalk. Grab a pastry at miette, then pivot to a window look for shoots that blend shopping with street style. This addition keeps your frames lively, as passersby naturally add motion to every shot.
In Hayes Valley, an alley behind boutiques hides installations and a staircase that feels overshadowed by brick facades; during the afternoon light, shoot through the metal railings to capture a line of storefronts and a hint of movement as shoppers pass.
Move toward the Embarcadero for water reflections at sunrise, then duck into waterfront shops for shoots that feel alive and living; the bustling energy makes a natural backdrop, and you can shoot alone or with a friend for diverse looks.
Some street corners glow with lights, but not every display is reliable–lights werent working on chilly evenings; adapt by using ambient tones and store glow to keep colors honest and avoid harsh shadows.
Wanted shots? Save your favorites in a gallery, then loop back along the alley behind a cafe to capture a second look with softer light.
Keep the route compact: basically a short loop that starts at miette, weaves through staircases and alley spines between shops, and finishes by water for a final montage. The morning cadence, installations, and bustling streets create cohesion across your set.