


Know the rule: place liquids, aerosols, and gels in containers under 100 ml and pack them all in a single clear resealable bag of up to 1 liter, arranged for quick inspection. This setup helps you move through security smoothly and speeds up entry for passengers with disabilities who rely on timely processing.
When you go through security, build a simple system: group items by size, mark kept-at-hand items, and keep the bag visible at the top of your carry-on. theyre short steps that reduce questioning and re-scanning, so your time in the queue stays predictable for their travel companions and the screeners alike. security staff typically follow standardized procedures, which your clear packing can help you benefit from.
Consult websites from airports and airlines for the latest allowances, as rules vary by country and carrier. In the United States, the 기술 behind screening helps identify liquids at checkpoints, and passengers bound for california or alaska often see different procedures at regional airports. For travelers with medical needs, carry medications and must-have items in the 1-liter bag, but keep them arranged in a way that you can present quickly to staff.
Some travelers follow a compact checklist; geller has highlighted a simple approach: list items by category (medications, cosmetics, baby items) and mark what stays outside the bag for separate screening. This approach features a practical flow that keeps their bags compliant and predictable during the trip.
Planning tips for outward trips include noting reach and storage: keep the bag in an accessible pocket, and know the airport’s specific layout so you can move efficiently from security to gate. If you’re traveling to california or alaska or visiting remote routes, check regional guidelines on their official websites and apps before you go. Some travelers prefer to distribute items across a second bag in case of unexpected changes in screening density, a practice that helps them stay comfortable and prepared.
If you’re going between connections, check each airport’s policies and plan extra time for screening so you stay composed in busy terminals.
Liquids, Aerosols & Gels Rule: Carry-On Guide for American Airlines Travelers
Bring containers under 3.4 oz (100 ml) per item and place them in a single clear quart-size bag before you reach security. For American Airlines travelers, this bag is presented at security, the information is provided on the official site, and the section on liquids, aerosols & gels covers every detail.
Keep the quart bag in the front pocket of your backpack and present it at the front of security without delay, then repack items back into your bag after screening. If you have an American Airlines account, you can review the latest guidance on the airline site using your account; this information includes the amount limits and is provided to help you travel smoothly. TSA PreCheck does not waive the liquids rule, but it can speed screening when you’re prepared.
Full-size containers must stay out of carry-on; switch to travel-size versions before you pack using the provided guidelines. If you forget, you can purchase travel-size replacements at the airport or during overseas trips, and pack accordingly to avoid delays at the checkpoint.
Within the larger aviation context, the site includes several tips to keep you moving. Open the geller section for a concise checklist; bring something small for backup, such as a spare contact lens solution or a compact moisturizer, and be ready to show the items to an officer when requested. This approach keeps you well prepared, without slowing your progress at security.
Liquids, Aerosols & Gels Rule: Practical Guidelines for Your Carry-On
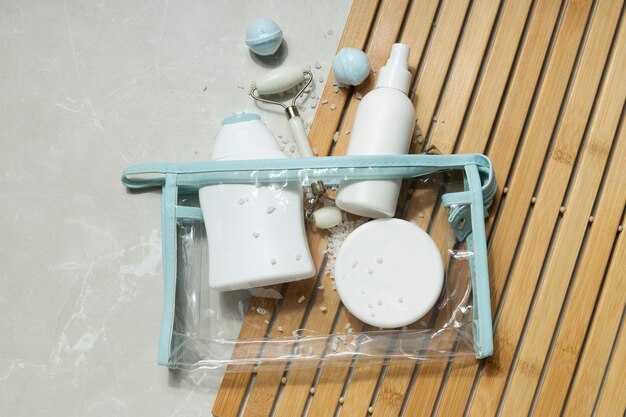
Pack all liquids, aerosols and gels in a quart-sized, clear bag with containers no larger than 100 ml (3.4 oz) and present it separately at screening. This setup speeds the process at most airports and keeps your carry-ons organized for quick checks.
What to include: liquid products under 100 ml, deodorant (solid sticks are fine), toothpaste, moisturizers, sunscreen, mouthwash, and hand sanitizer. Use some travel-size containers and keep 원본 packaging when feasible. Place everything in a single quart-sized bag; this improves accuracy on the belt and reduces spill risk. For items like bars of soap or sunscreen sticks, you can carry most in solid form to cut back on liquids.
At screening, the officer may ask that your bag is presented on the belt and to show contents. Keep items easy to inspect, and have your 티켓 handy in a separate pocket. If youre carrying medication and need a gel or liquid form that exceeds 100 ml, declare it and bring the original prescription or doctor’s note; many 공항 allow exceptions when properly documented. For cold or frozen items used for medical purposes, maintain proper packaging to prevent leaks and comply with screening rules.
Common mistakes to avoid: overpacking containers, using full-size bottles, and mixing items into a single container; avoid leaks by sealing lids tightly. For better results, reuse minimal packaging and keep your carry-ons light; this reduces back strain and speeds processing. The 특징들 of a good kit include a durable zipper, clear labeling, and a compact pouch that fits back pocket of your bag. By planning ahead, freelance travelers can save time at the gate and avoid extra charges or delays.
Pro tips for different trips: if you only need a few items, you can leave out creams or gels in non-liquid form; use bars or sticks, and keep accuracy when sizing containers. For deodorant, solid sticks are better and less likely to trigger alarms. If you regularly travel, invest in a 원본 kit with labeled containers; this innovation saves time at security checks. Most 공항 accept this approach and you’ll spend less time in queues.
Carry-on hygiene and readiness tips: take a full set of basics in the quart bag, then keep backup items in a separate pocket of your bag. When you arrive, you can refill from your checked baggage or buy replacements without risking a spill in transit. The system is designed to be simple, predictable and accurate for every traveler, whether you’re a regular flyer or a freelance explorer navigating crowded gates and busy screening lines.
What items count as liquids, gels, or aerosols?
Pack only containers of 3.4 oz (100 ml) or smaller for liquids, gels, and aerosols, and place them in a single, clear quart-sized bag. This bag goes through security separately; keep it accessible at the top of your carry-on for a quick pull-out. If you need more, use alternatives: buy travel-size products at your destination or decant into approved travel bottles before you depart. This is the best next step for a smooth checkpoint experience.
Items that count include beverages (water, juice, milk), soups, sauces, oils, creams and lotions, toothpaste, mouthwash, sunscreen, perfumes, deodorants (spray or gel), and any aerosol or liquid medication. Whether it’s a gel, lotion, paste, or liquid, it belongs in the bag. Some cosmetics blend the line; when in doubt, treat the container as a liquid. Bars of soap or solid deodorant are not counted as liquids.
Exceptions: medications, baby formula, breast milk, and infant foods may be exempt from the 3.4 oz limit. You may carry larger quantities for these items in carry-on if declared for screening and kept in original packaging. alisha, a photographer, asks whether breast milk is allowed; the answer is yes with proper screening. sean, traveling inbound with a child, confirms the same. Charges for extra bags vary by airline, so plan your packing around the annual program and your destination. Editors at travel outlets remind readers to check local rules before departure.
To stay compliant, review official guidelines and check the latest updates from your airport program, as security checks rely on a bank of rules that update annually. Put the quart bag at the top of your carry-on, keep everything in view for the officer, and consider checking larger items if they exceed the limit. If you travel often, a small set of approved travel bottles helps you stay prepared without unnecessary hassles going through security.
Understanding the 3-1-1 rule: bottle size, bag, and quantity
Pack travel-sized bottles no larger than 3.4 oz (100 ml) per container and place them in one quart-size, clear bag for your carry-on. This 3-1-1 setup keeps liquids accessible during screening and minimizes delays. weve found this approach makes the process smoother for consumer travelers.
Size matters: each bottle must be 3.4 oz (100 ml) or less, and all containers together should fit within the quart bag. You can carry multiple items such as shampoo, conditioner, toothpaste, mouthwash, and travel-sized food items, as long as the total stays within the bag’s capacity. If you need more for medically required items, such as certain medicines or specific travel foods, declare them at the checkpoint with any necessary documentation.
Bag strategy and packing tips: use a single, transparent, resealable quart-size bag and keep it easily accessible in your carry-on. Pack liquids toward the front of the bag to speed inspection, and avoid overstuffing so the bag lies flat in the x-ray machine. This simple setup works across airlines and simplifies the process at boarding.
Rules and exceptions: what’s allowed is determined within transportation security. If you’re transporting medically necessary liquids or baby food, you can declare them at the checkpoint. Bring documentation and keep items in their original packaging. Official updates appear on the news board managed by the security board members; first notices come from travel writers and are posted as whats determined changes. Post questions on the official site if you need more details under the rules.
Checklist: this is part of your travel kit. Count each container to ensure atomic precision and stay within the size limit. If a bottle isnt 3.4 oz, leave it out. Don’t fill the quart bag with full bottles; choose travel-sized items instead. If you bike to the terminal, keep the bag in an easily accessible pocket. Have your medical or food declarations ready and keep cash and documents separate from liquids.
Packaging tips: selecting compliant containers, labeling, and packing order
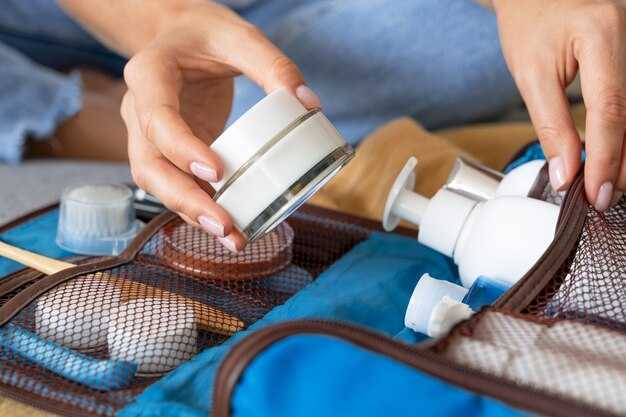
Choose a uniform set of leak-proof containers, each capped tightly and up to 100 ml, and place all gels, shampoos, and lotions in a single clear bag to meet carry-ons allowance and speed checkpoint review. This simplifies the process for the staff that screen your bag.
- Container selection: opt for flat or square shapes that fit neatly in a backpack; avoid tall, round bottles that waste space.
- Labels and labeling: label each item with its contents on the front, date opened, and any special handling notes; use waterproof labels to withstand the trip. Writers often point out that innovation in labeling helps screeners identify items quickly and reduces delays.
- Contents grouping: keep gels together with other toiletries, and store medications separately in a clearly labeled pouch; for disabilities or medical needs, keep them accessible at the top of the bag.
- Leak prevention: test caps for leaks, place bottles upright, and avoid mixing liquids that could corrode caps; in case of slight leakage, place containers in a polyethylene bag for containment.
- Labels and accessibility: ensure that the front-facing label can be read at a glance at the checkpoint; this makes it possible for staff to verify the item without opening containers.
- Since screeners often need to verify quickly, separate medications and keep them in a labeled pouch to speed the review.
- Backpack balance: position the heaviest items toward the back and bottom to maintain balance during travel.
- Front-pocket readiness: keep the clear liquids bag in the front pocket or near the top for quick review at checkpoint; if possible, leave a small open area to access them without digging.
- Medications and disability needs: place medications separately in a labeled pouch close to the top; include a note if you require special handling.
- Electronics handling: keep laptop and chargers in a dedicated sleeve; when going through security, they may ask you to remove the laptop and place it separately on the belt. Using a cable organizer helps.
- Documents: keep ticket and license in an easily accessible document sleeve; you should be able to present them quickly if asked as part of the screening.
- Sealing: check your bag for any open caps; re-tighten, ensure no open containers leak during transport, and monitor for possible spills.
With this method, you minimize risk, keep shape and balance, and reduce alarms at the checkpoint. This approach is practical whether you’re traveling solo or with disabilities, and it aligns with the expectations of front-line staff and writers who focus on traveler comfort and efficiency.
Exceptions and special cases: medications, baby formula, and dietary needs
Keep medications and baby formula in your carry-on and declare them at the airport. This approach gives you control and helps you find information for each step of transportation. youll have what you need on hand whether youre heading home, to a hotel, or onward to your destination.
Medications: Pack pills in their original containers with clear labels; include a doctor’s note or prescription if available. The security rules stipulate that liquids needed for health may exceed 3.4 oz when supported by documentation. Inhalers and other aerosols used for medical purposes are allowed in carry-on; keep them reachable and declare them if security asks.
Baby formula and dietary needs: Infant formula, breast milk, and baby foods are allowed in reasonable quantities beyond the 3.4 oz limit. Present them for screening and declare them at the checkpoint; keep containers in their original packaging and place items in a quart-size bag. The width of that bag is usually about 9 inches; plan accordingly so everything stays organized.
Other dietary needs: Medical foods and dietary supplements that are liquids or gels also get an exception when you have supporting documentation. Bring copies of prescriptions or clinician notes, and keep these items easily accessible in your carry-on for quick verification at the airport.
Airline specifics: Policies vary by carrier. Southwest shares common guidance and will usually allow these items if properly documented; always verify on the airline’s site before you travel and check whether there are any special steps for your itinerary. Youre better off consulting the airline’s page and the airport information hub to avoid surprises as you move through every transfer point.
Planning tips: Before you go, check information from ner dwallet’s travel resources and subscribe to their newsletter for updates. Please take a few minutes to map out where you’ll store each item in your carry-on so you can access them quickly during security checks, and bring the right documentation with you for peace of mind on your journey across the world. If you travel often, this approach helps you compensate for any hiccups in transportation and keeps your journey smooth from home to hotel and back again.
What to expect at security: screening steps and tips to speed up
Pack travel-sized gels and aerosols in a clear, quart-sized bag and place it in the outer pocket of your carry-ons so it’s easy to access at the belt.
At the lane, have your ID and boarding pass ready. Follow the bin sequence: liquids and the bag go into one bin, electronics into another, and shoes if requested. If you travel with a jacket, remove it before stepping up to the belt to avoid delays.
Know the 3-1-1 rule: containers must be 3.4 oz (100 ml) or smaller, all liquids fit in a single bag, and the bag must be accessible for quick removal. This amount constraint keeps the line moving and reduces the need to inspect every bottle.
For international travelers, screening can vary by airport, but most lanes use the same logic. If you know the policy isnt clear, ask the agent. If you’re a member of rewards programs such as TSA PreCheck or Global Entry, you access high-rated lanes and typically see shorter wait times.
Be mindful of items that could slow you down: canned beverages, large aerosols, or items that exceed the bag’s contents. Prohibited items stay at home; if you know something is questionable, move it to checked baggage or discard before you reach the checkpoint. In Alaska airports, you may encounter longer lines during peak travel windows, so build extra travel time into your plan. Remember: travelers who adhere to the rules move through security more smoothly.
Geller, a senior screener, reminds staff to help travelers adhere to the process; a quick, clear routine saves everyone time. Keep the flow smooth by keeping your access to the bin straightforward and avoiding last-minute searches for items.
| 단계 | 무엇을 해야 할까요 | 왜 도움이 되는가 |
|---|---|---|
| Before you reach the checkpoint | Pack travel-sized gels and aerosols in a clear quart bag; keep it in an easy-to-reach outer pocket | Speeds removal and prevents rummaging in bags |
| At the belt | Have ID and boarding pass ready; place liquids/bag in one bin; electronics and shoes in separate bins | Streamlines the flow and reduces re-scans |
| During screening | Follow the 3-1-1 rule: containers ≤3.4 oz (100 ml); bag accessible for quick removal | Ensures compliance and prevents delays |
| Speed options | Join TSA PreCheck or Global Entry; travel as a member or with rewards programs; check wait-times ratings | Shorter lines and quicker processing |
| Regional notes | Alaska and other remote airports may have longer lines; plan extra time | Prevents rush at gate |