


Choose a compact cruise; seasoned hosts; clear guidance; photo stops; cozy cabins; beverages aboard.
Snow glitters; participants gather; sightings appear under expert guidance; highlights unfold across a dark backdrop.
Hosts set intimate moments; shared stories flourish; beverages circulate; passengers seeking wonder savor each moment; their voyage sets a strong tone.
Duration shapes rhythm; embark timing aligns with long nights; photo memories rise as skies brighten briefly; investment in cozy spaces pays off for those cruising.
Investment returns through their eyes; fishing detours; local tales; intimacy rises from quiet conversations; lasting mosaic created; beverages remain a small luxury amidst vast wonder.
Best Season and Conditions for Tromsø Northern Lights Viewing
Season window: late September through March; chances pick on clear nights with rising solar activity. Photography thrives during longer hours of darkness, with comfortable layers needed for calm observation.
Located above 69°N latitude, this arctic zone offers lengthy polar nights; about optimum windows, plan flexible dates. Lodges have warm lounges.
However, weather shifts quickly; if cloud cover thickens, switch into a nearby vantage point or postpone to hours later. Minimum cloud cover below 40% typically yields cleaner silhouettes; solar activity levels around KP 3–6 raise chances of vivid sky glow.
Best seasons in practice include: early autumn (September–October) with crisp, mild evenings; mid-winter (November–February) brings polar night, long dark hours for multiple viewing blocks; March remains reliable during clear spells. Evening window: 21:00–01:00 yields frequent sightings. For a comfortable experience, consider arctic cruises, or lodgings away from city glow; both options offer sheltered viewing, warmer lounges, chances for cultural encounters.
Heading tips: plan for flexible slots, prepare extra batteries, bring spare memory cards; discuss with a local seller for gear rental. If you took a guided tour, shared cruises boost chances. Remote viewpoints reachable via a short drive from coastal towns, weather shifting hourly. Nearby lodges have warm lounges, gourmet beverages; staff can tailor photography-friendly hours for a comfortable schedule.
| Window | Conditions | Recommended Activities | ノート |
|---|---|---|---|
| Early autumn (Sept–Oct) | Clear, dry nights common; mild temps; rising solar activity; KP 2–4 | Shoreviewing, small boat cruises; photography-friendly hours | Good for beginners; limited wind |
| Mid-winter (Nov–Feb) | Extended darkness; polar night; cold; occasional bright skies during clear spells | Arctic cruise; remote viewpoints; guided snow drives | Best chance for long sessions |
| Late season (Mar) | Clear spells possible; daylight returns gradually; nights shorter | Evening viewings; short cruises; flexible scheduling | Ideal for combining with cultural encounters |
Thank you for reading this guide.
What to Pack for a Comfort-Focused Aurora Tour
Start with windproof insulated parka plus multiple warm layers: merino base, fleece mid, and waterproof shell. Include thermal socks, mittens, balaclava, and sturdy waterproof boots with solid grip for icy spots along a fjord path.
Layering and Warmth
Add compact heated hand warmers, scarf, and a lightweight face mask. Bring a compact thermos for hot beverages; this extends time outdoors during waits under borealis glow. A small battery pack can extend shoot life.
Photography, Pace, and Cultural Experience
For photography bring a sturdy tripod, spare batteries, and a camera with manual controls. A wide-angle lens helps capture fjord vistas; borealis displays look magical when you shoot with patience and proper exposure.
During fjord-side experiences you may hear authentic tales from locals and learn traditions; pack wool clothing for cozy warmth during campfire meals, while some hands-on activities like fishing breaks up long waits. Much warmth helps everyone stay alert for magical moments.
If traveling with students, designate a driver for drive breaks; professional guides, expert insights will help locate spots and set times for chasing imagery. They will keep groups safe and maximize chances for beautiful results along this journey.
Other practical additions include a hydration pack, headlamp with red mode, weatherproof bag, power bank, and copies of crucial documents. Pack much-needed snacks, meals, and a compact first-aid kit. A separate bag keeps gear dry and organized. On water excursions or fjord drives, a small fishing kit fits into a side pocket.
Choosing the Right Tour Type: Small-Group, Private, or Bus Options
Opt for small-group formats to maximize memories, experiences, plus value.
Six to twelve guests per group create a friendly vibe, faster rapport with hosts, plus shared access to scenic vistas.
Guides provide culturally rich commentary; licensed science insights; practical tips that sharpen sightings, safety.
This setup lasts longer; ensures comfortable seating; supports time-efficient itineraries for skies and mesmerizing moments.
Private Tours: Customization, Timing, Photographic Opportunities
Private options deliver full customization: pacing set by you; timing aligned with prime sightings windows; private experiences mean fewer arrivals to crowded locales, smoother traffic; special stops near landmarks, panoramic drives included; service enhances guest satisfaction.
Licensed guides deliver culturally rich notes; hospitality, service provided to guests; including local insights that made experiences memorable.
This option enables capturing mesmerizing skies; memories last longer, better chances for sightings.
Bus Options: Budget-Friendly for Large Groups
Bus arrangements fit groups, offering comfortable seats, shared hospitality, plus predictable pricing, including panoramic stops at iconic landmarks.
Time-efficient transit between spots; though total duration may be longer, it maximizes sightings.
Service provided by licensed drivers keeps pace; steady drive between stops, friendly groups sharing memories.
Bus transit aims to make experiences smoother, turning travel time into value.
How Aurora Forecasts Work and How to Read Them for Planning
Recommendation: check KP index; forecasted cloud cover 24–48 hours ahead; lock dates with low cloud risk; warm, comfortable evenings.
Forecasts derive from solar wind measurements, geomagnetic activity, plus modeling of a borealis visibility zone; this zone shifts during magnetic disturbances.
KP index values 0–9 provide a probabilistic guide; higher numbers suggest wider chances of glow, especially after local midnight; use 2–3 hour windows when skies clear.
Weather outlook matters; clear skies; calm wind; low humidity raise visibility. Cloud cover predictions invite plan shifts; choose a shorter window to maximize success.
For planning, a personal, tailored approach works best; a reliable display shows sighting probabilities, hour-by-hour windows; weather outlook; understanding borealis behavior helps booking decisions; always keep a flexible schedule, which keeps experiences amazing, enjoyable, relaxed.
Viewing choices resemble a cuisine of moments: scenic fjords, warm meals, driver-guided routes, attentive pauses for borealis glow; balanced planning keeps both energy; mood high.
Heading times shift with cloud cover; expert advice favors tailoring; booking windows with high probability; sturdy gear, flexible attire ensure warmth; dates chosen with forecast clarity raise chances of a memorable experience.
Booking workflow: select a package, confirm with a booking team; welcome reminders arrive; took notes from guides about local scenic routes; sturdy gear recommended for late hours; driver tips appear on display.
What to Expect on a Tromsø Lights Tour: Itinerary, Stops, and Duration
Choose a premium, highly relaxed, small-group option to maximize magical moments under night skies. A luxurious, well-coordinated itinerary minimizes fatigue, ensures comfortable viewing opportunities; this approach keeps pace relaxed. This option offers a variety of stops designed to enhance your arctic experience.
Itinerary typically starts with pickup near citys center; a 60-90 minute drive into wilderness sets mood. First stop at a lakeside overlook yields panoramic shots; picnic setup or dinner in a sheltered camp keeps you fueled; warm cuisine from a local seller; second viewing session; final night chase for a magical glow with high-quality optics.
Stops let you explore larger vistas, quiet wilderness clearing, citys edge glow, fjord viewpoint, sheltered camp for snacks.
Total duration ranges 6-8 hours, influenced by weather, group size, night sky activity. With favorable conditions, window expands; in mild weather, return may occur earlier.
Bring warm layers; headlamp; camera with tripod; extra batteries; this setup yields high-quality results. Dress in modular layers; a compact pack protects gear from wind and snow; a quick snack keeps energy up.
Groups range from smaller to larger options; schedule adapts to unpredictable conditions because weather shifts quickly. Professional guides tailor pace to your group; this approach enhances experience, ensures safety. Customize stops for preferred viewpoints, cuisine samples, or a relaxed dinner pause. Once youre back, feedback shapes future options.
Tips for Photographing the Aurora: Camera Settings, Lenses, and Tricks
Set manual exposure: camera in manual mode; ISO 800, shutter 15s, aperture f/2.8; shoot RAW; white balance around 3800K to capture natural tones.
Focus in live view at infinity, magnify star to confirm sharpness; switch to manual focus to retain consistency across frames.
- Exposure tuning: start with a camera in manual mode; ISO 800, 15s, f/2.8; shoot RAW; white balance around 3800–4200K; adapt to aurora strength; if glow is faint, extend shutter to 20s, raise ISO to 1000; if glow bright, 5–8s, ISO 800; bracket 1–2 stops for flexibility.
- Stability: use sturdy tripod; enable remote shutter or intervalometer; disable long exposure NR to keep color intact.
- White balance: begin near 3800–4200K; shoot RAW to adjust later; consider cooler hues if sky shows green glow.
Lenses, framing, composition
- Ultra-wide zooms 14–24mm or 16–35mm capture vast arctic landscapes; 24mm offers intimate foreground detail when foreground features are strong.
- Prime options 35mm or 50mm provide sculpted night figures; aim for intimacy in foreground, memories that resonate.
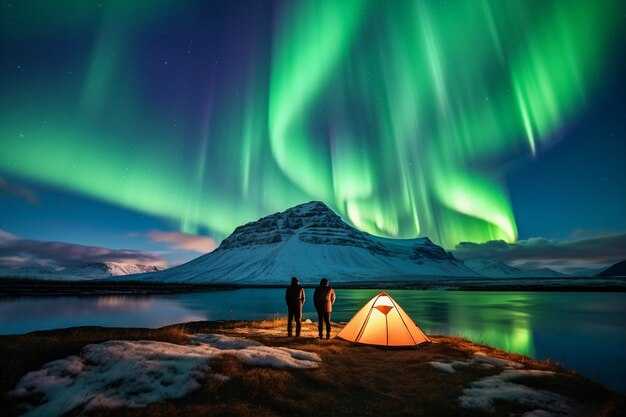
- Focus on foreground subjects; silhouettes of visitors elevate depth; reposition to block light pollution from distant city glare; pick spots with dark sky, clear horizon.
Final note: variety of sites boosts memories; guided trips yield intimate perspectives during arctic nights; pick silhouettes of visitors for warmth, hospitality, scale; with patience, captures of nature provide satisfaction that always feels luxurious; cant rely on a single shot to capture this phenomenon; choose locations which maximize dark sky; ensure memory sets always reflect arctic beauty; hospitality options keep nights comfortable; warm spaces tailored for visitors.