


Begin with Masca and a beginner-friendly center to ensure guaranteed satisfaction, starting with a shallow, sheltered session that begins in calm bays and emphasizes safety.
Choose a route that pairs masca’s volcanic terrain with sheltered bays, offering a natural combination of reef sections and caves. summer conditions tend to provide clearer visibility and smoother seas, increasing chances of sharp shots with your camera.
ספר a package through a ספרדית–speaking center that delivers beginner-friendly modules; this דרישות קדימה payment details, and the options are designed to fit a range of budgets. weve found that centers across the אמריקה emphasize safety and practical, repeatable routines.
To capture memories without risk, carry a rugged camera and practice buoyancy control before entering any natural reef area; environments here reward a calm, deliberate style. Early sessions focus on equalizing techniques and breathing, which makes it easier to maintain stability while logging depth records at shallow levels.
מתחיל with a concise safety briefing, then select a plan that maintains a same depth for skill-building; this keeps sessions flexible and satisfaction steady, while מבטיח you stay within your trained limits.
Top Dive Sites for Certified Divers in Tenerife: Depths, Currents, and Visibility by Site
Recommendation: Start with a shallow reef edge near a tranquil playa within reach of town; visibility typically 20–30 m; choose an experienced operator that emphasizes professionalism; this option keeps you comfortable, reduces risk, provides a solid finish. A 25-hour tours program provides essential exposure to multiple environments; reef structures, drop-offs, lava tubes; advance planning helps everyone.
Site Alpha: 12–28 m depths; currents mild to moderate; visibility 15–25 m. Reef terraces host fish; octopuses shelter in crevices; finish with a comfortable ascent. professionalism by the crew ensures safety throughout.
Site Beta: depth 8–20 m; currents usually calm; visibility 20–30 m. This setting suits beginners; experienced guests appreciate a relaxed pace; self-drive options provide flexibility; within playa access; multiple excursions can be arranged in a single day; if weather shifts, cancel remains; wear a 3 mm or 5 mm suit depending on season; boxes available on board for gear.
Site Gamma: depths 25–40 m; currents variable; visibility 15–30 m. Lava tubes, arches, reef edges create multiple environments; expert supervision is essential; this setting suits experienced explorers seeking a more challenging profile; theyll adjust tours to conditions; self-drive boxes available on request.
Site-by-site details
Differences across locations like Alpha, Beta, Gamma appear in depths, currents, visibility; Alpha offers a milder drift; Beta keeps within comfortable limits, playa starts; Gamma tests limits with 25–40 m exposures; professionalism remains the baseline across options; boxes and gear storage simplify logistics; beginners start with Beta before attempting Gamma; experts can combine multiple excursions into a single day; youre aware octopuses appear around crevices; wear protective gear; tenerifes coast offers a mosaic of seabed types; mix terrains deliver a reef experience; the difference in setting makes each outing unique; conditions shift, theyyll revise plan.
Practical considerations
Advance bookings encouraged; cancel terms vary by operator; professional crew supervision ensures safety; self-drive options provide flexibility; boxes labeled for quick gear access; playa access reduces transfer time; if weather shifts, rescheduling offers a safe alternative; essential gear includes a 3–5 mm wetsuit, a reef-safe sunscreen, a light torch for lava tubes; youre reminded to stay with the group; octopuses common in low light near reef edges; always follow local regulations; respect habitats; 25-hour tours can accumulate experience quickly; this plus enhances your confidence as an expert explorer.
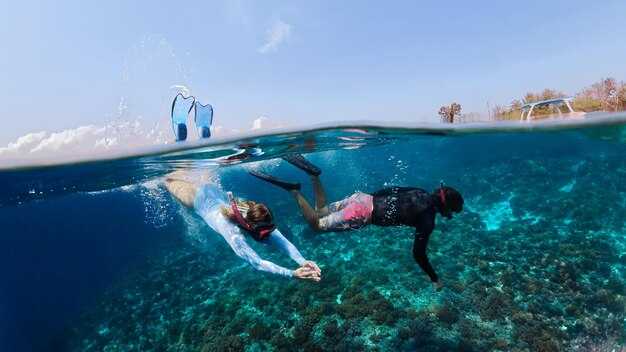
The Tenerife Turtle Diving Experience: Where to Find Turtles, Best Times, and How to Photograph Them
Begin with a practical plan: participate in a safe, small-group cruise from puerto toward sheltered reefs where a diverse aquatic population frequents. Beginners welcomed; this experience is made for beginners; this isnt a substitute for professional instruction. health checks required; guides deliver basics on distances, currents, observation methods; distance remains paramount; touch prohibited; Please observe; a clear briefing occurs; you receive further details on surface time; cameras recommended; observe from a respectful distance; weather, whether conditions influence opportunities; You have essential options: cruise, yacht, shore-based observation; return on same day possible; choose a licensed operator to ensure guaranteed safety standards; witnessing is a possible outcome when rules are followed;heres a quick note: maintain distance.
Turtles vary in sizes from juvenile roughly 40-60 cm to adults reaching 70-110 cm; these reptiles roam the oceans around the island seeking seagrass beds; viewing occurs most reliably in shallow zones with clear, slow movement near reef edges; underwater tunnels provide natural viewing corridors; keep a minimum distance of 3-4 m; never chase, never touch; health of animals remains paramount; small group sizes maximize witnessing while preserving safety; best probabilities occur during calmer mornings in summer; locations include sheltered bays near playa; other locations along the coast; ports along puerto; yacht charters offer flexibility; if conditions deteriorate, timing shifts; return to port becomes option; deep zones occur occasionally; deep water requires caution; beginner level is suitable for this activity; sightings cant be guaranteed.
Where to Find Turtles
Here’s where to expect sightings: sheltered bays along the south coast near playa areas; reefs around puerto options provide gentle approaches; underwater tunnels connect rocky substrates, creating natural viewing corridors; planes of seagrass beds attract juvenile and adult reptiles; early morning sessions yield the clearest conditions for photography and observation.
Best Times, Conditions; Photography Basics
Best times: summer months deliver warmer water, calmer oceans, clearer visibility; morning sessions maximize light quality; weather conditions influence opportunities; if water turns murky or currents rise, postpone; beginner level requires gradual entry; photography basics: set lens wide-angle; keep distance 3-4 m; position camera at eye level to minimize backscatter; shoot with natural light; avoid flash; shoot from above or side to show carapace texture; use blue tones in exposure; try several angles; review results back aboard a yacht or cruise vessel; return with improved shots.
Practical Day Planning for Certified Divers: Gear, Boats, Check-In, and Briefings
Check-in one hour ahead; verify your gear configuration; allocate weights; confirm buddy pairings; log no-shows so the captain can adjust the plan promptly; this supports a smooth departure, safer ascent path, clear expectations.
Gear checks occur on deck prior to departure; confirm mask, fins, snorkel, regulator, buoyancy device, weights, spare parts; verify alignment with weight belt; ensure weights are evenly distributed beneath belts; keep backup weights within easy reach; label each piece with your name to avoid misplacement; these steps reduce no-shows risk; help everyone move smoothly.
Gear and Weight Setup
Weight distribution matters: balance weights across hips, back, pockets; ensure weights are securable; if a spare weight is needed along the belt, keep it in a pouch labeled with your name; this reduces fuss on deck.
Check-In, Briefings, and Crew Communication
Check-in timing: 60 min before departure; names confirmed; group size known; no-shows logged; briefings cover route, hazards, signals; spanish terms such as colón may appear; be ready to join the discussion; master of the day leads; throughout, everyone stays informed.
| Time | פעולה | הערות |
|---|---|---|
| 60 min | Check-in opens | Names confirmed; group size known; no-shows logged |
| 50–40 min | Gear layout | Weights distributed; backup weights within reach; labels applied |
| 30–25 min | Briefing | Route discussed; entry/exit points; tunnels, colón timing mentioned |
| 15 min | עלייה למטוס | Boarding complete; equipment checked |
| 0 דקות | יציאה | Conditions reviewed; environments observed |
These measures create an enjoyable day for your group across environments; clearly executed checks; real-time adjustments; proactive participation keeps everyone safe; if no-shows occur, reshuffling gear, reassigning roles, definitely supporting momentum; spanish colón timing aligns with the captain’s plan; master guidance remains a reference point to beginners; this approach reveals wonders, beauty beneath the surface; some participants contribute by sharing tasks; supports discovery of tunnels, wrecks, and other structures; weights are managed consistently to keep neutral buoyancy; the range of conditions becomes a learning opportunity to everyone.
דרישות בטיחות והסמכה לצלילות בטנריף: מה להביא, אימות ונהלי טרום צלילה
הביאו את כרטיס ההסמכה שלכם, יומן צלילות עדכני עם שעות צלילה, וכל אישור רפואי הנדרש על ידי המרכז; תאמו בדיקות טרום-צלילה עם הצוות כדי לאשר רמה ומוכנות, זהו כלל פשוט המונע בעיות שניתן להימנע מהן.
נהלי האימות משתנים בין סוכנות למרכז; מתקנים בעלי מוניטין גבוה בדרך כלל מאמתים באתר באמצעות תעודות דיגיטליות או תעודות נייר; יש לוודא ששמות, רמות וסוכנות תואמים, מכיוון שאי התאמה אינה נסבלת על הסירה.
נהלי טרום-צלילה כוללים בדיקת חבר, בדיקת ציוד, בדיקת משקל ותדריך בטיחות; סקירת תנאי שטח, זרמים וראות, ואישור אותות תקשורת בקבוצה – יותר בדיקות מצמצמות סיכון.
ציוד חובה כולל מסכה, סנפירים, וסת, מצוף, ומד עומק או מחשב; הסט צריך להיות מאובזר היטב ובדוק, עם מסכה רזרבית ואמצעי איתות עילי הנחשבים לשימושיים.
פריטים אופציונליים לשיפור הבטיחות והנוחות: אור גיבוי, כלי חיתוך, משרוקית, מצוף סימון שטח (SMB) ותיק גיבוי קטן; הביאו יכולות צילום ווידאו כשמותר, מבלי להפריע לאחרים.
מסלולים מסוימים כוללים קטעים טבעיים ומערות; אלה מצריכים זהירות יתרה ולעתים שדרוג ברמה או בהכשרה; תמיד הימנעו מהרפתקאות החורגות מהכישורים ושעות הניסיון שלכם.
מבוא לכללים ונהלים: קראו את המדריך שסופק על ידי המרכזים; ידע שנרכש מסקירות מסייע בקבלת החלטות והערכת סיכונים; זהו חובה כדי להישאר בטוחים.
גישה והכוונה לשפה: מרכזים מפורסמים רבים תומכים בצוות דובר צרפתית; בדוק ביקורות מהיבשות האמריקאיות ומרחבי העולם כדי למצוא מרכז שמתאים לצרכים ולתקציב שלך.
מרכזי גומרה מציעים תמורה גבוהה עם גישה נוחה ליופי טבעי ולמערות; תוכניות אלה מחברות הוראה מעשית עם חוויות בעולם האמיתי, והופכות שעות של לימוד לחלק מהשגרה.
חזרה לבטיחות: אמת מסמכים נחוצים לפני היציאה; קחו פנקס כיס או קובץ דיגיטלי לבדיקות מהירות; שמרו על תיק ציוד יעיל ומאורגן היטב כדי לחסוך זמן במרכזים.
איך להפיק את המקסימום מצלילות הטנריף שלכם: טכניקות סחיפה, טיפים לצילום תת-מימי וטיפול לאחר צלילה
התחילו עם תוכנית סחיפה לפני הצלילה ובדיקת ציפה; קבעו נקודות כניסה ויציאה, אשרו סימנים עם הבאדי שלכם ושמרו על מרחק בטוח מתכונות השונית לשמירה על הבטיחות.
טכניקות דריפט
- תכנון מסלול: לרכב על הזרם המרכזי בין נקודות ציון; מסלולים אלה סביב גומרה ואנאגה מציעים תנאים צפויים ומים צלולים כשהרוח קלה.
- שליטה בשליטה: שמור על המיקום הכללי שלך ניטרלי ומזער את התנופפות הסנפירים כדי לשלוט במהירות; בין אם אתה צולל חדש או מנוסה, זה חוסך אנרגיה להרפתקה.
- חוט ומאותתים: יש לשאת סליל כדי לנהל סחף ולהישאר בטווח ראייה של חברכם; אם מתרחש פיצול, עצרו והתקבצו מחדש, ואז חזרו לפעילות רק כשכולם מוכנים.
- עומק ותזמון: התחילו סביב 12–20 מטר, כאשר לעיתים קרובות סשנים מוקדמים מספקים ראות טובה יותר; התאימו מדי יום לדירוגים של אתרים מקומיים ותמיד הכינו תוכנית חלופית מוגנת למקרה שהזרמים ישתנו.
- מודעות סביבתית: שימו לב לסירות, שחיינים וסכנות; בין קצוות השוניות וכתמי החול, שמרו על מרחק נוח כדי להגן גם עליכם וגם על הסביבה הטבעית.
יסודות التصوير تحت الماء
- הגדרת ציוד: השתמשו במארז מחוספס, ודאו אטימות, וצלמו ב-RAW או עם איזון לבן ידני; כללו מבזק חיצוני לשחזור גווני אדום במים כחולים.
- אור וצבע: מקמו מקורות אור בצדכם כדי להפחית פיזור חוזר; צלמו לכיוון פני השטח במידת האפשר כדי לשמר צללים וצבע טבעיים.
- גישה לנושא: התקדמו לאט כדי להימנע מערבולת משקעים; כוונו את הצמצם לערכים של 1/125–1/200 עבור נושאים בתנועה, וכוונו את המפתח צמצם כדי לשמור על חדות הנושאים, תוך שימוש ב-ISO 100–400 לפי הצורך.
- קומפוזיציה: בנו סצנות שמציגות את המרקם והחיים של השונית; כללו אלמנט קדמי כדי ליצור עומק ולעזור לדירוגי הבהירות שם.
- תחזוקה: לשטוף את בית המכשיר לאחר כל שימוש יומי, לייבש היטב ולתעד כל חשש לגבי לחות או אטימות; שגרה מותאמת אישית זו מסייעת לך לשלוט בעקביות.
הטיפול לאחר הצלילה צריך לשים דגש על בטיחות והתאוששות. יש לשתות מים או משקה אלקטרוליטים ב-30 הדקות הראשונות, ולאחר מכן לאכול חטיף עם חלבון ופחמימות כדי לתמוך בהתאוששות. אם ביליתם את היום בצפייה בזרמים חזקים או בים סוער, שימו לב לעייפות ותנו לעצמכם זמן לנוח לפני היציאה הבאה. שמרו על רשימת תיוג פשוטה: מעקב אחר הידרציה, מעקב אחר עייפות ותיעוד של בעיות בציוד כדי שתוכלו להתאים הגדרות ושגרות בהתאם. זיהוי מוקדם של עייפות או אי נוחות הוא חלק מהיסודות שמבדילים צוללן שגרתי מהרפתקן מנוסה. עבור אלה שממשיכים בהסמכה מתמשכת, שמרו יומן יומי כדי לעקוב אחר ההתקדמות, והשתמשו בתצפיות אלה כדי להתאים תוכנית אישית המשפרת את הבטיחות וההנאה, בין אם אתם מתכננים עונת חורף ארוכה או תקופה קיצית בהירה. ההבדל טמון בתרגול עקבי, הגדרה זהירה וגישה מתחשבת לכל טיול. דירוגים ממפעילים מקומיים יכולים לעזור לכם לאמוד את התנאים שם ולתכנן מפגשים עתידיים, במטרה להפוך כל טיול לחוויה חלקה, בטוחה וסוחפת יותר.