


המלצה: Power up the cockpit and ensure the primary flight displays wake before you begin the tour. With the overhead panels illuminated, you can confirm systems are within limits and ready for step-by-step inspection.
From the threshold, you see the layout placed around a broad center pedestal, with two side-by-side seats facing forward. The captain sits on the left, the first officer on the right, and each station includes a dedicated set of controls, a glareshield of displays, and a mirrored side console for quick access. A small glare shield sits over the center displays to reduce glare and improve legibility.
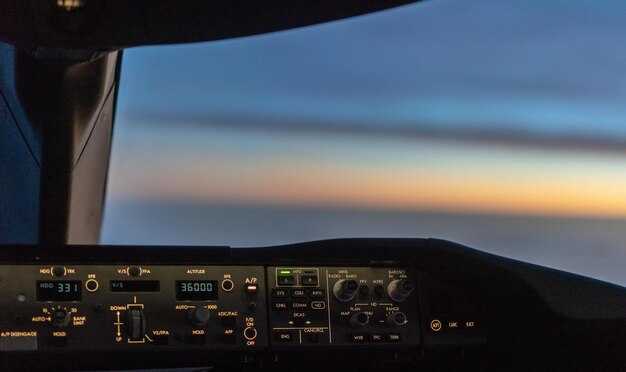
Four large primary flight displays sit in a 2×2 array and are backed by a dedicated engine/center system display; data is available on command for flight path, navigation, and performance applications. The arrangement ensures the information is always available and legible throughout the shift, even in high workload moments, like climbs and turns.
The fly-by-wire control laws keep inputs safe and coordinated; the sidesticks provide tactile feedback, and the autopilot can be engaged at a touch to center the aircraft for a stable level, while still allowing manual input when needed. The center console houses the thrust levers, autothrottle, and braking controls; brakes respond with precise hydraulic pressure to match fast accelerations or decelerations.
The overhead panel hosts circuits, fire protection, and environmental controls; when the crew door opened, the cabin air system hissed to life, and the conditioned air settled quietly through ducts. Controls mounted above the overhead rail provide quick access to lighting, oxygen, and system status indicators, with alarms and audible cues to alert the crew and protect against anomalies.
Within this cabin of precision, the workflow borrows discipline from kitchens and restaurants, with clearly labeled controls and color-coded groups placed to reduce motion and errors. Displays show flight parameters, warnings, and configuration settings; pilots can slide information between panels to support decision-making as they taxi, takeoff, and climb safely.
Compact cockpit layout and system overview
Keep the cockpit compact to reduce head-down time and speed up checks, supporting the working crew. Never compromise safety by hiding critical information from view.
Six 15.1-inch LCDs are arranged in a near-arc around the pilots: two PFDs, two NDs, and two engine/aircraft system displays, all within easy reach. Having a dedicated standby display enhances reliability. This arrangement is designed to represent a balanced trade-off between visibility and reach. This setup suits most airplane operations. The arc also respects wings and pilot sight lines, reducing eye travel during critical phases.
Soft keys and touch surfaces on the center console provide quick access to flight planning and checklists, while machined aluminum panels keep the interface durable.
Terrain awareness is integrated with the display suite, supported by active alerts that prompt timely actions. The layout further reinforces safe decision-making and reduces scan time.
Haneda operations and japans project influence the layout to reduce clutter in limited gates; the compact design helps crews maintain speed and comfort during routine data checks and at the exit to the taxiway.
This architecture can offer a scale canbus network, receive status updates from sensors, and adds redundancy to keep the airplane ready for upgrades.
Displays and instrument cluster: PFD, ND, and flight data at a glance
Focus on the PFD because it delivers attitude, altitude, and airspeed in one glance, enabling a quick baseline within minutes after startup.
-
PFD – Primary Flight Display shows the artificial horizon, bank and pitch cues, and the flight path vector, with airspeed and altitude tapes at the edges. The level of detail is tuned for rapid recognition, so you can confirm aircraft attitude and target altitude before scanning the ND. The PFD’s color coding, flight mode annunciators, and vertical speed readouts help you judge stability, adding confidence during transitions from climb to cruise.
-
ND – Navigation Display mirrors the route and situational data, offering map, weather radar overlays, traffic, and terrain. The data layers are scalable, and the canbus-enabled infrastructure ensures the PFD and ND share a robust, single source‑of‑truth stream. Pilots can prefer either a map-centric or data-centric view, and the overlays adjust to the current phase of flight without clutter. theres room to keep critical nav information visible while you focus on the bigger picture.
-
Flight data at a glance sits in the central avionics cluster, where engine parameters, fuel status, hydraulic pressure, and environmental data are summarized alongside altitude, Mach, and vertical speed. This enables a quick cross-check across systems; admission of faults triggers a prioritized alert palette so you can act without delaying descent or re-tracking a approach. The источник data stream is fused with avionics and displays to present a coherent picture, shaping your awareness in a way that older cockpits could only approximate.
The modern layout places displays in positions that minimize head movement, placing key instruments at eye level and within a natural scanning rhythm. The philosophy emphasizes a clean environment with robust room for critical data, reducing noise and letting you monitor altitude, level changes, and flight path without dropping focus. In practice, that means you read the PFD and ND, then quickly corroborate center‑panel data, all within a few seconds rather than minutes, empowering precise control during climbs, climbs‑through‑FL, approaches, and landings.
In everyday operation, the infrastructure behind these displays is designed to stay resilient under demanding conditions. The avionics network enables data fusion across sensors placed throughout the aircraft, so a single misread on one source doesn’t obscure the bigger picture. This robust approach mirrors a museum-quality presentation: everything is placed intentionally, shapes the user’s perception clearly, and supports a calm, efficient flight deck environment. For pilots, that means reliable altitude and speed cues, faster flight-path awareness, and a streamlined admission into the cockpit’s digital environment, all because the displays are designed to offer clarity, consistency, and confidence.
FMS setup: route entry, performance data, and constraint management
Begin with a concrete recommendation: use the FMS route entry to input the planned flight path, then verify the route on both primary flight displays. At centrair operations, preload the data on the ground to ensure the wings stay within limits during pushback. Load the same route data into the NAV database to keep consistency. Use the adjustable knobs on the equipment panel and tactile selectors to confirm entries without looking away from the windows.
Explain constraint management by tagging each leg with mandatory or advisory altitude and speed limits. Enter arrival and missed approach constraints, then check how they affect following legs. The processing engine flags a situation where the profile would violate terrain or airspace, and you adjust using adjustable altitude or speed, or switch to a nearby alternate route. This adds clarity and keeps you safely within the plan without surprises.
Performance data entry: Load weight data, fuel on board, and performance data for takeoff, climb, and cruise. Input adjustable cruise speed and Mach target based on weight and wind; ensure V1, VR, and V2 values reflect the planned weight, then transfer to the FMS so its mode computes thrust, flaps, and engine settings. Just enough wind correction data is reflected in the speed and Mach targets; verify the result stays within the normal envelope and the moving to the next leg proceeds smoothly.
Philosophy and backup: The philosophy is to keep core navigation in the digital platform while maintaining a tactile backup. Use paper charts during critical checks to validate the FMS data. The roof panel houses the controller and backup power; if a quick read is needed, you can glance at the windows to confirm route geometry while you adjust the plan.
Operational note for centrair: After loading the route, run a short active test. Confirm the progress stays normal, watch for moving legs and any stops, and adjust if needed. This approach works for aircrafts of various sizes and keeps the project scope aligned across platforms.
Autopilot and Flight Guidance System: modes, engagement, and monitoring
Engage autopilot only after confirming the mode, target altitude, and crew inputs; enable both AP1 and AP2 when needed and watch the rdcs status in the background as guidance locks in within seconds. The most reliable engagement occurs with the flight director active, the appropriate mode selected, and the control law verified by the desktop display, which keeps the pilot in command while reducing workload.
The Dreamliner uses a processor-driven flight control system with motorized actuators that move the movable surfaces under electronic commands. These electronics feed the controls from a stable supply, and the life of the system depends on robust power and fault protection provided by the rdcs and its suppliers. In the cabin, the video and display panels present the status clearly, helping adults and new crew alike to verify mode and status in real time. A clear background readout shows when guidance is engaged, and the ability to monitor multiple indicators from the desktop-style suites keeps the system well within limits even during off-nominal conditions.
To use this system effectively, select the desired mode, verify the auto-flight status on the PFD and ECAM, and keep an eye on the localizer and glideslope cues. Depending on weight, weather, and flight phase, most guidance tasks shift between autopilot control and pilot supervision. The RDCS coordinates both primary and back-up processors, ensuring redundancy so the life of the system remains robust even if a single module is offline. These safeguards help maintain stability while the cabin air-conditioning supports the crew by keeping comfort levels steady, which in turn sustains attention and decision speed.
When monitoring, observe the green autopilot cues, the flight director crossbars, and the magenta commanded path in the background video feeds. The pilot has the ability to intervene at any time by selecting AP OFF or switching modes, and this disengagement should be performed smoothly if conditions demand it. The most important practice is to confirm mode and capture on the flight path within seconds of activation, park the autopilot if needed, and re-engage only after rechecking the plan and constraints.
| אופן פעולה | What it does | Engagement notes |
|---|---|---|
| HDG | Holds a selected heading with autopilot control | Arm AP1/AP2; verify green indicators; disengage if a conflicting input appears |
| LNAV | Follows the programmed flight plan and waypoints | Activate after confirmation of the active leg; monitor path on the PFD |
| VNAV | Provides vertical guidance for climbs/descents | Enter target altitude and speed constraints; watch vertical profile in seconds |
| ALT HOLD | Maintains current altitude | Use for stable cruise; RDCS captures altitude and holds it until changed |
| APPR (ILS) | Approach guidance with localizer and glideslope | הפעל בסמוך לנתיב הגישה הסופי; עקוב אחר סטיות ותיקונים ממערכת בקרת כיוון רדיו (RDCS) |
| טיפוס/ירידה חופשיים | פרופילי גובה אנכיים פתוחים לניהול מהירות יעיל | הפעל במהלך שיוט עם כניסות מודעות אילוצים; אמת חלונות מהירות |
מערכות חשמל, הידראוליקה וסביבה בתא הטייס
התחל תמיד בבדיקת תקינות מלאה של מערכת הספק חשמלי (EPS) ובבדיקת מוכנות של מערכת בקרת סביבה (ECS) בתצוגות תא הטייס, ואמת את מצב הסוללה, חיבורי GPU ואספקת החמצן לצוות.
עמוד השדרה החשמלי מפעיל ציוד על פני סיפון הטיסה, החל ממוט ההיגוי ועד לאוויוניקה ולצגים הראשיים. יחידות ואפיקים יתירים שומרים על מערכות חיוניות מופעלות גם אם נתיב אחד נופל, כך שהמטוס נשאר מגיב. ארכיטקטורה חזקה זו יכולה לייצג קו בסיס אמין למעברים אוטומטיים למצב טיסה, ותומכת בבידוד תקלות מהיר. עקוב אחר זרימת החשמל ושים לב למתח חריג או למחווני התחממות יתר בתצוגות הצוות. אם אתה רואה חריגה, השתמש בהצלבה כדי לשמור על עומסי המנוע ובקרת הטיסה בגבולות בטוחים.
ההפעלה ההידראולית ב-787 משתלבת עם הספק חשמלי כדי להניע בלמים, כן נסע ומשטחי שליטה היכן שצריך. למרות שמערכת אוויר הדמם מצומצמת, המערכות ההידראוליות נשארות במקביל עם מעגלים ומיכלים עצמאיים כפולים השומרים על פעולה גם כאשר נתיב אחד אינו מקוון. דף מצב המערכת ההידראולית מציג לחץ, טמפרטורה ומצב מסנן; שימו לב לכל התראה ועברו לתצורה בטוחה אם מתרחשת תקלה. התוצאה היא מערכת התומכת בתחושת שליטה חלקה ותגובת בלימה צפויה, אפילו בתנאי משבי רוח או תמרוני עומס גבוה.
מערכת בקרת הסביבה בדרימליינר משתמשת בחבילות המונעות חשמלית כדי לנהל את הטמפרטורה, הלחות ולחץ האוויר בתא הטייס ובתא הנוסעים, בארכיטקטורה חסרת דימום. זרימת האוויר בתא הטייס מכוונת על ידי פתחי אוורור ומאווררי סירקולציה כדי לשמור על עמודת זרימת אוויר יציבה סביב מושבי הטייס, התואמת באופן הדוק לתנאי הטיסה. מערכות החמצן של הצוות מספקות אספקה מהירה במקרה של ירידת לחץ, ומחווני החמצן צריכים להישאר בירוק במהלך פעולות רגילות. בקרות מציאותיות מאפשרות לטייסים להתאים את הטמפרטורה ואת זרימת האוויר מבלי להתפשר על הבטיחות, והמערכת תומכת בקירור ציוד אלקטרוני עבור יחידות המתלים באזור תא הנוסעים.
צוות הטיסה עוקב אחר תקינות תת-מערכות החשמל, ההידראוליקה והסביבה באמצעות חיוויים ואזעקות בתא הטייס. שימו לב להתראות בלוחות הבקרה ולנתונים המגיעים מיחידות מרובות כדי שתוכלו לגלות חריגות לפני שהן משפיעות על בטיחות הטיסה. תקלה בודדת עשויה להוביל לחזרה בטוחה למצב יציב, או למעבר לטיסה אוטומטית עם יכולת פגומה במידת הצורך; זה עוזר למשטחי השליטה והבלימה להישאר בתוך הגבולות. שמרו על גישה רגועה ושיטתית, ועקבו מקרוב אחר שלבי בידוד התקלות המומלצים כדי למנוע חזרות מיותרות לשער.
עבור צוותים המשדרגים מתאי טייס ישנים יותר, מבנה ה-787 מציג תהליך עבודה שונה. הפריסה משתמשת בעמוד שדרה חשמלי עשיר בציוד, עם שערים המקשרים בין חיישנים, מפעילים ותצוגות. מוט ההיגוי מספק תחושה ישירה בעוד לוגיקת הטיסה האוטומטית מפרשת נתוני רוח ואוויר כדי לסייע בשמירה על טיסה יציבה. לא פחות חשוב, טייסים צריכים לוודא שהיחידות בשרשרת הספק והסביבה נשארות בתוך הסבילות וכי זרימת החמצן וזרימת האוויר תואמות את תנאי הטיסה הנוכחיים. כאשר אתם מגלים תקלה, עיינו במדריכי התחזוקה ויישמו את ההחזרות המומלצות למצב טרום-תקלה כדי לשמור על המטוס בתצורה הטובה ביותר האפשרית.
ארגונומיית תא הטייס, פריסת בקרה ושיקולי ראות
הגדר את תנוחת המושב והשליטה לפרופיל מרכזי, מתכוונן במלואו השומר על האמות שלך מקבילות לג'ויסטיקים ועל העיניים שלך בגובה הצגים העיליים. הסדר מותאם אישית זה מפחית את מאמץ הצוואר והופך את פקדי הסיפון לנגישים באופן מיידי, מבלי לדחוס את הפאנל בזמנים של עומס עבודה גבוה.
הפריסה נותנת עדיפות למדף האמצעי: הפונקציות הנפוצות ביותר נמצאות בשורה הקדמית הגבוהה, בהישג יד קל, לנוחות מוגברת בזמנים אלה. שני ג'ויסטיקים הצדדיים מותקנים באותו גובה, עם מגבלת הטיה לאחור ששומרת על המרפקים בנוחות במהלך תנועת הציוד.
החלטות לגבי נראות מסתמכות על גימור פני השטח ועל בהירות תצוגות עיליות (huds). המשטח סביב הצגים משתמש בגימור מט כדי להפחית סנוור; תצוגות עיליות מספקות תצוגה יציבה עם מינימום תנועת ראש. מידע על פני השטח מופיע ב-ND וב-PFD כדי לסייע לטייסים לפרש מזג אוויר, פני שטח ופריסת שדה תעופה במבט חטוף.
כדי לסייע לקוראים להשוות אפשרויות, גלו רשימת בדיקה מעשית המותאמת למודל ארגונומיה רחב-סיפון. ספקו למבוגרים פרופיל ישיבה ושליטה שנשאר בנוי, כולל בטנה בכיסא, ומשתמש בגיבוי נייר לעיון מהיר. תרגילי שבת ובדיקות שגרתיות נהנים מחבילות יפניות של לוחות קלות משקל ומיושרות לייזר המשפרות את תחושת השליטה.
יש לבצע את התוכנית הארגונומית בשלושה שלבים: להתאים את המושבים והמקלות המיושרים למרכז, לכייל את התצוגות העיליות לתרחישים קריטיים, ולהריץ תרגילי תנועה כדי לאמת טווח הגעה, תצוגה וזמני תגובה.