


Reserve your one-hour climb window and rental gear in advance to avoid cancellations. This lush lakeside route around comacina attracts climbers from languages worldwide. The trip pairs past stonework with modern steel anchors, delivering a thrilling experience and a gallery of panoramas.
Plan the day by checking počasí and transportation schedules; winter daylight is short, while march brings longer light and cooler temps. For access, take a regional train to a lakeside village and then a local bus or taxi to the trailhead; ferries from comacina connect to the harbor, allowing a flexible loop if weather shifts.
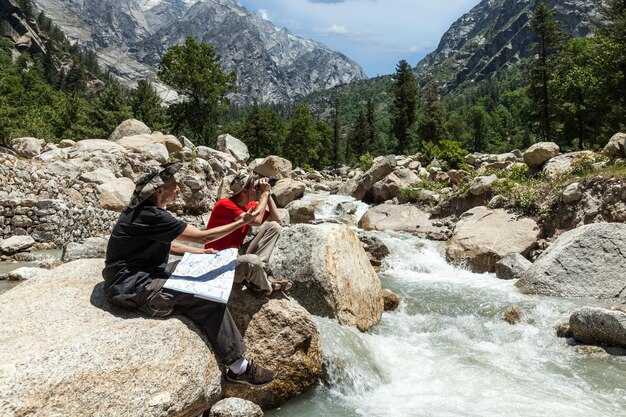
Your gear should include a helmet, a harness, two lanyards, and a dynamic rope; rental options along the lake como network are affordable, and many outfits bundle a safety briefing with the gear. Pack gloves, a light shell, water, and energy bars to maintain grip and focus during the ride between sections.
The route presents a series of fixed anchors and ladders, with segments that can be tackled in a d'une heure pace for most climbers; expect dramatic views across the lake and comacina’s shoreline. Because weather and crowds shift, choose operators with flexible cancellations and clear show of safety records; read recent trip reports and gallery posts for up-to-date conditions.
For languages, many providers offer briefings in several tongues; if needed, request a multilingual briefing before you start. This is not only a fitness test but a smart way to align with the route’s pace, allowing every participant to enjoy the vertical scenery without rushing. The scenery after the crux offers lush panoramas over comacina and the surrounding hills.
To maximize value, consider a mixed itinerary with a shorter warm-up and a longer, rewarding finale; groups mohou tailor the day based on skill, weather, and trail conditions. If you plan in march or winter, book early to guarantee slots and avoid last-minute changes; this approach keeps costs down and ensures a memorable lake-side experience for climbers of all levels.
Route options and start points for the Varenna Via Ferrata
Begin at the monastero entry point for a balanced, reachable ride, with long covered stretches and a clear path for climbers of varying levels, allowing a steady ascent to the first belay and a breathtaking view from the northernmost shoulder. Bring a helmet (helma) and headphones to hear safety briefings clearly.
Primary entry points
Option 1 – monastero: best for gradual exposure, typically less crowded, with most of the early segments covered; entry is straightforward from the road and the route takes about 60–75 minutes to reach the first cross. This path stays delightful in good weather, and its shorter pitches are ideal for noblesse climbers seeking a calmer ride with osobní gear stowed in a compact pack.
Option 2 – varenna harbor gateway: adds a longer approach and a more thrilling, northern-facing exposure; takes roughly 2–2.5 hours to reach the top of the first plateau, with views spanning comacina and the surrounding towns along the lake. A boat ride to comacina is possible for a convenient reset, offering ovoce snacks and a moment to enjoy the scenery. The climb here suits climbers seeking a demanding profile and a touch of fireworks over the water on clear evenings.
Conseils pratiques
Gear and preparation: standard harness, helmet, and a pair of sturdy gloves; pack light but include headPhones and a small energy supply; carry a map in languages to follow signs when you arrive in zájezd guides or zahraničného resources, and you can rent or borrow gear from local towns. Choose entry points based on weather, your fitness, and whether you want a less exposed option or a best, more ambitious ride with occasional exposed sections. Your vaše výbava should fit into a compact daypack, leaving space for a short break at comacina and a quick stop for ovoce before the final ascent.
Gear checklist for a safe day on the ferrata
Begin with a certified helmet, a climbing harness, and a ferrata-set with energy-absorbing lanyards; connect two locking carabiners to your harness before you move, then inspect each connection. This approach offers maximum protection through the most exposed sections near comacina shores.
Footwear must be rugged approach boots with solid tread; gloves protect hands during detours and rung exchanges. Carry a spare locking carabiner and a backup ferrata connector. Pack a compact, spacious 40–50 liter daypack with water, snacks, a wind layer, and a headlamp for sunset. If you plan a kempu-style tour led by guides, sjednat transport and access in advance; choose hardware from a trusted house supplier like sedacího. Keep the tour details, such as route, schedule, and contact points, handy for quick feedback.
Weather checks: monitor forecasts; cancellation applies if storms or strong winds are forecast; plan to finish before darkness. Bring a lightweight rain shell, a map or offline navigation, and a small first-aid kit. Also note breathtaking views along the shores can tempt longer breaks; pace yourself to avoid fatigue and stay aligned with your group, especially when you tour with guides who know historical pockets along the path near comacina.
Packing and pace tips
Set a steady pace so you can enjoy the garden and the beautiful scenery while keeping a safe distance from the edge; store electronics in a dry bag and keep a spare battery. After the day, refresh your feedback with the team and revisit details to improve home safety for future trips, ensuring the house-safety mindset remains active while you plan your next tour.
Safety protocol: helmet, harness, lanyards, and inspection steps
Put on a certified helmet and snug harness before approaching any anchors. Attach your lanyards to rated points, test the connections by pulling away, and perform checks while your group stays at the entry. Do not wear headphones during crucial checks; stay focused on partner calls and audible cues. Use a downloadable checklist to verify gear status, and review it on-site with the team; this keeps time efficient and the session fantastic and enjoyable.
Equipment setup
Ensure vybavení includes a helmet that fits, a properly sized harness, two locking carabiners per lanyard, slings, and a gear board for organization. Have a spare case on hand for quick swaps; the harness should sit mid-body with snug leg loops, and the helmet should sit level with the strap buckled. Test each lanyard by tugging along its length and confirming gates close completely; do this for every lanyard. If you’re arriving from Milan, plan for lush scenery and outdoor conditions; use sportovní protection wherever available and wipe buckles with dezinfekce wipes after use. Keep everything on-site in a sturdy case to prevent loss, and treat the routine as běžně practiced over months. This routine is part of naši safety culture.
Inspection steps
Walk through a step-by-step on-site inspection: inspect helmet shell for cracks; check the chin strap; inspect harness for wear or fraying; verify tie-in points and belay loops; test carabiners and gates; inspect lanyards for wear; test all anchor points by a loaded tug to confirm integrity. Confirm that transfer points align with the route plan and recheck before continuing. Repeat checks after any rain or mud; record results in the downloadable log to track your progress over months. This approach is important to enhance safety, creating a rich and enjoyable outdoor experience that you can share with home and travel partners. Ensure you stay hydrated and respect the environment, preserving our lush surroundings for many seasons to come.
Best time to climb: weather, daylight, and crowd considerations
Climb during May–June or September–October: these seasons offer dry days, cooler temperatures, and a manageable crowd. Start at first light and plan to finish before the hottest period; this window keeps the ascent memorable for most ages and fitness levels.
Weather and daylight: at lake level, expect 18–24°C on May–June days, with ridges cooler by 6–12°C. In September, highs are around 15–22°C. Afternoon storms and thunder are possible, so cancellations follow lightning or heavy rain. Check a downloadable weather board or alpenverein alerts before you set off. Open conditions prevail on clear mornings, while clouds can dim the line–which means a smart plan includes a close eye on the forecast.
Daylight window grows longest in peak season–roughly 15 hours in midsummer–then narrows to about 11–12 hours by early autumn. Start moves around dawn or just after sunrise and aim to complete the exposed sections well before dusk. This approach keeps the pace manageable for most lovers of trekking and prevents fatigue that could affect footing on kamením sections.
Crowd and status: weekends draw normy crowds, so consider weekdays or early/late starts to avoid congested approach paths and wait times at the open/close points. Always verify which routes are open or closed on the official board and in downloadable guides; cancellations can occur with weather shifts, so have a flexible plan. Wear shoes with solid grip and bring a light layer you can add or remove as you climb; the route rewards patience and steady progress even if the day isn’t perfectly calm.
Gear, age, and safety: fitness matters more than age alone; minimum guidance suggests a steady pace and the ability to step with care on exposed ledges (kamením). For families or beginners, pick a túry that stays within easy altitude changes and keep a personal, osobní risk assessment (který pace fits your group). Always have helmet, harness, and a board-style safety plan in your pack; carry water, ovoce for energy, and a small weather-ready layer. Alpenverein resources often feature consejos and downloadable checklists to help you prepare with confidence.
Getting there: transport, parking, and trailhead access from Varenna
Park in the harbor’s large municipal lot and use the adjacent transfer point to reach the trailhead zone. A day ticket costs approximately €5–€8 and is valid from 06:00 to 22:00; arrive early in the busy months to secure a space.
From the harbor, take a short transfer by boat to Lenno or a nearby pier, then follow a signed path of approximately 15–25 minutes that goes through wooded sections and past monastero ruins toward Balbianello.
Trailhead access: the entry sits behind a spacious car park on a quiet street; the initial section is a broad, covered path that leads to the first points of interest and a short scramble toward the exposed sections, with views toward castles along the shore.
Gear and guides: carry or rent a harness and helmet; experienced guides offer briefings and options in several languages; ensure the harness is clean and properly secured before you start.
Seasonal notes: sailing services operate in the warmer months, with a maximum number of daily trips; in peak periods, book transfers in advance; check forecasts for počasí and plan accordingly; if you need to arrange a private transfer, you can sjednat with operators; this route promises a thrilling tour of Balbianello and surrounding monastero areas.
Guided tours vs DIY: costs, pros, and booking tips
Opt for an expert-led excursion if you want reliability, pace control, and gear included; choose DIY if you prefer flexibility, more control over timing, and tighter cost management, provided you are comfortable handling navigation and safety checks.
- Costs and value
- Guided tours: typical price range is 60–120 EUR per person for a half-day, 120–180 EUR for a full day. Most packages include helmet, harness, rope, safety briefing, and on-site guidance from a qualified instructor; some itineraries add transport from a nearby spot. You’ll reach iconic spot with breathtaking mountain scenery and may include a cursory visit to a monastero or a Balbiano-area villas glimpse as part of the zájezd. This option streamlines access and entry logistics, reducing planning friction.
- DIY: equipment rental runs about 25–40 EUR if you don’t own gear; entry to protected locations costs about 5–15 EUR; local transit or parking adds 7–20 EUR. If you bring your own gear, total can be 50–100 EUR; with rentals and a bit of extra transport, 80–150 EUR is common. Always check normy and safety norms before proceeding.
- Avantages et inconvénients
- Guided tours: dependable pacing, safety oversight, and immediate access to route knowledge, which is especially helpful for ferratového-style itineraries. You enjoy a curated combination of scenery and practice, with a guaranteed entry sequence that minimizes delays. The route often showcases a couple of monastero stops, a few villa facades, and a Balbiano vantage point, delivering a reliable glimpse of the landscape without surprises.
- DIY: maximum control over timing and browsing pace; potential savings on cost; the freedom to linger at a favorite spot or skip a non-essential segment. You can tailor the experience to a single mountain vista or a longer zájezd, but you assume the full burden of route planning, safety checks, and weather contingency. Ghosts of weather and fatigue can alter the plan; preparation is essential.
- Conseils de réservation
- Start browsing reputable operators and read recent user feedback; confirm opening windows relevant to your date and verify that gear, insurance, and entry permissions are included. If you prefer English-speaking support, check language options in advance.
- Clarify inclusions: gear, insurance, any entry permissions, and whether a separate transport leg is included; ask about ferratového-specific safety briefings and belay support if applicable; ask for a clear timetable and meeting location near a practical spot such as Balbiano or a nearby monastery for a smooth zájezd start.
- Logistique : épingler le lieu de rendez-vous exact, confirmer la taille maximale du groupe et examiner la politique d’annulation ; en haute saison, réserver au moins 2 à 3 semaines à l’avance et envisager un plan de secours (voire un itinéraire alternatif) en cas de problèmes météorologiques.
- Préparation pratique : emportez de l’eau (vodu), une couche légère, des chaussures robustes et un imperméable compact ; assurez-vous d’avoir les documents requis et de connaître l’heure d’entrée pour le secteur choisi ; pour les journées en autonomie, téléchargez des cartes hors ligne et enregistrez les coordonnées de l’itinéraire.
À quoi s'attendre une fois terminé : durée, indices de difficulté et points de ravitaillement
<p Prévoyez un circuit complet de 3,5 à 4 heures, en ajoutant du temps pour les pauses photos et les courts repos. Partez tôt de Balbiano et rejoignez le départ du sentier à pied ; un bateau entre les villes peut raccourcir les transferts si vous venez de Milan. La partie la plus au nord est la plus palpitante, offrant des vues imprenables sur les montagnes et un mélange ludique de sections exposées et de progression constante. La condition physique est importante : gérez votre rythme et utilisez l'équipement doporučené indiqué par alpenverein, notamment un casque, un harnais, deux longeurs, des mousquetons, des gants et des bottes robustes. Restez sur les sentiers balisés et préparez-vous à de courtes marches kamením. Les rafraîchissements sont nombreux le long du parcours : prévoyez une pause complète près de Riva pour vous réhydrater et grignoter. Si le temps se gâte, des conditions d'annulation et des options de remboursement peuvent s'appliquer ; ayez un plan pour vous adapter. <p Indices de difficulté : Le sentier comporte des segments courts et pénibles et plusieurs endroits exposés. Attendez-vous à des passages d'escalade avec les mains sur des plaques de kamením et des cordes fixes sur les parties les plus raides. La section la plus au nord est la plus exigeante ; maintenez votre forme physique et fiez-vous à un équipement approprié. Si le vent se lève, adaptez votre rythme ; sans vous précipiter, surveillez vos appuis sur les différents terrains et parfois sur les marches de kamením qui nécessitent un placement prudent. Pour réussir, prévoyez un plan de secours. Des indices audio sont disponibles dans certains guides pour vous aider à maintenir le rythme et la sécurité. Il y a des points de vue ludiques, et les points culminants peuvent distraire ; vous voudrez rester concentré sur la ligne. <p Points de rafraîchissement : De nombreux endroits pour l'eau et les collations sont disponibles le long du parcours, y compris une pause à mi-chemin près de Balbiano, et une pause plus longue près de Riva pour de l'ombre et un panorama. Gardez une bouteille d'eau pleine, et utilisez les signaux audio pour minuter les pauses. Pour ceux qui viennent de Milan, combiner cela avec une courte promenade en bateau peut prolonger la journée et offrir des transitions pittoresques entre les arrêts. Les vues époustouflantes aux points de vue clés rendent les pauses intéressantes.| Stade | Durée typique | Indices de difficulté | Rafraîchissements/notes |
|---|---|---|---|
| Approche Balbiano | 30–40 min | courte ascension, terrain varié ; passages avec des pierres ; suivre le marquage. | eau, collation légère ; ombre à proximité |
| Crête la plus au nord | 20–40 min | sections exposées ; passages d'escalade nécessitant de l'équipement fixe ; bonne condition physique requise ; signaux audio disponibles | Point de vue panoramique ; endroit idéal pour prendre des photos |
| Ravitaillement Riva | 15–20 min | courte pause ; textures de roche variées (různých) ; rester en sécurité | eau, collations, ombre |
| Chemin de retour | 20–30 min | descente progressive ; attention où vous mettez les pieds ; sans vous précipiter | points de vue finaux ; liaison en bateau possible |
| Aperçu de la politique | – | Des conditions d'annulation et de remboursement peuvent s'appliquer. | Vérifiez les prévisions ; conseils de l'Alpenverein |