

 Experience a Lantern-Making Workshop in Hoi An – Create Your Own Lantern">

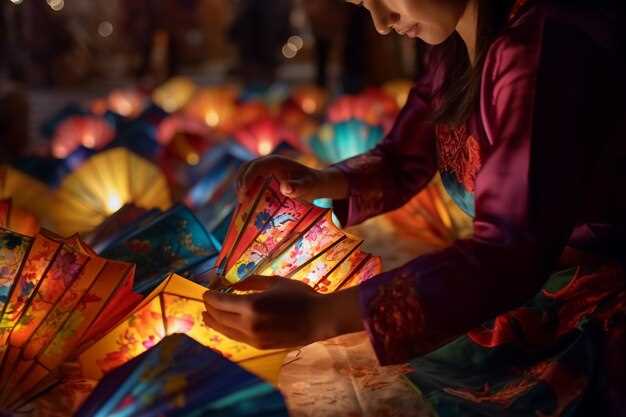
Join this lantern-making workshop now to create your own lantern and take home a keepsake from Hoi An. The experience sits at a cultural center along the Thu Bon river, where a Vietnamese founder guides you through the craft and the stories behind each glow. This занятие invites families and solo travelers alike to explore tradition with a modern twist.
Time slots run 90 minutes, with sessions at 9:30, 11:00, 14:00 and 16:00 daily; ages 8 and up are welcome, and groups of up to 12 participants receive personalized guidance from a skilled instructor.
Joining the activity is straightforward: register online or at the cultural center desk. We begin with gentle stretching to warm up, then move to shaping the frame, applying rice paper, painting, and sealing for weather resistance–using natural dyes and bamboo from nearby suppliers.
This experience leads to experiences that are unique to Hoi An’s lantern culture. After crafting, you can stroll to a riverside resort where local stalls offer better dishes and live music, letting you compare the art you made with the city’s warm flavors.
whats your preferred color and size? Tell us what you want, and the instructor will adapt the palette to your vision; you can choose red for celebration or white for lanterns to hang indoors. Your lantern is portable and durable for years of display.
Come with family, friends, or solo for a calm, creative retreat that respects time-honored techniques while offering practical tips you can reuse at home–like clean-up, storage, and quick-dry methods to ensure your lantern lasts.
Hoi An Lantern-Making Workshop & Culinary Tour: Create Your Own Lantern, Market Walk, and Cooking Class
Reserve your spot now for joining a hands-on lantern-making session, a market stroll, and a cooking class that deliver really memorable experiences.
The program focuses on eco-friendly materials–rice paper, bamboo frames, and natural dyes–so you leave with a lantern that lights beautifully in the evening and adds a rich glow to your memories of Hoi An.
In the lantern-making, you choose colors, shapes, and textures; simple steps guide you through folding, gluing, and assembling, then you очистить the lantern before the first lighting check.
Alongside the making, the market walk lets you visit stalls, sample local coffee, and learn how herbs and seafood flavor the region’s dishes.
This занятие is designed for beginners and families; after the market, the cooking class covers a handful of classic Hoi An dishes, with demonstrations and hands-on practice, giving visitors a practical, delicious takeaway.
Visiting the ancient town core, you’ll find photo-worthy moments and a natural rhythm that keeps everyone engaged, with lighting effects that highlight your lantern’s colors as dusk falls, stretching away into the evening.
What to bring: comfortable shoes, a light jacket, and a curious mindset; materials are supplied, and the guide offers thoughtful, practical tips to help your lantern shine.
Booking details: this offer combines a lantern-making activity, a market stroll, and a cooking class into a perfect, family-friendly experience that suits eco-conscious visitors and groups alike. Lets you enjoy a rich afternoon and leaves you with a super keepsake.
What’s Included: Lantern-Making Studio, Materials, and Instructor Guidance
Book this experience to create your own lantern with guided instruction from passionate artisans in a village setting. This evening blends heritage, culture, and personal creation, giving you a tangible keepsake and a memorable moment with locals.
The Lantern-Making Studio provides a focused space with individual workstations, ample light, and a calm tempo so you can craft a lantern that reflects your style. You’ll meet artisans that have cherished this craft for generations, and you’ll feel their pride in every step.
You’ll receive all essential materials: bamboo frames, rice-paper sheets, paints, brushes, glue, string, and a small LED light for the final glow. A practical pack ensures you can carry everything home, and you’ll have extra sheets for experimentation.
Guided by two locals who are passionate about lantern-making, the session breaks the process into simple steps: frame assembly, paper application, painting, and final embellishments. They share cultural context and practical tips, answer questions in real time, and help you stay confident and creative as you work.
At the end, you’ll take home your personal lantern and a sense of village heritage you can share with friends and family. This truly fantastic experience brings people together, spanning ages and backgrounds, in an evening of creating and delights. When you’re ready to go, pack your lantern carefully for the journey home.
| Included | Detalles | Notes |
|---|---|---|
| Lantern-Making Studio | Dedicated workspace, bright lighting, calm tempo | Comfortable setup for individual and small-group creation |
| Materials | Bamboo frames, rice-paper sheets, paints, brushes, glue, string, LED light | All necessary items provided; extra sheets available |
| Instructor Guidance | Two local artisans, step-by-step coaching, demonstrations | Culture context shared throughout the session |
| Duration & Group Size | Approximately 90 minutes; small groups (6–8 participants) | Personal attention and hands-on help |
| Take-Home | Your finished lantern; pack with spare sheets | Ready to display or gift |
Materials, Design Options, and Personalization Tips for Your Lantern
Begin with a bamboo frame and rice-paper panels for a light, durable lantern that fits Hoi An’s setting.
Materials
- Frame and core: bamboo from a local eco-friendly source; aim for outer diameter 18–22 cm and height 22–28 cm for a balanced silhouette.
- Panels: rice paper or silk, natural color; thickness around 0.18–0.25 mm; use starch-based glue for a clean, reversible join.
- Accents: pottery beads and a small ceramic weight; consider a truc ring or tinh-inspired pattern for texture.
- Binding: cotton cord or hemp twine (2–3 mm) for a sturdy hang.
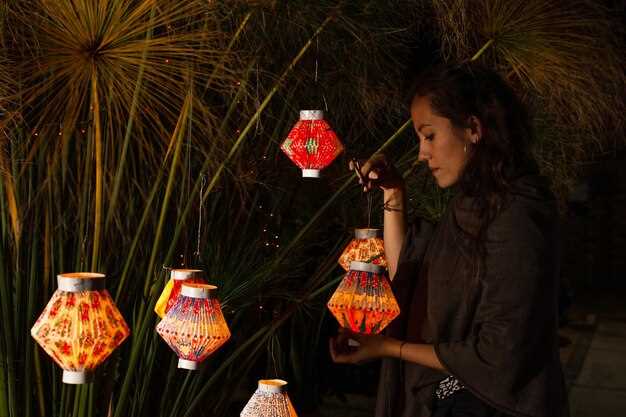
- Lighting: low-heat LED tea-lights or a small solar module; expect 6–12 hours of steady glow; place inside to avoid direct heat on paper.
- Finish: water-based varnish or natural oil to protect against humidity; ensure coatings are non-toxic.
- Tools and prep: scissors, craft knife, metal ruler, soft brush, and a cutting template for precise panel shapes.
- Source notes: acquire parts from reputable local markets or craft suppliers; a portion of the purchase supports sustainable programs in the region.
Design Options
- Shapes: round, hexagonal, or cylindrical; two to four panels create clean lines and easy assembly.
- Patterns: lattice, lotus silhouette, fish-scale texture, or simple geometric cuts; incorporate tinh motifs to reflect local heritage.
- Color and finish: choose amber glow or ivory; pair with jade green accents for contrast; use non-toxic dyes or paints.
- Material mix: bamboo frame with a brass ring, wooden tassel, or pottery bead trim for a tactile feel.
- Lighting layout: place the LED inside for a soft halo or position the light outside to cast decorative shadows on walls.
- Durability tweaks: reinforce joints with thin bamboo strips and a light varnish to resist humidity in seaside settings.
Personalization Tips
- Place a nameplate or date with careful calligraphy on the front panel; keep lines compact for legibility.
- Include a few local tinh motifs, like lotus or dragonfly silhouettes, and add a small truc accent near the rim for texture.
- Attach a lightweight tassel or a tiny pottery bead as a touch of local craft and to add movement in the breeze.
- A simple cleaning routine helps longevity: dust with a soft cloth, then очистить with a damp, mild-soap wipe and dry thoroughly.
- Outdoor use: shelter from direct rain, and store indoors when not in use to extend life.
- Transport tip: if a ride by bike is planned, keep the lantern in a padded bag during transit to prevent scuffs.
Step-by-Step Lantern Creation: From Frame to Final Glow
Begin with a ready-made bamboo frame kit; it stabilizes the structure and makes the final glow achievable from the first touch.
- Materials and safety: Gather a lightweight fabric in your preferred color, a bamboo frame, thin wire, a small LED candle, herbs for aroma, and string for tying. Definitely check edges and corners; morning light helps you see clean edges.
- Frame preparation and attaching: Clean the frame, then attach the wire at key points to hold fabric taut. Use a gentle twist to avoid snagging. Attaching the fabric panels to the frame creates a smooth, skin-like surface for light to bloom.
- Fabric panels and pattern: Cut fabric into panels, lay them on the frame, and secure along the seams. Keep edges straight and avoid over-stretching to prevent sagging. This step establishes a unique silhouette for the lantern.
- Light source and wiring: Place the LED module behind the fabric, thread the wires along the inner edge, and test brightness. Ensure the battery pack is accessible but discreet for a clean glow.
- Color, scent, and detailing: Apply natural pigments or safe markers for color; tuck a small herb sachet inside to release a herbal aroma during use. This adds a fragrant layer to the lantern’s offering and wellness vibe.
- Decorations and traditions: Add tassels, paper cut patterns, or fabric trims to reflect local traditions. Many locals share tips during classes, and a well-placed motif deepens the sense of culture. The mentor, a lady with высокой standards, guides you in selecting balanced accents.
- Drying, testing, and safety: Let the lantern dry completely before lighting; test in a quiet space to ensure even illumination. Check for loose threads and secure knots; a stable build prevents wobble when you hang it near seating areas.
- Display and tips for use: Hang the lantern where it can catch a breeze, such as a center balcony or a garden path. If you join a morning workshop, you’ll savor gastronomic delights and dishes from nearby stalls, while learning from many locals who share tips and stories.
Market Tour Route: Key Stops, Local Specialties, and Practical Tips
Start at the Thuan Market gate, grab a herbal tea, and map this simple loop before the crowds arrive. This route has been favored by locals for years, then shared with visitors. Follow the street that leads past rice stalls, where vendors explain the link between water, soil, and grain; listen for notes about different rice varieties and the texture they bring to local dishes. Then turn toward the old lane where you can buy small street snacks and observe how locals shop, then compare prices and quality with calm eyes.
Next stop: a papermaking studio behind a garden shop. Watch handmade paper being pressed, the scent of herbal oils, and learn how each sheet carries meaning and keepsake, meaningful to you. Buy a keepsake such as a simple, locally made card or tag that ties to the fiber or bark used in papermaking. Then joining a quick workshop to try making a tiny sheet yourself; this is a tactile way to understand what goes into better paper and its local meaning.
Continue along rural streets toward a calming garden area near a small resort, where a water feature adds a soothing backdrop. lets take a short break, have a sip of water, and observe how streets hum with life. This pause helps you plan the remaining stops and decide what to buy as a keepsake or gift.
Practical tips: carry only what you need; bring small change; keep your bag clean and dry. Use the local guide or ask stalls whats on offer to tailor what you learn. Joining conversations helps you learn prices and respect local customs. Have a bottle of water, wear comfortable shoes, and plan to finish before crowds peak.
Cooking Class Experience: Dishes You’ll Learn, Techniques, and Recipe Notes
Join our hands‑on cooking class and discover three dishes you will master, with clear technique notes you can apply in your own kitchen just for your week. The session unfolds in a peaceful resort setting with warm lighting, and you’ll walk away with recipes you can pack into your routine there and back.
You’ll learn a fragrant herb fish with coconut rice, a handmade vegetable stir‑fry, and a hearty bean stew that adapts to seasonality. Materials include spice blends, fresh greens, and pantry staples; you’ll receive a paper sheets guide with step‑by‑step directions you can take home. Markets and farm‑fresh produce boost flavor, letting you taste the local culture in every bite, from the heart of the dish to your table, and a story that connects kitchen to community.
Techniques cover knife work, searing, timing, and finishing sauces. Our expert instructor demonstrates plating with balance and color, then guides you as you replicate these moves at your station. A short stretching routine accompanies the practice to keep you relaxed, and the result is a full, confident meal you can recreate for family and friends, with notes you can refer to again and again.
Recipe notes offer adjustments for servings, substitutions, and seasonal produce. Use the included sheet to record tweaks, note texture and salt levels, and keep a personal reference for flavor. After the class, you can join others for an evening stroll, a peaceful walk, or a vespa ride or riding stroll to a quiet corner of town, continuing the conversation about wellness, culture, and food that matters to guests of all ages in our workshops.