

 নিউজিল্যান্ডের সবচেয়ে সেরা স্কাইডাইভ - এনজেড-এর সেরা জাম্পগুলির চূড়ান্ত গাইড">

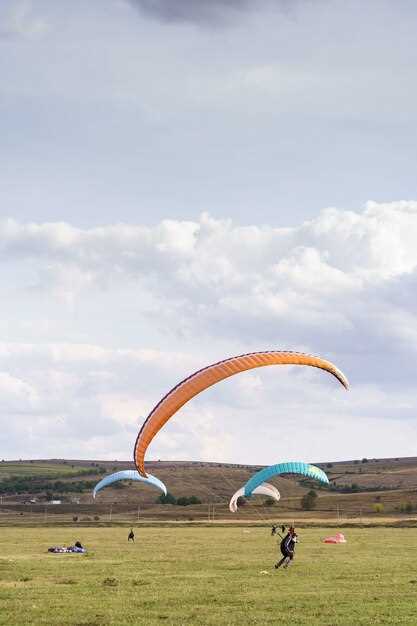
Recommendation: start with parakai for your first jump, with josef as your guide. This setup keeps your rush under control and centers your intention on staying comfortable from entry to exit. The minimum requirements are explained by the operators, and the equipment provided is checked before you fly. Your briefing covers how to operate the harness, how to keep your feet above the line during the exit, and how to look around safely. A handycam on the ground can capture the brilliant moment, while the team offers cookies after you land and regroup.
Beyond parakai, NZ’s best jumps span Queenstown, Tekapo, and Wellington. Regarding weather, plan for calm wind windows and clear visibility; most operators run from morning until late afternoon with backup slots if clouds move in. Expect standard tandem heights around 12,000 feet, with some sites offering 15,000 feet for the more experienced. The teams emphasize technical setup and safety, with equipment checked and redundancy built in. They provide video options and can share footage captured by handycam after landing with them, so you can relive the moment with your crew and maybe celebrate with cookies.
What to bring and how to prepare aligns with comfort first. Check the minimum age and weight limits the operator enforces, and arrive with layers you can shed as needed. The equipment provided by the crew includes a helmet, goggles, jumpsuit, and a reliable altimeter; you will not need to manage the main parachute–your instructor operates the system. If you want extra assurance, request a quick technical briefing before boarding. For video keepsakes, ask for a handycam handoff or ground shot during exit; post-flight you’ll usually get a few bright photos and a brief debrief before heading to your next jump.
Timeline tips for a tight NZ itinerary: start with parakai, then spread to other spots such as Queenstown or Tekapo to compare scenery and technique. Keep your expectations in line with weather windows and your own comfort level, and coordinate with your instructor to ensure your plan matches your intention. If you’re keeping a log, use the handycam footage to review form above and below the canopy; you’ll likely finish with a sense of achievement, some snacks, and perhaps a row of cookies to celebrate the day.
New Zealand Skydives: The Ultimate Guide
There’s no guesswork–book a tandem jump with a certified provider on waiheke this season for quick access to the sky and a comfortable, controlled start.
Top options include Queenstown’s Nevis jump for dramatic alpine scenery; Wanaka for wide lake-to-sky vistas; Taupo for steady weather and easy logistics; waiheke for a coastal horizon and shorter flights. Availability varies by season, and weekends fill fast, so plan 6-8 weeks ahead.
Choose a provider by safety standards, instructor qualifications, and what the package includes; what does the upgrade cover? Some outfits offer handycam footage, others rely on still photos. Review the marketing to see what you actually get, and check the pre-jump briefing posted on the board.
As you prepare, wear comfortable clothing, bring a light layer, and pack secure hair; most outfits supply a harness and jumpsuit, but you should bring a smile and a touch of adrenaline for the wind on your back.
Footage is commonly captured by a handycam or a professional photographer; you can decide on your clip and share it using the provider’s access link. Video clips become available shortly after the jump. Complete the user forms at check-in to confirm who handles the recording.
Booking tips: start with shoulder seasons, arrive early, and confirm the weather window; just a small delay can shift your flights by hours. If you’re on your third jump, ask for a longer freefall or extra coaching. Availability is usually tighter in peak weeks, so always book 2-3 weeks in advance if you want a specific time.
Brilliant first-timer memories come from staying relaxed, breathing deeply, and letting the crew guide you through the exit; your hearts race at the moment of leap, then you feel a calm rush as you soar. There’s real support there from the team, and you’ll leave with a story you’ll share back home.
What to Expect During a 13000ft Abel Tasman Skydive (Altitude, Duration, and Sequence)
Book a 13000ft Abel Tasman skydive with a licensed instructor to maximize safety and memories. You’ll join a friendly kiwi crew, strap into the harness, and climb into the plane as you begin the ascent toward the coast. This is the ultimate NZ jump and a must for anyone visiting the region.
Altitude reaches 13,000 ft for the exit. You’ll experience about 60 seconds of pure freefall, then deploy the canopy around 5,000–6,000 ft. The canopy ride lasts roughly 4–6 minutes as you fly across the coastline, then you’ll touch down softly on the ground. The entire airborne phase is designed to be crisp and controlled, so you can soak in the views and capture footage with your camera.
Sheila from inflite coordinates the briefing and signals the exit. Their team checks equipment, confirms wind conditions, and ensures clear communication between the plane, jumpers, and ground crew. You’ll notice the emphasis on safety and smooth execution, and you’ll feel the confidence lift as you prepare to move between tasks with precision.
Photography and footage play a major role. If you bring a camera, mount it securely on a helmet or wrist and coordinate with the instructor so it does not interfere with control. The coast across Abel Tasman National Park provides stunning shots for loved ones back home. After the flights, download clips and back them up; this content is always a highlight to share with family and friends who visit your feed.
Equipment checks happen on the ground: harnesses, altimeters, buckles, and spare parts. Dress in practical layers, with a light jacket and sturdy footwear. The plane ride is brief but you’ll feel the breeze, so be prepared. The support crew will guide you through fully explained steps and ensure you feel comfortable each time you take your place on the board. For athletes and adventure lovers, this experience is a strong benchmark for breath control, balance, and timing, and it often draws a diverse crowd who enjoy extreme moments and want to relive the thrill with camera footage.
Plan ahead for your visit: a drive to the operator base, a concise briefing, and a chat about the 26th weather window. The staff can help you pick the best day to fly, especially when conditions align for a pristine view of the coastline. This experience connects you with locals and travelers alike, and many who love it return for another jump on a future NZ visit.
| ফেজ | Altitude (ft) | সময়কাল | কী হয় |
|---|---|---|---|
| Plane ascent to jump altitude | 0–13,000 | ১৫–২০ মিনিট | Safety briefing, harness checks, and final signals; inflite team coordinates the sequence. |
| Exit and freefall | 13,000 at exit | ৬০ সেকেন্ড | Arched body, stable form, look across to the coast, and capture the moment with your camera if permitted. |
| Deployment | 5,000–6,000 | 5–7 seconds | Canopy opens; lines verify; instructor provides steering cues for a clean start. |
| Canopy flight | 1,500–2,500 | 4–6 minutes | Cruse over the coast, keep communication, adjust heading for a smooth approach, and enjoy the panorama. |
| Landing approach | 0–500 | 20–40 seconds | Flare, touch down, and roll to a gentle stop with the crew ready to unclip. |
| পোস্ট-ফ্লাইট | 0 | – | Equipment check, review footage, and celebrate with a quick visit to the beach or a kiwi toast with teammates. |
Safety Basics for 13,000-ft Jumps: Training, Gear, and Tandem vs Solo Options
Start with a tandem from an award-winning national drop zone at 13,000 ft to build confidence and gain practical experience before any solo attempt. youll receive a full briefing, an equipment check, and the chance to feel the exit, free-fall, and canopy deployment under supervision. If weather or airspace forces the session to be cancelled, it is typically rescheduled quickly, often for the next available slot; check advance availability on the drop zone websites and plan a date that fits your itinerary, perhaps around the 26th for a long weekend.
Advance training for 13,000-ft jumps uses a formal path like AFF or a tandem progression for future solo work. Expect canopy control drills, body position practice, altitude awareness, emergency procedures, and reserve handling. The course includes ground school and supervised practice jumps, building long experience before stepping to 13,000 ft.
Gear checklist: main canopy and reserve sized for your weight, a properly fitted harness/container, an AAD if required by the operator, a dependable altimeter (digital wrist unit or audible), a helmet, goggles, gloves, and a jumpsuit. Do a full gear check before every jump and replace worn parts.
Tandem vs solo: That point is simple: for first-time 13,000-ft jumps, the tandem is the safest option; youll just need to demonstrate you can handle the freefall and canopy control. If you plan a solo path later, enroll in AFF or a formal COA program and complete medical clearance, a long training period, and a demonstrated ability with ground and wind training. Be mindful of limitation: there are weight and medical restrictions; confirm them with the instructor and operator before signing. The jump plan should spell out exit point, freefall period, and canopy opening.
Experience NZ’s outdoor magic: 13,000-ft jumps offer beautiful views over a lake and glaciers, with Albany nearby as a convenient hub for pre- and post-jump experiences. Booking windows open in advance; many award-winning teams post availability on their websites. Youll often start with a shorter jump first and gradually progress to 13,000 ft, which is the perfect path to grow skills safely.
Practical tips: To avoid cancelled plans, monitor the forecast and book an alternate day if wind or ceilings aren’t suitable; plan around the 26th if possible; confirm weight limits and gear specs with the operator; check safety records and request a post-jump debrief or video review to reinforce technique; use official contact numbers and websites for the latest information.
Weather, Wind, and Sea Conditions at Abel Tasman: Planning Windows and Safety Margins
Plan your Abel Tasman jump within a perfect morning window, aiming for wind under 20 knots and a smooth sea state below 1.5 meters; verify the latest details on the operator’s website the day before and again in the morning of the jump. This keeps planning tight and reduces surprises.
Wind behavior is tied to the local geography: mornings often bring a light offshore breeze that can stabilise the approach, however forecast gusts above 25 knots or crosswinds above 15 knots should prompt postponement. Note the direction relative to your chosen drop zone, and adjust plans accordingly. Also, check whether the wind direction aligns with the beach orientation for a stable exit.
সমুদ্রের অবস্থা ও অঞ্চলসমূহ: অ্যাবেল তাসমান উপকূলের উন্মুক্ত প্রসারিত অংশে বড় ঢেউ দেখা যায়, অন্যদিকে সুরক্ষিত খাঁড়িগুলো শান্ত প্রবেশপথ দেয়। জোয়ার ও বাতাসের পরিবর্তনের সাথে সাথে দৃশ্যাবলীও পরিবর্তিত হয় এবং এটি দৃশ্যমানতাকেও প্রভাবিত করে; তীরে কাছাকাছি ঢেউয়ের পূর্বাভাসিত উচ্চতা ও গভীরতার সাথে মানানসই অঞ্চল বেছে নিন। জলে প্রবেশের জন্য, বয়া ডেটা ও অপারেটরের পরামর্শগুলো দেখুন; ওয়েবসাইট থেকে আপনি যে বিবরণ পান, তা গুরুত্বপূর্ণ।.
পরিকল্পনা করার সময় সুযোগ এবং নিরাপত্তার সীমা: আবহাওয়া যখন স্থিতিশীল থাকে তখন ৬০-৯০ মিনিটের একটা সময়সীমা রাখতে হবে; বাতাসের ঝাপটা সামলানোর জন্য পূর্বাভাসের বাতাসের গতি কয়েক নট কমিয়ে ধরতে হবে এবং ঝাপটার জন্য বাড়তি জায়গা রাখতে হবে। এর মানে আপনার পরিকল্পনায় কী পরিবর্তন আনতে হবে? এর মানে হল আপনাকে নমনীয় থাকতে হবে এবং প্রয়োজনে বিকল্প তারিখ ব্যবহার করতে হবে। পূর্বাভাসের পরিবর্তনের সাথে সাথে দ্রুত সিদ্ধান্ত নিতে হবে। যদি পূর্বাভাস খারাপ হয় বা আপনি সীমা পূরণ করতে না পারেন, তাহলে ক্রুদের সাথে বিকল্প নিয়ে আলোচনা করুন; সবসময় একটি বিকল্প তারিখ মাথায় রাখুন। মার্জিন বা সুযোগগুলি সম্মান করার জন্য নমনীয়তা বজায় রাখতে হবে; যা সকলের কাছে অভিপ্রায় স্পষ্ট করে।.
চেকলিস্ট এবং প্রযুক্তি: বায়ু এবং সমুদ্রের অবস্থা নিশ্চিত করতে উইন্ড প্রোফাইলার, বয়া রিপোর্ট এবং রাডারের মতো প্রযুক্তির উপর নির্ভর করুন। অপারেটরের পাতায় সর্বশেষ পূর্বাভাস সর্বদা দেখে নিন এবং অনুশীলনে মার্জিনগুলি বুঝতে পুরস্কার-বিজয়ী সুরক্ষা ব্রিফিং থেকে ভিডিওগুলি পর্যালোচনা করুন। আপনার যদি আরও তথ্যের প্রয়োজন হয়, অপারেটরের ওয়েবসাইটে চেকলিস্ট এবং ডাউনলোডযোগ্য গাইড রয়েছে। সময়োপযোগী আপডেটের প্রয়োজন।.
গিয়ার এবং যোগাযোগ: শীতল, বাতাসপূর্ণ উপকূলীয় বাতাস এবং স্প্রে-এর জন্য উপযুক্ত গিয়ার পরিধান করুন; বাতাসের রিডিংয়ের জন্য একটি কম্প্যাক্ট ডিভাইস বহন করুন এবং নিশ্চিত করুন যে স্থানীয় ক্রু আপডেটের বিষয়ে যোগাযোগ করতে পারে। উদ্দেশ্য হল যোগাযোগ স্পষ্ট রাখা যাতে আপনি সময়োপযোগী নোট পান যা উইন্ডোকে প্রভাবিত করে, আপনি অ্যাবেল তাসমানের জন্য নতুন বা ফিরে আসা জাম্পার কিনা তা বিবেচ্য নয়।.
গুণমান এবং কমপ্লায়েন্স: নিশ্চিত করুন যে অপারেটরের কোয়ালমার্ক স্বীকৃতি আছে; এটি ইঙ্গিত দেয় যে নিরাপত্তা ব্যবস্থা, ব্রিফিং প্রোটোকল এবং সরঞ্জাম পরীক্ষা জাতীয় মান পূরণ করে এবং দল একটি উচ্চ নিরাপত্তা সংস্কৃতি মেনে চলে। ওয়েবসাইট-এ ভিডিও এবং কেস স্টাডিগুলি এই অনুশীলনগুলি কীভাবে বাস্তব অপারেশনে কাজ করে তা চিত্রিত করে।.
ব্যবহারিক নোট: আপনি নিউজিল্যান্ডের স্থানীয় হন বা বেড়াতে আসা, অঞ্চল-ভিত্তিক নির্দেশিকা, অবতরণের অনুমোদিত স্থান এবং যেকোনো বিধিনিষেধের জন্য স্থানীয় দলের সাথে যোগাযোগ করুন। আপনি যদি আগে থেকে পরিকল্পনা করেন, তাহলে ভাউচার এবং নিউজলেটারগুলিতে সাবস্ক্রাইব করে আপডেট পেতে পারেন। পরিবর্তনশীল আবহাওয়ায় পরিকল্পনাকারীরা কীভাবে উইন্ডো শিফটগুলি পরিচালনা করে তা বুঝতে আপনি ওয়েবসাইট থেকে ভিডিও দেখতে এবং বিস্তারিত তথ্য ডাউনলোড করতে পারেন।.
লাগেজ তালিকা, ফিটনেস প্রস্তুতি, এবং জাম্পের জন্য মানসিক প্রস্তুতি
ড্রপ জোনে আসার আগের রাতে আপনার হার্নেস, প্রধান এবং রিজার্ভ প্যারাসুট, অল্টিমিটার এবং হেলমেট পরীক্ষা করুন এবং আপনার প্রশিক্ষকের সাথে নিশ্চিত করুন সবকিছু ঠিক আছে।.
প্যাকিং তালিকা
- হার্নেস, প্রধান ক্যানোপি, রিজার্ভ, অল্টিমিটার, হেলমেট এবং গগলস; এগুলি চিহ্নিত ব্যাগে ভরে ডিজেড-এ দ্রুত পাওয়ার জন্য রাখুন।.
- আবহাওয়ার উপযুক্ত পোশাক: বেস লেয়ার, একটি মিড-লেয়ার এবং একটি বায়ুরোধী আউটার লেয়ার; ঠান্ডা সকালের জন্য একটি বিনি বা বালাক্লাভা নিয়ে আসুন।.
- জুতা: ভালো গ্রিপযুক্ত মজবুত স্নিকার বা হালকা বুট; ঢিলেঢালা ফিতা পরিহার করুন যা উড্ডয়নের আগে এবং অবতরণের সময় আটকে যেতে পারে।.
- গ্লাভস: ফুল-ফিঙ্গার বা ফিঙ্গারলেস গ্রিপ সহ; গরম দিনের জন্য পাতলা এবং ঠান্ডা সকালের জন্য একটু মোটা গ্লাভস বিবেচনা করতে পারেন।.
- সানস্ক্রিন, লিপ বাম এবং অ্যাপ্রোচ করার সময় ও ল্যান্ড করার পরে সুরক্ষার জন্য একটি ছোট টুপি; একটি জলরোধী থলিতে ভরে নিন।.
- ব্যক্তিগত জিনিসপত্র: আইডি, চিকিৎসার তথ্য, বীমা কার্ড, জরুরি অবস্থার জন্য যোগাযোগের নম্বর এবং হলফনামার অনুলিপি; আপনার ফোন বা একটি ইউএসবি ড্রাইভে একটি ডিজিটাল ব্যাকআপ রাখুন।.
- হাইড্রেশন ও স্ন্যাকস: জলের বোতল অথবা হাইড্রেশন প্যাক; ওয়েস্ট ডিজে যাওয়ার পথে অথবা জাম্পের মাঝে খাওয়ার জন্য কুকিজ বা এনার্জি বার; জাম্পের ঠিক আগে ভারী খাবার এড়িয়ে চলুন।.
- ক্যামেরা এবং মিডিয়া: অ্যাকশন ক্যামেরা অথবা ছোট ভিডিও ক্যামspare ব্যাটারি ও মেমোরি কার্ডসহ; প্লেন রাইড ও জাম্পের সময় বাতাস থেকে বাঁচাতে একটি ড্রাই ব্যাগ বা ডেডিকেটেড থলিতে রাখুন; ল্যান্ডিংয়ের সময় এবং জাম্পের পরে স্মৃতি হিসেবে ধরে রাখার জন্য ছবি তোলার পরিকল্পনা করুন।.
- সংগ্রহস্থল এবং ছোট সরঞ্জাম: জিপ টাই, ছোট টর্চলাইট, মাল্টি-টুল, টেপ; সবকিছু লেবেল করুন যাতে বিমানের মধ্যে বা গ্রাউন্ড ক্রু স্টোরে নিরাপদে উপাদানগুলি সংরক্ষণ করতে পারেন।.
- নথি এবং আবহাওয়া পরীক্ষা: বাতিলের শর্তাবলী এবং অপারেটরের অফিসিয়াল ওয়েবসাইটের একটি প্রিন্টআউট বা অফলাইন সংস্করণ; ডিজেড-এ যাওয়ার আগে আবহাওয়া এবং উচ্চতার সীমা পরীক্ষা করুন।.
- বিবিধ জিনিস: হালকা ওজনের একটি এনার্জি স্ন্যাক, কয়েকটা ডিসপোজেবল হ্যান্ড ওয়ার্মার এবং ক্যামেরার জন্য একটি অতিরিক্ত মেমরি কার্ড।.
শারীরিক প্রস্তুতির প্রস্তুতি
- কার্ডিও: সপ্তাহে তিন দিন, ২৫-৪০ মিনিট; একটানা দৌড়, সাইকেল চালানো, অথবা দ্রুত হাঁটা воздухаয় দীর্ঘ সময় এবং জাম্পের সময় টিকে থাকার জন্য সহনশীলতা তৈরি করতে।.
- শক্তি: সপ্তাহে দুটি সেশন কোর, পা, পিঠ এবং গ্রিপের উপর ফোকাস করে; প্ল্যাঙ্ক, স্প্লিট স্কোয়াট, স্টেপ-আপ, লাঞ্জ এবং ফার্মার ক্যারি জাম্প এবং ল্যান্ডিংয়ের সময় স্থিতিশীলতা বজায় রাখতে সাহায্য করে।.
- নমনীয়তা: ব্যায়ামের আগে ডাইনামিক ওয়ার্মআপ এবং ব্যায়ামের পরে নিতম্ব, হ্যামস্ট্রিং এবং কাফ প্রসারিত করা শূন্যে মসৃণ পরিবর্তন এবং অবতরণে সহায়তা করে।.
- পুনরুদ্ধার: ঘুমকে (৭-৯ ঘণ্টা) এবং হাইড্রেশনকে অগ্রাধিকার দিন; উচ্চতার পরিবর্তন এবং বাতাসের পরিস্থিতি সামাল দিতে একটি নিয়মিত সময়সূচী বজায় রাখুন।.
- সক্রিয় জীবনধারা বিষয়ক নোট: আপনি যদি ড্রাইভ করে ডিজেড-এ যান, তাহলে আগেভাগে পৌঁছানোর এবং হালকা ওয়ার্মআপ করার পরিকল্পনা করুন; এটি দিনের শুরুতে সাহায্য করে এবং পরবর্তীতে শরীরের জড়তা কমায়।.
- অভিজ্ঞ জাম্পারগণ: এটি যদি আপনার ত্রয়োদশ জাম্প হয়, তাহলে আপনি হয়তো কোর শক্তি এবং নিয়ন্ত্রিত শ্বাস-প্রশ্বাসের উপর বেশি নির্ভর করতে পারেন; পশ্চিম ড্রপ জোনের জোসেফ একটি ধারাবাহিক প্রি-জাম্প চেক বজায় রাখা এবং প্লেনে শান্ত থাকার উপর জোর দেন।.
- রাইয়ানন থেকে প্রস্তুতির টিপস: উপলব্ধ স্লটগুলির সাথে প্রশিক্ষণের দিন নির্ধারণ করুন এবং আবহাওয়া বা ভিড় অনুসারে সেশনগুলি সামঞ্জস্য করুন; একটি ব্যাকআপ পরিকল্পনা রাখুন যাতে আপনি ওয়ার্কআউট মিস করার চেয়ে ট্র্যাকে থাকেন।.
মানসিক প্রস্তুতি
- শ্বাস-প্রশ্বাস রুটিন: উড়ানের আগে স্নায়ুতন্ত্রকে শান্ত করতে ২-৩ মিনিটের জন্য ৪-৬ শ্বাসের চক্র দিয়ে শুরু করুন (৪count-এ শ্বাস নিন, ২ ধরে রাখুন, ৬-এ শ্বাস ছাড়ুন)।.
- ভিজুয়ালাইজেশন: জাম্পের আগে বের হওয়া, আর্চ করা এবং বডি পজিশনের একটি স্টেপ-বাই-স্টেপ মহড়া করুন; একটি মসৃণ লাফ, স্থিতিশীল ফ্রিফল এবং নিখুঁত অবতরণের ছবি দেখুন; ছবি তোলা ও পোস্ট-জাম্প পর্যালোচনার জন্য জাম্প পরবর্তী রুটিন মহড়া করুন।.
- বের হওয়ার পরিকল্পনা: আপনার প্রশিক্ষকের সাথে ক্রমটি পর্যালোচনা করুন, প্রাথমিক সংকেত এবং একটি পরিচ্ছন্ন আর্চের উপর মনোযোগ দিন; মনোযোগী থাকার জন্য অ্যাপ্রোচের উপর পদক্ষেপগুলো জোরে জোরে পুনরাবৃত্তি করুন।.
- সাপোর্ট নেটওয়ার্ক: প্রত্যাশাগুলো শেয়ার করতে রিয়ানন ও জোসেফের মতো সতীর্থদের সাথে কথা বলুন; তাদের দেওয়াfeedback জাম্পের সময় উপস্থিত থাকতে এবং ল্যান্ডিংয়ের পর গ্রাউন্ডেড থাকতে সাহায্য করতে পারে।.
- প্ল্যান বি সম্পর্কে সচেতনতা: বাতিলের শর্তাবলী এবং বিকল্প জাম্প উইন্ডো নিয়ে আলোচনা করুন; অপশনগুলো জানা থাকলে আবহাওয়া বা সময়সূচীর পরিবর্তনেও আপনি শান্ত থাকতে পারবেন।.
- যদি আপনি চালিয়ে যেতে অক্ষম বোধ করেন: প্রশিক্ষকের সাথে পূর্বে স্থির করা সংকেত ব্যবহার করুন এবং বেরিয়ে যাওয়ার আগে থামুন; আপনার পুনরায় শুরু করার এবং জানানোর সময় আছে, তারপর পরবর্তী পদক্ষেপগুলি স্থির করুন।.
- স্মৃতি সহায়ক: একটি ব্যস্ত মুহূর্তে কোনো বিশদ বিবরণ যাতে বাদ না পড়ে, সেজন্য আপনার স্টোরেজ ব্যাগে একটি সাধারণ লেমিনেটেড চেকলিস্ট (ধাপে ধাপে পরীক্ষা, উচ্চতার রেফারেন্স এবং বের হওয়ার সংকেত) রাখুন।.
দিনের জন্য குறிপণী
- দেরীতে পৌঁছানোর আগেই আসুন, যাতে শেষ মুহূর্তের পরীক্ষার জন্য সময় পাওয়া যায়; এই ব্যবসার আন্তরিক আয়োজকরা আপনাকে পুরো প্রক্রিয়ায় সাহায্য করবে এবং তাদের কাছে আপনার জন্য প্রয়োজনীয় সরঞ্জামের একটি ছোট ভাণ্ডারও প্রস্তুত থাকবে।.
- একটি অতিরিক্ত পাওয়ার ব্যাংক নিয়ে আসুন এবং নিশ্চিত করুন যে আপনার ডিভাইসগুলোতে ছবি তোলার জন্য এবং ওয়েবসাইট বা মেসেজিং অ্যাপের মাধ্যমে দলের সাথে সংযুক্ত থাকার জন্য ব্যাটারি আছে।.
- লাফের পর, সতীর্থদের সাথে ছবি শেয়ার করুন এবং আপনার পছন্দের ওয়েবসাইট বা সামাজিক মাধ্যমে পোস্ট করুন; এটি মাইলফলক উদযাপন করতে সাহায্য করে, বিশেষ করে যদি এটি ১৩তম লাফ বা তার বেশি হয়।.
- দিনভর সহায়তা এবং সুরক্ষা নির্দেশনার জন্য টিমকে ধন্যবাদ।.
পোস্ট-জাম্প বিকল্প: ফটো, ভিডিও, ডি-ব্রিফ এবং স্থানীয় এবেল তাসমান অ্যাডভেঞ্চারসমূহ
রিয়েল টাইমে আপনার উল্লম্ফন ক্যাপচার করতে হ্যান্ডিক্যাম প্যাকেজ দিয়ে শুরু করুন। একজন ডেডিকেটেড অপারেটর প্রস্থান থেকে টাচ-ডাউন পর্যন্ত আপনাকে অনুসরণ করে, ক্রিস্প, স্ট্যাবল ফুটেজ সরবরাহ করে যা আপনি কয়েক সেকেন্ডের মধ্যে পুনরায় দেখতে পারবেন। সেটআপটি অনবোর্ড শট এবং অবতরণের পরে একটি উপকূলরেখার ক্লোজ-আপ সরবরাহ করে, যা আপনাকে মুহূর্তটির নিখুঁত দৃশ্য দেয়। এই প্যাকেজটি আপনাকে আপনার পেজে শেয়ার করার জন্য একটি টার্নকি মেমরি দেবে এবং স্মৃতির জন্য টিমকে ধন্যবাদ।.
স্থির চিত্রের জন্য, বিমান থেকে দ্রুতগতির সিকোয়েন্সের অনুরোধ করুন অথবা একজন ডেডিকেটেড ফটোগ্রাফারকে দিয়ে ছবি তোলান যিনি স্থিরভাবে প্রতিকৃতি এবং অ্যাকশন শট ধারণ করেন। আপনি আপনার ক্যানোপি খোলার মুহূর্ত এবং স্পর্শ ধারণ করা মুহূর্তের একটি নির্দিষ্ট সেটসহ উচ্চ-রেজোলিউশনের ফ্রেমের একটি গ্যালারি পাবেন। এই ফটোগুলি আপনার পেজ এবং ভবিষ্যতের বিপণন প্রচেষ্টার জন্য কাজে লাগবে, যা আপনাকে বন্ধু, পরিবার এবং ক্লায়েন্টদের সাথে ভাগ করার জন্য একটি বাস্তব প্রমাণ দেবে।.
ঝাঁপের পর, একটি সংক্ষিপ্ত তথ্যাবলী আলোচনা ৫-৭ মিনিট ধরে চলে। আপনার প্রশিক্ষক উচ্চতা, পতনের হার এবং ক্যানোপি স্থাপনের সময়ের একটি পরিসংখ্যানগত রিডআউট প্রদান করেন, সাথে আপনার ফর্ম এবং পরবর্তী জাম্পের জন্য হার্নেস ফিট আরও আঁটসাঁট করার টিপস দেন। এই আলোচনা অ্যাড্রেনালিন রাশকে ব্যবহারিক নির্দেশিকায় অনুবাদ করতে সাহায্য করে। যদি পরিস্থিতি তাৎক্ষণিকভাবে আলোচনা চালিয়ে যাওয়া অসম্ভব করে তোলে, তাহলে দল আপনার সময়সূচী ঠিক রাখতে দ্রুত একটি সারসংক্ষেপ দেয়, এবং অন্তর্দৃষ্টি ও ব্যবহারিক নোটের মধ্যে আপনি স্বচ্ছতার সাথে প্রস্থান করবেন।.
স্থানীয় অ্যাবেল তাসমান অ্যাডভেঞ্চারগুলি আপনার পোস্ট-জাম্প ফ্লোকে আরও বাড়িয়ে তোলে। পার্কের মধ্যে একটি মনোরম হেলিকপ্টার বা ফিক্সড-উইং ট্রান্সফারের জন্য বুক করুন, যেখানে কোয়ালিমার্ক সুরক্ষা এবং একজন পেশাদার পাইলট থাকবেন যিনি ভ্রমণটিকে সক্রিয় এবং মনোযোগী রাখবেন। আলবেনি-ভিত্তিক বিকল্পগুলিতে, আপনি সৈকত, মোহনা এবং বনভূমিযুক্ত শৈলশিরার দৃশ্য দেখিয়ে একটি ছোট মনোরম ফ্লাইটের সাথে জাম্পটিকে যুক্ত করতে পারেন। আপনি যদি ফ্লাইটটি বাড়ান, তবে পাইলটরা আলপাইন রুটে হিমবাহ দেখাতে পারেন, যা নিউজিল্যান্ডের উপকূলে একটি নাটকীয় বৈপরীত্য যোগ করে। আপনার হাতে সময় থাকলে, একটি গাইডেড কায়াক বা উপকূলীয় হাইকিং যোগ করুন, তারপরে আপনার পৃষ্ঠাটিকে বাজারজাত করতে আপনার ছবি এবং ভিডিও ব্যবহার করুন। দলটি একটি পুঙ্খানুপুঙ্খ সুরক্ষা ব্রিফিং এবং একটি ধন্যবাদ-জ্ঞাপন নোট সরবরাহ করেছে যা আপনি বন্ধু, ক্লায়েন্ট বা অনুসরণকারীদের সাথে ভাগ করতে পারেন এবং এটি স্থানীয় বিপণন প্রচেষ্টাকেও সমর্থন করে। আপনি যদি অ্যাবেল তাসমান অ্যাডভেঞ্চার সম্পর্কে আরও তথ্য জানতে চান, তবে স্থানীয় পৃষ্ঠাটি দেখুন; আলবেনি-ভিত্তিক বিকল্পগুলি আপনাকে যৌথ অভিজ্ঞতাগুলি সাজাতে সহায়তা করতে পারে।.