

 Kananaskisdə Heç Vaxt Məyus Etməyən 14 Göl – Mütləq Baş Çəkməli Bələdçi">

Begin with Spray Lakes Reservoir for your first stop: easy access, a 6 km loop with about 180 m elevation gain, and water that mirrors glacier-fed peaks in the morning light.
Our solid advice helps you pick favorites among the 14 lakes, whether you want a quick stroll or a longer day’s hike. Parking and trailhead access are practical; this personal plan held space for a few options that are easy to reach. If you’re planning to skate on frozen water in winter, some lakes offer dependable ice–however, enforcing seasonal closures may affect access; always check ice thickness and local advisories. Hint: check weekday access for quieter shorelines.
Advice for a smooth day: pair two lakes in the morning, add a glacier view or a quiet shore break, and finish with a third option that matches your personal pace. This approach holds space for reflection and works for travelers from different countries seeking a national-scale outdoor day. The solid plan yields gain in memories and remains easier to manage with a clear map and current trail reports. Each stop held to a simple rule–respect wildlife, keep noise low, and pack out everything.
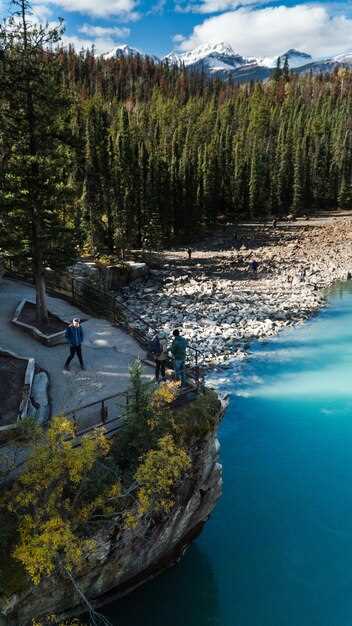
Rundle Forebay Reservoir & 14 Lakes in Kananaskis
Begin at Rundle Forebay Reservoir and complete the 14 Lakes circuit in a single day; the core loop runs about 12–14 km with 500–700 m of elevation gain, and side detours push total distance to 15–17 km. The payoff is a string of picturesque alpine lakes, each with a distinct hue, and a rewarding finish back at the forebay with calm reflections on the water.
Park at the Rundle Forebay Reservoir trailhead; early arrival helps, and a park pass is required for Alberta Parks. Notice boards show current conditions and bear advisories; Rangers can assist with conditions and safety tips. Carry bear spray in season and keep noise to a minimum for wildlife comfort; if the lot is full you could park at the junction lot and walk a short connector trail.
Itinerary options: begin with the lower lakes near the reservoir to ease into switchbacks, then climb toward mid-elevation pools, finishing with the higher tarns that catch golden hour light. Those seeking a shorter day can focus on the first 6–8 lakes and skip backcountry spurs; if you have the time, detours to extra ponds add variety. Ones wanting a more strenuous plan could add a sunrise start, then loop back via a different spur to create a longer experience.
To plan from afar, Calgary’s airport (YYC) serves as the main gateway; several national and international airlines offer direct and connecting routes. From the airport, rent a car and follow the parkway toward Canmore and the Kananaskis Country gates; the drive to the trailhead takes about 1.5 hours, depending on traffic and wildlife. If you travel with a lot of gear, consider dropping it at a Canmore hotel before heading to the trailhead.
For lodging, consider glamping options in Canmore or Nakiska that pair with day hikes; sister camps and private sites provide convenient bases; for those requiring more privacy, backcountry huts or private yurts can be booked in advance. To secure space, make a booking at least two months ahead during peak season; add an extra night if you want a slower pace and extra lake views.
When you come prepared, bring a compact stove or snack supplement for a relaxed lunch by the water; pack extra layers for chilly mornings and insect repellent for buggy afternoons. Be sure to carry a current map and a GPS device; certain sections have poor signal, so technically you should rely on route descriptions and markers. Observe wildlife from a distance; the area hosts deer, elk and other game, and you should respect their space. Pack out all trash and follow Leave No Trace guidelines to protect nature.
Access Plan: Parking, Trailheads, and Peak Entry Times
Park at Pocaterra Trailhead Lot and start at an exact time of 05:15 to catch the dawn light on the north-facing mountains, a prime spot for a photographer who wants crisp ridgeline silhouettes. This early window also keeps you ahead of most traffic and roadside parking distractions.
If 05:15 feels early, aim for 06:30–06:45 and use the Pocaterra, Ptarmigan, or Sarrail pullouts first thing. Averaging crowds stay light before 07:30 on weekdays, but Saturdays can see a noticeable uptick. Park only in official lots and avoid curbside spots to keep access smooth for residents and maintenance crews.
From the north slopes, Pocaterra and Ptarmigan trails deliver scenic switchbacks and wide open bowls where the light travels along the coast of the range–great for a steady pace and steady views. Follow the posted terms, stay on marked routes, and keep your stay brief if trail traffic is heavy. If you bring a skateboard or winter gear, use the roadside staging area only where allowed and be mindful of pedestrians and wildlife; winter ice can invite skate or ice-skate stints, but safety always comes first.
When planning, note that NickPalastro and Tauck editors highlight Pocaterra as a reliable starter for first-time peak entries in this area. Stay aware of local maintenance notices and be prepared for occasional pullouts closure or temporary lane changes near busy trailheads. Being conservative with start times helps you enjoy the peaks without feeling rushed, and keeps roadsides clear for everyone who relies on these access points.
Staying in approved areas supports residents who use the same corridors; this approach preserves the pleasant atmosphere and reduces the chance of closures due to crowding. Carry essentials, respect wildlife, and savor the moment as you start your ascent toward the first scenic lookouts before the day warms up.
| Parking Lot | Trailhead | Peak Entry Window | Praktiki Qeydlər |
|---|---|---|---|
| Pocaterra Trailhead Lot | Pocaterra Trail | 05:15–09:30 | Best for sunrise; use official lot; watch for wildlife; photographer-friendly vistas; roadside parking limited beyond signs; maintenance less frequent in morning. |
| Ptarmigan Trailhead | Ptarmigan Circle | 06:00–10:00 | Gentle to steep grades; light improves after 07:00; averaging mid-season crowds; scenic bowls and lake glimpses; leash pets where allowed. |
| Sarrail Trailhead | Sarrail Creek Access | 07:00–10:30 | Quieter start; pleasant early light; confirm parking rules; staying on marked trails reduces impact; watch for seasonal debris on lower slopes. |
Photography Hotspots: Best Viewpoints and Lighting for Each Lake
Start at Grassi Lakes at dawn to catch the right light washing the pines and the water; bring a wide-angle lens (16-35mm) for the overlook and a telephoto (70-200mm) for compression of the peaks in kananaskis; keep ISO 100–200, aperture f/8–f/11, and a tripod for longer exposures when mist sits on the surface; oranges glow on the water as the sun climbs, and natasha, a local photographer, confirms this is a must-shoot window. The area is surrounded by pines and grasses, and grassi maps mark the trail you’ll follow.
Spray Lakes Reservoir offers calm mornings with reflections of jagged peaks. Head to the north shore overlook for a balanced composition; use a polarizing filter to cut glare on glassy water and enhance greens; bring a 24-70mm or 70-200mm; time it for sunrise around 05:45–07:15 in summer, shifting earlier in spring; wind can arrive by late morning, so plan your longer exposure shots early. Live colors show up as the sky shifts from pinks to oranges, and coming light becomes more vivid as the day begins. Sights across the ridge change with the sun, so keep an eye on it and adjust your position accordingly.
Barrier Lake presents bold color on the west-facing shore during golden hour. Stand near the boat launch or on the small bluff above the water for a composition that includes granite ridges and the lake surface; a 70-300mm isolates rock textures and a 24mm captures the full scene; exact light positions vary with the date, so keep looking for the pinks and oranges crossing the peaks and aim to shoot in the first hour after sunset or the hour before sunrise; continue along the shore if the light shifts onto a new face of the ridge.
Two Jack Lake yields mirror reflections when wind is calm. Choose the southern or western shore for best silhouettes against the foothills; shoot with 24-70mm; freeze small ripples at 1/125–1/250s, or drop to 1–2s on a tripod for glassy water; backlight from the east around dawn creates a soft rim on pine silhouettes; oranges in the sky often show when the sun climbs above the tree line; if you hike to a higher lookout, you may discover cleaner reflections and a quieter scene, which is ideal for a right, stable shot onto the water.
General tips for all lakes: check information below on access and parking, as well as seasonal closures; plan to arrive heading to the trailhead at least 30 minutes before first light; keep baggage light and organized so you can switch lenses quickly; walk along the shore to find a clean foreground and keep people out of the frame; if you want a guided morning shoot, natasha recommends early bookings and a flexible date to catch the best light; always face the sun to keep colors vivid and to avoid flat shading; you should be able to carry a compact medical kit with a physician-approved supply list and stay hydrated while you hike.
Seasonal Guide: When Lakes Are At Their Best and Access Notes
Check snowpack and trail status before you head out; checked updates keep surprises away. Use a simple planner to map your route and keep your journeys together, yourself included.
Summer light, from July to August, brings long days and plenty of mellow water, delivering serene reflections on blue-green surfaces. starting from the Spray Lakes trailhead or the Icefield corridor, there are spots with sunset views along the rimwall. The rundle mountains loom in the distance, and these ones near clear-water bays reward patient photographers.
Access notes: In spring, snow patches linger and gates may close; by mid-summer most routes open, but conditions shift after heavy rain. For a safe crossing over streams, test footing and watch for slick rocks. No motor access is allowed on most trails to protect habitat and conserve wildlife.
Route ideas: From the rundle mountains base, you can reach several lakes in a long but rewarding circuit; the ones closest to the rimwall offer gentler ascents and straightforward routes. For a tougher day, combine two lakes along the icefield corridor for a longer crossing and expansive views. Each destination presents fresh descriptions of color, water clarity, and rock patterns, so plan a couple of spots to capture the best angles.
Practical tips for travelers: carry layers for changing alpine weather, a compact headlamp, and plenty of water. Travel lighter for the easier loops, and save longer loops for optimal conditions. Whether you hike solo or with a group, stay on established paths to protect fragile meadows and rimwall edges, and leave your plans with a friend so you can find yourselves back together on the trail. natasha, a ranger on the ground, highlights the value of observing wildlife from a respectful distance and keeping noise down to preserve the serene atmosphere. источник conservation notes emphasize minimal impact and responsible behavior for long-term preservation of these alpine lakes.
Hiking Details: Distances, Elevation, and Time Estimates for Trails
For ones who want a reliable lakesday, pair Lakeside Loop (Trail A) with Ridge to Loon Lake (Trail B) to cover shoreline beauty and stunning ridge views. Sarah, a Calgary resident, swears by this approach for every journeys and every pace. Read the trailhead notes before you go and open your map there to compare segments and plan refuels.
-
Lakeside Loop (Trail A)
Distance: 5.0–6.5 km; Elevation gain: 150–230 m; Time: 2.0–3.0 hours.
Highlights: gentle climbs, open shoreline, reflections on calm mornings. Foreground scenery includes a mix of pines and open shore; average pace sits around 3.0–4.0 km/h. Notes: some muddy patches after springs; maintenance may shift weekend plans.
-
Ridge to Loon Lake (Trail B)
Məsafə: 7.5–9.5 km; Yüksəklik artımı: 350–520 m; Vaxt: 3.0–4.5 saat.
Diqqətəlayiq məqamlar: geniş mənzərələr, alpin yamacları, yol boyunca çoxsaylı göllər. Açıq səma və atmosfer üfüqləri buranı insanların sevimli məkanına çevirir; daha dik hissələr üçün hazır olun. Əlçatanlıq seqmentdən asılı olaraq dəyişir; pilləkənləri və qayalıq yerləri olan nöqtələr var. Səyahətə tez başlamağı planlaşdırın və yolun başlanğıcında yerləşdirilmiş qeydləri oxuyun.
-
Falls Creek Birləşdiricisi (C Cığırı)
Məsafə: 4.0–5.5 km; Yüksəklik fərqi: 120–210 m; Vaxt: 1.5–2.5 saat.
Əsas məqamlar: sürətli yüksəliş, meşə altı örtüyü, bulaqları və kiçik şəlalələri olan axınlar. Görüşlər və ya restoran dayanacaqları arasında daha qısa bir seçim kimi əladır, rahat göl günündə idarə etmək tamamilə mümkündür. Relyef qarışıqdır; kölgəli sahələr üçün yüngül bir qat gətirin.
-
Alp Sahil Xətti Halqası (D Cığırı)
Məsafə: 6.5–9.0 km; Yüksəklik artımı: 400–700 m; Vaxt: 3.0–4.5 saat.
Əsas məqamlar: daha yüksək ərazilərdən mənzərələr, sərt qranit və bir neçə göl perspektivi. Daha uzun yürüşlər və mükafatlandırıcı mənzərələr gözləyin; seyr meydançalarında daha çox vaxt keçirməyi planlaşdırın. Əvvəlcədən havanı yoxlayın; aydın bir gün heyrətamiz, açıq panoramalar təqdim edir.
-
Göl Kənarı Asan Gəzinti (E Cığırı)
Məsafə: 2.5–3.5 km; Yüksəklik fərqi: 60–100 m; Vaxt: 1.0–1.5 saat.
Əsas məqamlar: mülayim gəzinti və isinmə üçün uyğun, düz, əlçatan seqmentlər. Ailələr, ilk dəfə gələnlər və ya tez bir zamanda sahil dairəsi etmək istəyənlər üçün yaxşı seçimdir. Texniki qulluq seqmentlərə təsir göstərə bilər, buna görə də bura getməzdən əvvəl ən son yenilikləri oxuyun.
Planınızı optimallaşdırmaq üçün məsləhətlər: orta hesabla 3–4 km/saat əksər cığırlarda yaxşı işləyir; Əgər daha çox vaxtınızı mənzərələri seyr etməklə keçirmək istəyirsinizsə, sevimli sahil və ya baxış yerində 30–60 dəqiqə əlavə edin. Cığırların yaxınlığında avtomobillər üçün park yerləri var və çiyin fəsillərində bir neçə təmir briqadasının iş başında olduğunu görəcəksiniz–işarələri yoxlayın və lazım gələrsə, marşrutunuzu dəyişdirməkdən çəkinməyin. Gəzintidən sonra yaxınlıqdakı restoranlara gedərək layiq olduğunuz göl günü yeməyini yeyin və Kalqariyə qayıtmazdan əvvəl sahilin yaxınlığında tez bir soyumağı düşünün. Burada relyefə hörmət etdiyiniz və iz qoymamaq təcrübələrinə əməl etdiyiniz zaman səyahətləriniz yadda qalan olur. Başlamazdan əvvəl, cığır başlanğıcındakı çəndə suyu doldurun, xəritəni oxuyun və qatların və kiçik bir yağış örtüyünün yığıldığına əmin olun–bu addımlar hər bir gəzən və səyahət edən üçün rahatlığı və təhlükəsizliyi qətiliklə artırır. Açıq cığırlar, atmosferli səmalar və heyrətamiz mənzərələr sizi orada, öz açıq macəralarınız üçün hazır vəziyyətdə gözləyir. Oxuyun, planlaşdırın və bu yaddaqalan Kananaskis səyahətlərinin ön planında özünüzdən həzz alın.
Avadanlıq və Təhlükəsizlik: Geyim, Naviqasiya və Vəhşi Təbiətdən Qorunma Tədbirləri
Yola çıxmazdan əvvəl kompakt, suya davamlı qabıq, isti orta təbəqə və möhkəm çəkmələr yığın və əlçatan cibinizdə yüngül bir ilk yardım dəsti və xəritə saxlayın.
Baza qatları merino yunundan və ya sintetik materialdan olmalıdır, tənəffüsedici dəriyə yaxın qat, orta çəkili polar və küləyin və sıçrayışın öhdəsindən gələ bilən davamlı örtük açıq silsilələrdə istifadə üçün idealdır. Quru corablar ehtiyat cütü ilə birlikdə, papaq və əlcəklər sistemi tamamlayır; pambıqdan qaçınmaq lazımdır, çünki o, istiliyi azaldır və uzun səyahətlərdə bərpanı ləngidir.
Buzlaq sahəsində buz baltası və ön dişli dırmıqlar götürün və şüşəli hissələrdə hər addımı sabitləşdirmək üçün paz duruşundan istifadə edin. Qar uçqununu yoxlamaq üçün yürüyüş çubuğundan istifadə edin, gizli çatları yoxlayın və riski azaltmaq üçün uca zirvələrin altında sadə, möhkəm addımlar atın.
Çəkmələri quru və möhkəm bağlanmış vəziyyətdə saxlayın; tozluqlar palçığı kənarda saxlayır və hər fasilədə bağları, dabanları və burun hissələrini yoxlayın. Dırmanışdan əvvəl uyğunluğu tənzimləməyi vərdiş edin ki, sürüşməyə enerji sərf etməyəsiniz və hər yüksəliş zamanı yorğunluğa diqqət yetirin.
Vəhşi təbiətə qarşı tədbirlər: ayı spreyi əlçatan yerdə olsun, ərzağı ayı qabında və ya möhürlənmiş qabda çadırlardan uzaqda saxlayın və yatmaq yerlərindən xeyli kənarda bişirin. İmkan olduqda qruplarla səyahət edin, sıx kolluqlarda səs-küy salın və heyvanları qəfil yaxalamaqdan qaçının; əgər təmas baş verərsə, yavaş-yavaş geri çəkilin və sakit danışın.
Naviqasiya və planlaşdırma: cari topoqrafik xəritə, kompas və GPS ehtiyatı götürün; oflayn xəritələri yükləyin və etibarlı mənbələrdən son təsvirləri saxlayın. Yerli bələdçilərdə olan ətraflı təsvirlər süxur, qar və buzda cüzi dəyişiklikləri olan yolları ayırmağa kömək edir. Marşrutunuzu relyef nişanları və müxtəlif ərazi xüsusiyyətlərindən istifadə edərək planlaşdırın və əsas dönüş nöqtələrini xəritədə qeyd edin. Hərəkətə başlamazdan əvvəl qovşağı böyütmək və şimal istiqamətlərini yoxlamaq üçün xəritəyə klikləyin. Biz aydın planların və müxtəlif hava şəraitləri üçün alternativ variantların səyahətləri rahat saxladığını gördük.
Çester ərazisi rahat istirahət üçün və səyahətini davam etdirmək istəyən səyyahlar üçün sevimli məkanlar təklif edir. Ərazinin qeydlərini və əvvəlki ziyarətçilər tərəfindən qoyulmuş etiketləri yoxlayın, küləyin istiqamətini, qar örtüyünün dərinliyini və günəşin bucaqlarını qeyd edin. Şimal silsiləsinin üstündə şəfəqdə çəkilmiş fotolar yol boyu hər dayanacağa ilham verən heyrətamiz səhnələri ortaya qoyur.
Bitirmək üçün, dəyişən şərtlərə diqqət yetirin, istirahət anlarından həzz alın və həddindən artıq yorulmadan kəşf etməyə davam edə bilməniz üçün sabit tempdə olun; bu yanaşma təhlükəsiz qayıtmağa və növbəti səyahətlərinizə hazır olmağa kömək edir.