

 ኦኪናዋ ውስጥ ሁለት ሳምንታት - ለአሳሽ ዳይቨሮች የመጨረሻው የጉዞ መርሃ ግብር">

ምኽሪ ፦ Board this plan today to ensure you start strong. Easily follow a 14-day route designed for scuba enthusiasts, with clear checklists to help you navigate entering the southernmost reefs and moving between prime sites with minimal downtime.
The route balances boat days and shore days, keeping you inside safe zones and between top locations. August marks peak visibility, with numerous added stops along the way to sample hidden bays while avoiding crowded harbors. At several sites, you’ll find cameras ready to capture wide-angle and macro shots, while suspended platforms offer angles for close-ups.
Gear and value: This plan will allow you to adjust gear lists and packing. Inside budget considerations, it comes with money-back guarantees if weather disrupts a leg. You can rely on clear, inside access to rental shops and camera gear near Naha, easily arranging a kit that suits your needs. The guide ensures you have a strong base for your Okinawa expedition all season long.
What travelers say: Numerous enthusiasts liked that the route included added marine reserves and flexible days; they report better time management and more consistent experiences. The plan helps conserve money while keeping you moving smoothly, and most who used it would recommend it to others.
Practical pointers: Inside this guide you’ll find a concise checklist, recommended camera settings for wide and macro work, and suggestions for nearby lodging close to boat docks. The schedule minimizes backtracking, ensures you aren’t stuck waiting during peak season, and helps you maximize time at sea without compromising safety. If you’re traveling in August, bring a lightweight wetsuit and a dry bag for gear, and plan for occasional rain showers that won’t disrupt the main plan.
Practical Two-Week Okinawa Dive Plan for Evening Painted Sky Dives and Onna Blue Cave
Base in Onna near Maeda Point to cut travel time to the outer reef and Blue Cave zones; choose a room with a kitchen to keep costs at a least level; book ahead, especially in peak season, and use official, licensed guides for evening snorkelling sessions.
- Week 1 – setup, prep, and first evenings
- Day 1: Arrive, check in, and lock in two to three evening windows. Confirm a small-group, official night snorkelling option; since weather can shift, keep one flexible day for a back‑up plan. Talk with tetsuro service to compare independent and official options.
- Day 2: Market visit to stock snacks and spare batteries; visit local shops for a low-cost mask or spare lens if needed; plan to do most onshore prep at the room to protect your energy for the water.
- Day 3: Maeda Point orientation at the outer reef: depth typically 8–12 m, with azure water and colourful reef life. Look for numerous anemones and friendly fish; note currents and best exit points before sunset.
- Day 4: First evening session near Maeda Point: target 60–90 minutes before sunset; use a wide-angle lens to capture the painted sky and cave silhouettes; keep the light extremely gentle to avoid spooking wildlife; return to the room for a quick meal.
- Day 5: Onna Blue Cave visit: arrive at mid‑tide for calmer water; shoot from the cave entrance toward the blue shaft, trying a shallow composition with a compact lens; protect cave surfaces by avoiding contact with walls.
- Day 6: Snorkelling practice near Misaki cape: azure water, colourful life, and a few friendly anemones; stay off the reef and respect currents; carry a spare dry bag for gear and a back‑up mask.
- Day 7: Independent option or light rest: consider Yaeyama market exploration or a simple walk along the coast; if you go, return early to keep energy for week 2.
- Week 2 – photography polish, repeat sessions, and peak-light planning
- Day 8: Second Maeda Point dusk session: test three angles, bracket exposure, and look for the moment when the sky’s colour blends with the outer reef; keep footprints minimal to protect natural habitats.
- Day 9: Onna Blue Cave second visit: vary composition with a different lens choice; compare shots of the azure beam and cave walls; review in the room and pick the best few for editing.
- Day 10: Optional Yaeyama day trip if weather cooperates; bring a light snack and waterproof bag; if back late, do a short snorkelling session near Misaki to cap the day.
- Day 11: Misaki cap dusk sequence: shoot five-frame bracketing sequences to capture the gradient from orange to azure; use a polarizer or suitable filter to tame glare, and protect the reef by staying off the rocks.
- Day 12: Night snorkelling with tetsuro/service option or another official operator: brief safety plan, buddy system, and a clear turnaround time; if using a small air tank, handle with care and keep group size tight to avoid crowds.
- Day 13: Gear check and photo curation: back up top shots to a second card for year‑end edits; visit a few shops for small accessories and a memory card if needed; plan a final review of the shooting routine.
- Day 14: Return planning and wrap‑up: confirm transport, pack impressions and gear, and arrange a future visit with okinawan hosts or guides; note the most stunning spots to revisit next year.
14-Day Dive Schedule: Core Sites, Rest Days, and Travel Time
ምኽሪ ፦ Begin with two days focused on Cape Maeda’s Blue Cave and Maeda Point, then switch to Kerama’s reefs for days 4 and 5, returning to central Okinawa for days 7 and 8. This layout minimizes dropout risk and keeps travel time efficient.
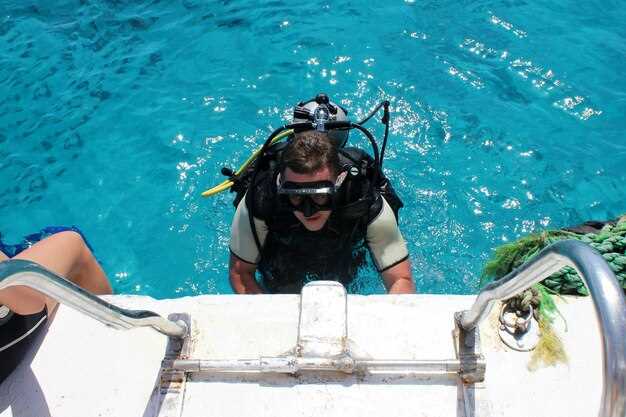
Day 1 – Arrival and gear check Arrive in Naha, pick up rental gear at the shop, and bring your ሱፍ plus a spare layer. Conduct a quick መእተዊ briefing, confirm ስልጠና for nitrox if desired, and verify all equipment fits. In the evening, settle into the hotel and review the plan with your guide; note local information about weather and currents for the week.
Day 2 – Cape Maeda: Blue Cave and Maeda Point Driving from central Naha takes about 40 minutes. Schedule two underwater sessions on shallow reefs, with bottom depths around 6–18 m and visibility typically 15–25 m. Lunch is typically on board; return mid‑afternoon to rest. Monitor nitrogen levels and avoid long bottom times on the same air fill.
Day 3 – Rest day with trekking option Use the morning for a light hike along the northern coast or visit a local market for ceramic souvenirs. If you prefer a low‑impact activity, choose a scenic bike or walking route. Estinate costs for optional guided treks range, and you can compare price ranges at the shop. Keep bringing water and sun protection; ይኹን ደኣ።, stay within comfort to prevent fatigue.
Day 4 – Kerama Islands: Zamami and Aka zones (Day 1) ቶማሪ ወደብ ቀደም ብሎ ጀልባ ከ ቶማሪ ወደብ ወደ ኬራማ ይውሰዱ (በግምት 1.5–2 ሰዓታት). ሁለት ይጠብቁ underwater sessions ኣብ ሪፍ ወాల్ስ ወይ ድማ ፕላቶ ጅረት፡ ኣብ 12–25 ሜ. ምሳሕ ኣብ መርከብ፤ ካብ ሆቴል ናብ ወደብ ዝወስድ ግዜ ብመሰረት ትራፊክ ኣስታት 40–60 ደቂቓታት እዩ። እቲ ዕድል ዕንቁላሉትን እንሰሳዎችን እና የዓሣ መንጋዎችን ለመመልከት ምቹ ነው።.
ቀን 5 - ኬራማ ደሴቶች፡ ቶካሺኪ እና በአቅራቢያ ያሉ ሪፎች (ቀን 2) ሓደ ካልእ ናይ ንግሆ ጃልባ ምብጋስ፡ ኣብ ቶካሺኪ ዙርያ ተወሳኺ ቦታታት ምብጻሕ። ክልተ። underwater sessions ኣተኵሮኻ ኣብ ጥዑይ ሑጻውን ኣዝዩ ጽቡቕ ኣብ ዝመስል ታሕታዋይ ገደል ይግበር፤ ኣብ መስመራት ዝርከብ ጅረት ሓያል ክኸውን ይኽእል እዩ፣ ስለዚ እንተድኣ ኣድላዪ ኮይኑ ሓጺር ግዜ ኣብ ታሕቲ ንኽትጸንሕ መዲብ። ትጽቢት ግበር price ልዩነት በጀልባ ቻርተሮች፤ ያካተቱ ወጪዎችን እና የሠራተኞች ጉርሻ አረጋግጥ።. Where 가능하다면, 간단한 일정을 잡아주세요 lunch ቆም በጸጥታ የባህር ዳርቻ ላይ።.
ቀን 6 – ዕረፍት እና የተለመደ ዳሰሳ ኣብ ገምገም ባሕሪ ኸባቢ እንደገና ብምብጻሕ driving በደቡባዊ ፕላትስ አብሮ ወይም ዘና ባለ evening ፀሐይ መጥለቂያ በባህር ዳርቻ ክበብ። በተግባር መሳተፍ ከፈለጉ ስልጠና ይሓድስ፣ መምህርካ ብዛዕባ ሓይልታት ምድፋእን ትልምን ጋዝን ክገምግም ሕተቶ፣ ከምኡውን ናይትሮጅን ማኔጅመንት።.
ཉིན་ 7 – የኦኪናዋ ማዕከላዊ ሪፎች፡ ማንዛ ፖይንት ኣስታ 50 ደቒቓ ተመሪሕካ ናብ ከባቢ ኦና። ክልተ underwater sessions እምብርት ዝቅተኛና መካከለኛ ጥልቀት ያላቸው ሪፎችን (12–20 ሜትር) በአስደናቂ የታችኛው ክፍል ይፈልጉ። ኤሊዎችን እና ደማቅ ለስላሳ ኮራል የአትክልት ቦታዎችን ይፈልጉ፤ ከእኩለ ቀን በኋላ ለሚደረገው ሁለተኛ ዙር ልምምድ ጉልበትዎን ይቆጥቡ lunch. Aghareghian eraze yi leweti plan እንዲሁም information ብዛዕባ ልምምድ ሓደጋ ምክልኻል።.
ልዕሊ 8 – ማእከላይ ሪፋት ኦኪናዋ፡ ኦና ፊልድ እና ከባቢኣ ይቀጥሉ በሁለት underwater sessions ኣስታራቒ ኣብ ከባቢ ዖና። ቀወምቲ ኸተማታት ንድፈታት ምዕባለ ዞባታት። ኣብዚ ሓደገኛ ኩነታት ንግዜኡን ንንቡርን ምዕባለታት ይቆጻጸሩ፣ እዚ ኸኣ ንዝተረፈ ኸተማ ዘለዎ ጽቡቕ ግዜ እዩ። መእተዊ ስልጠና ትእዛዛት እና ለመለማመድ። ምረፅቅድሚያ ተከተታይን ናይ ምውራድ ስነ ስርዓትን። ናይ ምሸት ምምልላስ ኣብ ልዕሊ የት ለመጭው ዕለት ግቤቶችን ለማስቀመጥ።.
ቀን 9 - የጉዞ ቀን እና ቀላል እንቅስቃሴ ኤን ናሃ ተመለስ በ driving, ፣ ከዚያ ዘና ያለ ከሰዓት በኋላ ለማገገም ይውሰዱ። አማራጭ ትሬኪንግ በአቅራቢያ ያሉ መናፈሻ ቦታዎች ወይም ጥሩ እረፍት እንደተሰማዎት ከተሰማዎት ትንሽ የባህር ዳርቻ ክፍለ ጊዜ ያዘጋጁ። ይሰብሰቡ information በቀሪው የጊዜ ሰሌዳ ላይ እና ያረጋግጡ cost ክልሎች ለማንኛውም ተጨማሪ ቻርተሮች።.
ኣሜሪካዊ፡ መዓልቲ 10 – ደቡብ ኦኪናዋ፡ ሱናቤ ሲዎልን ኣብ ጥቓኡ ዝርከቡ ሪፎችን Ating mga baybayin sa Sunabe ay nagbibigay ng mas kalmadong kondisyon para sa isang መእተዊ ስልጠናን ተንሳፋፊነት ልምምድን። መጠነኛ ጥልቀት (5–12 ሜትር) ከቀላል ሞገድ ጋር ይጠብቁ፤ ለተረጋጋ lunch እረፍት እና ገምግምበት ታሕቲ ጊዜን ናይትሮጅንን ድረት። ሓንጽጽ። priceንቁ መሣሪያ አጠቃቀም እና በአካባቢው ሱቅ ውስጥ ሊደረጉ የሚችሉ መሣሪያዎችን የማሻሻል ግንዛቤ።.
ቀን 11 – ዕረፍት እና የዕቃ ቁጥጥር መሣሪያዎችን ለመመርመርና ስልጠና ማደስ። እንደገና ጎብኝ። plan ንመወዳእታ ኽልተ መዓልታት ኣረጋግጽ Where ክትከይድ፣ እኹል ከምዘሎካ ኣረጋግጽ። bringing አቅርቦቶች (አየር፣ ክብደቶች፣ መለዋወጫ ዕቃዎች)። የምሽት ውይይት የሚሸፍነው ዕድል የባሕር ሁኔታዎች ከፈቀዱ የምሽት ክፍለ ጊዜ ለመጨመር።.
ཉིན་ 12 – འokinawa དབུས་མའི་མཐའ་མའི་འདེམས་ཀ་དག་གམ་kerama བསྐྱར་ལྡོག ባሕሪታት እንተፈቐዱ: ንኽልተ ናብ ተፈታዊ ቦታ ተመለሱ። underwater sessions (lalim 12–22 m) para iyemento i abilidad-mu magbantay flotabilidad yaw gas. Nu ari, sukatan ya cape Maeda o ikaduwa nga sona Kerama nga mas madani ha hotel, para sigurado makakatapos kamu ya pagbisita.
ཉིན་ 13 – ཉིན་གང་པོ་མཐའ་མ།: མཇུག་སྡོམ་གནས་སྤོས། Use a final two underwater sessions to revisit preferred lines, confirm gas plans, and collect information for future trips. Ensure all gear is brought to the hotel safe and organized; check catch‑up notes in case you want to recheck any price estimates or estinate costs for future itineraries.
Day 14 – Departure Check out after a light morning lunch and a brief debrief. Your guide delivers a written summary of the week, including the days when you dived (note: term avoided here to keep language consistent) and the ታሕቲ depth ranges you experienced, plus ዕድል for booking a future trip with preferred shop and charter partners.
Evening Painted Sky Dive Booking: Availability, Fees, and Waivers
Book the Evening Painted Sky session two weeks ahead to guarantee a slot on zamami and the Kerama islands, with three twilight windows and a maximum of six travellers per slot. Sessions run roughly 75 minutes, from 5:30 PM to 7:15 PM, weather permitting, and you’ll receive a confirmation email within 24 hours. If you’re travelling here from abroad, plan a little extra time to settle in and set a clear thought about what you want to observe.
Fees start at $140 per person for the standard package; Premium adds a private viewing space and a light snack for $195 per person. Equipment rental is $25, and a private room for group briefing can be added for $50. Quotes exclude taxes.
Waivers: All participants sign an online waiver before arrival. The waiver covers safety guidelines, current sea conditions, weather variability, and emergency procedures. Minors must be accompanied by a guardian who also signs. If the session is called off due to safety reasons, you may reschedule or receive a full refund; otherwise, the policy requires 24 hours notice to avoid fees.
Availability and locations: The experience operates from zamami and the Kerama islands; you can add island-hopping to your plan, including zamami. Availability depends on sea state and daylight; safety takes priority. The program also weaves in local history, including wwii wrecks near zamami.
Weather and schedule changes: If showers or strong currents appear, the session may be postponed to the next day or moved to a safer time. If the operator calls off, you can reschedule or receive a full refund; in difficult conditions, we aim to minimize disruption while keeping safety as the main priority. Stop moments for breath and observation are built into every plan, so you won’t miss the painted sky.
Booking tips and what to bring: Choose either standard or premium; decide based on your group size and desired extras; bring a light jacket, water, and a small bag for essentials. Even if conditions shift, it’s not difficult to adjust, allowing you to reach the painted sky and still appreciate the deepest tones. We cover everything you need to know about timing, gear, and safety. The current conditions will determine stops along the route, and our guides provide significant safety oversight, ensuring a room for every kind of traveller.
Safety and understanding: Our guides maintain safe protocols and clear communication; you’ll leave with a new understanding of the sky over water and the sense of lightness you feel in the moment, appreciating the current, the scenery, and the history that surrounds zamami and its islands.
Onna Blue Cave Access: Best Entry Points, Time Windows, and Photo Opportunities
Arrive at Cape Maeda’s main entry before 9:45 to catch a low-tide window (roughly 9:30–11:30) when currents calm, water stays clear, and natural light paints the cave walls. You wont wait long for a prime slot if you book the morning session with the instructors.
Alternative entry points include the backside access along the middle of the cliffs, where a calm stretch can be navigated with instructors’ guidance; contrary to popular belief, the backside is not always open, and tides matter, so check before you depart.
Time windows for optimal illumination depend on sun angle and water influence; knowing the window helps your effort. Maybe you’ll be able to capture a shaft of light between 10:30–12:30 on cloudless days to illuminate corals and rock textures, then switch to photography mode as the water turns from turquoise to cobalt.
Photo opportunities highlight the cave’s interior: luminous blue water, coral gardens along the floor, and reflections on limestone surfaces. If you time it right, you’ll be lucky to catch a shaft of sunlight slicing through the opening. Use a wide-angle lens, frame minimalist scenes, and capture silhouettes of swimmers against the opening.
Recommended gear includes a compact camera unit for quick snaps and a lightweight mask kit. Local shops coordinate with instructors for trekking along the coast, provide safety briefings, and help you stay able to move through tighter sections. After the session, rinse in rooms with showers at the base and store gear for quick access.
Visiting from nearby spots like Kouri or the Onna Gardens area offers alternative entry approaches; these routes depend on weather and water conditions, so verify with guides and plan to arrive early. On busy weekends, tourists crowd the main site, and unfortunately, heavy seas can close the option.
Respect marine life: sharks may appear near reefs; keep distance, avoid touching corals, and participate in small groups to minimize impact.
Night Dive Gear and Safety Protocols: Lighting, Buddies, and Emergency Procedures
Begin your night immersion with a clear buddy plan: pair up with a single partner, agree on signals, and perform a two-light check at the harbour facilities listed by your operator. Arrive early to review the open-water plan, confirm the ride back to the harbour, and verify a spare battery stored in a dry bag.
Lighting focus: carry a primary white LED around 1000–1500 lumens, a back-up 300–600 lumens, and a red light for close work and signaling. Keep batteries in a dry, taped container and rotate between sources if needed. In azure night water, plenty of light helps you spot spots on reef edges and avoid hazards near the bottom. Mount the main light on a head strap for hands-free steering, stash the back-up in a pocket, and clip the red light to your wrist for quick signaling to your buddy.
Buddy protocol: stay within arm’s reach, maintain a fixed distance of about one to two meters, and agree on a simple, practiced signal for any problem. Before entering open water, review the plan with your partner and confirm who leads in low-visibility sections. If you must reassess, pause together at a known point and recheck gear, air supply, and the surface contact plan.
Emergency procedures: if a light fails, switch to the back-up and return toward the ascent plan with your buddy. Use a surface marker buoy (SMB) on ascent and a red light to stay visible to the official safety boat. If separation occurs, follow the pre-arranged signal, ascend slowly, and rejoin at the planned point or surface at a pre-agreed harbour location. Always use the official signals and stay calm to reduce risk during a quick, controlled ascent.
Seasickness and boat-back considerations: if seasickness hits, sit on deck, hydrate, and focus on the horizon. Avoid heavy meals immediately before the session and keep medicines as advised by crew. On arrival back to shore after the session, a short harbour ride helps you settle; this ride is usually quick and planned to minimize downtime.
Pre-session checks: prior to entering open water, review current conditions, currents, and the maximum depth allowed for your certification. The depth40 limit is listed for many night activities; do not exceed it without explicit authorization from the service staff. If you arrive from Haneda or another hub, use the listed transfer times to reach the harbour facilities in time for briefing and equipment checks.
Facilities and logistics: harbour showers and changing rooms are typically open after the tour, with ample space to rinse gear and reorganize for the return ride. The staff often provide a brief on local spots and caution you about hidden entanglements near reefs, so stay alert at all times and respect the marine environment.
Part of a smooth experience is knowing what to do if something goes wrong. Keep a small spare set of consumables aboard and spent time reviewing the official emergency procedures before you arrive on site. This approach minimizes risk and keeps the mood calm, allowing you to enjoy the night wash of the azure water and the glow of your lights.
| ንጥል | Must-have | ማስታወሻዎች |
|---|---|---|
| Primary white light (1000–1500 lm) | Must-have | Hands-free option; critical for visibility |
| Back-up light (300–600 lm) | Must-have | Swap quickly if primary fails |
| Red light | እመክርሃለሁ። | Preserves night vision and signals |
| ተረፈ ባትሪታት | Must-have | Dry bag storage; clearly labeled |
| ደረቅ ቦርሳ | Must-have | Protects electronics and spares |
| Surface Marker Buoy (SMB) | እመክርሃለሁ። | Locate your group from surface; attach to ascent line |
| ፉጨት ወይም የምልክት መሣሪያ | እመክርሃለሁ። | ምልክት ማሰማት ከገጽ |
| ጓንት | አማራጭ | ኣጥርን መተሓሕዝን ኣብ ኬልፕ ወይ ድቃው በራድ መሬት |
| Spare o-rings | እመክርሃለሁ። | የጥገና መሣሪያ ለመሠረታዊ ጥገናዎች |
ሎካ’ል ሎጂስቲክስ፡ ትራንዚት፣ ማረፊያ፣ ናይ ዝተመከሩ ዳይቭ ሱቆች ንምቹእ ጉዕዞ።
ቶማሪ ወደብ ዛማሚ የሚያደርገውን የመጀመሪያውን የጠዋት ጀልባ ያዝ እና ወደቡን የሚመለከት ክፍል አስይዝ፤ በየቀኑ ብዙ መነሻዎች አሉ፣ እና ቀድመህ መድረስ የባህር ንፋስ ከመነሳቱ በፊት እንድትረጋጋ ያግዝሃል። በመጀመሪያው ክፍል ላይ የተረጋጋ ባህርን ጠብቅ፣ እና ከዚህ በፊት ዳይቭ አድርገህ ከሆነ፣ ቀላል ቅድመ ማብራሪያ እና የጉዞ ድካምን ለማስወገድ ፈጣን ላይ ላዩን ዋና ማድረግ ትፈልግ ይሆናል።.
ከናሃ ኤርፖርት ወደ ቶማሪ ወደብ ታክሲ ወይም ቀጥታ አውቶቡስ በመጠቀም ከ20–30 ደቂቃዎችን ያቅዱ፣ ከዚያም ወደ ጀልባ ተሳፋሪዎች ማ terminal ይግቡ። አስቀድመው ካስያዙ መስመሮችን ይዘላሉ እና ለስላሳ ዝውውር ይኖርዎታል፤ መንገዱ ከታይዋን አጠገብ ስለሆነ ሰፋ ያለ የጉዞ መርሃ ግብር ለማዘጋጀት ቀላል ያደርገዋል።.
ዛማሚ ላይ፣ ማደሪያ አማራጮች የእንግዳ ማረፊያ ቤቶችን እስከ ትናንሽ ፔንሲዮኖች ያካትታሉ፤ ወደቡ አጠገብ አስቀድሞ የተያዘ ማረፊያ የጉዞ ጊዜን የሚቆጥብ ከመሆኑም በላይ ቀደም ብሎ ለመነሳት ቀላል ያደርገዋል። ቀጥተኛ ቁርስ ያለው ክፍል፣ አስተማማኝ የዕቃ ማስቀመጫ ክፍል፣ ወደ ወደቡ በእግር ርቀት እንዲሁም የሚገኝ ከሆነ ከመሬት በታች ያሉ የዕቃ ማስቀመጫዎችን ይፈልጉ።.
በአከባቢው የሚመከሩ የውሃ ውስጥ መጥለቂያ ሱቆች የዕቃ ኪራይ፣ በጀልባ የሚደረጉ ጉዞዎች፣ እና ግልጽ የደህንነት መግለጫ ይሰጣሉ። መሳሪያዎችን፣ የአየር ሙሌትን፣ ክብደቶችን እና የጀልባ ትራንስፖርትን ወደ ባህር ዳር የሚያካትት ነጠላ ፓኬጅ ይፈልጉ፤ የሪፍ ስነምግባር መመሪያ ክፍያ እና የባህር ፓርክ ማለፊያ አስፈላጊ መሆኑን ያረጋግጡ። ንጹህ የዕቃዎች ማሳያ እና ወዳጃዊ ሰራተኞች ያሉት ሱቅ ቀኑን በትክክል ለመጀመር ይረዳዎታል።.
በደሴቲቱ ላይ የግሮሰሪ አማራጮች ውስን ናቸው፣ስለዚህ አስቀድመው ያቅዱ። ወደቡ ላይ ብዙ ትኩስ ፍራፍሬዎችን እና አንድ ወይም ሁለት ቲማቲሞችን የያዙ ጥቂት puestos ያገኛሉ; ወጪዎችን ለመቀነስ ትንሽ ምሳ ይዘው ይምጡ ወይም የተዘጋጀ አማራጭ ይግዙ እና ለመግዛት የሚመራዎትን ወቅታዊ ምርቶች ማሳያ ያረጋግጡ።.
የሚጠለል መግቢያን በመጠቀም ማዕበሉን መቀነስ፤ ለመጀመሪያዎቹ ደቂቃዎች ተንሳፋፊነትን አስተካክሎ ራስን መቆጣጠር፤ ኮራልን ለመጠበቅ ሪፉን መከታተል። ከመጓዝዎ በፊት ነፋሱን ይፈትሹና ፀጥታ የሰፈነባቸውን ጠዋቶች ይምረጡ፤ በእግር የሚሄድ መንገድ በሁለቱም መንደሮችና ወደቡ መካከል ስላለ የዕቃ ዕቃ ትራንስፖርትን ቀላል ያደርጋል፣ ከታች ያለውን የሕይወት ገጽታ ለመመልከት ብዙ ጀልባዎች ፈጣን ጉዞዎችን ይጠቀማሉ።.